
Adobe InDesign is one of the most popular page layout programs in the world. It can be used to create any type of document, from short interactive brochures to annual reports to a 100,000-word textbook, and it has a number of unique tools for managing such large documents.
InDesign also has a reputation as a difficult program to learn, but it doesn’t have to be. Even if you know nothing about InDesign and you’ve never used a page layout program before, this tutorial series will show you how you can create your own print and digital documents from scratch.
My name is Thomas Boldt, and I’ve been working as a designer, writer, and photographer for over 15 years. I’m trained as a graphic designer, and I’ve written extensive tutorials on many of Adobe’s most popular programs (as well as a few created by their competitors). I’ll use all that experience to help you start exploring the world of digital page layout with InDesign.
This post will act as a top-level guide to the inner workings of InDesign, complete with links to more in-depth tutorials so you can focus on the areas that interest you most.
I’ll take you through the process of creating a document in InDesign, including how to add and format text, images, objects, and interactive elements. I’ll share a few practical advanced workflow tips with you to help save time and frustration and then show you how to finalize and prepare your document for printing or sharing online.
Table of Contents
- Chapter 1: When to Use InDesign
- Chapter 2: Creating InDesign Documents
- Chapter 3: The InDesign Interface
- Chapter 4: Working with Text in InDesign
- Chapter 5: Working with Images
- Chapter 6: More InDesign Elements
- Chapter 7: Creating Interactive Documents
- Chapter 8: Advanced Workflow Tips
- Chapter 9: Finalizing Your InDesign Documents
- A Final Word
Chapter 1: When to Use InDesign
Even if you’re already familiar with other Adobe Creative Cloud apps, it can take a while to master some of InDesign’s more advanced features, and even some basic ones work a bit differently in other apps.
Before you take the time to set up your document, it’s important to know when to use InDesign and whether or not it’s the right program for your project.
InDesign is built around a number of unique features specifically designed for page layouts and long, multi-page documents. If you only have one or two pages and don’t have to work with a lot of text, it may be faster and easier to work in Adobe Illustrator instead.
Last but not least, determine if anyone else without access to InDesign will need to adjust your document. Most InDesign files cannot be edited without access to InDesign, so it’s usually best to wait until all the elements of your document are finalized before starting the page layout process.
You can technically edit InDesign files online, but only if they’ve been saved in the special IDML format instead of the default INDD format used by InDesign. Even then, you may experience corrupted layouts, missing images, and other problems caused by unauthorized online editors.
Once you start a project using InDesign, it’s best to handle the entire document preparation and finalization process using InDesign!
Chapter 2: Creating InDesign Documents
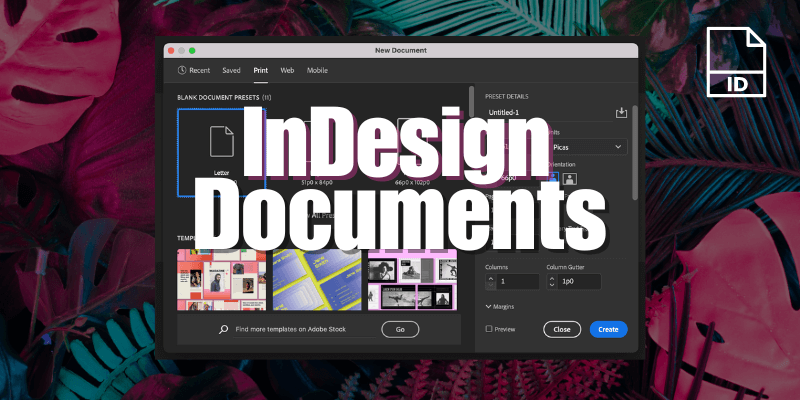
To get started with any InDesign project, the first step is to create a new document. No matter whether you’re making a 4-page brochure, typesetting a 200-page novel, or designing an interactive digital document, everything starts the same way: the New Document window.
Click the New File button on the InDesign home screen or open the File menu and click New Document. InDesign will open the New Document window, where you can set the structural elements for your document: page size, facing pages, margins, and any bleed or slug areas that should be added around the edges of your document.
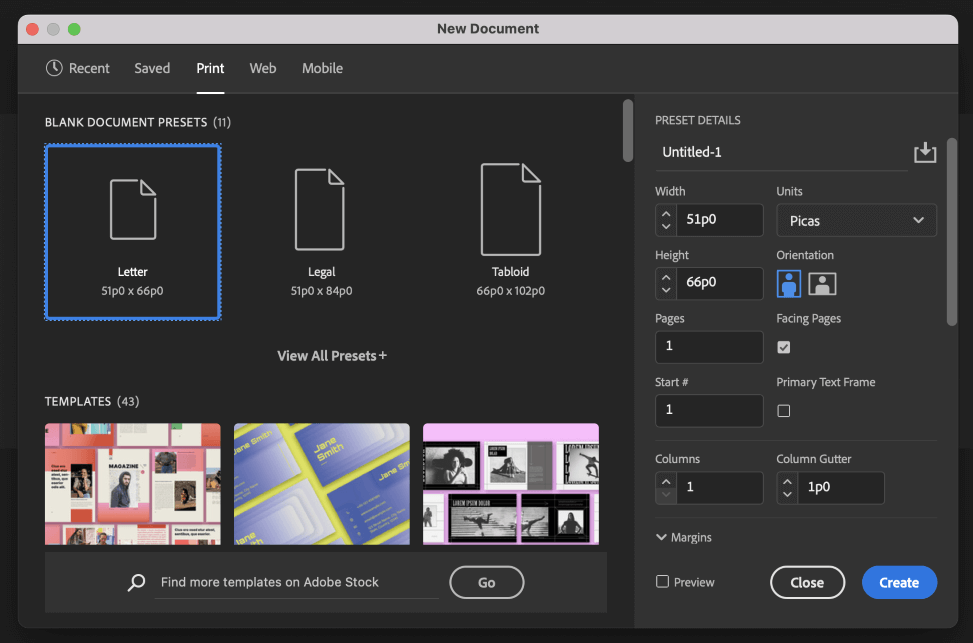
If you’re new to the world of page layout and document design, some of these terms will probably be strange to you. Don’t panic! We’ll go through the most important terms one by one.
The “facing pages” setting controls whether two pages will be shown at once facing each other to help your page composition like the two pages of an open book or magazine spread.
This setting only affects how your document displays inside InDesign, so don’t worry about it affecting your final version, but this setting is a lifesaver when you’re designing two-page spreads.
Bleed and slug areas are a bit more complicated, but they only apply to certain print documents.
Because the printing and trimming processes don’t always align perfectly, the bleed area is used as an extra buffer along each edge of a print document.
Images and other elements that reach the edge of the page should be extended beyond the page border into the bleed area, which is then trimmed away during the printing process so that all of your content reaches the edge of the page, regardless of any potential alignment issues.
The slug area is a special printable part of your document that is used to provide instructions to printers, so it should only be used after speaking to your printer. By the time you need to use it, you’ll be much more familiar with InDesign!
It’s a good idea to take some time to make sure that you set these options correctly for your document the first time. You can change the page size and other structural settings later in the design process, but if you wait until after you’ve already started the page layout process, any new adjustments you make will create extra work and cause many headaches.
Chapter 3: The InDesign Interface
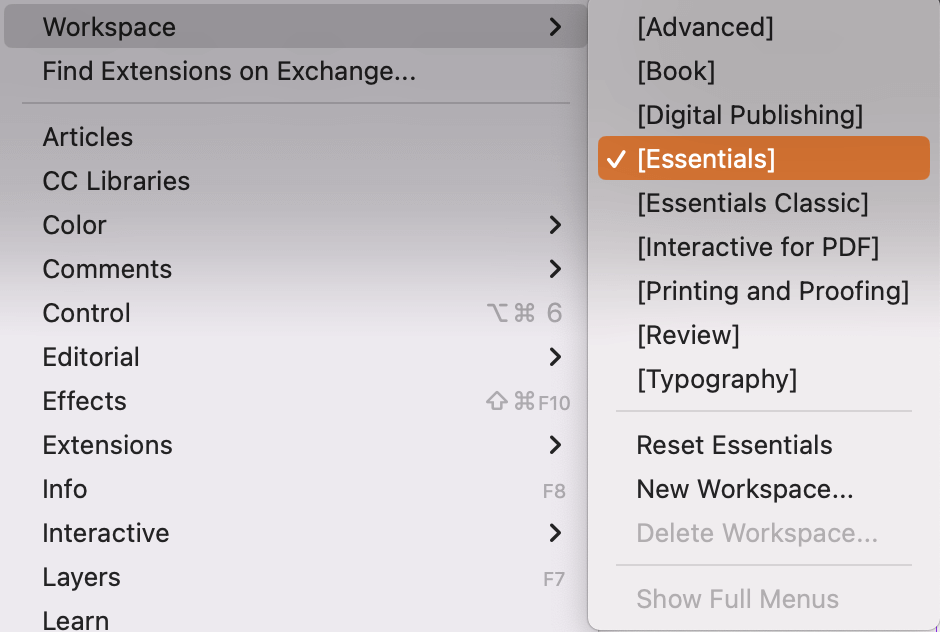
InDesign allows you to completely customize the interface layout and save different preset configurations known as “workspaces”. The default workspace is named Essentials, but Adobe has recently made huge changes to the Essentials workspace and renamed the older version to “Essentials Classic”.
Since all of my in-depth linked tutorials use that older workspace version, I recommend that you set your workspace to Essentials Classic in order to follow along more easily with the matching screenshots. You can switch back and forth between workspaces at any time, so feel free to experiment with the other preset workspaces.
To adjust your workspace, open the Window menu, select the Workspaces submenu, and click Essentials Classic. Now you can really get down to work!
The main Tools panel is located on the left side of the screen, where you’ll select between different essential tools, such as the Move tool and the Text tool.
Along the top of the screen is the dynamic Control panel, which changes to show different settings depending on which element of your document you have selected.
Finally, along the right side of the screen, there are various collapsible panels filled with all sorts of useful settings and displays, such as an overview of your document pages, document layers, color swatches, and more.
Once you know the basics, the best way to get more familiar with the InDesign interface is to spend time actually using it, so let’s move on to the good stuff!
Chapter 4: Working with Text in InDesign
Once you’ve set up the basic structure for your document, it’s time to add some content. Text is a huge part of most InDesign projects, so it’s the perfect place to start.
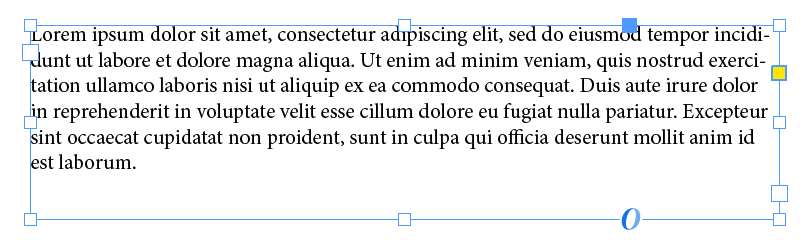
All of the text in an InDesign document is contained within text boxes. You can have as many text boxes as you want, of any shape and size you want, and the text boxes can be linked together so that long passages of text which don’t fit into one box will flow automatically into the next linked text box.
Switch to the Text tool using the Tools panel or the keyboard shortcut T, then click and drag on your blank page to create a text box. Now you can paste in the text you want to typeset or fill the text box with the legendary Lorem Ipsum placeholder text, which gets used so much that Adobe includes it as a built-in feature.
Remember that InDesign is a page layout app and not a word processor, so it’s usually best to finalize your text in another app instead of composing it directly within InDesign.
When you have a text box selected, the Control panel along the top of the InDesign interface will display various options for formatting your text. You can select which font you want to use, as well as set the font size, leading, and other typographic options. These settings can be applied to entire text boxes or any individual section of text you have selected, but there is a better way.
Instead of formatting each part of your text individually, the best practice is to tag each section of your text using paragraph styles, which act as reusable formatting templates. This lets you keep your whole document visually consistent and saves you from reviewing every page one by one if you tweak your text formatting.
For example, you can create a paragraph style for your section headlines and then tag each headline with that paragraph style. If you decide to change the formatting of your headlines later on, you just have to change the settings for the headline paragraph style, and all your headlines will update to match the new style.
Adobe includes a basic selection of typefaces when you install InDesign or any other Creative Cloud apps, but if you want some fresh inspiration, you can add new fonts quickly and easily. Browse through the Adobe Fonts online collection that’s included as part of your Creative Cloud subscription, and with just a few clicks, a new font will be synced and available to use in InDesign.
Chapter 5: Working with Images

Unless you’re typesetting a novel, a giant wall of text can be a bit overwhelming. Fortunately, InDesign makes it easy to insert images into your document with just a few clicks or a single keyboard shortcut.
Images are inserted in InDesign documents using the Place command, although it’s also used to insert other document formats. You can open the File menu and click Place each time, but it’s better to learn your first keyboard shortcut since the Place command will be one of your most commonly used commands in InDesign.
Pressing Command + D (use Ctrl + D instead if you’re using InDesign on a PC) will run the Place command and open a file browser window. Browse to select the image you want to insert, and click Open.
At this point, take a close look at your mouse cursor: it will have a small thumbnail of the image you want to insert attached to it. InDesign calls this a “loaded” cursor, and the next place you click on your page will be used as the upper-left anchor point for positioning the image.
Since image selections are often one of the last parts of a document to be finalized, InDesign allows you to insert special empty frames that act as placeholders. These placeholders allow you to work on the text and overall layout without waiting for final copies of your images.
When they eventually arrive, you can simply select the placeholder frame and run the Place command. Indesign will automatically position the image within your frame and resize it to match.
Once an image is placed in InDesign, you can apply any of Adobe’s standard transforms, such as scale, rotation, and even mirroring, but InDesign has an extra complication that can cause no end of headaches. At least, it did for me when I was first learning InDesign!
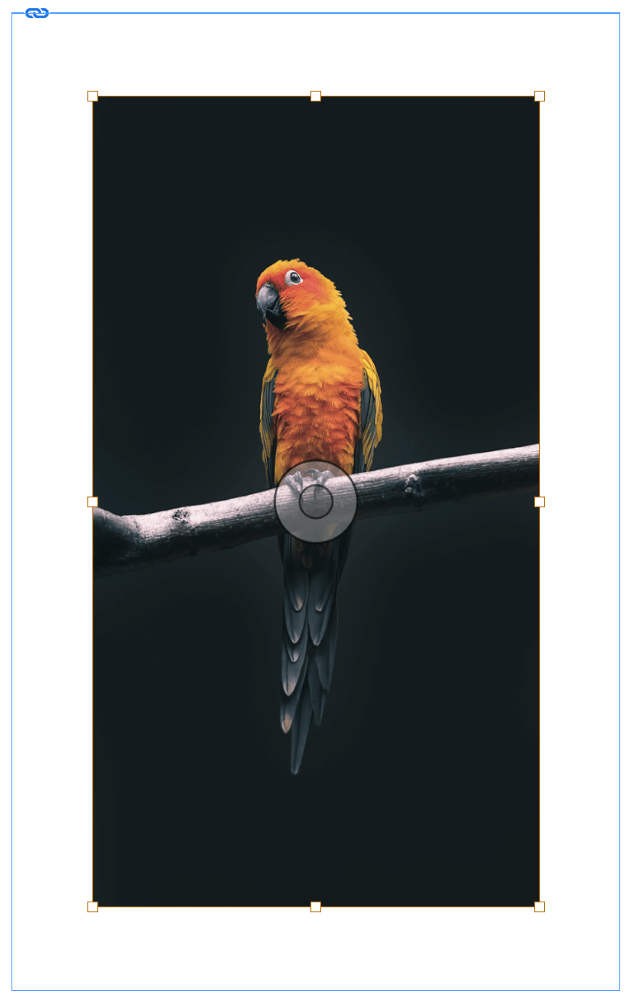
Each image in your document is actually made up of two objects: a container object and your placed image object, and they can be selected and adjusted separately. This allows you to crop images in InDesign and create shaped image frames, but it also can make simple positioning adjustments take longer than they should.
Fortunately, Adobe has added a new feature known as the Content Grabber, which allows you to select the image object more easily. When you select an image in your document, the Content Grabber appears to overtop it as a small grey circle.
Click and drag on the grey circle to move only the image object, or hold down the Command and Shift keys to move the image object and the container object together (use Ctrl and Shift if you’re on a PC).
The container object uses a blue bounding box, although this color changes depending on the color of your active layer. In contrast, the image object always uses a brown bounding box, which can help you figure out which of the two objects you have selected.
While you can do some basic editing tweaks like cropping or making an image black and white in Indesign, it’s always better to finalize your images in a proper image editor like Photoshop. InDesign should be used for bringing finished elements together, not doing any of the actual editings!
Chapter 6: More InDesign Elements

While you can create a nice coffee table photo book with just text and images, InDesign allows you to create a range of different design elements for all sorts of layouts. This is not a complete list, but hopefully, you’ll find something inspiring to include in your project.
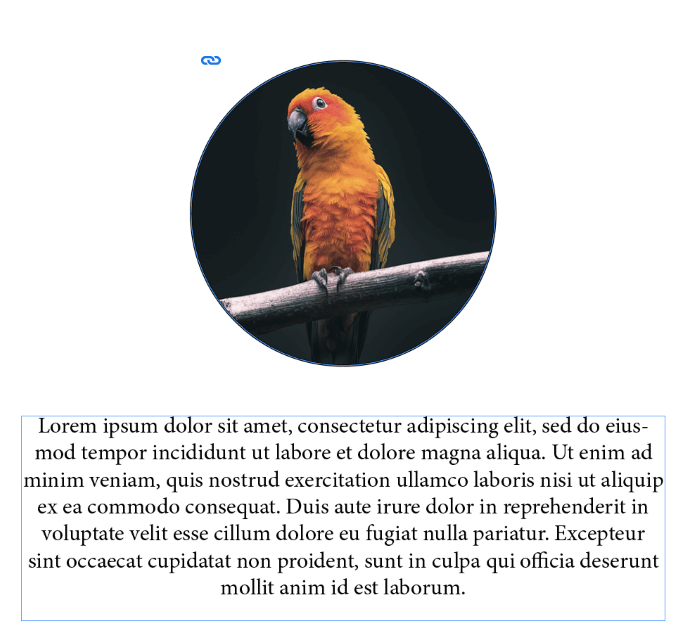
You can add drama to your text using drop caps, and you can experiment with text wraps and clipping masks to create more dynamic layouts and visual interplays between text and image.
If you want to create smaller design elements or background styles, InDesign has a number of tools for drawing vector shapes, and you can also draw custom shapes using Adobe’s universal Pen tool. To create dynamic color across objects or entire pages, InDesign also has a handy gradient tool.
Before you get carried away using all these new tools, it’s important to remember that InDesign isn’t a drawing app, and it shouldn’t really be used like one. If you find yourself using a lot of InDesign’s vector tools for creating design elements, you might want to consider creating them in Illustrator instead.
You can also create more practical items for displaying information. Tables have their own custom creation process that saves you all the time and tedium of trying to create them by hand using the default shape tools, making it easy to adjust the data later if necessary.
Chapter 7: Creating Interactive Documents

While most of InDesign’s tools are focused on creating print documents, it’s also great for creating interactive digital documents that will be shared online. This can be as simple as a PDF document that functions as a slideshow, or it can be a complex, rich media document using dynamically flowing text – but I think we’ll save that last one for a more advanced tutorial 😉
InDesign handles digital color modes slightly differently than Photoshop or Illustrator, so you don’t need to worry about whether you’re using CMYK or RGB notation unless it helps you when selecting colors.

When creating a new document, you can select one of the Web or Mobile document presets to convert all of InDesign’s swatches and color picker tools to use RGB color notation typically used for on-screen imagery, but it isn’t necessary since all colors are converted to your chosen color space during the export process.
If you’ve reached this part of the post, you’ve probably already experimented with the Place command. As I mentioned in Part 5, it can be used to add more than just images to your document.
The only drawback to these advanced media features is that you can run into playback issues depending on how you export your final digital document. Adobe recommends using MP4 for video and MP3 for audio to guarantee playback when exporting your document as a PDF, but InDesign also supports a much wider range of file types that may be playable when exporting your document as an HTML or XML file.
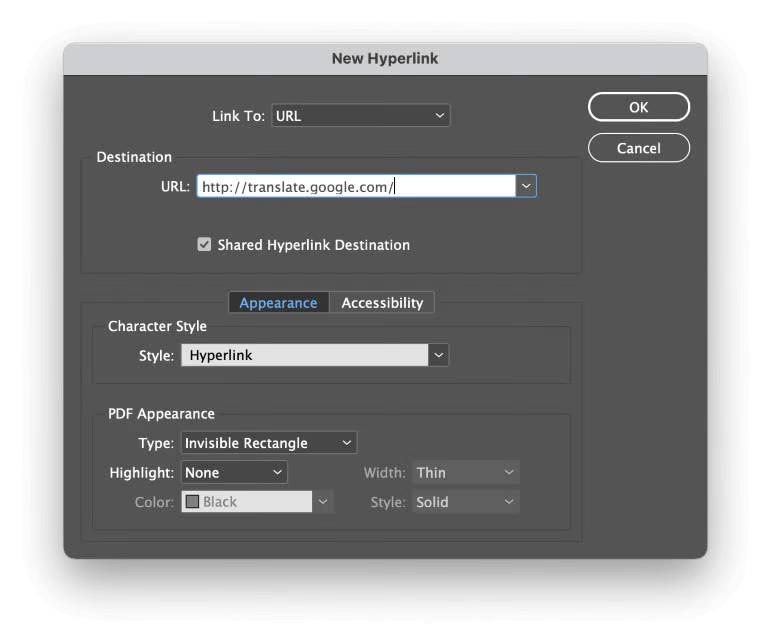
One universal interactive element is the humble hyperlink. You can add a hyperlink to any text or object in your document using the Hyperlinks panel, and the link will be active when your document is exported, no matter if you use PDF, HTML, or XML.
This is useful for everything from interactive art storytelling projects that challenge traditional narrative structures to digital marketing materials with individual product page links.
If the Hyperlinks panel isn’t visible in your current workspace, you can display it by opening the Window menu, selecting the Interactive submenu, and clicking Hyperlinks.
Chapter 8: Advanced Workflow Tips

Now that we’ve covered the basics of creating documents and adding page elements, it’s time to start looking at how you can speed up your workflow and save yourself some time, energy, and frustration.
Keyboard Shortcuts
The single best thing you can do to improve your workflow is to learn your InDesign keyboard shortcuts. Many people resist keyboard shortcuts because they’re more comfortable working with a mouse, but you can increase your work speed dramatically just by learning a few of the shortcuts for your most commonly used tools. It’s worth taking the time to learn some, I promise!
Parent Pages
When you’re working on a document with lots of pages, you’ll probably start to find that certain page layouts keep repeating themselves. Rather than recreate the same page over and over again, you can use parent pages to speed up the layout process.
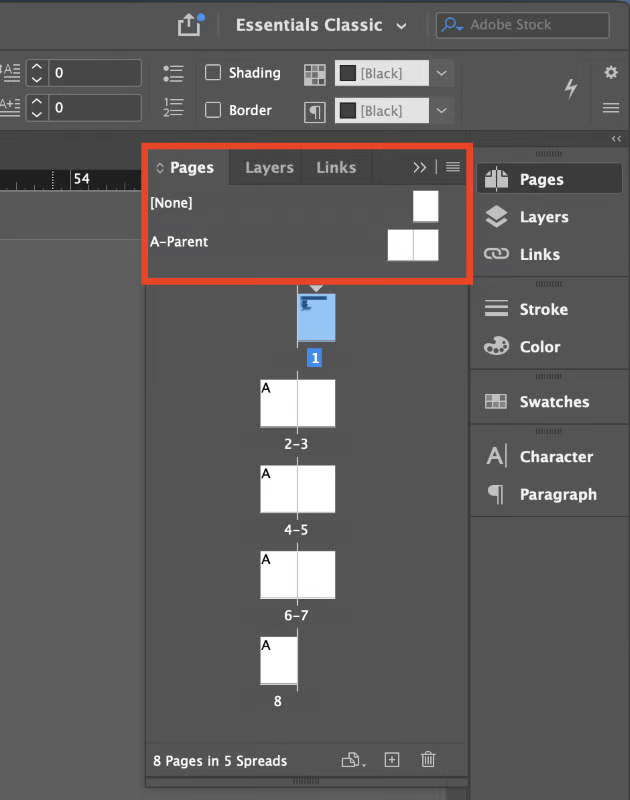
Design the page once, and then you can use the Pages panel to apply it in as many other places as you need with a simple drag and drop.
Grids
Grids are one of the most commonly used page layout tools, and InDesign has quite a few different ways to use them. You can use the baseline grid to ensure that all your text is perfectly aligned, or you can use the document grid to help position and align your objects.
If you want to get really fancy with your layouts, you can start exploring modernist column grids to help create powerful designs, but this requires some advanced knowledge of text columns and a little bit of math (sorry!).
Easy Text Formatting
While it’s a good idea to get familiar with paragraph styles and character styles for typesetting long documents, it doesn’t always make sense to use them for shorter ones. If you need to copy and paste the formatting from one piece of text to another without using styles, you can use the Eyedropper tool.
Just click the source text to copy the formatting, and then click the destination text to apply the same formatting.
GREP
This is undoubtedly the most advanced workflow tip that I’m going to share, and it’s only really valuable when you’re working with a long document. Global Regular Expression Print, or GREP, is a way to search through the text for any string of text that matches a specific pattern.
That sounds just like the Find/Replace command at first, but GREP has an extra trick up its sleeve: you can use dynamic wildcards known as metacharacters in the search parameters.
For example, if you need to search for all the mentions of historical years in your document, you can use a GREP search for \d\d\d\d, which will return all the strings of four numbers in a row, which should correspond to all the times a year is mentioned in your document.
That just scratches the surface of what GREP can do, but it’s all we have time for here!
Chapter 9: Finalizing Your InDesign Documents
Once you’ve finished designing your document, there are a few things you should do before you finalize your document and send it off to the printer or share it online.
First, save your document if you haven’t already been doing so throughout the design process. It’s usually a good idea to have multiple iterations of a document, just in case you need to return to a previous version.
Before you finalize your document, give yourself a preview of what your document will look like without all of the InDesign bounding boxes, margins, and bleed area lines cluttering up the view.
It’s easy to zoom your focus in too tightly when you’re doing typesetting work, so it’s important to step back and look at your document as a whole with fresh eyes. While you’re at it, it’s a good idea to run a quick spellcheck!
Next, you should check the Preflight area at the bottom of the InDesign window. If InDesign has detected any layout errors, such as overset text or missing fonts, it will alert you here with a small red circle and an error count. It’s not absolutely necessary to fix any Preflight errors before you export your document, but you should at least review them to make sure there are no major issues.
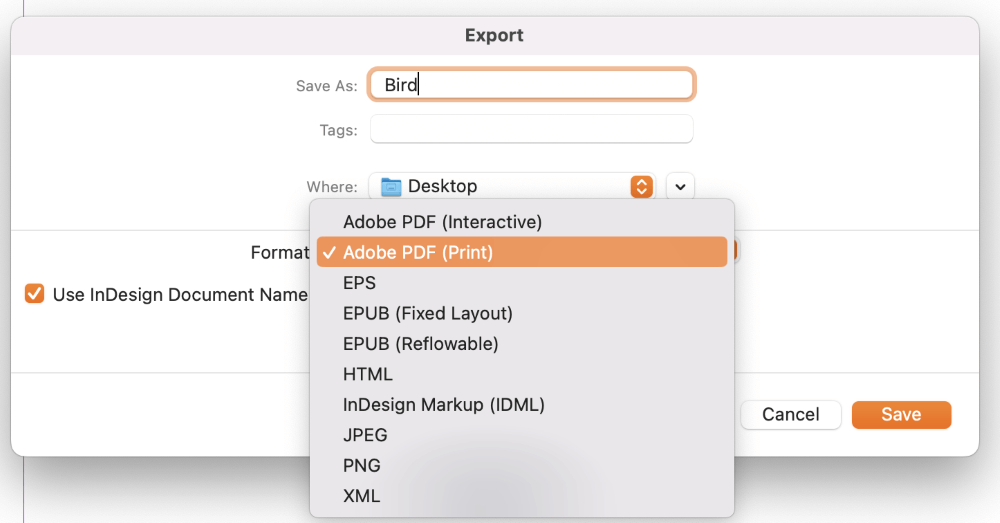
Most of the time, it’s preferable to export your InDesign document as a PDF file. PDFs can be opened on any computer or mobile device, and they display your document consistently and accurately, just the way you designed it.
If you’re not sure how you should export your document for printing, make sure to check with your print house in case they have any special requirements.
If you’re handing off a document that will be worked on by another designer, it can be useful to package your InDesign document. InDesign will collect all your placed images, media, fonts, and any other linked files into a single folder, and it will also generate PDF and IDML files as well as a standard INDD file.
This process makes it easy to share your document without worrying about broken links or missing images.
A Final Word
Phew, we’ve covered a lot of ground in the post! Hopefully, you now know enough about InDesign that you feel confident enough to get started working on your own documents.
No matter how many tutorials you read, there’s absolutely no substitute for spending your time actually working on the app. Even if you’re not sure what project you want to work on, just exploring the interface and testing out the various tools can spark creative inspiration.
Remember, if you ever get stuck or run into trouble with InDesign, you can always visit us here at SoftwareHow or check out the Adobe support forums for more technical assistance.
Happy InDesigning!