
Images are at the heart of many good InDesign layouts, but you don’t have to be stuck with boring old rectangles. Adobe InDesign has a great set of tools for creating complex text wraps that help integrate your visual and typographic elements into a more dynamic layout.
These tools are easy to learn but take some time and practice to master, so let’s take a quick look at how they work.
Table of Contents
How to Wrap Text Around an Image in InDesign
Wrapping your text around shapes and images is extremely easy in InDesign, especially if you’re working with a simple shape such as a rectangular photo or graphic.
For the purposes of this tutorial, I’m going to assume that you’ve already inserted the object you want to wrap text around, but if you’re not sure how to, you can check out my tutorial about how to insert images in InDesign.
Step 1: Select the object you want to wrap and make sure that it’s overlapping a text frame (this isn’t actually necessary, but it can help you to gauge the results of your text wrap settings).
Step 2: In the Control panel that runs across the top of the main document window, locate the text wrap section, as highlighted below.
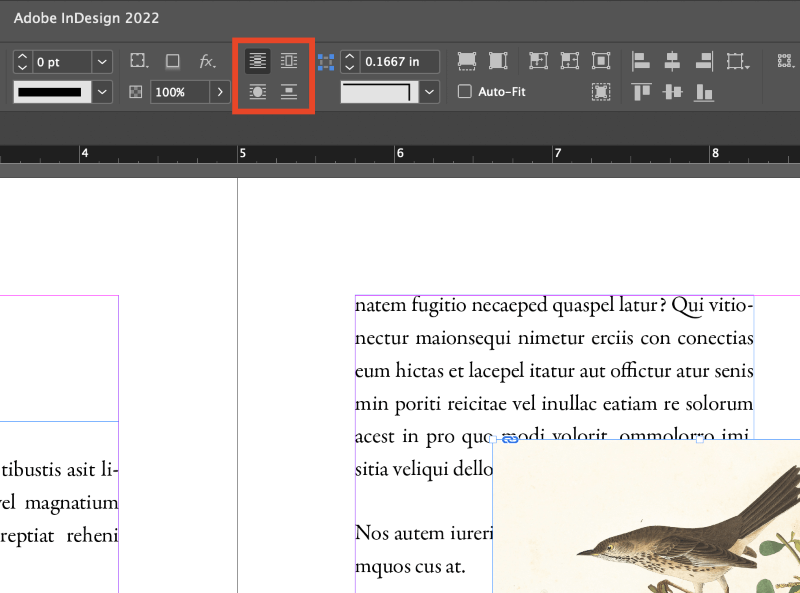
These four buttons control the basic text wrap options in InDesign. Clockwise from the top left, they are: No text wrap, Wrap around bounding box, Wrap around object shape, and Jump object.
Step 3: With your wrap object selected, click the appropriate text wrap button to create a basic text wrap.
You can also adjust more options using the Text Wrap panel. Open the Window menu, and click Text Wrap, or you can use the keyboard shortcut Command + Option + W (use Ctrl + Alt + W if you’re using InDesign on a PC).
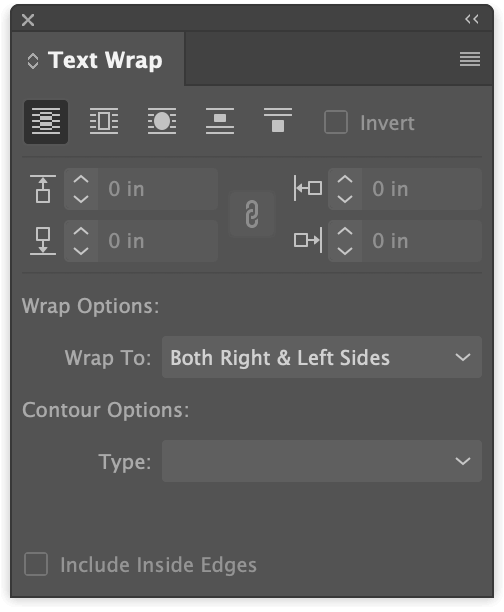
The Text Wrap panel allows you to adjust the same four wrap options but also gives you some customization options about how close your text will fit around the wrapped object.
You can also restrict wrapping to certain areas and customize the wrapping contours with a range of different options.
Last but not least, you can also invert the whole wrap so that your text is only visible overtop of your image.
Content-Aware Text Wrapping in InDesign
One of the most appealing new features of InDesign’s text wrapping toolkit is the ability to use Photoshop’s Select Subject algorithm directly within InDesign to create an extremely accurate custom path for your text wrap edge.
If you’re not familiar with this tool from Photoshop, it’s a machine-learning trick that does exactly what the name suggests: it analyzes your image and creates a selection around what it considers to be the main subject.
To create a custom wrap around the subject in an image, you’ll need to be working with an image that has a fairly clear distinction between the background and the main subject. The Select Subject algorithm is pretty good, but it sometimes gets lost in more complex images.
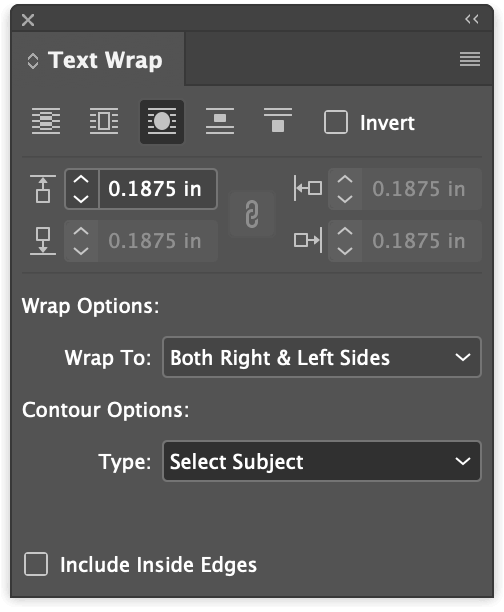
With your object selected, enable the Wrap around object shape option in the Text Wrap panel. In the Contour Options section, choose Select Subject from the dropdown menu.
InDesign will think for a second or ten, depending on the complexity of the image and your CPU, and then you’ll see a new path appear in light blue around the subject of your image.
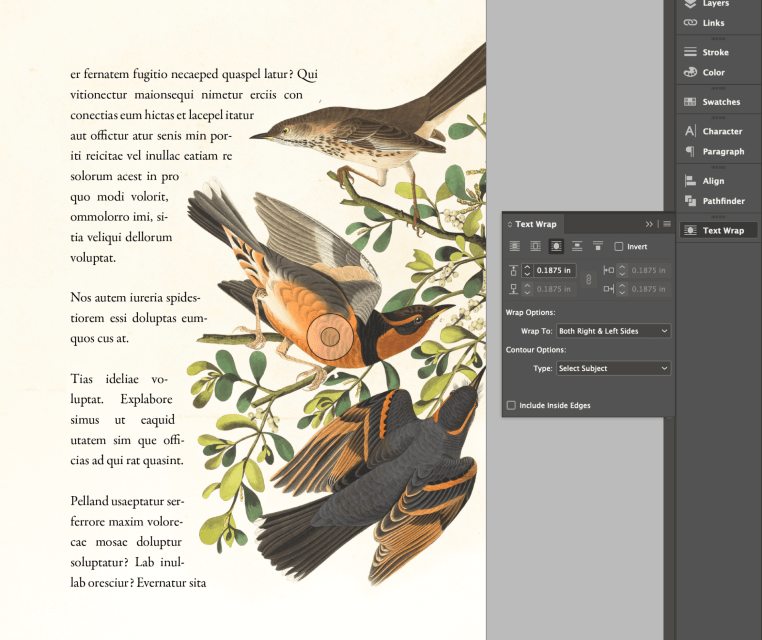
I think the implementation of this process is still a bit rough from a user experience perspective, but the results are good, as you can see in the example above.
Advanced Text Wraps
If you like the sound of custom text wraps but you want even more flexibility, InDesign can also read clipping masks and alpha channels from any file format that supports them and then use them as text wrap guides.
Place your image, and enable the Wrap around object shape option in the Text Wrap panel. In the Contour Options section, select the appropriate option for your image. If InDesign hasn’t detected your clipping path, Photoshop path, or alpha channel, then the corresponding option will be unavailable.
A Note About InDesign Clipping Paths
InDesign can also make its own clipping masks using a slightly more complex process than the newer Select Subject option. It’s less capable, and it forces you to remove the background of your image, but it may still be useful if the fancy modern version isn’t working for you.
Select your image object, and press the keyboard shortcut Command + Option + Shift + K (use Ctrl + Alt + Shift + K on a PC) to open the Clipping Path dialog.

Change the type to Detect Edges, and you’ll be able to adjust the options below. Depending on the contents of your image, you may have to experiment quite a bit with the Threshold and Tolerance settings, so check the Preview box to see the results before you click OK.
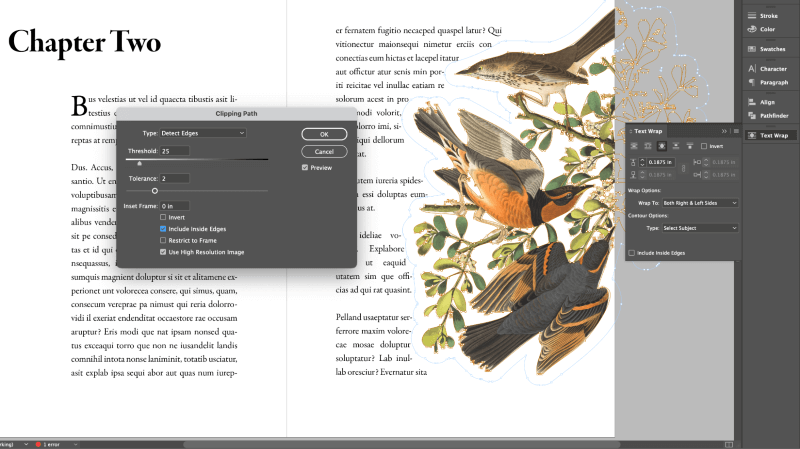
The clipping path generated with this method can then be used in the Contour Options section of the Text Wrap menu. While it’s not quite as simple as Select Subject, it can offer a better wrap on certain images, and it allows you to isolate a subject from its background without having to rely on an external image editor.
FAQs
InDesign projects have almost unlimited layout possibilities, so there are inevitably some additional questions that didn’t get covered in the sections above. If you have a question about InDesign text wrapping that I missed, let me know in the comments below!
How to wrap text around a table in InDesign?
InDesign allows you to wrap text around a table very easily, it’s just that the Control panel doesn’t update to display the text wrap options automatically when you have a table selected. Instead, you’ll need to work with the Text Wrap panel directly.

Display the Text Wrap panel by opening the Window menu and selecting Text Wrap. You can also use the keyboard shortcut Command + Options + W (use Ctrl + Alt + W on a PC). Select your table object, and click the button for your desired text wrap style in the Text Wrap panel.
How to remove text wrapping in InDesign?
There are a couple of different reasons to stop text wrap in InDesign, and so there are a couple of different methods to apply.
If you just want to turn text wrap off completely for your selected object, click the No text wrap option in the Control panel at the top of the main document window.
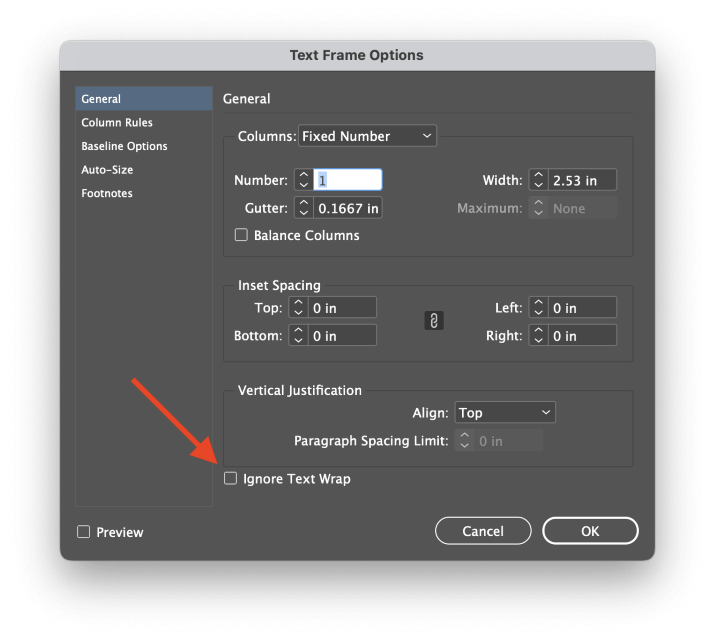
You can also set a specific text frame to ignore text wrap settings. Select your text frame, and press Command + B (use Ctrl + B if you’re using InDesign on a PC) to open the Text Frame Options dialog. Check the box at the bottom labeled Ignore Text Wrap.
A Final Word
That covers all the basics about how to wrap text in InDesign, but you’ll need to practice your skills to get comfortable working with the more advanced text wrap options. Clipping paths and masks give you the ultimate degree of control over your wraps, but the Select Subject option is a great shortcut in some situations.
Happy text wrapping!