
Adobe Premiere Pro is one of the best video editing software that even a beginner can learn in a few days. It’s widely used software – in a production house, for personal or commercial use, just name any type of media firm; they likely use Adobe Premiere Pro.
You must be wondering why learning Adobe Premiere Pro might be difficult; come off it, it’s very simple to use and learn, even if you don’t have any prior video production skills. You may be under the assumption that Adobe Premiere Pro is difficult to learn.
But I will show you why it is one of the easiest and simplest to learn video editing programs out there. This article assumes you’re a complete beginner who plans to become the best video editor. That said, if you already have some experience with Premiere Pro, it can help you too.
I’m David, a professional cinematographer and video editor. I’ve been using Adobe Premiere Pro for over a decade. I have edited videos for known brands with millions of views across the globe.
I want you to mention– not all PCs can run Adobe Premiere Pro; you must ensure your PC meets the minimum requirements. Your PC must have at least 8GB of RAM, 2GB GPU, a CPU of at least 6th Gen, and 500GB of storage space.
I am pleased to walk you through the process of learning Adobe Premiere Pro. Let’s get started!
Table of Contents
Chapter 1: Adobe Premiere Pro, Free to Learn?
You can learn how to use Adobe Premiere Pro for free. In fact, that is precisely what this detailed guide covers. But first, you need the software–downloading it is simple. Head to adobe.com, select register, and download. Adobe Premiere Pro is not free software, but you can get a 7-day free trial.
Think of the massive things you can do with this software and the magic you can perform. You wouldn’t expect a gem like Adobe Premiere Pro to be free.
For additional help with downloading and installing the software, I made an extensive tutorial on how to get Adobe Premiere Pro to your PC.
You can learn the basics of Adobe Premiere Pro in days, and if you’re like me, you can learn the basics in just a couple of hours. All it takes is dedication. You can find Premiere Pro courses for free almost anywhere. In fact, you’re reading this multi-million article for free right now!
Chapter 2: Getting Started With Adobe Premiere Pro
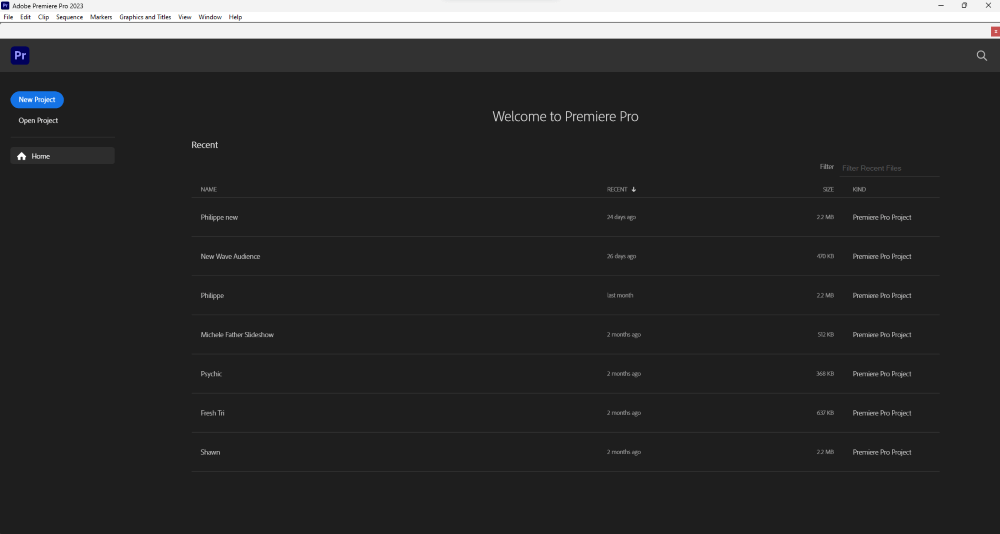
When you open Adobe Premiere Pro for the first time on your PC, it will prompt you with a getting started page where you can watch video tutorials about the software. Then you can create a new project to access the software’s full features.
Now that you’ve opened Premiere Pro, let’s create a new project to access the full features.
Once you click on the New Project in Premiere Pro welcome page, it will take you to the point where you need to set up your new project. Setting up your New Project means giving it a Project Name, Setting Your Project Location, Importing your clips, and Creating a Sequence.
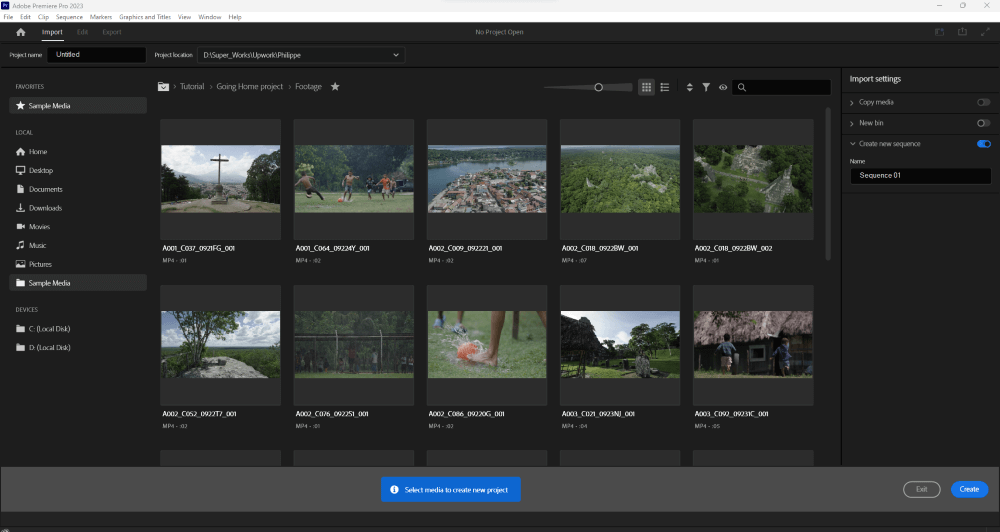
If you don’t have any media clips to work on and want to do something with Premiere Pro, you don’t have to worry about where to get clips. Adobe Premiere Pro comes with preshot footage that you can choose to import and work it; hover your mouse over the footage to preview them and select the ones you want to work on.
Give your Project a Name, set a project location (ensure you stay organized), select the footages you want, create a new sequence, and give it a name. We are done; click on Create to get started.
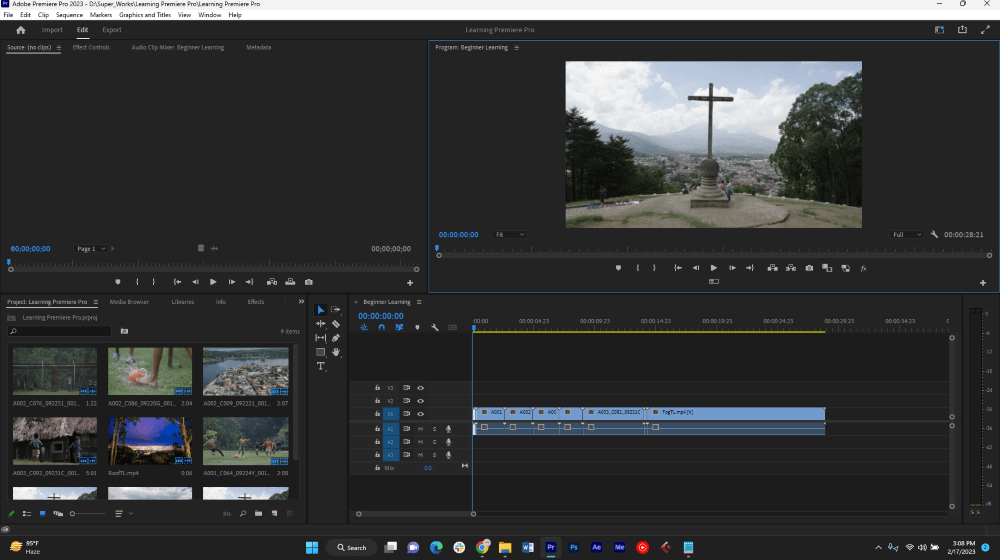
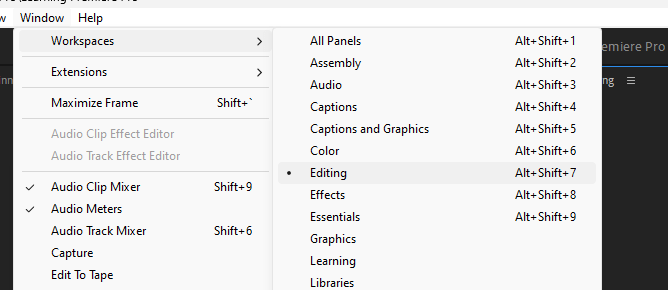
Opening up the project, your screen will look like this, go to Windows > Workspace > Editing. This will make your workspace look like mine.
On the top left of Premiere Pro, we have the Menu Bar, which consists of File, Edit, Clip, Sequence, etc.; this is the engine room of Premiere Pro. Whatever you want to do, you can find it here.

Following this bar, we have the section of Premiere Pro. We have:
- Import Section – This is where you can import your clips; that was the first screen we were directed to when creating a new project,
- Edit Section – This is the current screen; it is where you can perform magic with your clips and creativity.
- Export – After editing your clip and finalizing things, this is where you will export your project. You are making it playable and shareable with the whole world. You can export in any format of your choice.
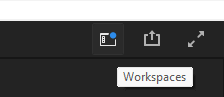
On the top right, we have three icons: Workspace, Quick Export, and Fullscreen buttons, respectively. Self-explanatory!
Now to Premiere Pro itself. Premiere Pro basically consists of different panels. In other words, different panels make up Premiere Pro. I will explain the important and necessary panel one after the other.
These panels can be moved anyhow you want, or placed anyhow you want, so don’t be surprised if your Premiere Pro screen is not the same as that of your friend or mentor. Also, Panels can be stacked together.
The Project Folder Panel
The Project Folder Panel is the panel that houses all your clips and all your imported files. If you want to create anything, you can choose to create it in this panel.
Let’s say you are working on a complex project, have tons of files, and quickly need to use one asset; the Search Bar is where you can search for any files you created or imported.
The View Customization is where you can customize your view, maybe into Thumbnail mode or list view; the choice is yours. You can also sort your files just as you do on your PC.
The New Bin is used to create a Bin; the layman will call it a folder, but Adobe Premiere Pro’s term is Bin, be professional. While learning any software, the number one thing to learn is to stay organized; being organized will make your project neat and more understandable to you! Not just to you but probably to anyone you share your project files with.
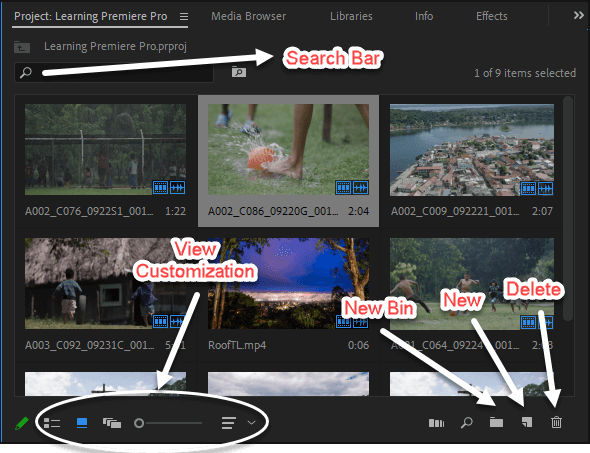
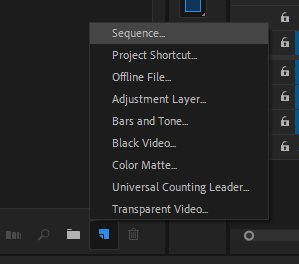
The New Icon is where you can create some Premiere Pro assets – Sequence, Color Matte, Adjustment Layer, Bars and Tones, Universal Counting Leader, etc.
And the Delete Option is obviously where you delete an unneeded file, not from your PC but from Premiere Pro Project.
The Source Panel
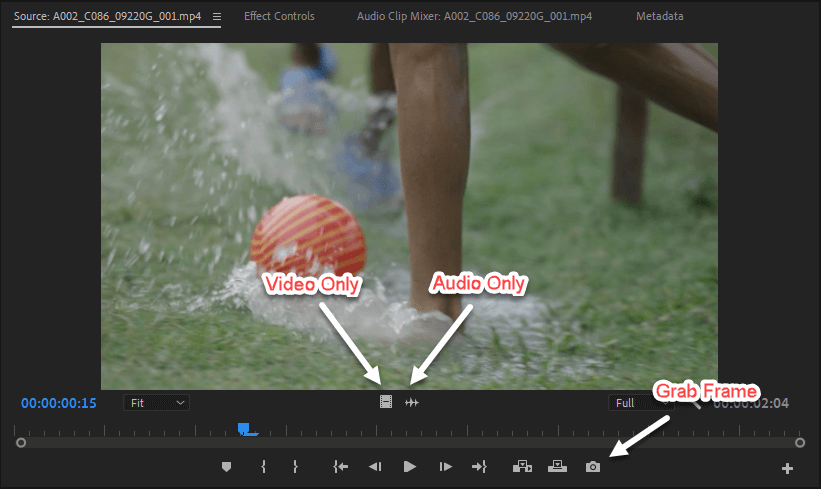
The Source Panel is where you can Preview your imported files. This is the basic function. You can import your files into the Timeline from The Source Panel.
If your video file has audio and you want to import only the video’s audio or just the audio leaving out the video, you can choose to import any or both of them in this panel.
You can also choose to import any particular clip segment to the timeline. Instead of having the whole clip in your Timeline, you can choose to import a section of the clip into your Timeline.
You can also take a picture of a particular frame in your clip and save it as an image file.
The Timeline Panel
The Timeline Panel is where you perform your magic. This is where you edit, cut, apply effects, insert graphics, texts, etc.
After importing your clips to Premiere Pro, it goes into the Project Folder Panel. Then, you preview them in the Source Panel. Finally, you import it into your timeline for edits.
In the timeline, you can cut clips, add effects onto clips, arrange clips, speed up clips, import background music, and add title cards. Whichever way your project plays out in the timeline, that is how you will have it when you export it for the whole world to see.
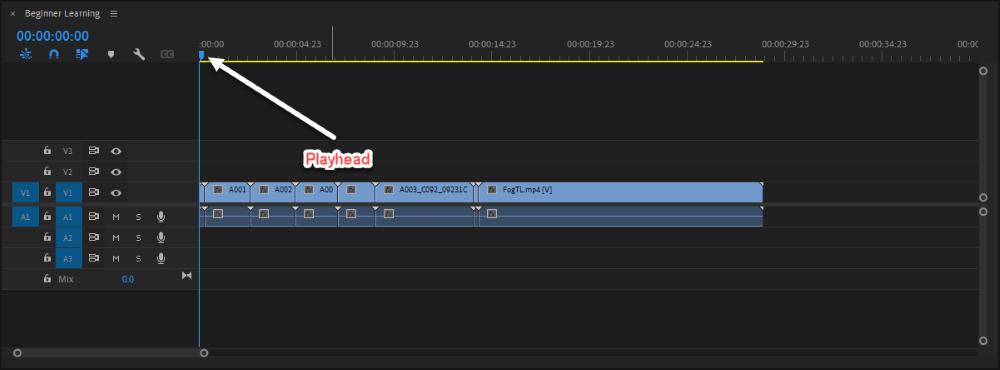
The Timeline panel consists of Audio and Video Layers. A new Sequence comes with three video layers and three audio layers. You can choose to add more if you want.
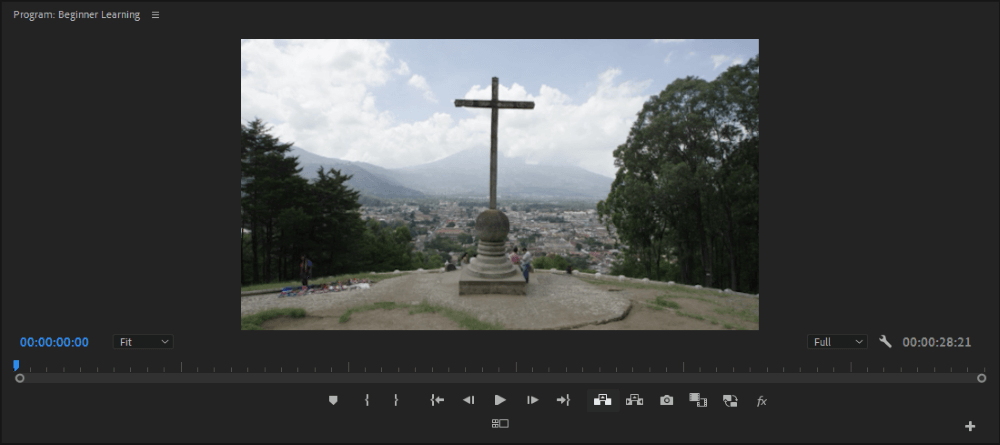
The Program Panel
You should have noticed two monitors in your workspace: the Source and the Panel. The Program Panel is the panel that shows you whatever is going on in your Timeline Panel.
The Source and Program Panels look mostly the same; the source panel is where you preview your imported files, while the Program Panel is where you preview whatever thing you have in your Timeline. Easy peasy!
The Toolbar Panel
Like any other editing software, the toolbar consists of several tools you can use to perform different options in your Timeline Panel. You would see, by default, they are close to each other. You get to use the tools in your Timeline Panel.
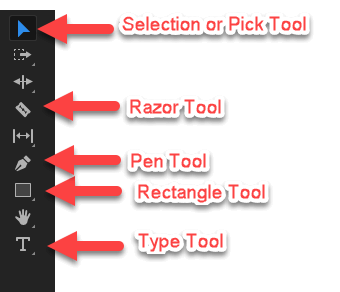
Going through the basic tools, you use the selection tool to select things around. Think of it as your hand, using it to pick, move, and drag items in your day-to-day activities.
The Razor Tool is sharp as a knife; you use it to cut your clips. Once you cut your clip in your timeline, it will split it into two. You can cut as much as you want and do anything will the pieces.
The Pen Tool is used to drag a custom shape and mask clips. The more you learn, the more you know the usefulness of this tool.
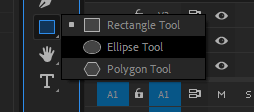
The Rectangle Tool is used to draw shapes. Just as its name implies, it is a rectangle. And finally, the Type Tool; is used to create texts in your timeline.
Note that these are not all the tools; some of the tools have families; we can call them brothers. Any tool with a small arrow beneath it has one or more brothers. To access them, you only need to click and hold the tool.
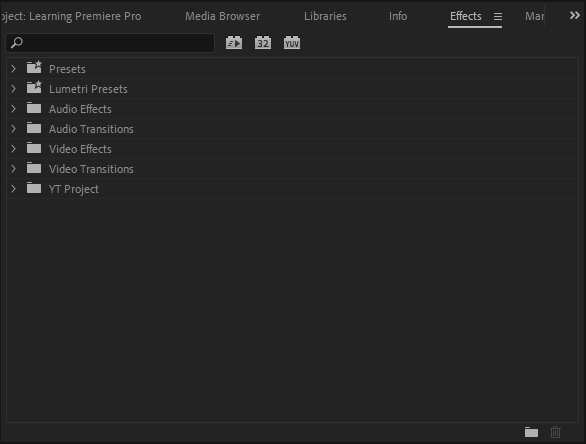
The Effects Panel
The Effects Panel consists of fx you can use in your project; Fade transition, blur effects, audio effects, etc. Just think of any fx; you would find it here.
The fx are grouped into different sections; Audio Effects, Audio Transitions, Video Transitions, and Lumetri Presets. You can also create your own custom folder for your custom effects.
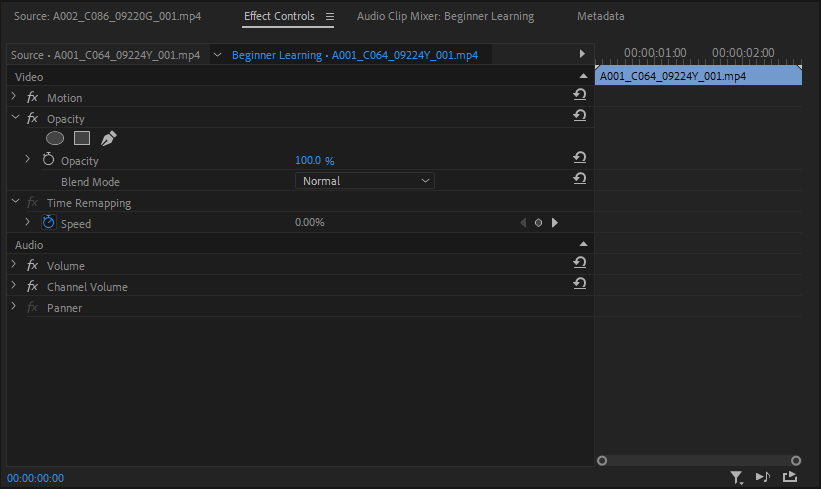
The Effects Control Panel
The Effects Control Panel is where you get to control the effects added to your clips. A Clip imported into your Timeline comes with three default effects, three for audio and video each.
You can get control and tweak any parameters of default and added effects (fx) of your clips.
Other panels that might be useful to you; include
- The Lumetri Color Panel is where you color correct and color grade your clips.
- The Essential Graphics Panel: You can customize and beautify your graphics clips here.
- The Audio Meter Panel: This is where you monitor your audio levels to ensure they all balance and don’t peak.
- The Audio Clip Mixer: You can raise the volume of each audio track here and apply a general fx to the audio layer. This is a basic mixer for your audio design.
- The Text Panel: This is where you can create subtitles and auto-generated captions for your clips.
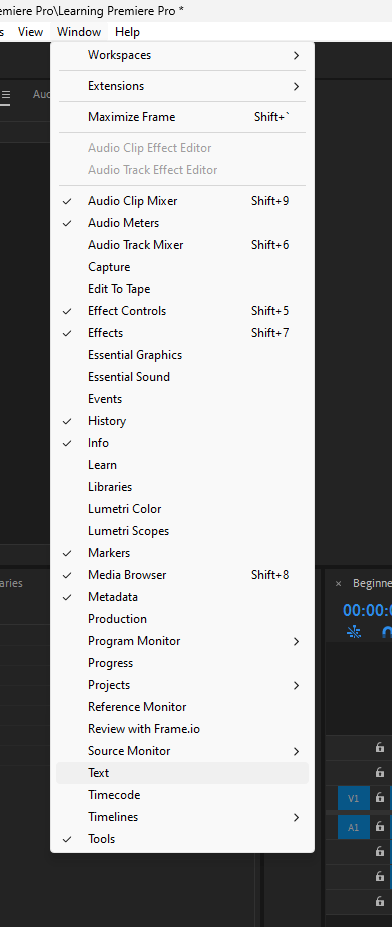
There are more panels; to access any of them, go to Windows, and you will see all these beauties.
Chapter 3: Your First Premiere Pro Project
As mentioned above, three sections are involved when editing Premiere Pro. After creating your project, importing your clips to Project Folder Panel is the first section. Then, the second section – editing our project to our taste and exporting it as mp4 – a shareable file.
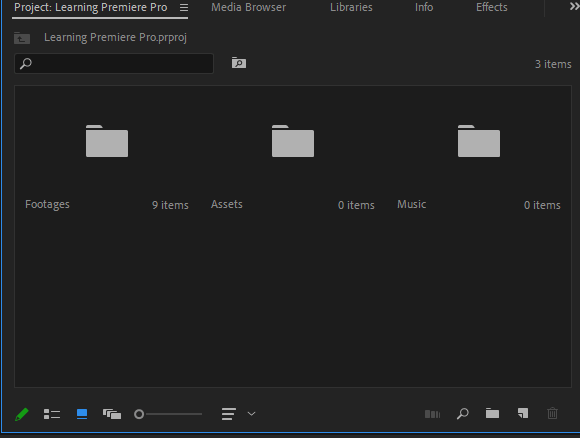
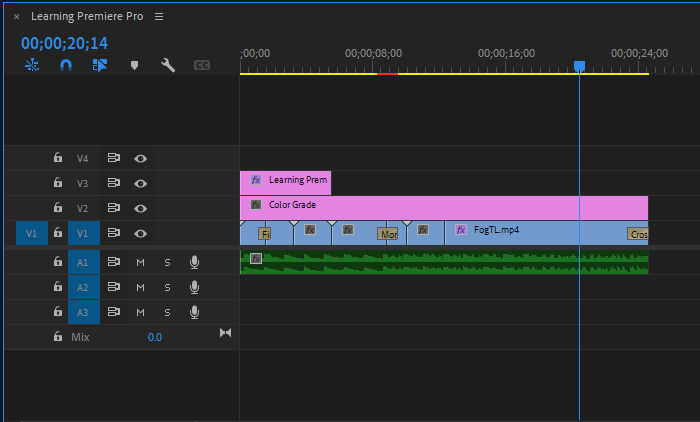
Let me walk you through creating your first Premiere Pro project. I created bins and grouped my clips into them. The Assets bin will contain all my sequence files and other files. The Footages bin contains all my video clips and The Music Bin for the background music.
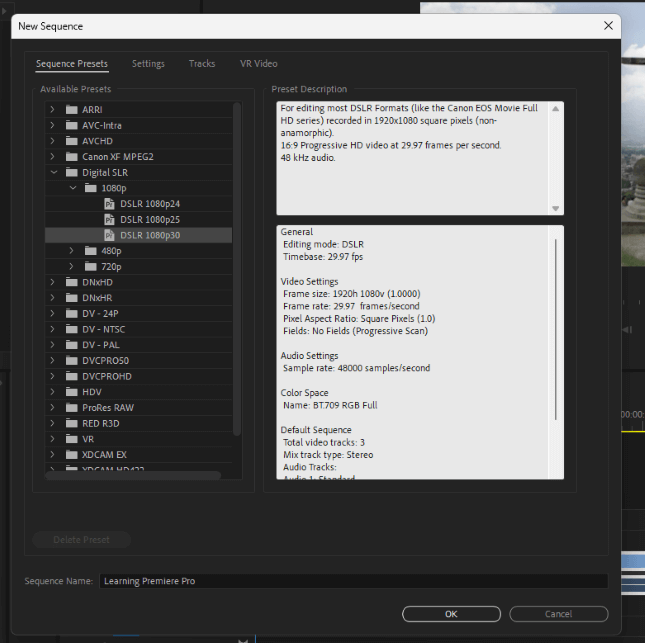
Open up the Assets Bin and create a sequence. Let’s name the sequence “Learning Premiere Pro.”
Now, we have our sequence, which is an empty Timeline. My Process of editing is to first sif the clips. By siffing, I mean you import the useful parts of the clip to your timeline.
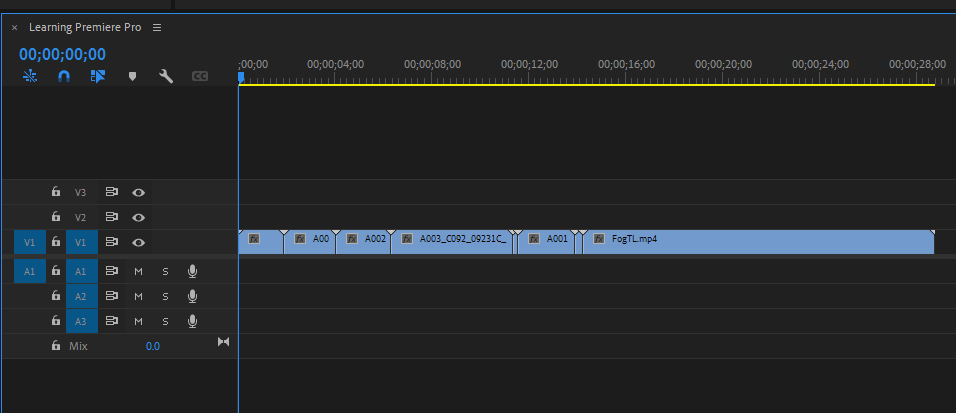
Okay, we have our useful clips in our sequence. It’s time to import the background music and edit to music. After chopping and cutting, our timeline looks like this.

Let’s add a few transitions. Head over to the Effects Panel > Video Transitions. I’m going to apply a few to my clips. To apply, you must click, hold and drag the transition to your preferred point.
The point of a transition is to link different clips together smoothly, so I will drag the transitions to the middle of my clips.

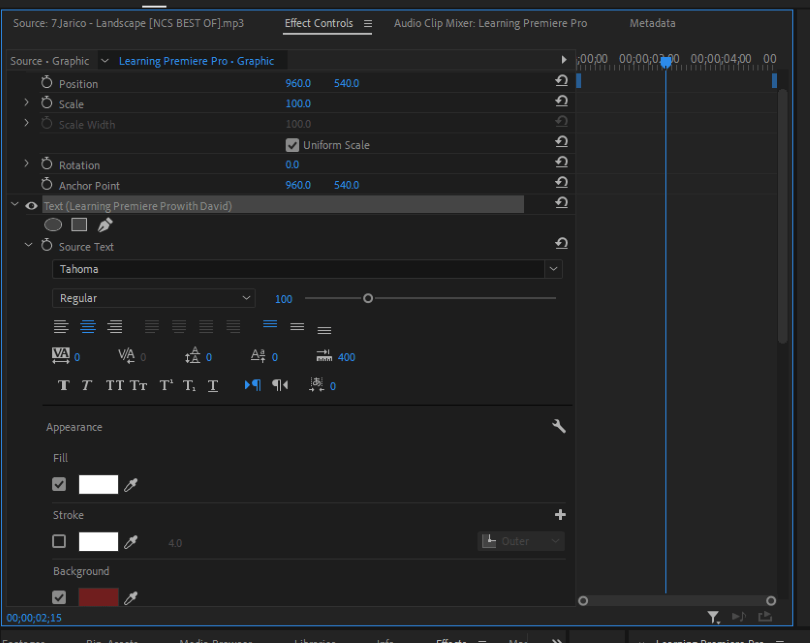
There you go with the transitions! Now, let’s add a few titles. To do this, we have to use the Type Tool. Move the playhead to the point where you want to add the title, then click anywhere in the program panel to add the title.
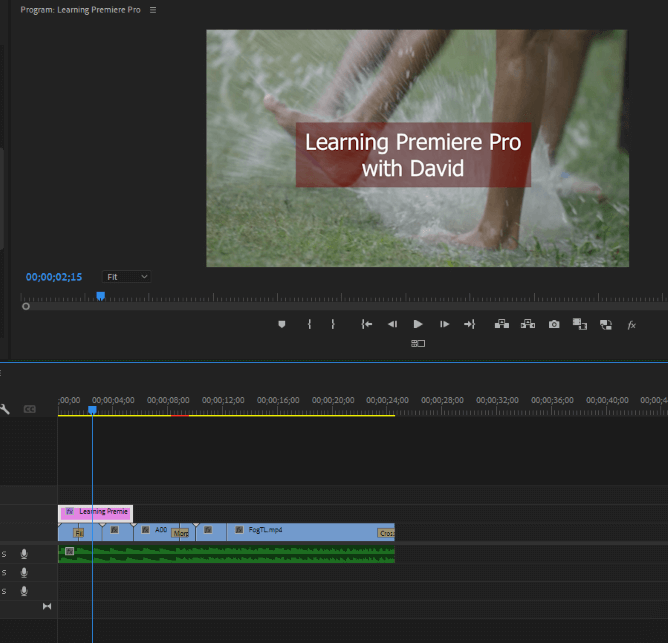
You can always customize your titles in the Effect Controls Panel, change fonts and colors, add shadows, etc. There’s no limit to creativity.
We just did basic editing; I hope you see how simple it is. Now, let’s export our project. Click on the Export Button.
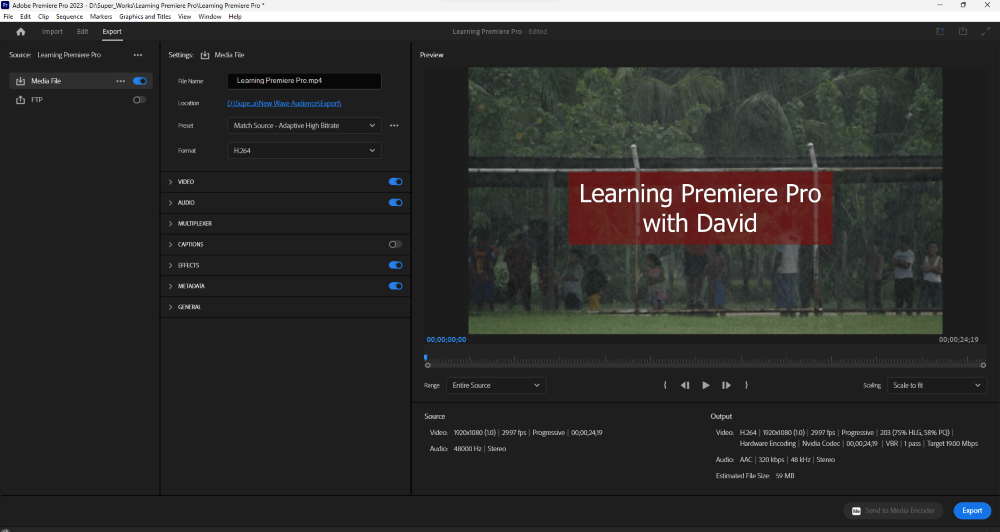
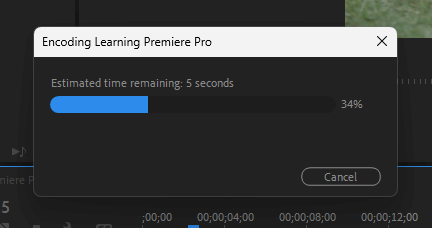
Give your project a file name, set the right location, ensure your format is H.264 (MP4), then hit Export. It might take a few minutes, depending on your PC’s speed. Sit back and enjoy while you wait for the export to complete.
There you go! Your first Premiere Pro Project is all done! Congratulations on making it here. It’s time to up your skills.
Chapter 4: Changing the Look of Your Clips
In video production, we have what we call color correction and color grading. What is color correction? Color correction ensures you have a balanced image; the exposure is not too much, and it’s not too dark, just balanced.
Color Grading, conversely, is making your image have a preferable look based on your choice. Your choice might be on the mood of the clip (angry, sad, happy), location (New York, Mexico, Africa), etc. Just making sure it has a specific and meaningful look.
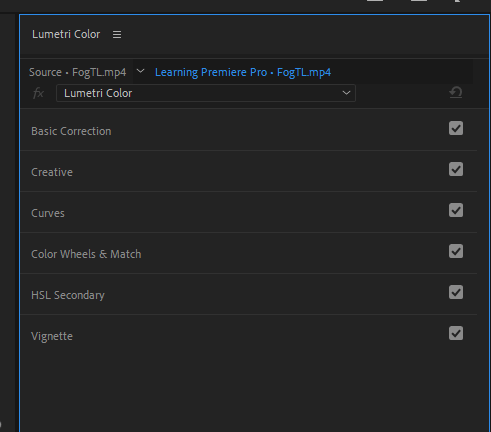
You must do this in Lumetri Color Panel to color correct or color grade. Go to Windows > Lumetri Color to Open up the Panel.
Lumetri Color has six (6) different segments; the Basic Correction segment is where you do your color correction.
To do color correction, ensure you click on the clip you want to color correct, and tweak the color and light parameters until you see that the image is balanced – no under or over-exposure.
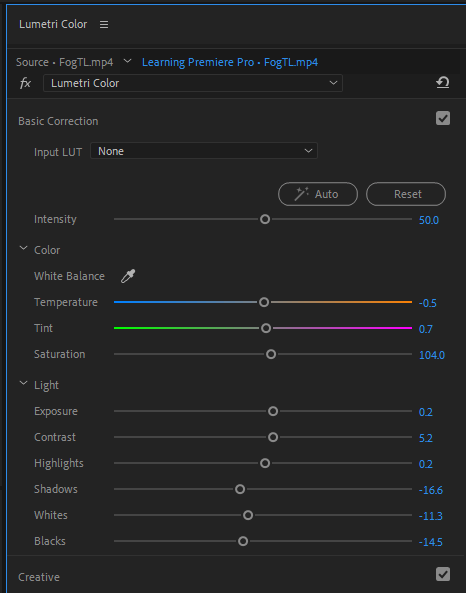
You can also use the Auto option, but as with any AI system, it’s not always accurate, so it’s better to do things yourself.
After color-correcting all your clips one by one, the next is to color-grade them based on how you want them. To color grade, you will need to create an adjustment layer.
Why do you need an adjustment layer? A color-graded project has to have the same look all throughout the project, so with the adjustment layer, we will get to add the color grade to all of our clips at ONCE.
To create an adjustment layer, go to your Project Folder Panel, open up the Assets Bin, right-click on any empty space, or click on the new icon to create an adjustment layer.
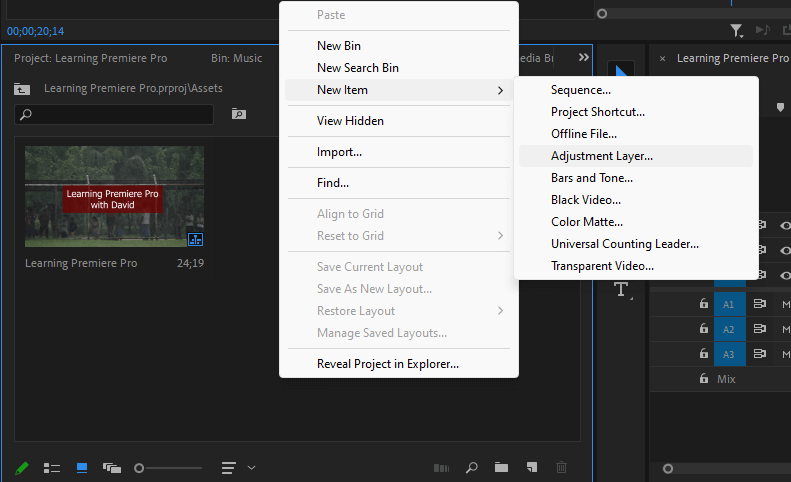
Staying organized, you can give the adjustment layer a name; I prefer to call it “ColorGrade.”
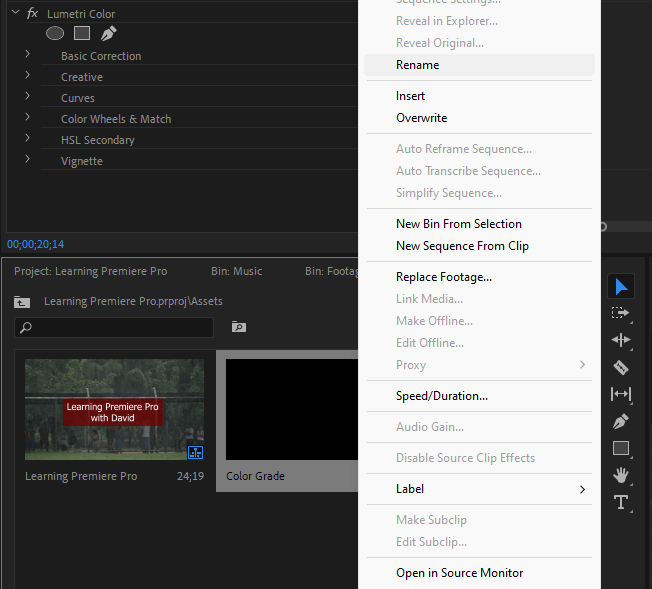
The adjustment layer works in a way that in the timeline panel, all the effects that are being applied to the adjustment layer will apply to all other clips under the adjustment layer.
So, create a new video layer immediately above all your video clips. To do this, right-click on an empty space on your video layer and click on add track.
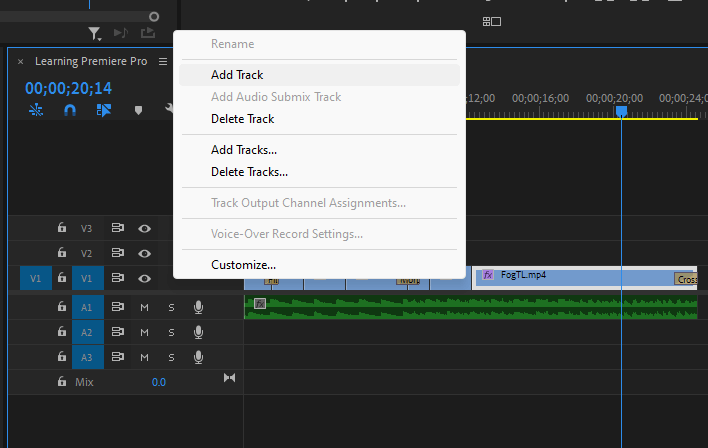
Now, drag your adjustment layer to that created video layer and drag the adjustment layer at the end to elongate it to the end of the project. Our Timeline is now like this.
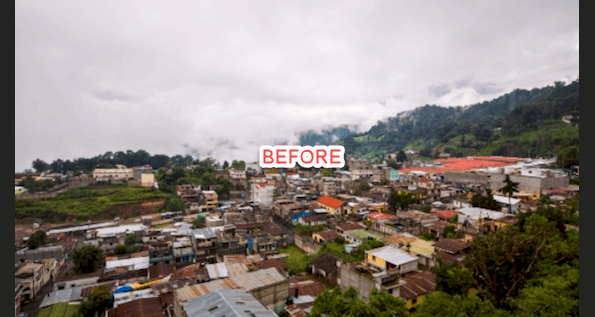
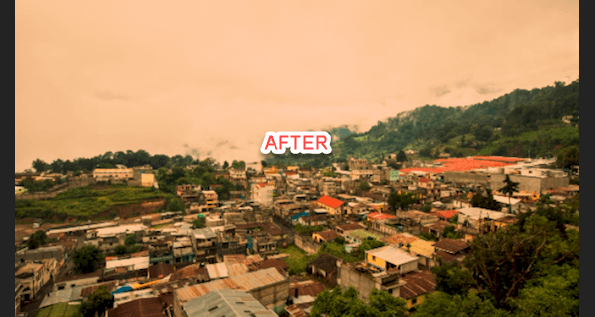
To color grade, click on the adjustment layer, head over to the Lumetri Color Panel, navigate to the Creative Section, and tweak until you’re convenient with the look. I tried to have an African look in this image. Check out the before and after.
I made a concise tutorial on color grading your project; check out the article. To fully understand how to color correct and color grade, you must take a detailed course on Color itself.
Chapter 5: Basic Audio Editing
People treat audio as secondary when editing, whereas Audio should be treated as an essential entity. Take it like this; Video is King, Audio is Queen, and both are needed to rule a kingdom.
You can make some basic edits to your audio. For example, suppose your audio is windy or has some background noise. In that case, you can remove all these unwanted elements with audio effects like DeEsser, DeNoise, Parametric EQ, High Pass, and Low Pass.
If your audio has too much Reverb or echoes, you remove it by using the DeReverb effects. You can do tons of stuff to make your audio sound professional. For instance, you can apply a Reverb and Echo fx for a devil vocal.
There’s no limit to creativity. There’s what we call Sound Design in Video Production.
Chapter 6: Troubleshooting
As with any software, you will definitely encounter one or two problems. The more you learn, the more you know, and that is experience!
Your PC might be lagging at some point, you might experience some “not responding” moment, you might be editing, and Premiere Pro will just crash, don’t fret; it happens.
Adobe has a forum where you can log complaints or checkout threads of people who have faced that kind of issue before, and you will get a solution. Sometimes, you just need to clear your cache, update your driver, free up space on your PC, and you’re good to go!
Final Thoughts
Adobe Premiere Pro is one of the best professional video editing software to learn. Throughout my years of using it, I haven’t regretted using Premiere Pro. I have tried other software, but Premiere Pro will always be my go-to.
Now that you have a basic knowledge of using Premiere Pro don’t just stop there; the journey has only just begun. I have some other great articles you can check out; they will definitely benefit you.
You can also take some advanced courses to up your skill. There’s still a lot to learn, including Adobe Dynamic Linking, Tracking, MultiCam, etc.
If you have any questions for me, drop them in the comment section, it will be my pleasure to respond immediately. Remember, Rome wasn’t built in a day. The more you do it, the more you know. Happy Editing!