
Go to the “effect” tab, open the video transition folder, then open the dissolve folder, select film dissolve effect, and drag it to the end of your video clip to have a fade-out video effect in Adobe Premiere Pro.
Transitions in video editing are a valuable tool for video creators because they help to tell the story, convey a mood or tone to viewers, and introduce the next scene. Different transitions have different meanings and symbolism, so they should be used thoughtfully and always serve the story.
Apart from using the fade-out effect for video transition in Adobe Premiere Pro, it can also perform some other purposes. The fade-out effect can be combined with sound effects to draw the viewer’s attention and get their mood connected to the scene.
In this article, I will explain how to fade out a video, how to use the opacity effect to fade out, and finally how to set fade-out as your default transition in Adobe Premiere Pro for a fast workflow. Let’s get started.
Table of Contents
How to Fade Out Video in Premiere Pro
When creating a video, you may want to fade the video out. Fading out can help create a smooth transition between two scenes. The Fade-out effect is not among the effect listed in the video transition, effect panel in adobe Premiere Pro. Thus, in Adobe Premiere Pro, there are a few different ways to do this. You can use the opacity effect, or the film dissolves transition.
Go to the effect panel, and open the video transition folders, after which you open the dissolve folder, here you will find the film dissolve transition effect.
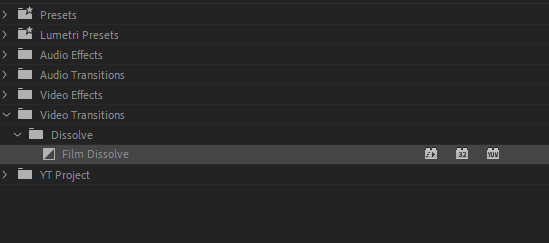
Select and hold the Film Dissolve transition effect, Drag and drop Film Dissolve at the end of the video clip and this will automatically create Fade out effect.
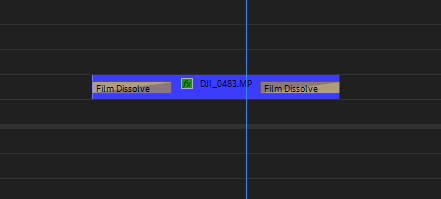
It is as well possible to change the length of the fade-out effect in Premiere Pro. To do this, click on the small box that appears at the end of your video clip, and drag it to the length you want.
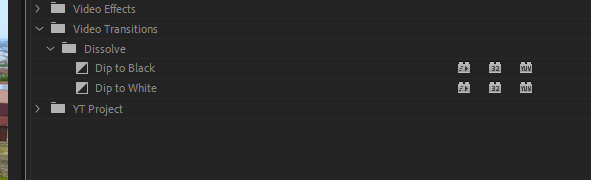
Another method to achieve this fade out is through the use of another video transition called dip to black this transition can as well be found under the dissolve transition.
How to Use Opacity Effect to Fade Out in Premiere Pro
Another way to fade out in Premiere Pro is with the use of the opacity effect. To do this, select the video clip. Then, go to the effect control panel and locate the opacity function.
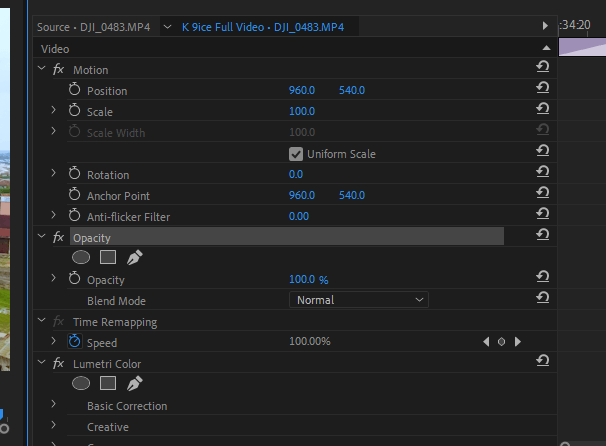
Now, click on the stopwatch icon next to Opacity. Then, keyframe the opacity by clicking on different points in which you want this keyframe to affect your video clip. Then set the opacity to 100% at the beginning of the clip, and 0% at the end. This will then perform the fade-out transition.

How to Set Fade Out as Default Transition in Premiere Pro
You may find it tasking to be going up and down into the effect panel to repeat adding the fade-out effect as a transition. To make things easy, just add it as a default transition.
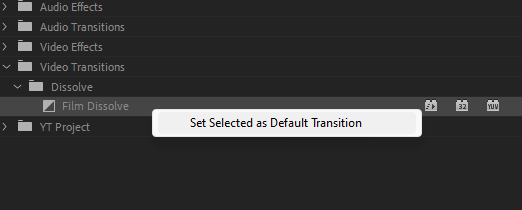
To do this, go to the effect panel, video transition, open the dissolve folder, and select film dissolve. Now right-click on it and select the option that pops i.e set selected as default transition. To apply this just right-click on the space between two video clips and then apply.
Conclusion
The fade-out effect in Premiere Pro is a simple and effective way to transition between scenes in your video. Goto Effects Panel, search and select film dissolve effect, and drag it to the end of your video clip. With just a few clicks, you can add this professional touch to your project.
But, the fade-out effect can sometimes be overused and become quite repetitive and boring. At the same time, it can make your video project look amateurish and can be difficult to control or manage.