
You’re done editing and you want to export your project, congratulations, you’ve already done the tough part. Welcome to the simplest part of the whole project.
Call me Dave. As a professional video editor, I’ve been editing for the past 10 years and yes, you guessed right, I am still editing! As an expert in Adobe Premiere Pro, I can boldly tell you that I know the nukes and crannies of Adobe Premiere.
In this article, I’m going to show you a detailed step-by-step guide on how to export your amazing project. It doesn’t matter if you are on Mac or Windows, they are both the same step. The whole process is very simple and straightforward.
Table of Contents
Step 1: Open up Your Project
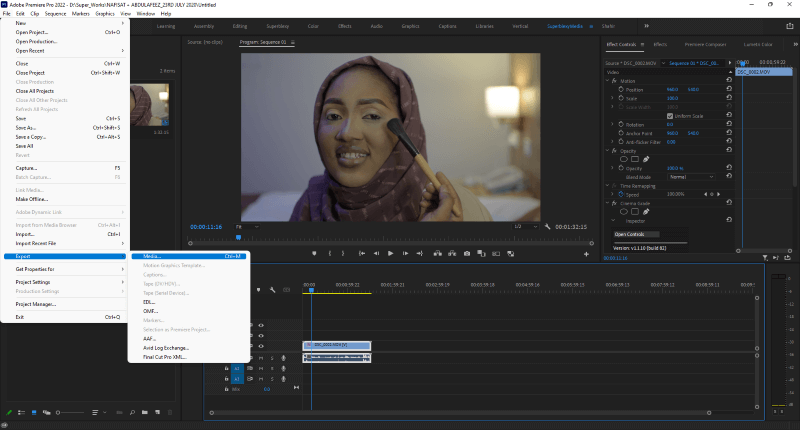
I believe you already have your project opened, if not, kindly open up your project and follow me. Once you’re done opening your project, go to File, then Export, and finally click on Media as shown in the image below.
Step 2: Customize Export Settings
A dialog box will open up. Let’s go through it.
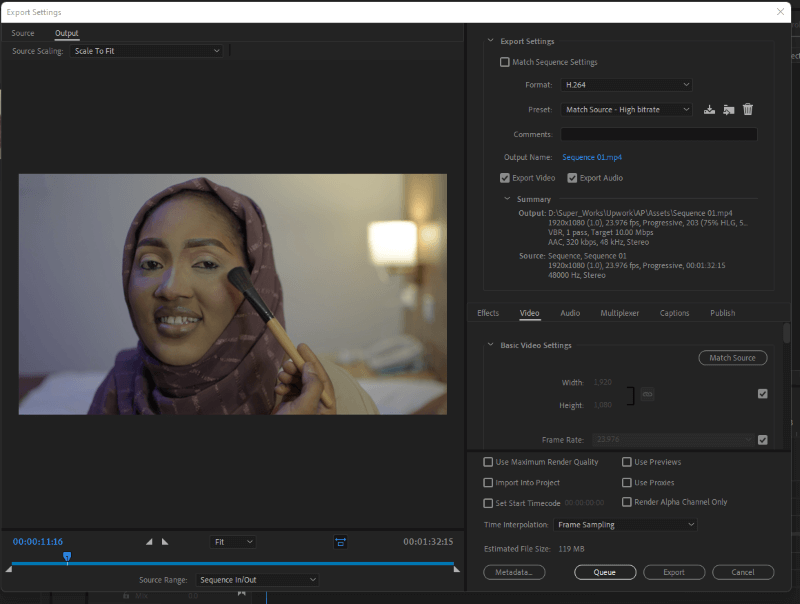
You don’t want to tick “Match Sequence Settings” as it will not allow you to customize the settings and get the best quality as much as possible.
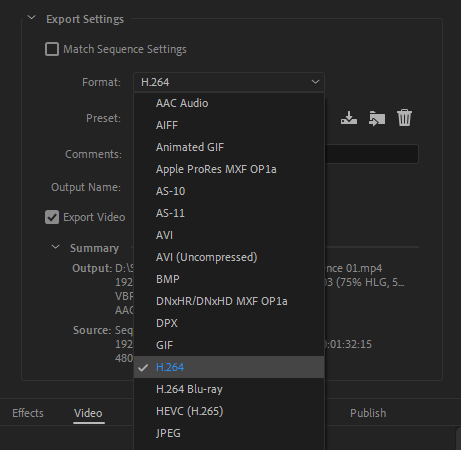
Format: The most common video format is MP4, which is what we are going to export. So, you click on “Format” then look up H.264 and this will give us the MP4 video format.
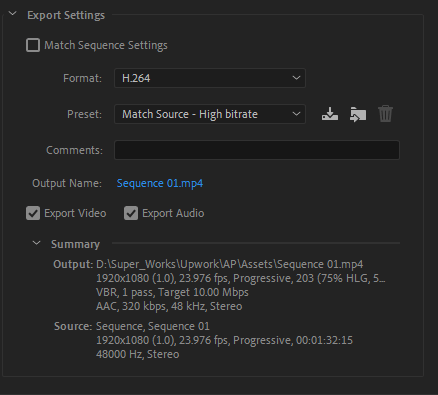
Preset: We are going to use Match Source – High Bitrate Then we are going to tweak the settings.
Comments: You can put anything you want just to describe the video you’re exporting so Premiere can add it into the video metadata, this isn’t necessary though, but you can go ahead with it if you want, it’s your choice 🙂
Output Name: You have to click on it and set the path you would want your video exported to. Make sure you know and confirm the location you’re exporting to so you won’t end up looking for what is not lost. Also, you can rename your project here, give it any name you want.
The next part is pretty explanatory, if you want to export video, check the box! Audio? Check the box! Want to export either of the two? Check the two boxes! And finally, if you want to export just one of them, check the one you want to export.
The last part of this section is the Summary. You get to see the whole informations of your sequence/project. Also, you see where your project is exporting to. Do not freak out, we will get to each part.
Step 3: Handle Other Settings
We only need to tamper and understand the Video and Audio sections. As this is the necessary part.
Video
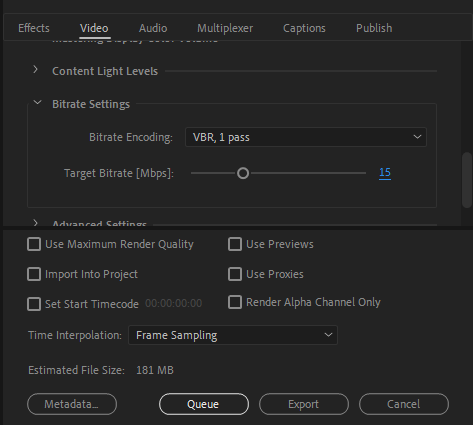
We only need the “Basic Video Settings” and “Bitrate Settings” under this section.
Basic Video Editing: Click on “Match Source” to match the dimension settings of your sequence. This will match the width, height, and frame rate among others of your project.
Bitrate Settings: We have three options here. CBR, VBR 1 Pass, VBR 2 Pass. The first one CBR is a Constant Bitrate Encoding which will export your sequence at a fixed rate. We don’t have anything to do with that. Obviously, VBR is a Variable Bitrate Encoding. We are going to use either VBR 1 or VBR 2.
- VBR, 1 Pass as its name implies is only going to read through and render your project once! It’s faster. Depending on the duration of your project, this will export in no time.
- VBR, 2 Pass will read through and render your project two times. Ensuring it’s not missing any frame. First pass analyzes how much bitrate is needed and second pass renders the video. This will give you a cleaner and more quality project. Don’t get me wrong, VBR 1 Pass will also give you a better export.
Target Bitrate: The higher the number, the bigger file and the more quality file you get. You should play with it. Also, note the Estimated File Size displayed beneath the dialog box to see how well you’re going. I recommend you don’t go below 10 Mbps.
Maximum Bitrate: You get to see this when you’re using VBR 2 Pass. It’s called Variable Bitrate because you can set the bitrate to vary. You can set the maximum Bitrate you would want.
Audio
Audio Format Settings: The Industry Standard for Video Audio is AAC. Ensure that is used.
Basic Audio Settings: Your audio codec AAC. The Sample Rate should be 48000 Hz which is the industry standard. Also, your channels should be in Stereo unless you want to export in Mono or 5:1. A stereo gives you a Left and Right Sound. Mono channels all your audio in one direction. And 5:1 will give you a 6 surround sound.
Bitrate Settings: Your bitrate should be 320 kps. Which is the industry standard. You can go higher if you want. Note that this will affect your file size.
Step 4: Expert Your Project
Congratulations, you’re all set. You can now click on Export to have your project rendered or encoded. Seat back, relax, and take a coffee as you watch your project export and ready for the world to see.
What do you think? Was this as easy as I said? Or it was kinda tough for you? I’m sure not! Kindly let me know what you feel in the comment section.