
Adding an adjustment layer to your project is very simple. Right-click on anywhere in your Project Folder Panel. Then, New Item > Adjustment Layer. The adjustment layer will be created in the Project Panel and ready for use in your timeline.
Adjustment layers are transparent layers that you can apply an effect to which will affect multiple layers at once and will help to achieve your great and amazing creative idea.
Imagine the amount of time you will need to add a single effect to more than ten layers. A lot of time! An adjustment layer is a good way to speed up your editing process since it allows adding effects and deleting changes without ruining the original footage.
Without this adjustment layer, you would need to make changes to each layer individually, which will make the editing process very slow and challenging.
Therefore, in this article, I am going to show you different ways to create an Adjustment Layer, how to add the adjustment layer created into your project, how to add effect on your adjustment layer and I will show you different uses or power of an adjustment layer.
Table of Contents
How to Create An Adjustment Layer in Premiere Pro
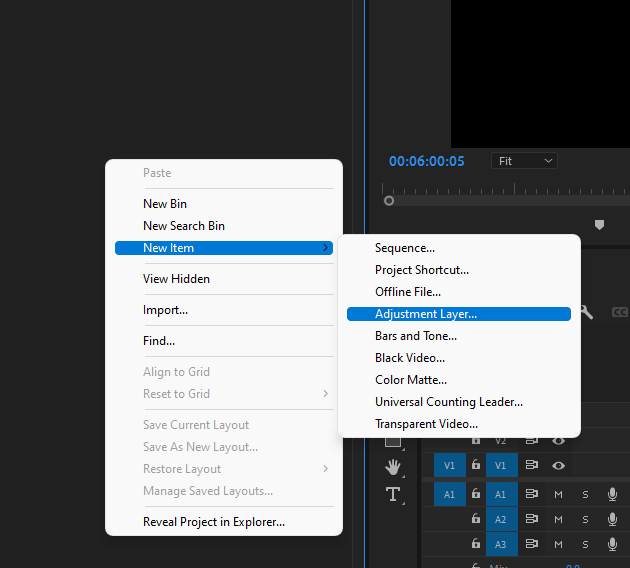
Yes, you have your project opened and also you have your sequence opened as well. If not please do! Let’s get ready to start. Right-click on anywhere in your Project Folder, and click on New Item > Adjustment Layer.
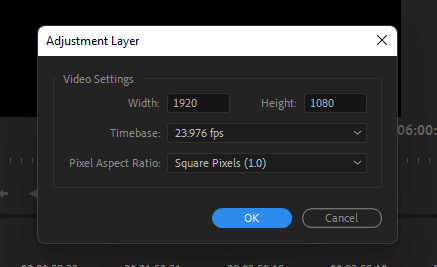
A dialogue box will pop which will allow you to modify the settings for the adjustment layer. The dimension shown will match your sequence settings by default, but you can change the dimension if there is a need, once you are done, click on OK.
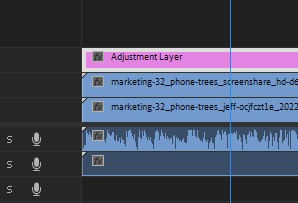
Select the adjustment layer from your Project panel and drag it to a video track above the clips on your Timeline that you want to perform magic on.
Select your newly created adjustment layer. Open up the Effect Panel, find your desired effect, drag it to the adjustment layer, or better still, double-click on the effect to add it to your adjustment layer.
Then go to your Effect Controls Panel to tweak the parameters of the selected effect as wanted. To hasten it up you can press Shift + 5 to open it up right away. You can thank me in the comment section for this tip.
Fastest Way to Create An Adjustment layer
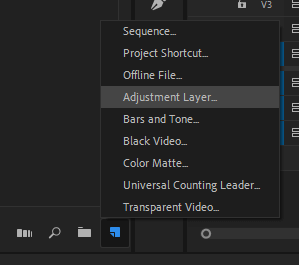
As a smart user of Premiere Pro, you can as well create the Adjustment layer by clicking on New Item in your project panel’s bottom-right corner, Select that icon and you will see the option for the adjustment layer.
Once you’ve done this I mean created the adjustment layer, hold and drag the adjustment layer to the project timeline. Then you can kick-start your editing.
Benefits of the Adjustment Layer in Premiere Pro
One important thing to know about an adjustment layer is that it allows you to add more than one effect into a single adjustment layer. For instance, you can decide to add Lumetri Color fx and at the same time add crop fx. In short, you can add as much as possible fx you want.
Also, with the Adjustment layer, you can use many layers to achieve your desired idea. But the greatest of all is that It is possible to use an adjustment layer in the editing panel and still maintain the properties in the original footage.
Adding Creative Effect to An Adjustment Layer
There are lots of effects to add to the adjustment layers. Effects like, lumetri color, gaussian blur, warp stabilizer, and special effects among others.
To add any of this, just go to your Effects Panel, select your adjustment layer, and search for the effect you want to add. Any effect of your choice be it internal or external effect, you are free to use anyone. Double-click on it to apply it to your adjustment layer.
Hurry and go Effect Controls, don’t hurry too much, you have the maximum time in this world. Well, no time to check the time though. Quick way, click on Shift + 5 to open up your Effect Controls and tweak the parameters of the added fx as wanted.
Pro tip coming from me: it’s advisable you create more than one adjustment layer to avoid a bad color effect. For example, an adjustment layer for color correction, and another for color grading.
Conclusion
The adjustment layer is a lot of fun to work with, as they allow you to experiment with your growing visual effects skills in a user-friendly way. They can also save you time, both in how long it takes you to add and amend your effects and through handy preset functions. Also, it helps to stay organized.
Now that you’ve learned how to add an adjustment layer, I want to believe you can now create an adjustment layer into your clips effectively. A recap, right-click in your project folder panel > New Item > Adjustment Layer. There you go. Then drag it to your timeline and do your thing.
Are you facing any challenges regarding the adjustment layer? You shouldn’t go through a lot of stress, just drop a question for me in the comment box, and I will respond to it promptly.