
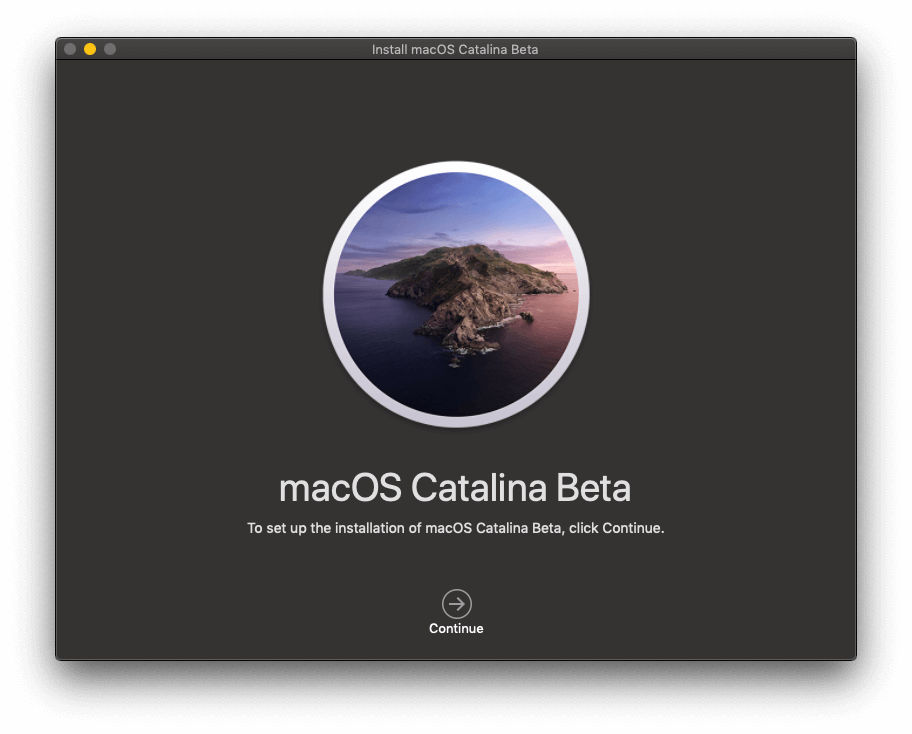
The public beta of macOS 10.14 Catalina is now available, and I successfully installed it in around an hour. So far I like it, but there’s so much more to explore. I encountered a few performance issues along the way, and I’m not alone. Read on to learn about the problems that I and others had, along with how to fix them.
I installed the beta on my MacBook Air, a machine that’s not critical for my day-to-day work. Until the official version has been out for a few days or weeks you might want to hold off on installing it on a Mac you rely on. Every new operating system introduces new bugs that take time to squash, and installing a beta is more about finding the bugs rather than avoiding them.
But I know many of you won’t be able to help yourselves, so this article has been written to show you how to solve a variety of problems you might encounter when installing and using Catalina, including installation problems due to insufficient disk space, third party apps being slow to open, and more. I hope you find it helpful.
Table of Contents
- Before You Start
- Installing macOS Catalina
- Using macOS Catalina
- Issue 4: Catalina Runs Slow on Startup
- Issue 5: Some of Your App Icons are Missing in Finder
- Issue 6: Your Playlists Are Missing in the New Music App
- Issue 7: Third-Party Apps are Slow or Unable to Open
- Issue 8: You’re Unable to Sign Into iCloud
- Issue 9: Your Desktop Icons Have Vanished
- Issue 10: You Can’t Empty the Trash
- Issue 11: You Have No Internet
- Issue 12: Wi-Fi Disconnecting
- Optimizing macOS Catalina
- Reverting Back to Mojave
- Final Thoughts
Before You Start
But before you get started installing Catalina, here are some questions you need to answer first.
1. Will Catalina Even Run on My Mac?
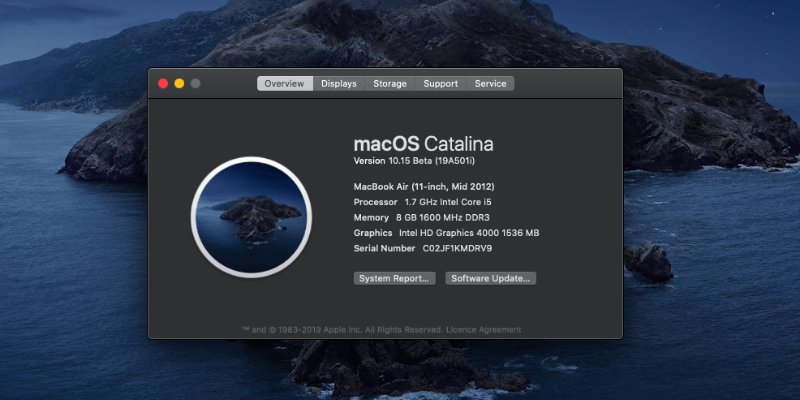
Not all Macs can run Catalina—especially older ones. In my case, it will run on my MacBook Air, but not my iMac. Apple’s Catalina Preview includes a list of which Mac models are supported.
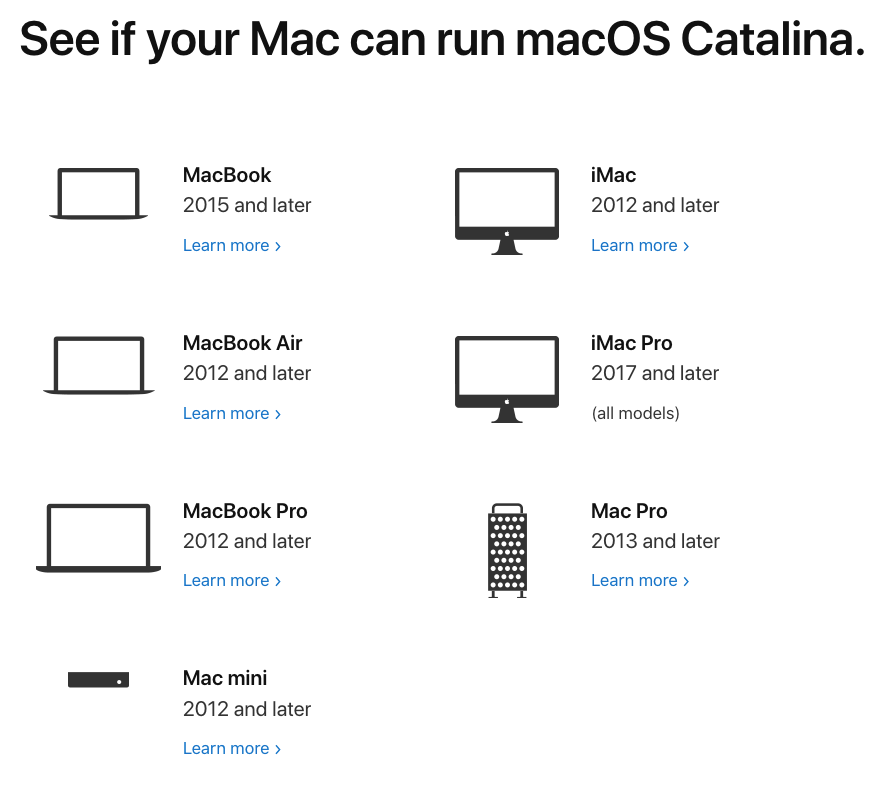
The short version: If your Mac is running Mojave, then you can safely install Catalina on it.
2. Should I Postpone the Upgrade Because I Still Rely on 32-Bit Apps?
Apple is moving forward, and with this update, they’re dragging you with them. Older 32-bit apps will not work under Catalina. Do you rely on any? You may have noticed Mojave warning you that some of your apps are not “optimized” for use on your Mac. Chances are, they’re 32-bit apps. If you rely on them, don’t upgrade!
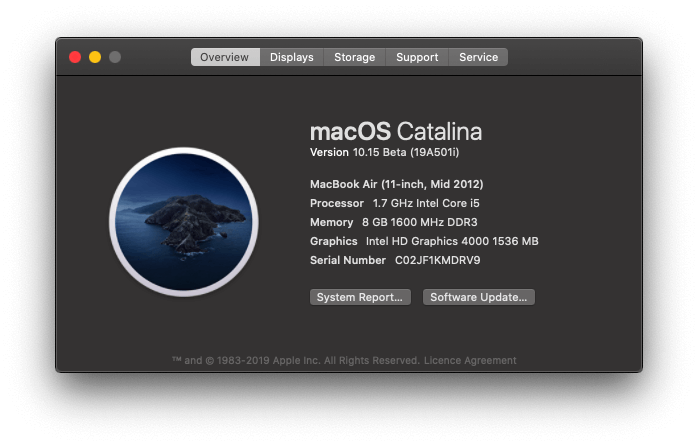
Here’s how to use macOS to identify 32-bit apps:
- Choose About This Mac from the Apple menu at the top left of your screen.
- Select About This Mac.
- Click on the System Report button near the bottom.
- Now select Software > Applications and wait for your apps to be scanned.

Notice there are quite a few 32-bit apps on my MacBook Air. That includes several apps and browser extensions that I forgot were even there, like Evernote’s Clearly and Web Clipper extensions. Since I don’t need those apps and services anymore, I can safely remove them.
If you do have some 32-bit apps, don’t panic. Many will probably be updated automatically. If it says “Apple” or “Mac App Store” in the “Obtained from” column, there should be nothing to worry about.
If some of your third-party apps that are still 32-bit, you have some homework to do. First, update all of your apps—there’s a good chance the latest version will be 64-bit. If not, check with the app’s official website (or email the support team) before upgrading. Your life will be much easier if you do this before upgrading your operating system.
If the developers aren’t working on an update, chances are they’re no longer serious about the app, and it’s time to start looking for a replacement. Delay your upgrade to Catalina so you can continue using the app in the meantime, and start testing some alternatives.
Or if you’re intentionally using an old version of an app to avoid upgrade costs, the time to pay up has arrived. Upgrade the apps you actually need, then install Catalina. You can’t stay with Mojave forever!
3. Are My 64-bit Apps Ready for Catalina?
Even if an app is 64-bit, it may not be ready for Catalina. Developing upgrades takes time, and unexpected problems can arise. Some apps may not work with Catalina for several weeks after it is available. Check their official website for any warnings of problems.
4. Do I Have Enough Free Space on My Internal Drive?
Catalina needs plenty of free storage space to download and perform the upgrade. The more free space you have, the better. Plus, it will take you less time to back up your Mac.
As a guide, the beta installation files that I downloaded were 4.13 GB, but I needed even more additional space for the upgrade to be performed. The most effective way we’ve found to free up wasted disk space is to use CleanMyMac X to remove system junk and Gemini 2 to find large duplicate files, and we’ll cover a few more strategies later in the article.
5. Have I Backed Up My Data?
I hope you back up your Mac regularly and have an effective backup strategy. Apple recommends that you back up your computer before all major macOS upgrades, just in case. It’s good to have a Time Machine backup of your data, and Apple can use that if necessary when performing the upgrade.
You may also like to use the advanced features of an app like Acronis True Image, and also clone your entire drive using Carbon Copy Cloner. To learn about the range of software options, check our best Mac backup software review.
6. Do I Have Enough Time Right Now?
Upgrading your operating system is time-consuming, and complications may arise. Performing a hard drive cleanup and backup will add even more time to the procedure.
So make sure you have at least a few hours to spare and are free from distractions. Trying to squeeze it into a busy day at work isn’t the best idea. Doing it on the weekend will maximize your time and minimize your distractions.
Installing macOS Catalina
Installing macOS Catalina Beta 2 was quite a smooth process for me. I’ll briefly explain my experience, then go through some issues that I and others had, along with how to fix them. You’re unlikely to encounter all these issues, so feel free to navigate through the Table of Contents to learn how to fix your own issues.
I hope your experience is as straightforward as mine! First, to install the public beta I had to join the Apple Beta Software Program and download the macOS Publish Beta Access Utility.
I installed the beta from About This Mac. Alternatively, I could have opened System Preferences and clicked Software Update.
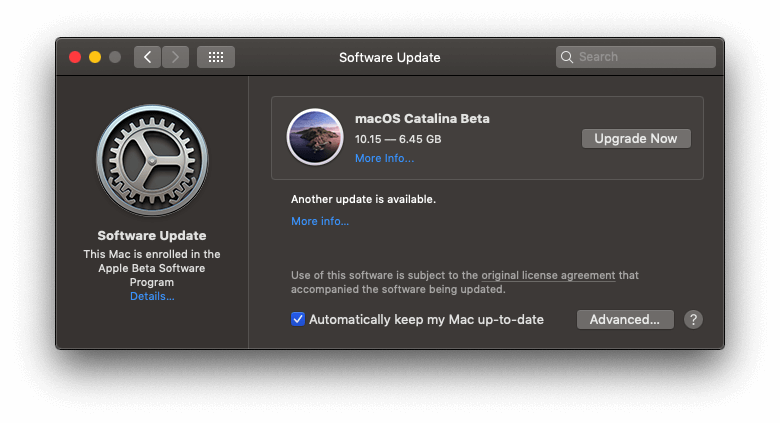
The installer estimated the download would take 10 minutes.
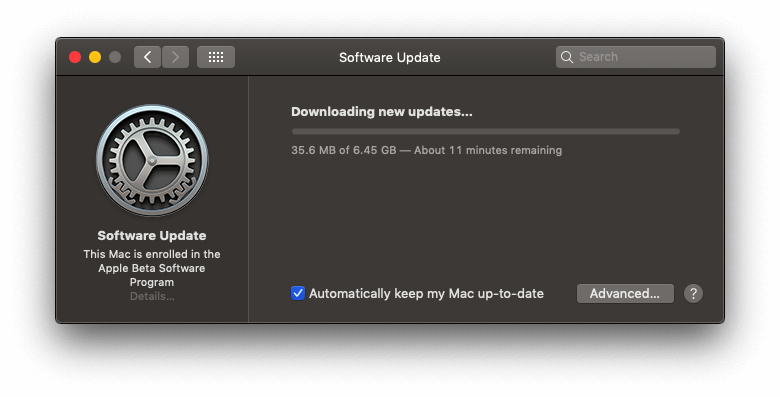
But it took just a little longer. 15 minutes later it was done, and I’m ready to install. I click through the usual screens.
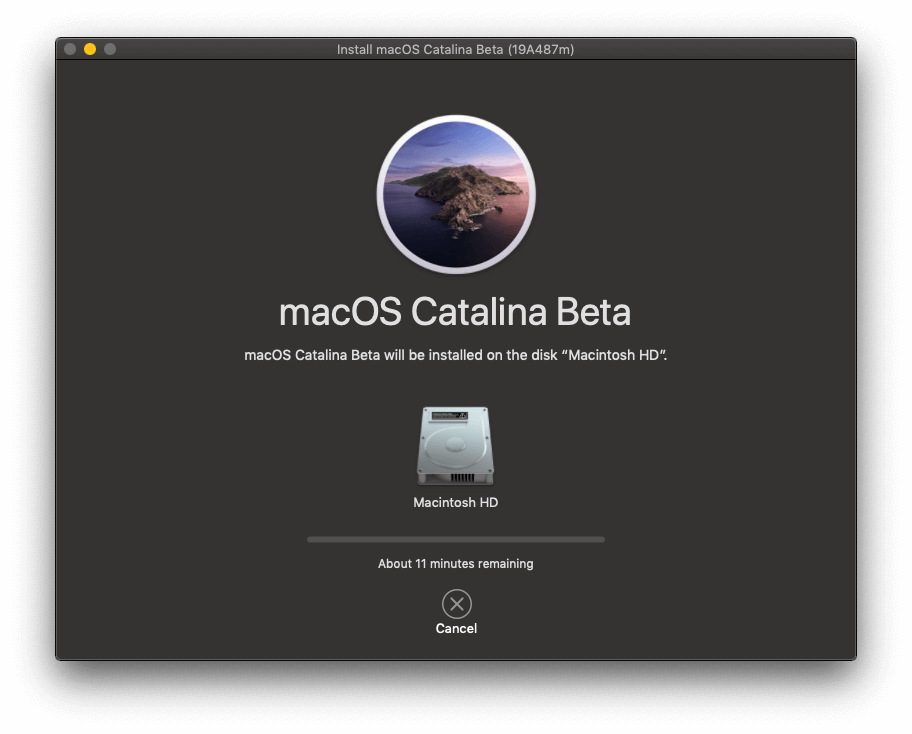
The install was estimated to take 15 minutes. After 4 minutes my Mac was restarting and the waiting began—no further intervention was required from me.
The complete install actually took about an hour in total. It was quite a smooth update though took significantly longer than estimated. But I think an hour for a system update is pretty good.
But not everyone was so lucky. Although I didn’t encounter any issues at this point, others did:
Issue 1: Installation Won’t Start or Complete
Some people were not able to complete the installation of Catalina. Either the install wouldn’t start or would freeze before it completes.
Fix: Many users have reported that restarting your Mac and trying again can help. One beta tester reported the installer hanging, leaving his drive unbootable. That’s a worst-case scenario, and you may need to consider reverting to Mojave until there is a fix. Refer to the instructions later in this review.
Issue 2: You Don’t Have Enough Disk Space to Complete the Installation
The Catalina installation files will take up some space after you download them, then they’ll need working space on top of the space the operating system will take up once installed. Make sure you have more space than you think you’ll need.
One user on Reddit was told during installation that he was 427.3 MB short. He deleted more than enough room to receive a similar error message, but this time he was 2 GB short! So he did a thorough cleanup of 26 GB of files. Now the Catalina reports that he’s 2.6 GB short. There may be a bug there.
Fix: Whether you encounter the same problem or not, you’ll have a much easier time of backing up your computer and installing Catalina if you have as much space available as possible. Check out our best Mac cleaner review, or see our recommendations in “Before You Start!” above.
Issue 3: Activation Lock Won’t Let You Access Your Mac
Activation Lock is a feature on Macs with a T2 Security Chip that allows you to erase and deactivate your Mac if it is stolen. Apple Support reports that this will cause problems installing Catalina (as it should assuming that Mac is stolen).
If you use Recovery Assistant to erase a Mac that has Activation Lock enabled, you won’t be able to unlock it when reinstalling macOS. (52017040)
Fix: Assuming your Mac isn’t (still) stolen, open the Find My app on another device or from the iCloud.com website. Remove your Mac from the associated Apple ID, then restart your Mac and reinstall Catalina.
Using macOS Catalina
Now that Catalina is running, a new adventure begins. Does Catalina run correctly? Do my apps work? Is the system stable? Here I encountered a few problems, and we’ll also cover major issues reported by Apple and other users.
Issue 4: Catalina Runs Slow on Startup
If your Mac runs slow on startup, there may be a number of problems you can fix yourself that aren’t directly caused by Catalina:
- You may have too many apps that open automatically on startup,
- You may be running out of storage space,
- You may have an internal hard drive rather than SSD (solid-state drive).
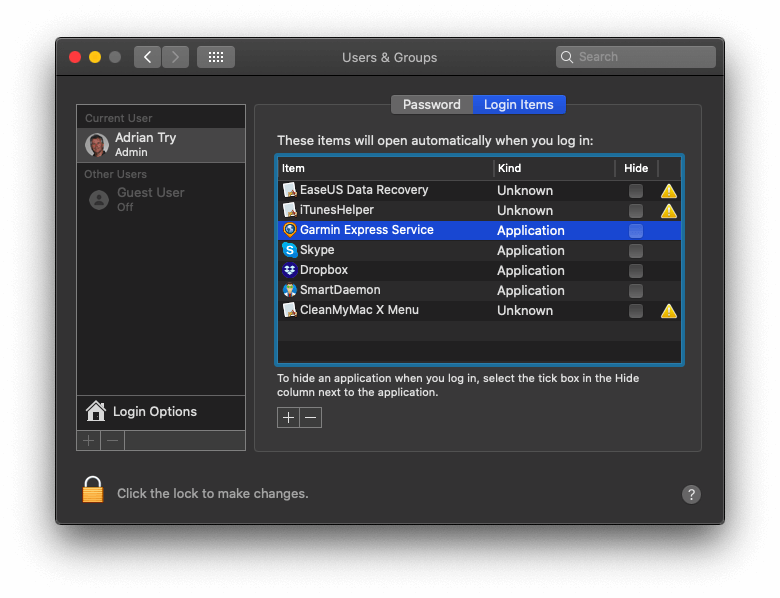
Fix: To decrease the number of apps that open automatically when you log in:
- Click the Apple logo at the top left and select System Preferences,
- Navigate to Users & Groups then Login Items,
- Highlight any apps that don’t need to open automatically, and click the “-“ button at the bottom of the list.
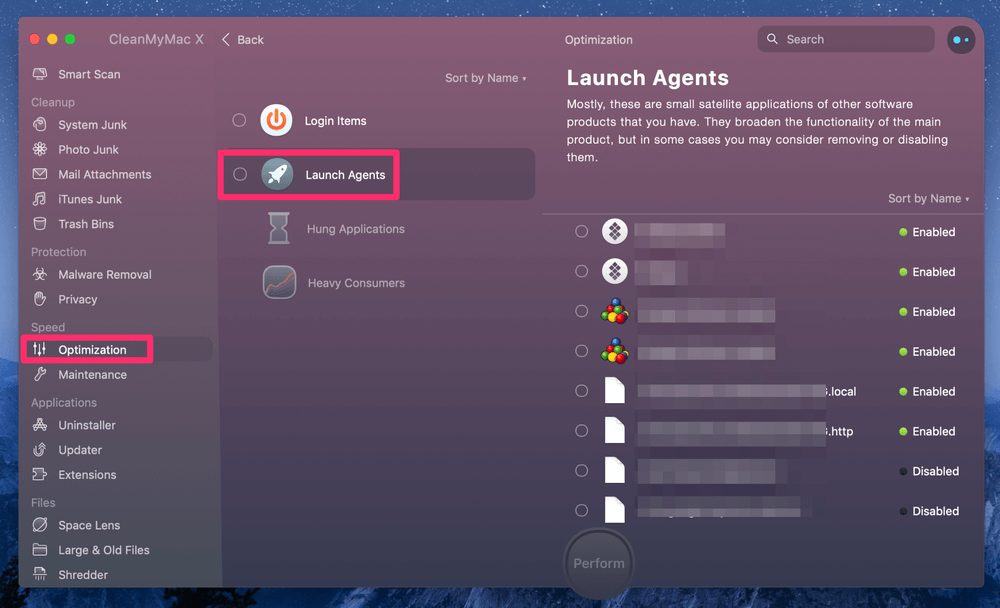
CleanMyMac will let you disable automatically starting apps that have been missed with the method above. Under the Speed module go to Optimization / Launch Agents and remove any further apps you don’t want to open at login.
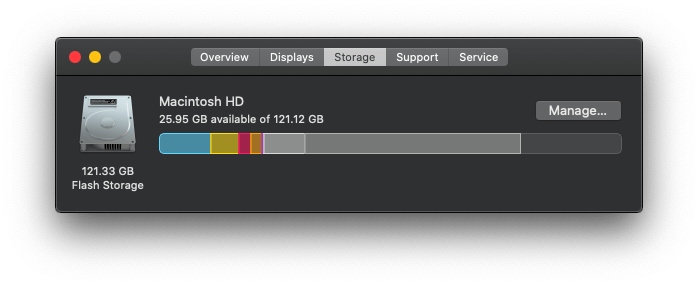
To check how full your startup disk is:
- Click the Apple logo at the top left and select About This Mac,
- Click the Storage button at the top of the window,
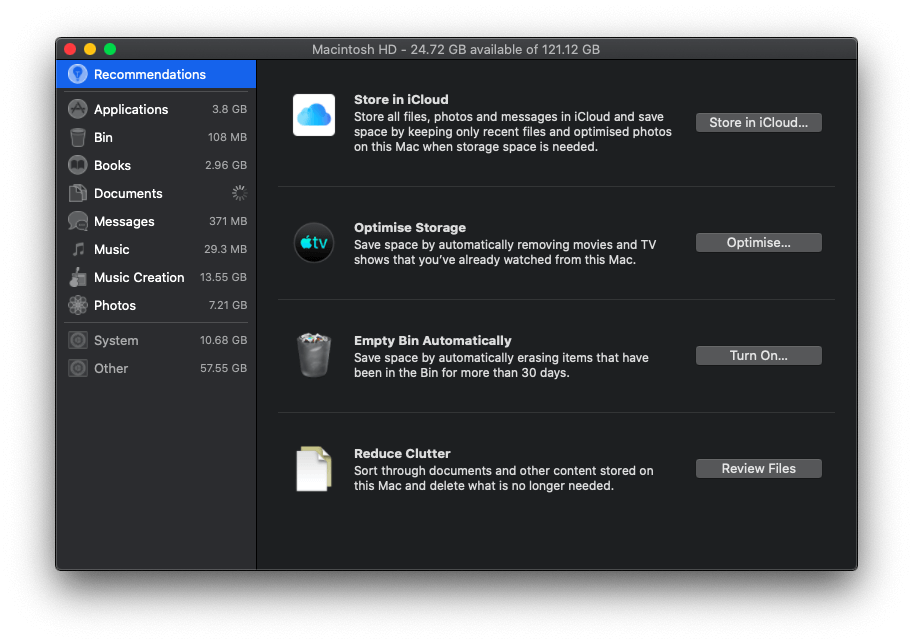
- Click the Manage button to see a detailed overview of what types of files are using the most storage. That’s a good place to start a cleanup.
- You may also find the Store in iCloud, Optimize Storage, Empty Bin Automatically and Reduce Clutter buttons helpful.
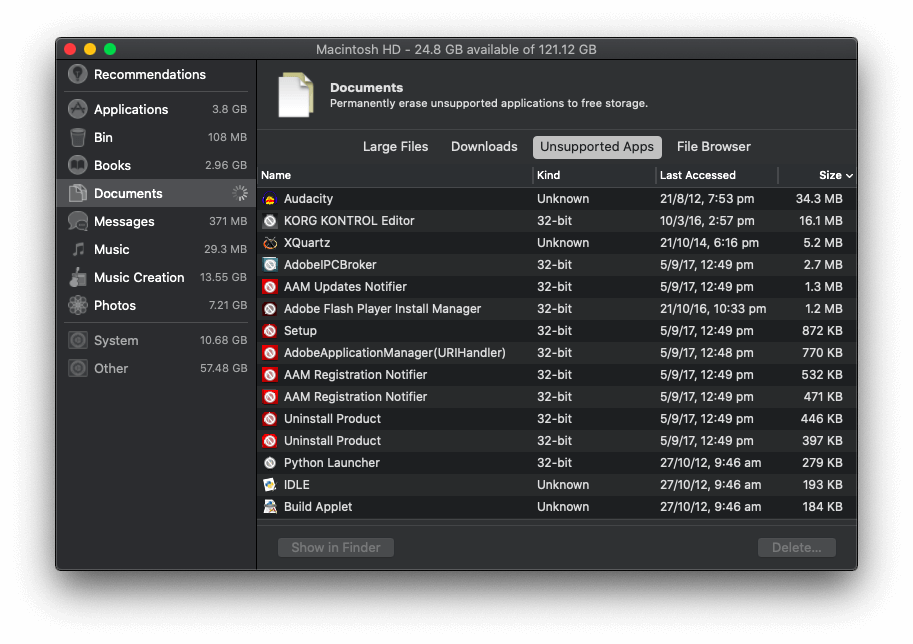
Under Reduce Clutter you’ll find a new feature: Unsupported Apps. There’s no point keeping these apps on your Mac since they won’t run, and deleting them will free up space.
Finally, upgrading your startup drive to an SSD is the easiest way to boost the performance of your Mac. When SoftwareHow’s JP upgraded his MacBook his startup speed went from thirty seconds to just ten!
Issue 5: Some of Your App Icons are Missing in Finder
Apple Support warns that under certain circumstances some of your app icons may be missing:
If you used Migration Assistant to migrate your data to a Mac running macOS Catalina beta, you might see only third-party applications when clicking the Applications shortcut in the Finder sidebar. (51651200)
Fix: To get your icons back:
- Open Finder, then select Finder / Preferences from the menu,
- Navigate to the Sidebar tab at the top,
- Select then remove the application’s shortcut that is displaying incorrect results.
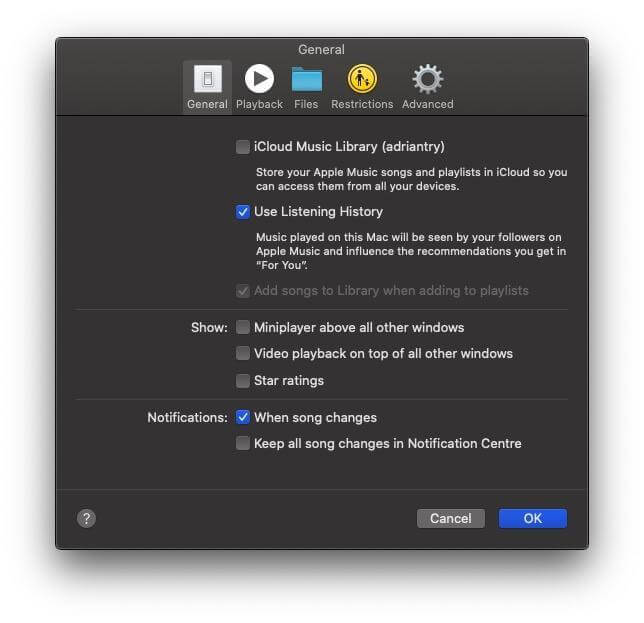
Issue 6: Your Playlists Are Missing in the New Music App
Now that iTunes is gone, I was keen to try the new Music app. But when I first opened it I noticed my playlists were gone. There’s only one there: the Genius playlist.
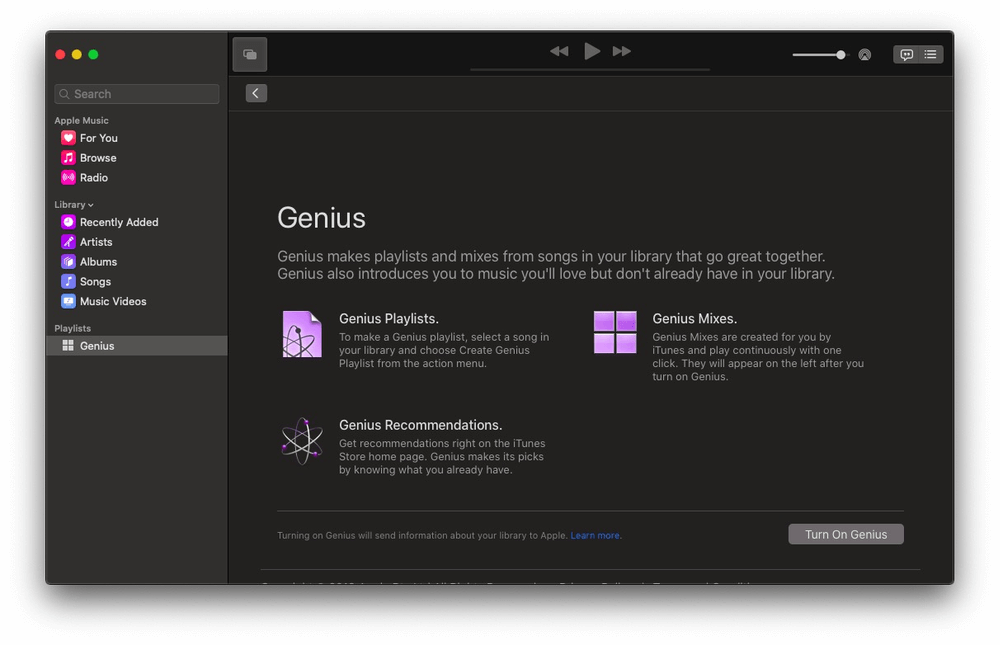
Fix: The fix is easy: turn on iCloud Music Library. Go to Preferences and on the General tab, you’ll see a tick box that does just that. Wait for everything to sync, and your playlists will be back!
Issue 7: Third-Party Apps are Slow or Unable to Open
If some of your third-party apps crash or won’t open, first make sure you have the latest version. Open the Mac App Store and go to the Updates tab. Click the Update All button. Then check for any updates for apps you downloaded from elsewhere.

If you rely on any apps that are not currently compatible with Catalina, hopefully, you discovered that before updating to it. If not, you’ll have to wait for an update or look for an alternate program.

Issue 8: You’re Unable to Sign Into iCloud
When starting the Catalina beta for the first time, I (and others) couldn’t sign into iCloud. There was a System Preferences notification that led us on a wild goose chase:
- There was a message: “Some account services require you to sign in again.” I clicked Continue.
- I got another message, “Some account services require you to sign in again.” I clicked Continue.
- I went back to Step 1, a frustrating endless loop.
Fix: Fortunately, this problem was fixed by the next beta update a few days later. If you’re still having this problem just run System Update from System Preferences.
Issue 9: Your Desktop Icons Have Vanished
Possibly related to the problem above, I noticed that all of my desktop icons had vanished. Worse still, if I tried to move something to the desktop or create a new file or folder there, it didn’t appear. The same thing happened when taking screenshots: they never appeared on the desktop.
To investigate, I opened Finder and looked at the Desktop folder. The files were actually there! They hadn’t been deleted, they just weren’t being displayed on the desktop.
Fix: I decided to try restarting my MacBook, and all of the desktop icons were there when I logged in.
Issue 10: You Can’t Empty the Trash
I right clicked on my Trash Can and selected “Empty Bin”. After the usual confirmation dialog, everything seemed to go well. Except the trash looks like it’s still full! When I open the trash to see what’s in it, I get an empty Finder window with a “Loading” message that never goes away.

Fix: I assumed the issue may be related to the one above when I couldn’t log in to iCloud, and I think I was right. The same beta update that fixed that problem fixed this one too.
Issue 11: You Have No Internet
I haven’t experienced this problem myself, but some users report not being able to access the Internet after installing Catalina. In each case, they were using the Little Snitch utility, which isn’t yet compatible with Catalina.
Fix: There are two ways to get internet access back:
- Uninstall Little Snitch,
- Change your Little Snitch settings that give it access to the nightly update. That update is compatible with Catalina.
Issue 12: Wi-Fi Disconnecting
Has your Mac’s Wi-Fi frustrated you since upgrading to macOS Catalina? You’re not alone. The release of macOS 10.15 seems to be buggier than usual.
Fix: We created a step-by-step guide for this macOS Catalina WiFi issue here.
Optimizing macOS Catalina
Now that you’ve installed Catalina and sorted out any issues with the new operating system and your apps, you may still find yourself wanting to boost your Mac’s performance.
1. Declutter Your Desktop
Many of us are used to saving everything on the desktop, but that’s never a good idea. A cluttered desktop can seriously slow down a Mac. And additionally, even with Catalina’s new Stacks feature, it’s simply bad for organization.
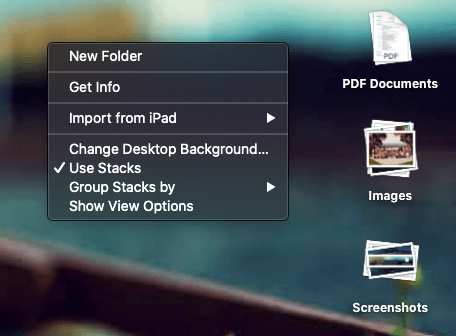
Instead, manually create some new folders under Documents, and move your files in. If you have to, just have the documents you’re currently working with on your desktop, and file them away afterward.
2. Reset NVRAM and SMC
If your Mac is not booting correctly after updating to Catalina you can perform a simple NVRAM or SMC resetting. First back up your computer, then follow these detailed step-by-step instructions from Apple Support:
3. Check Your Activity Monitor
Third-party apps can potentially slow down or freeze your Mac. The best way to pinpoint the cause of such problems is your Activity Monitor.

You’ll find Activity Monitor in your Utilities folder under Applications, or just use Spotlight to search for it. Once you identify a problem app, check the developer’s site to see if there’s an update, or turn to an alternative one.
From Apple Support:
Reverting Back to Mojave
If you discover your favorite app doesn’t work, or for some reason decide that it isn’t time to upgrade quite yet, you can downgrade back to Mojave. You can always give Catalina another try in the future.
The easiest way is to restore a Time Machine backup if you have one. Just make sure that the backup was created when you were still running Mojave, and your computer will be put back to the same state it was at that time. Of course, you’ll lose any files you created after the backup.
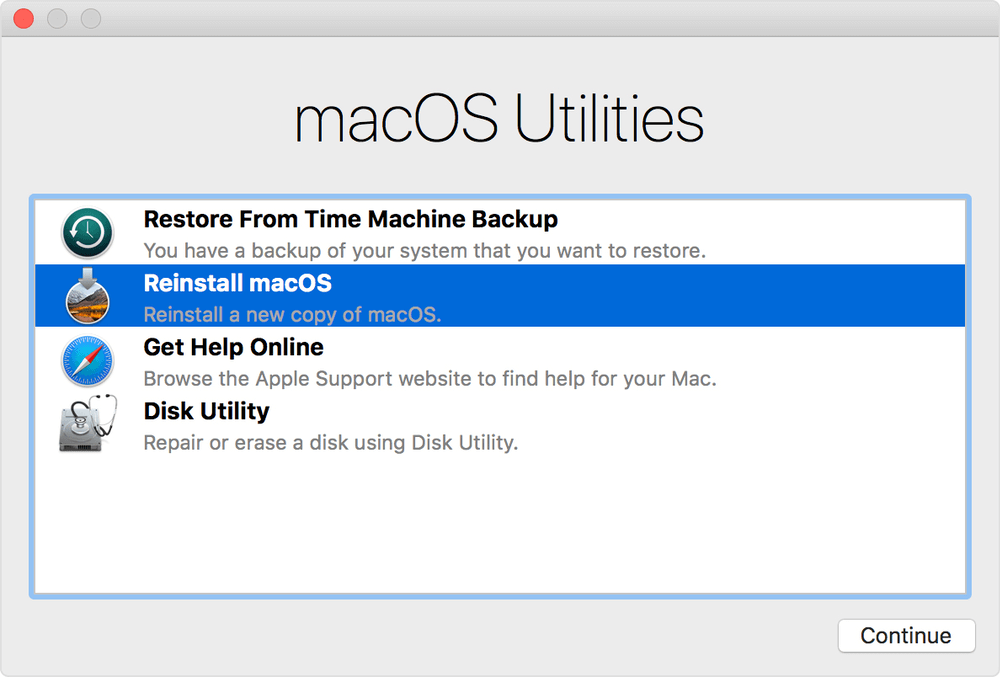
Restart your Mac and hold Command and R to get to macOS Utilities.
- Make sure your backup drive is connected to your Mac, then choose the Restore From Time Machine Backup option.
- Click Continue, then choose the backup that you want to restore from.
- Click Continue after you choose the latest backup and then wait for the restore to complete.
Alternatively, you can do a clean install of Mojave. You’ll lose all of your data and will need to restore it from a backup. Apple Support has instructions about how to do this from your Recovery Partition.
Final Thoughts
Operating system updates can be time-consuming. In previous years it took JP two days to update his Mac to High Sierra and less than two hours for Mojave. It only took an hour for me to install Catalina on my seven-year-old 11” MacBook Air.
Maybe I’m cheating because JP included the time it took to clean up and back up his Mac, and I’d already done that. And the hour doesn’t include time spent installing Catalina beta updates as they become available. In any case, that type of steady improvement version after version is encouraging.
From here I look forward to exploring the new Music and Apple TV apps, making use of enhancements to the Photos and Notes apps, using my iPad as a second screen (well, once I upgrade my iMac later this month), and automatically logging in when I’m wearing my Apple watch.
Which features are you looking forward to most? How was your upgrade experience? Did your Mac run slowly after updating to macOS Catalina? Let us know in the comments.
Hi dave,
with Catalina the upload is extremely slow, the Creative Cloud update tool does not work and everything feels very sluggy.
Steve tested the new versions himself. Now nobody test new versions any mor, they just push them out for the customers to test them.
I use 10.15.7, but its still crab. Unfortunately downgrad is not possible, because its a new computer. I am happy still to have my 8 years old Macpro for emails, scanning documents etc.
Hi Dave. You could try starting your computer in Safe Mode. To do that, hold down Shift when you first turn it on (until the Apple logo appears). Alternatively, you could do a fresh reinstall of Catalina. This will wipe your drive, so hopefully, you backed it up before performing the upgrade. Hold down command-R as your computer starts to enter Recovery Mode, and you’ll find an option to reinstall Catalina in the menus.
Installed Catalina, entered sign in password as normal and was offered a “screen time” options window. Didn’t want any so clicked “continue” screen froze. Switch off but returns to frozen screen . HELP
Catalina is very laggy. May have to uninstall unless there’s a fix. Any suggestions?
Hi SF. Issue 4 and 7 above, along with the section on Optimizing Catalina may help. Alternatively, you could try a fresh install of Catalina. This will wipe your drive, so make sure you back up first. Boot into Recovery Mode by holding down command-R when your computer starts, and install Catalina from there (you’ll find that option in the menus).
I have catalina. Its slow as everyone says. I want to reset. Do I need to download the whole catalina again, or does it reset from the OS it has now?
I just installed Catalina and all of my photos look terrible now.
I’ve just installed Catalina on my iMac….however, it’s not accepting my log in for iCloud…..and when I log into iCloud mail …..it says I’m already logged in. When I go to my ADMINISTRATOR….iCloud works fine…but not on the other side.
How do I fix this?
Catalina On macbook pro 2015 8g ram HDD 500gb. This software eats my ram Like french friends. It slows my make screen responsive and apps when it hits 6gb. Im not going to update to this software when they release public one. It’s so bad for device that are old especially with less memory ram.
I am running Catalina Public Beta3 on my Mac Mini ‘14. Now it says there’s an update available but Software update can’t find the server. And there are no software update prefs in the library folder to be found… (remove this file used to do the reset trick…)
Hi Hugo. Good news. As you may already know, today Catalina was officially released!