
CyberLink PowerDirector
Summary
CyberLink PowerDirector is intuitive (you’ll hear me say that word a lot), speedy, and amazingly user-friendly, but it does not offer the same high-quality video editing tools that some of its competitors do.
If your priorities are to save time while creating your next home movie project, you’re exactly the kind of person that PowerDirector was designed for. Perfect for editing handheld videos (such as high school graduations and birthday parties) or creating slideshows to show to the family, PowerDirector does an excellent job of making the video editing process as painless as possible for users of all levels.
However, suppose you endeavor to create high-quality videos for commercial use or have already taken the time to learn a more advanced video editing program. In that case, you’re probably better off sticking with competitors such as Final Cut Pro (Mac) or VEGAS Pro (Windows).
What I Like:
– Incredibly quick and painless to learn the software and start creating basic videos.
– An intuitive user interface that makes it easy to find the tools you’re looking for.
– Several AI features (Body Effects, Object Detection, Sky Replacement, Motion Tracking, and more) help make you more efficient and your videos look better.
– Built-in video templates enable even the most technically illiterate users to create entire videos and slideshows in minutes.
– Editing 360 videos was just as simple and easy to do as editing standard videos.
What I Don’t Like:
– Some of the effects are far from professional or commercial quality.
– Advanced video editing tools in PowerDirector offer less flexibility than competing video editors.
Is PowerDirector easy to use?
It is without question the easiest video editing program I have ever used. Designed to minimize the headaches you’d have to work through learning more advanced software, PowerDirector offers a number of tools that enable users of all skill levels to easily splice together simple videos in a matter of minutes.
Is PowerDirector worth it?
Yes, I think PowerDirector is worth its cost. It has several easy-to-use features and has implemented many AI tools to help your video editing process.
Who is PowerDirector best for?
Here are the key reasons you might be interested in purchasing PowerDirector:
- The target audience for your videos is friends and family.
- You need a cheap and effective way to edit 360 videos.
- You don’t plan on making a hobby out of video editing and are not interested in spending hours and hours learning a new piece of software.
Here are some of the key reasons you might NOT be interested in purchasing PowerDirector:
- You’re creating videos for commercial use and require nothing short of the highest quality videos.
- You’re a hobbyist or professional video editor who already owns and has taken the time to learn a more advanced piece of software.
Is PowerDirector safe to use?
Absolutely. You can download the software directly from the trusted CyberLink website. It does not come with any viruses or bloatware attached and poses no threat to the files or integrity of your computer.
Is PowerDirector free?
PowerDirector is not free but offers a free 30-day trial for you to test drive the software before you buy it. Almost all of the features are available for you to use during the free trial, but all videos produced during the trial will have a watermark in the lower right-hand corner.
Table of Contents
Why Trust Me for This Review
My name is Aleco Pors. Having just begun the process of learning how to edit videos in the past six months, I’m a relative newcomer to the art of making movies and the exact sort of person to who PowerDirector is marketed. I’ve used programs such as Final Cut Pro, VEGAS Pro, and Nero Video to create videos for both personal and commercial use. I have a decent grasp of the standard features of competing video editing programs and can quickly recall how easy or difficult it was to learn other video editors.
My goal is to highlight the program’s strengths and weaknesses and outline exactly which kinds of users the software is best suited for. Someone who reads this PowerDirector review should walk away from it with a good sense of whether or not they are the kind of user who will benefit from using the software.
In testing CyberLink PowerDirector, I did my best to exhaustively use every feature available in the program. I’ll be completely transparent about the features of the program I was either not able to thoroughly test or did not feel qualified to critique.
Quick Review of PowerDirector
Please note: this tutorial is based on an earlier version of PowerDirector. If you’re using the latest version, the screenshots below may look different than the version you’re using.
How Quickly and Easily Can You Create Movies?
To illustrate just how fast, clean, and simple PowerDirector’s “Easy Editor” tool is, I’m going to step through the entire video creation process for you in a matter of minutes.
Upon launching the program, PowerDirector offers the user a number of options for starting a new project, as well as the option to select the aspect ratio for the video. Creating a full movie with transitions, music, and effects can be completed in just 5 steps with the Easy Editor option.
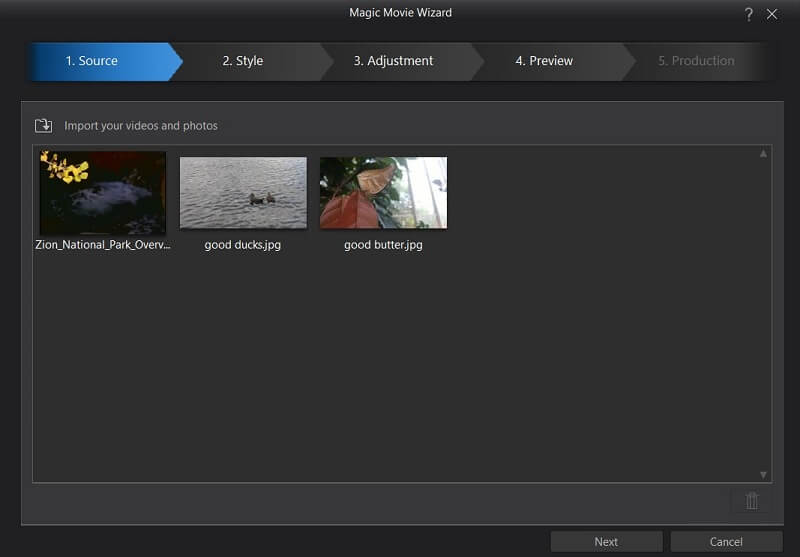
The first of our five steps is importing our source images and videos. I imported a free video I found online of Zion national park, as well as a few nature photos I took myself.
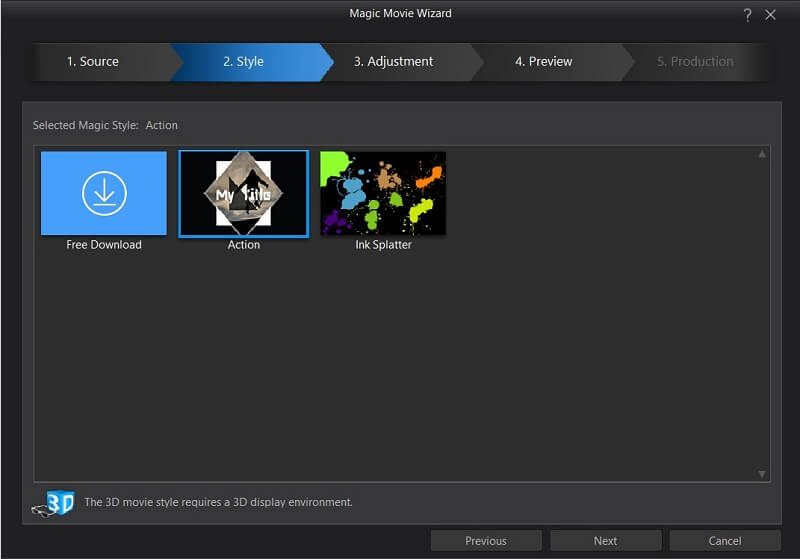
The next step is to select a “Magic Style” video template for your project. By default, PowerDirector only comes with the “Action” style, but it’s very simple to download more free styles from the official Cyberlink website. Clicking the “Free Download” button opens up a page in your default web browser that contains download links to a handful of styles you can choose from.
To install the style, all you need to do is double-click on the file after it’s done downloading, and PowerDirector will automatically install it for you. As you can see above, I was able to easily install the “Ink Splatter” style. For the purposes of today’s demo, I’ll be using the default Action style.
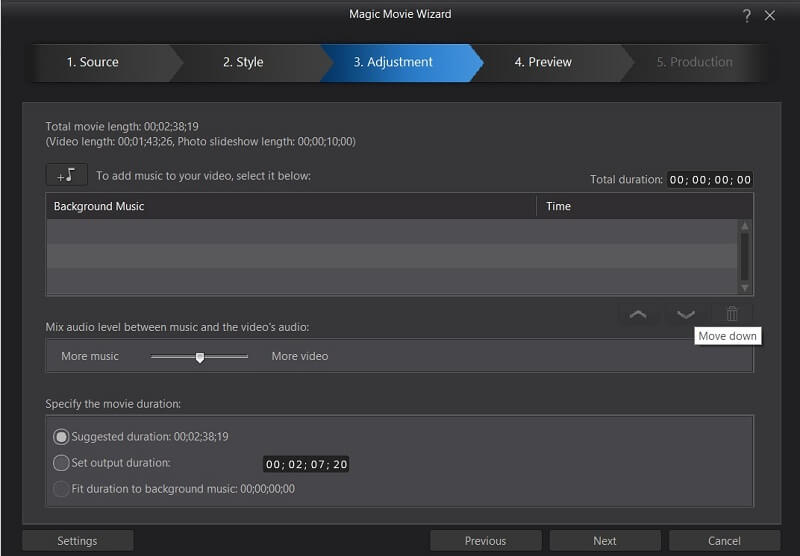
The Adjustment tab allows you to edit the background music and the length of the final video. As with most things in PowerDirector, all you have to do is drag and drop a music file into the “Background Music” tab to load it into the program. I skipped this step for this demo as I want to showcase the default song PowerDirector uses with the default Magic Style.
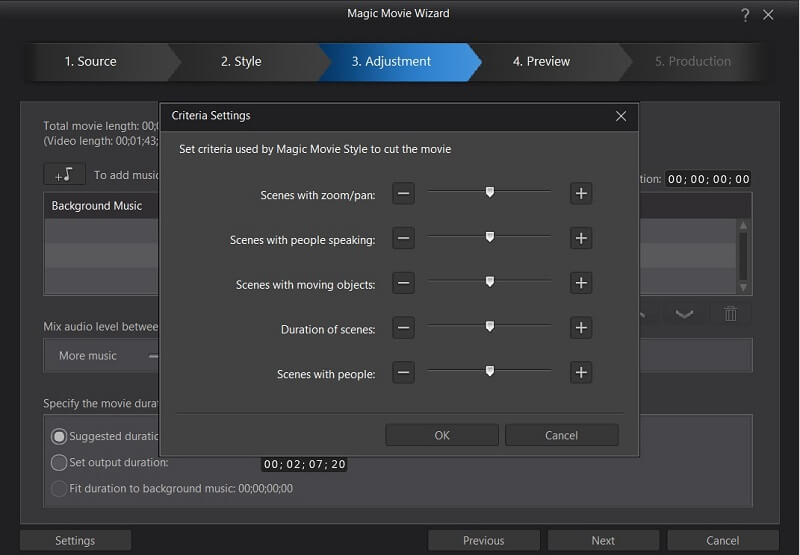
The settings tab brings up a number of simple options which allow you to highlight different features of your video. PowerDirector makes it easy to highlight features of your video, such as “Scenes with people speaking,” without having to do any of the dirty work yourself.
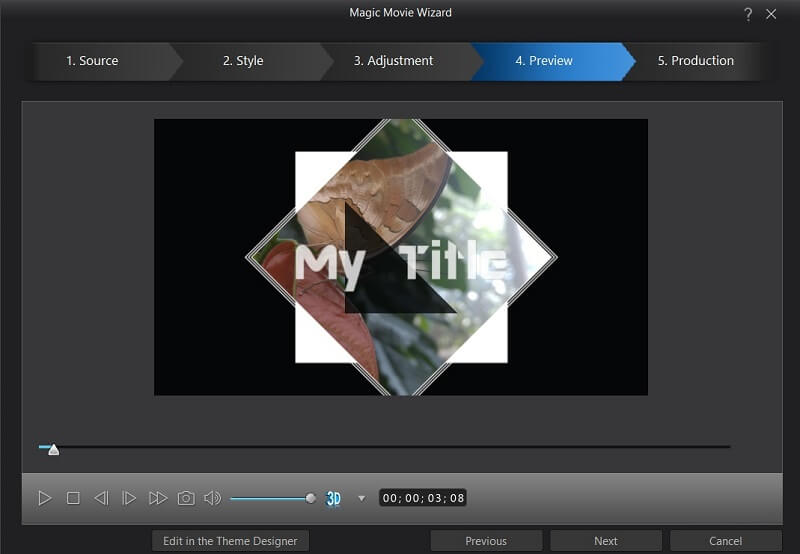
The Preview tab is where your video is automatically spliced together according to the settings and Magic Style you provided in the previous two tabs. Depending on the length of your video, it may take a few minutes for PowerDirector to get cut it altogether.
As you still haven’t told PowerDirector what you’d like your video to be called, we’ll have to briefly enter the Theme Designer. Just click the “Edit in the Theme Designer” button to tell our intro screen to say something other than “My Title”.

In the Theme Designer, we can edit the title settings (circled in red), click through the different transitions automatically created by the Magic Style at the top to edit our scenes one by one, and apply effects to each of our clips and images by selecting the “Effects” tab in the top left corner of the page. Be sure to watch the video in its entirety, as you may have to change the default text in more than one scene.
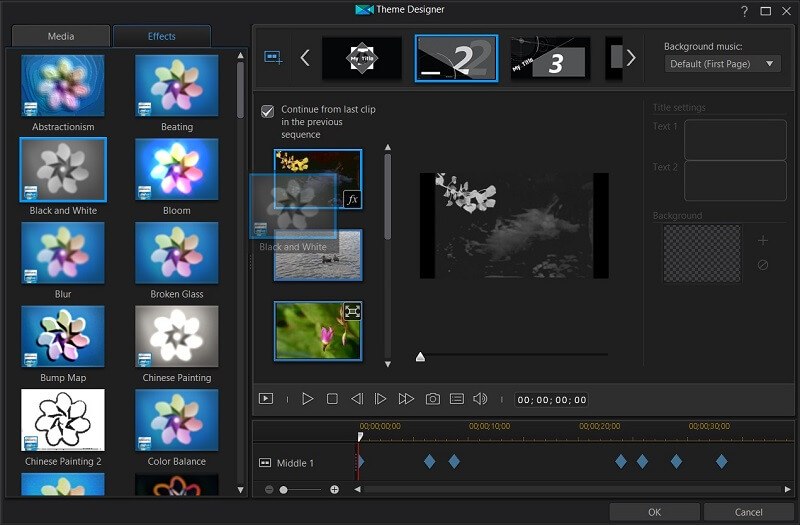
Applying effects to clips and images, like most features in PowerDirector, can be performed by clicking on the desired effect and dragging it to the desired clip. PowerDirector automatically identified the natural transitions in the video I provided it, which made it simple to apply effects to just one scene at a time without having to go in and cut up the video into different scenes on my own.
Once you’re satisfied with your changes, you can click the “OK” button in the bottom right of the screen and watch the preview again.
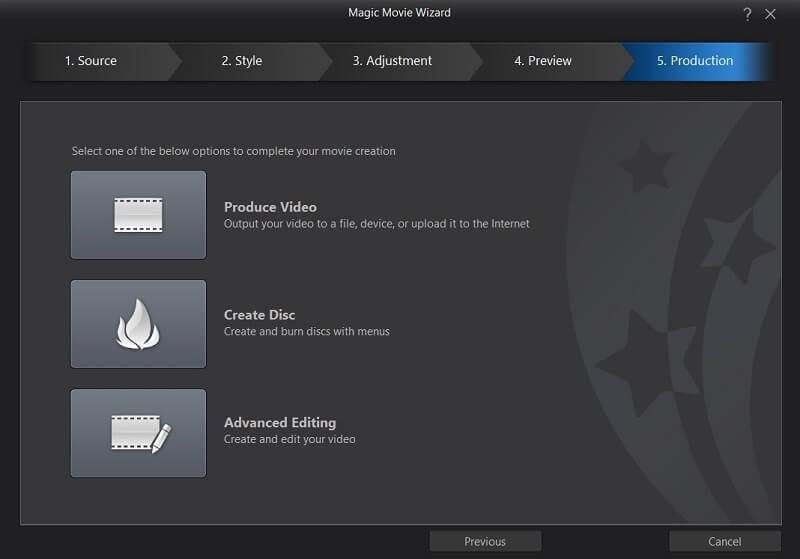
Just like that, we’re ready to pack it up and output our completed project. All three of the options provided on this screen will bring you to the Full Feature Editor. Since we’re done with our video, click on the “Produce Video” button to take us to the very final step of the project.
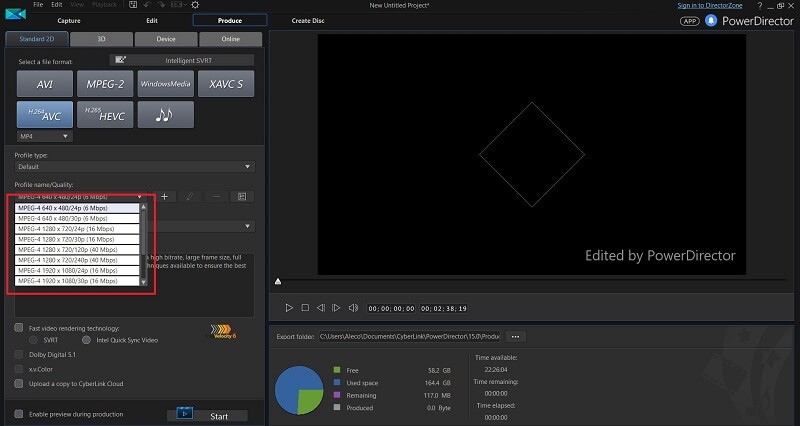
Here we can select the desired output format for the video. By default, PowerDirector suggests MPEG-4 video at 640×480/24p, so you may wish to adjust this output format to a higher resolution (highlighted in the red box). I selected 1920×1080/30p, then clicked the Start button on the bottom of the screen to begin rendering the video.
From start to finish, the entire video creation process (not including the rendering time at the end of the project) took me just minutes to complete. Though I may have a bit more video editing experience than the average intended customer of PowerDirector 15, I believe that a user with absolutely no video editing experience whatsoever could complete this whole process in roughly the same amount of time it took me.
Feel free to check out the quick video PowerDirector created for me here:
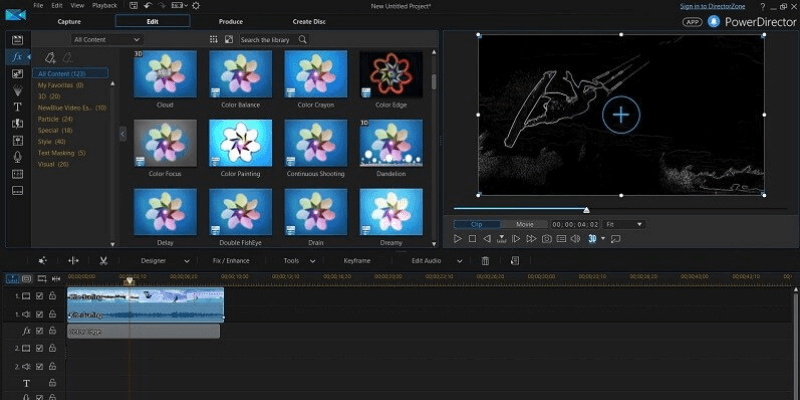
How Powerful is Full Feature Editor?
If you’re looking to have a little more control over your video, the “Full Feature Editor” is what you’re looking for. The entire program uses a click-and-drag system to add features such as visual effects, transitions, audio, and text to your movies. Once you find what you’re looking for, it’s always easy to add those effects to your project.
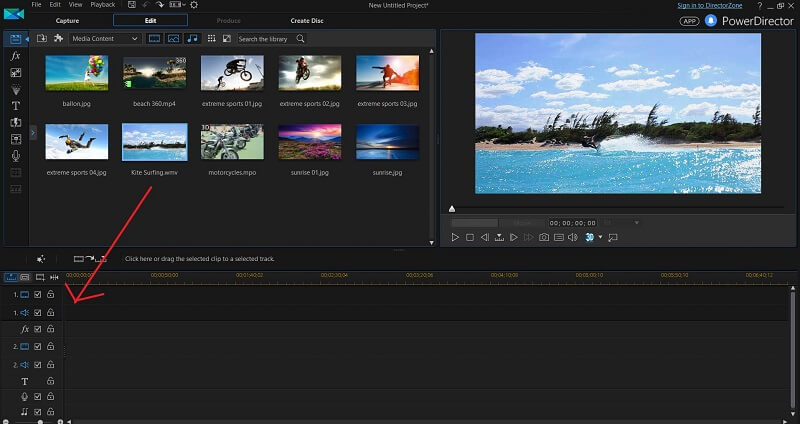
To add this video file from my Media Content tab to my project, all I have to do is click and drag it to the timeline windows below. To add new content to my Media Content tab, all I need to do is click and drag from a folder on my computer to the Media Content area. If you’re ever in doubt about how to add something to your project, it’s safe to assume that all you need to do is click and drag somewhere.

The Edit tab at the top of the screen is where you’ll do all of the actual edits for your project. The other tabs allow you to perform most of the other major features provided by PowerDirector.
You can capture video and audio from your computer’s built-in or supplementary audio devices in the Capture tab, output the video to a video file or to a number of video hosting websites such as Youtube or Vimeo in the Produce tab, or create a fully-featured DVD complete with menus in the Create Disc tab.
You can accomplish 99% of what the program has to offer in these four tabs and only need to stray into the drop-down menus at the top of the screen if you’re interested in playing around with the default settings — something I fiddled with myself only to test out the software but was never actually necessary in practice.

In the Edit tab, the majority of the effects and modifications you’re likely to apply to the video can be found in the leftmost tab pictured above. By hovering your mouse over each tab, you can see the type of content you can expect to find in that tab, as well as the default keyboard shortcut to navigate there without using the mouse.
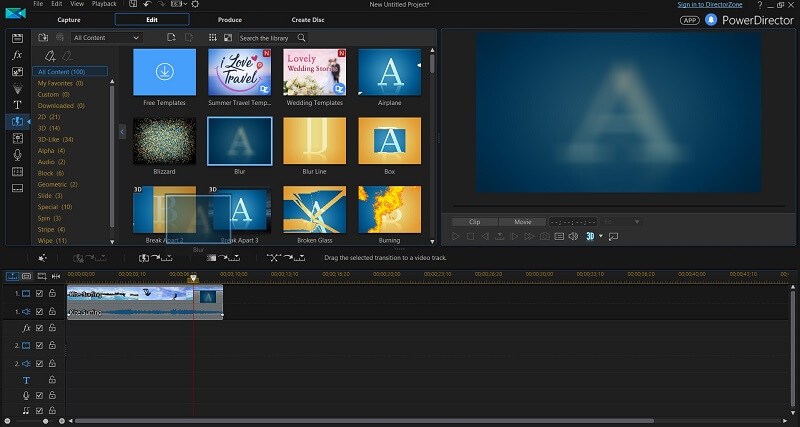
Here I’ve navigated to the transitions tab, which as you may have guessed provides the transitions you can use to link two clips together. As you also may have guessed, applying a transition to a clip is as easy as clicking and dragging it to the clip you would like to transition out of. Many of the tabs, including the transitions tab, provide you with a “Free Templates” button to download additional content for free from the Cyberlink website.
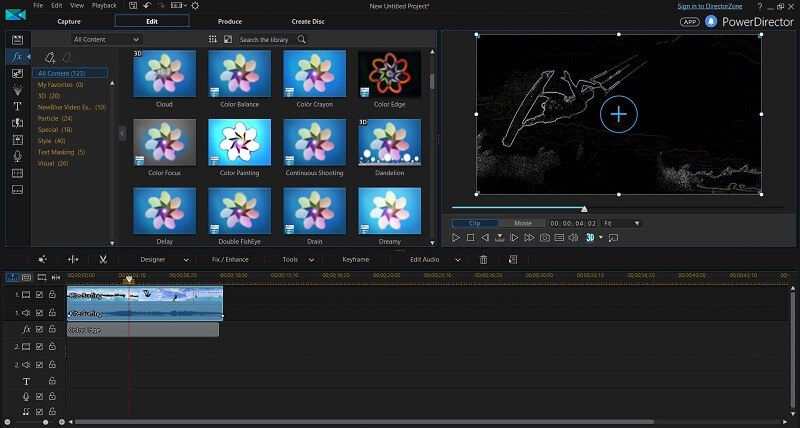
Here I’ve applied the Color Edge effect to a portion of my video by dragging it into the FX portion of the timeline below my clip. I can click on the edge of the effect to adjust the length of time the effect will apply to my video or double-click on the effect itself in the timeline to bring up a window that allows me to adjust the effect’s settings.
Virtually everything in PowerDirector’s editor functions the same way – locate your desired effect in the leftmost tab, click and drag it into your timeline, and double-click on the content to edit its settings – a very elegant design.
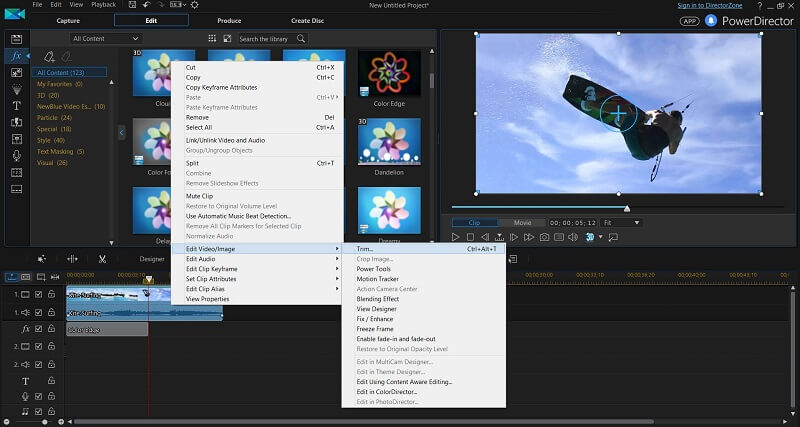
The more “advanced” video tools, such as color correction, blending options, and speed adjustment, can be found by right-clicking on your video in the timeline and navigating to the Edit Video/Image submenu.
Newer features include various AI effects and automations. AI Body Effects lets you easily apply visual effects to moving people or objects. AI Object Detection is great at removing fixed objects from your videos. AI Sky Replacement allows you to transfer your daytime video to include a starry night sky or animated Northern Lights at the click of a button. I expected these features to be subpar and noticeable, but they are quite remarkable.
I was able to find every feature I needed within these submenus without ever having to use Google or look at an online tutorial for where to find them. I certainly can’t say the same for when I was learning how to use other video editors.
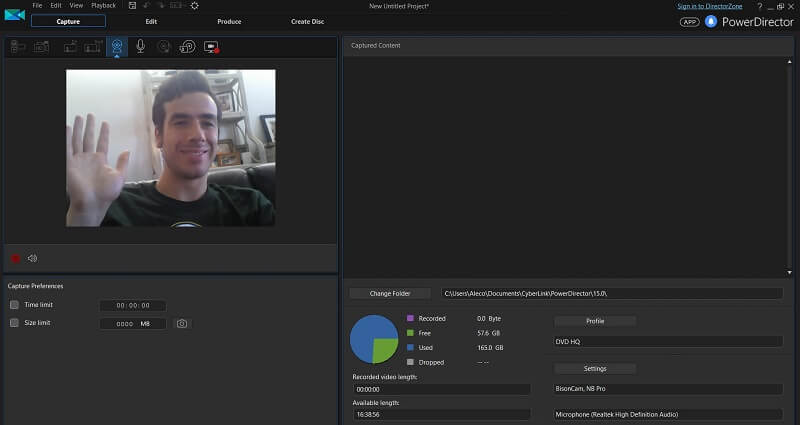
The last feature of the editor I’d like to highlight is the capture tab. Simply by clicking on the tab, PowerDirector was able to automatically detect my laptop’s default camera and microphone, enabling me to capture audio and video clips from my hardware in seconds. This tab can also be used to capture the audio and video output from your desktop environment – perfect for recording how-to videos for youtube.
The 360 Video Editor and Slideshow Creator
Two major selling points for the program which I haven’t yet covered are the 360 video editing tools and the slideshow creation feature.
As I mentioned before, I wasn’t able to test out the output quality of the 360 videos on an actual 360 viewing device such as Google Glass. However, I was still able to easily edit and view 360 videos by using a feature in PowerDirector that allows you to explore panoramic environments with your keyboard arrows. Editing these videos uses the exact same process as editing normal videos, coupled with some additional features to adjust the angles of the camera in the 3D environment and the depth of field for objects such as 3D text.
I can’t guarantee that everything works exactly as promised when it comes to the output of 360 videos, but the CyberLink team has given me no reason to imagine that it wouldn’t work as intended. In my experience with the program, it was extremely reliable and easy to navigate. I’d imagine that 360 video is just as easy and painless as everything else is in PowerDirector.
Another nice feature in PowerDirector is the Slideshow Creator tool. As you’d probably imagine, all you need to do to create slideshows is click and drag a group of selected photos into the media window, organize them into the order you’d like them to be presented, then select a slideshow style.
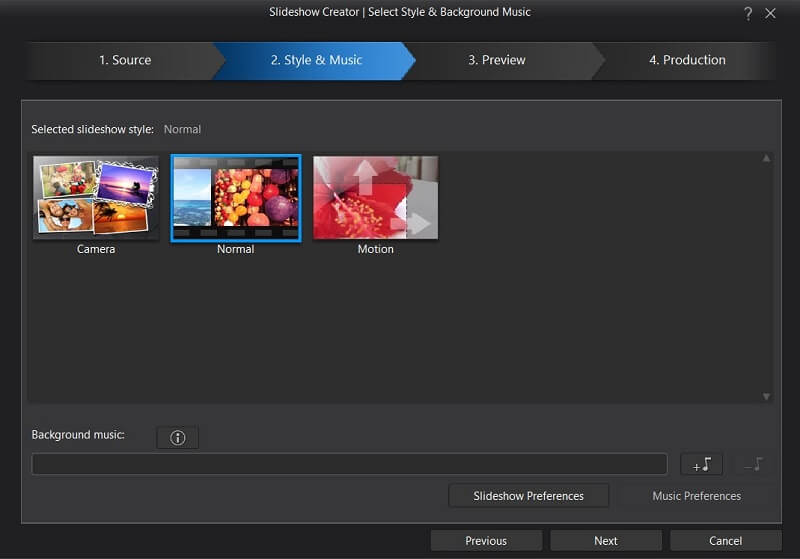
It took me one minute to create an example slide show with some pictures I took of my girlfriend.
Is PowerDirector Good for Making High-Quality Videos?
As you may have noticed from the example videos I’ve provided above, most of the default templates and styles provided by PowerDirector don’t appear to be of professional quality. Unless you’re creating an ad for a used car lot in 1996, I simply wouldn’t feel comfortable using anything but the most basic effects provided by PowerDirector in a professional environment.
That said, if you stay away from the bells and whistles and stick to just the basic tools, it is possible to create professional quality videos in PowerDirector. If you’ve recorded some video content that can stand on its own and just need a program that can overlay some basic text, do voiceovers, edit lightning, and splice in some basic intro/outro screens, PowerDirector can easily tackle these simple tasks.
Reasons Behind My Ratings
Effectiveness: 4/5
PowerDirector offers a thorough and complete suite of tools for doing basic video editing but comes short of offering some of the more advanced features you’ll find in other video editing programs. It can do everything it advertises quickly, powerfully, and in my experience, completely bug-free. The reason I gave it 4 stars instead of 5 for effectiveness is because of the noticeable difference in the quality of its video effects between this program and some of its competitors.
Price: 4/5
Regularly listed at $139.99 (lifetime license) or $51.99 per year ($4.33/month) in subscription. This makes it an affordable video editing tool, much less expensive than other professional video editing software like Adobe Premiere Pro, which costs $20.99/month for individuals and $35.99/month for teams.
Ease of Use: 5/5
Bar none! PowerDirector is the most intuitive and easy-to-use video editing tool I’ve ever seen, as well as one of the most elegantly designed and well-programmed pieces of software I have ever used. Major props to the CyberLink UX team for creating such an amazingly streamlined program and utilizing AI.
Support: 4/5
There are numerous video tutorials available on the CyberLink support portal to teach you how to use the PowerDirector software. However, if you’d like to talk to a human to solve your problem, you need to fill out their contact form. And while they respond in 24-48 hours, there is no live chat feature.
With that said, the documentation and video tutorials on the CyberLink website are thorough, and the program itself is amazingly intuitive, so it’s entirely plausible that you’ll never actually need to contact their support team for technical assistance while learning the program.
PowerDirector Alternatives
There are a number of great video editors on the market, varying greatly in price, ease of use, advanced features, and quality.
If you’re looking for something cheaper, try out Nero Video. Not as elegant or fully featured as PowerDirector, I prefer the library of video effects in Nero to PowerDirector.
If you’re looking for something more advanced:
- If you’re in the market for a more professional quality video editor, you have a number of good options. The gold standard of video editors is Final Cut Pro, but a full license will run you $300. My choice is MAGIX Movie Studio, which is cheaper and a popular choice among many YouTubers and videobloggers.
- If you’re a fan of Adobe products or are in need of the ultimate program for editing your video’s colors and lighting effects, Adobe Premiere Pro is available for $20.99 a month or comes packaged with the entire Adobe Creative Suite for $49.99 a month.
Final Verdict
CyberLink PowerDirector is thoughtfully designed, quick and efficient, and one of the most intuitive programs I’ve ever used. As a moderately experienced video editor, it was never necessary to search the internet or read the documentation on where and how to use the numerous features in the program. It really is that easy to learn. If you’re a first-time video editor or a relatively technical newbie in the market for a quick, easy, and relatively affordable tool to cut together home movies and simple videos, look no further than PowerDirector.
With that in mind, it feels like the CyberLink team focused all of their efforts on ease of use and intuitive design at the expense of the overall quality of the program’s built-in video effects. The effects, transitions, and default templates offered by PowerDirector don’t come close to cutting it for professional quality videos, and the program doesn’t offer many of the advanced video editing features its competitors do. If you’ve already taken the time to learn a more advanced video editor or are aspiring to make a hobby out of video editing, you can do better than PowerDirector.
Have you tried CyberLink PowerDirector? Do you find this PowerDirector review helpful? Share your thoughts below.
I’m a little confused between the difference of purchasing a lifetime license vs. a subscription. If I purchase a lifetime license, does that mean I would have access to everything a monthly subscription has to offer?
Not good, outdated looking titles and tons of terrible transitions. Don’t buy, it’s a shame, it can do so much but who’s responsible for adding the effects? The titles and transitions are two of the most important parts of an engaging video and it comes with sh*t for both
I was hoping to use cyberlink to edit video, but I’m often in areas where Internet is not available for days at a time. This makes the software UNUSABLE unless you buy an expensive lifetime license.
The tools are GREAT, but their Internet requirement makes it worthless. Wish I would have bought monthly and saved the one year subscription rate as I cannot edit video unless I have a robust Internet connection to verify my subscription EVERY TIME I OPEN IT.
I have recently tried the Cyberlink Powerdirector 17 ultimate. Unfortunately when I burnt the final product on a DVD and played it on DVD player the pictures/film were jerky. I just can’t figure out what is wrong. Someone told me that the Panasonic camcorder may not be compatabile. Any help in this regard.
A Darmanin Malta
I prefer to create the file as a full hd video, then use a third party program like Any2DVD to create the DVD.
I do a lot of videos in 4K 60fps and with 5.1 surround sound, and could not find a way to render this combination. After contacting CyberLink, they told me how to do it. Is this easy to do in other video editing programs?
Thank you for this great review. I fell in love with Powerdirector since day #1. I started with PD13 and upgraded to PD14 when it came out.
At the time of this writing PD16 is out, but I really don’t have a need for the upgrade as I originally bought it for the multicam feature. I just wish they would add the ability for more cameras, like 6 or so multicams.
I fell so much in love with powerdirector that I started my own journey and taught myself how to create Theme Designer Templates. Now I have created a software which in conjunction with a 3D software enables me to create templates like on the fly. 🙂
My main objective is basically to use Powerdirector to create templates like After Effects, but it is still a looooong road ahead of course.
I purchased powerdirector15 just over a year ago based on reviews like this one, but I would like to add a “1 year later” comment. 1 year and 5 days after the date of purchase, powerdirector15 began to act very buggy that it was nearly unuseable, then it became totally unusable. Although the skeptic in me was suspicious of the timing because I’d begun to get sales pitches to upgrade to v16, I blamed my machine. I uninstalled the program according to their directions, a couple of months later I was finally able to upgrade my machine and attempted to install pd15 on it. I was told the links they provided me in my emailed receipt were no longer valid, so I just transferred the files themselves. Upon trying to install, I was refused and forced to accept v16 trial version. So, I logged into my account, go to “my products” and there is nothing there. None of the 17 products that I have purchased from them are in my account. I go back to my receipt click the original download link again so I can see the page that gave me a “contact” link – it takes me to a login page and it refuses my account information, even though I am currently logged on obviously with the same account info. All of their “help” on this matter tells me to contact customer service, yet they never tell me how to contact customer service. I can pay for technical help, but there’s no way to access files that I already own. Make of this what you will about the honesty and integrity of this company. I know I have.
I have Vegas Pro 14, PD14,VS X10 and Pinnacle Studio 21 Ultimate. Choice for editing, Vegas and Pinnacle. Pinnacle’s “roots” were Avid Liquid. I like the idea where any track can be anything you want. You are not “stuck” with 2 audio tracks, and I like editing with overlays placed over the video, not under. I also like the fact that Sonicfire Pro 6 integrates with the program (and Vegas). The feature set has a lot of NewBlue FX included, and a lot of “cheese” transitions. But the Split Screen editor, the ability to multicam 6 cameras, etc make it a quick go to editor for me. Sadly, no free trial… pony up the money, download the full version and you have 30 days to give the full product a test, not a scaled down version. It does put a lot of demands on your hardware if editing 4K. There is no “proxy” editing. But out of all the “consumer” editors, it’s the fastest rendering as tested by PCMag.
Hi Mike,
Sony Vegas Pro is $599 and as you point out not in the same league as Powerdirector (price or features/quality). Because of the price I don’t see them as comparable. What do you see as an equivalent product category (price) that is a better product (features and function)?
Thanks
Brent
Hi Brent,
Thanks for your question – which is a great one! Hope me don’t mind me answering it, not sure if Mike is still here 🙂
Aleco wrote this review two months ago, later he tested several other video editors including Corel VideoStudio — the most direct competitor of PowerDirector.
As he put “The main reason to purchase VideoStudio over PowerDirector is that it is a bit more powerful…I found PowerDirector even easier to use than VideoStudio”, you can read his full review on VideoStudio here.
Hope this helps!
Thanks for a truly informative review of the program. There are not many unbiased reviews to be found on the internet.
Mike
Thanks Mike!