
Camtasia
Summary
Camtasia is a powerful video editing program available for both Windows and macOS. It supports a range of popular media formats and offers an impressive degree of control over the videos you create while still being easy to use. TechSmith (the maker of Camtasia) even has a free mobile app for Android and iOS that makes it easy to transfer media from your device for use in Camtasia. Once you’re finished editing, you can render and share your video files to Youtube, Vimeo, Google Drive, and Screencast.com from within the program.
Even if you’ve never used video editing software before, Camtasia is easy to learn, thanks to the excellent tutorial support provided by TechSmith. You can try Camtasia for free for 3 days, buy it directly as a one-time purchase, or subscribe yearly.
What I Like: Professional-level features. Excellent cursor tracking options for screen capture. 4K video support. Extensive tutorial support. Social sharing integration. Mobile companion app.
What I Don’t Like: Subscription provides limited value. Some users have issues with the companion app.
Is Camtasia a good video editor?
Yes, Camtasia is a very good video editor! It contains all the tools that you need to create professional video content.
What is Camtasia best used for?
Camtasia is a great general-purpose video editor, but it really excels at creating screen-based content, such as app tutorials, thanks to its impressive screen capture tool, which is able to track mouse cursor position.
Is Camtasia completely free?
No, Camtasia is not free, although there is a free 3-day trial available. Any videos produced with the trial version will be watermarked, and there are several other restrictions.
How much does Camtasia cost?
Camtasia currently costs $299.99 USD per user, for both the PC and Mac versions of the software. TechSmith also offers different pricing plans for Business, Education institutions, and Government & Non-Profit.
Do you have to buy Camtasia every year?
Camtasia is available as a yearly subscription, but it’s also possible to make a one-time purchase of a lifetime license that doesn’t require an active subscription.
Table of Contents
Why Trust Us for This Camtasia Review
My name is Thomas Boldt, and I’ve worked with a wide range of video editing software in the past, from small open-source transcoders to industry-standard software such as Adobe Premiere Pro and Adobe After Effects. As a part of my training as a graphic designer, I spent time learning the ins and outs of both motion graphics and the software that creates them, including their UI and UX design.
I have worked with TechSmith products in the past, but TechSmith has had no editorial input or review of the content here. They have no stake in the review, and I did not receive any special consideration from them for writing it, so I am completely unbiased in my opinions.
Meanwhile, JP has been using Camtasia for Mac since 2015. He first used the program when he was assigned a task to make video tutorials for a mobile app. He tried a couple of video editing tools before finally selecting Camtasia, and he has been happy working with it since.
Detailed Review of Camtasia
Camtasia is an incredibly powerful and complex program with a lot of features, so I’m going to stick to the most commonly used and the most interesting ones – otherwise, you’ll get tired of reading before we’re done.
First, we’ll take a quick look at the interface and then explore how Camtasia works with your video and audio files. Finally, we’ll look at a few of the extra features Camtasia offers, take a quick look at the Fuse mobile companion app, and see how you can share your videos with the world.
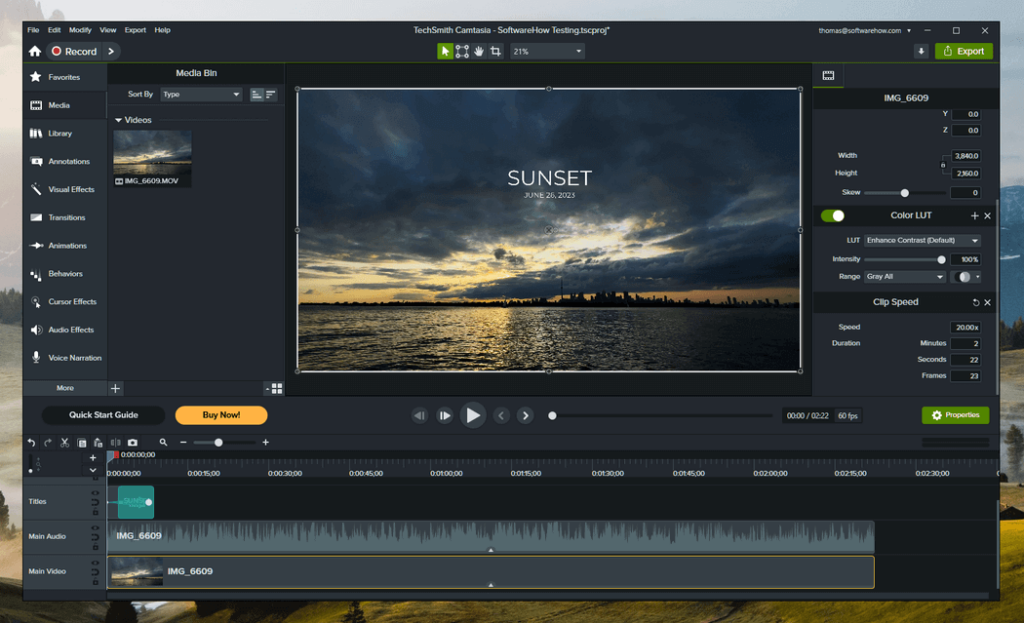
There are three main areas of the interface: the media track timelines at the bottom, the media and effects library at the upper left, and the preview area at the upper right. Once you begin to add effects that have customizable options, a ‘Properties’ panel also appears in the top right.
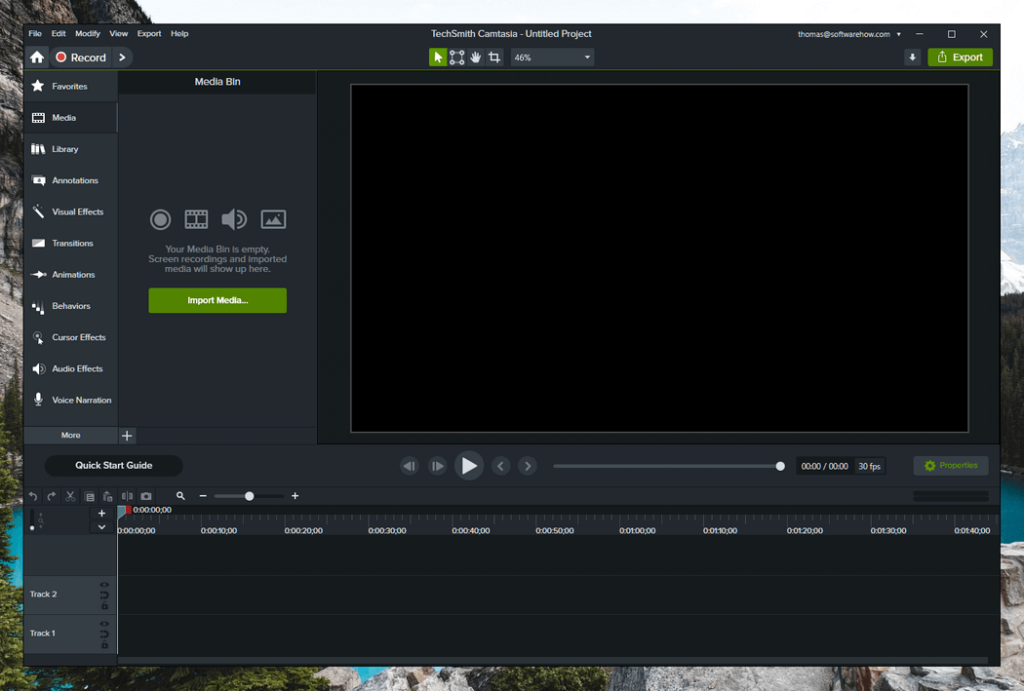
Importing media is a snap, as it functions just like any other ‘File Open’ dialog. Everything you import sits in the ‘Media Bin’ section, and besides that, you can access the Library of all preset media that comes built into the program.
You can also import files directly from Google Drive, which is a nice touch, but one of the most useful features is the ability to import directly from your mobile device using TechSmith’s companion app, Fuse (more on that later!).
Working with Your Media
Once you’ve breezed through adding the media you want to work with, Camtasia continues to be extremely easy to use and well-designed. Simply dragging your selected media to either the preview window or the timeline adds it to your project and populates a new track automatically if required.
You can create as many tracks as necessary, rearrange them and rename them as you like to keep your media organized during longer complex projects.

Trimming, cutting, and pasting sections of your video file is extremely fast and easy to do – simply select the desired section of your video using the red and green play-head markers, then cut and paste it into a new track just as if it was text in a word processor.
Perhaps it’s just because I’m working on an incredibly powerful computer, but there was absolutely no lag time while cutting this 4K video of a sunset into separate sections during my testing of Camtasia.
Adding in overlays and effects is just as simple as adding your initial media files. Select the type of object or effect you want to add from the list on the left, choose the appropriate type, and then drag and drop it onto the timeline or the preview window.
You can customize almost every aspect of the effect to fit your style using the properties section on the right of the preview window, and since it’s all done non-destructively, you can tweak, adjust, or remove your edits at any time.
Adding scene transition effects is also just as easy – choose the one you want, and then click and drag. As soon as you start to drag, each element on every track displays a yellow highlight which areas will be affected.
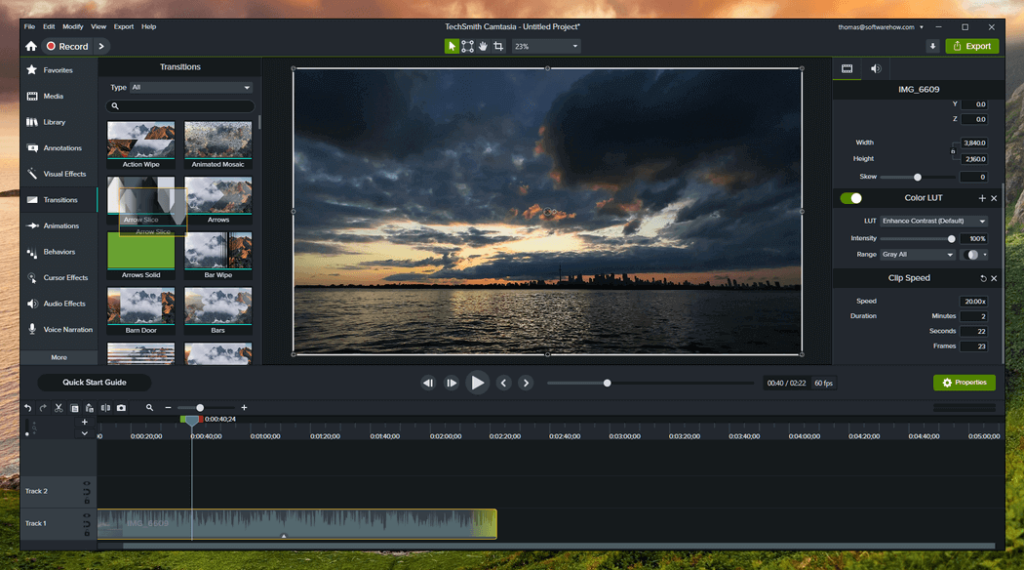
This is an example of great user interface design that makes it easy to see how much overlap you’ll need to include to make your various elements mesh successfully.
Animating sections of your video is also quite easy. you simply see an arrow overlay on the track you are working with, complete with start and end points that can be dragged around to the right spot. To get frame-level accuracy, clicking and holding on the point will show a tooltip with the exact timecode, another nice user interface touch that makes it easy to be precise.
JP’s note: I have similar feelings to Thomas on using the media-related features while using the Mac version. TechSmith makes it a breeze to drag and drop, edit, and annotate media elements the way you want. Pro tip: if you are new to video editing, I highly recommend you take an hour or so to watch the awesome tutorials the TechSmith team made.
Working with Audio
Camtasia doesn’t have quite as many audio editing features as you might want if you’re an audiophile, but for most purposes, it can do more than enough.
You can quickly separate the audio from any imported video into a separate track for cutting and trimming, and there are several standard editing options such as noise removal, volume leveling, speed adjustments, and fades.
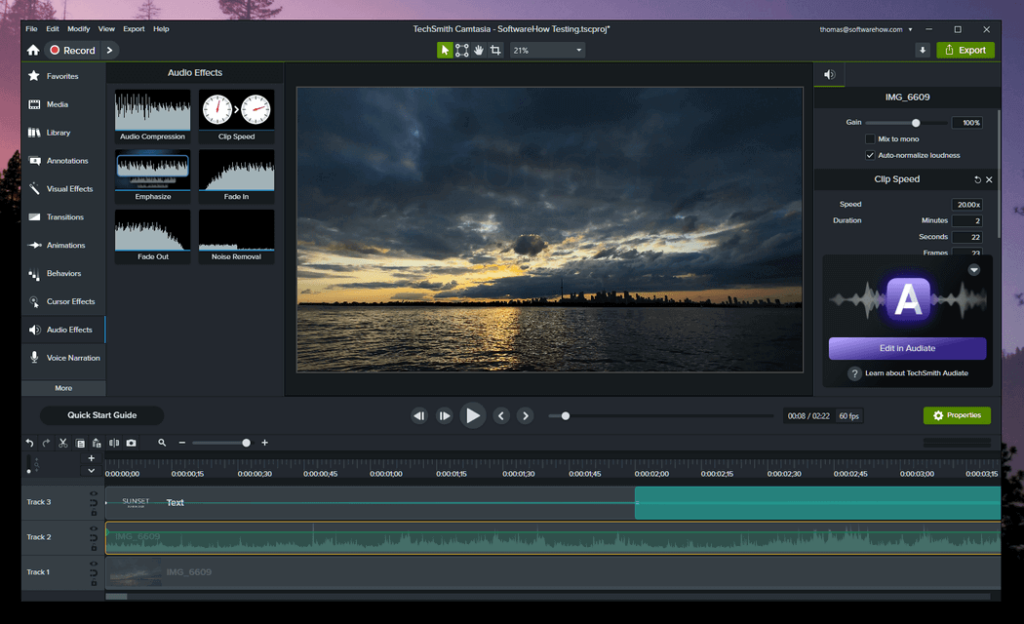
One of the more interesting and useful audio features is the ability to add narration to your video directly within the program while you actually watch what’s playing. This means you don’t have to worry about making sure your audio syncs up with your video during a separate recording session since you’ll be able to record in real time as the video plays.
Obviously, this is a huge help for anyone making tutorial content or any other situation that would benefit from separate narration since you don’t have to think about the narration script while you’re actually recording your video.
JP’s note: I didn’t expect the audio editing features to be that awesome. To be honest, I tried Audacity to trim voiceovers for the app tutorial I made. It turned out that I wasted a couple of hours because Camtasia was powerful enough to meet all my audio editing needs. Nevertheless, I like Audacity and still use it occasionally these days.
Screen Capture
For those of you making tutorial videos or other screen-based video content, you’ll be happy to know that Camtasia comes with a built-in screen recorder that is easily accessed with the big red ‘Record’ button in the top left of the main interface. This will open a new window, shown below, with simple controls for selecting your desired screen area.

It’s everything you could want in a screen recorder, complete with audio, mouse cursor position tracking, and webcam companion recording. The resulting video appears in your project’s media bin alongside all your other project media and can be simply added to the timeline like any other file.
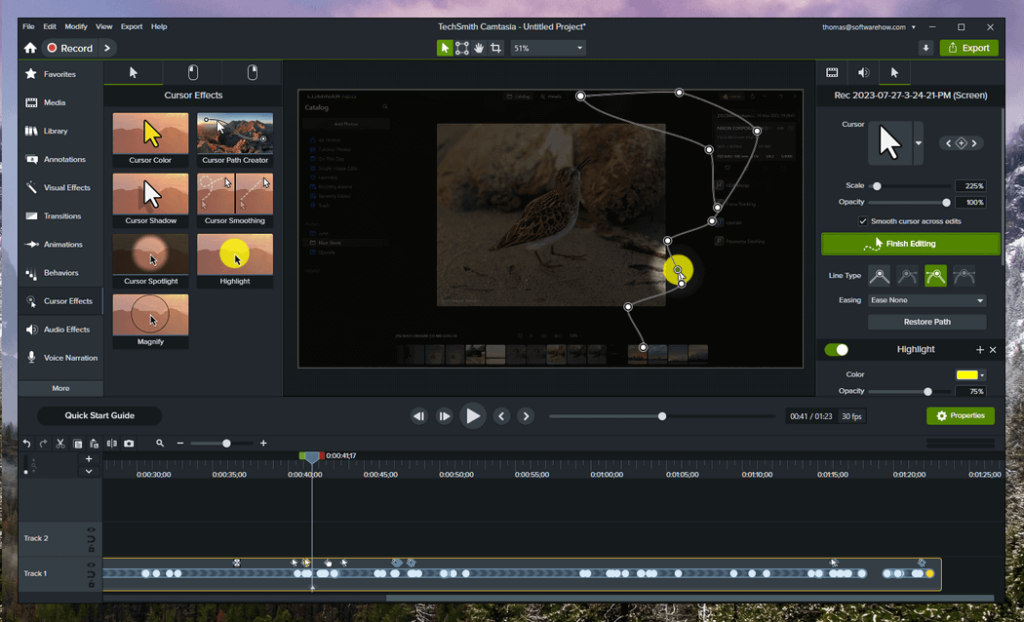
While it’s a solid screen capture tool, the best feature by far is its mouse cursor position tracking. Normally, mouse cursors aren’t captured by screen recording software, but Camtasia tracks its position anyways during the recording and then adds a customizable mouse cursor back into your video after the fact.
This means you can completely control how the mouse cursor looks, change its color, and even adjust the path that it takes. You can even automatically smooth out the cursor path to make it look like you have the most steady and precise mouse hand in the world!
These features are simply incredible for app tutorial videos and any other screen-based content, making them must-have tools for teachers and other instructors who educate online.
JP’s note: Seriously, this was the killer feature that made me go with this TechSmith product. Why? Because it was the first video editor software that supported adding an iPhone 6 frame to the app videos I made. If you have the chance to read this post I wrote earlier, you know that I tried Screenflow before its competition. But Screenflow didn’t have the latest iPhone frame in its media library at that time, so I switched to Camtasia and found it truly great.
TechSmith Fuse
This is an incredibly useful feature if you use your smartphone or other mobile device to shoot video, which is becoming more and more popular as their cameras grow more capable. Click File, then choose ‘Connect Mobile Device,’ and you’ll be presented with a series of simple instructions.
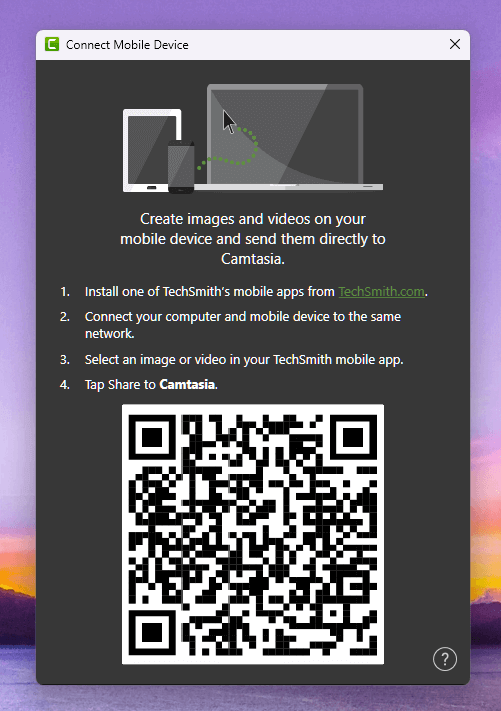
Since both my devices were connected to the same network, I was able to pair the app and the Camtasia installation on my PC without any problems. I could then transfer images and videos from my phone directly to my Camtasia media bin with only a few taps, where they were ready to include in my project after the upload process was completed.
The only issue that I ran into was that Fuse tended to disconnect itself when my phone screen locked temporarily, but it would resume within a few seconds of running the app again.
JP’s note: This is a huge benefit. The Fuse app wasn’t actually available when I first used Camtasia for Mac. I was using the app to edit mobile app tutorials for Whova, and Fuse would have been a big help. There were several times, as I recall now, I took several screenshots on my iPhone, and I had to transfer them to my Mac via email before they were imported into the dashboard. Fuse is definitely a time-saver!
Rendering and Sharing Your Video
Once you’ve finally got your masterpiece just the way you want it, Camtasia has a range of options for creating your final video. You can create a local file on your computer using any settings you want, or you can create a file and have Camtasia upload it automatically to Youtube, Vimeo, Google Drive, or TechSmith’s two online video projects, Screencast and Knowmia.
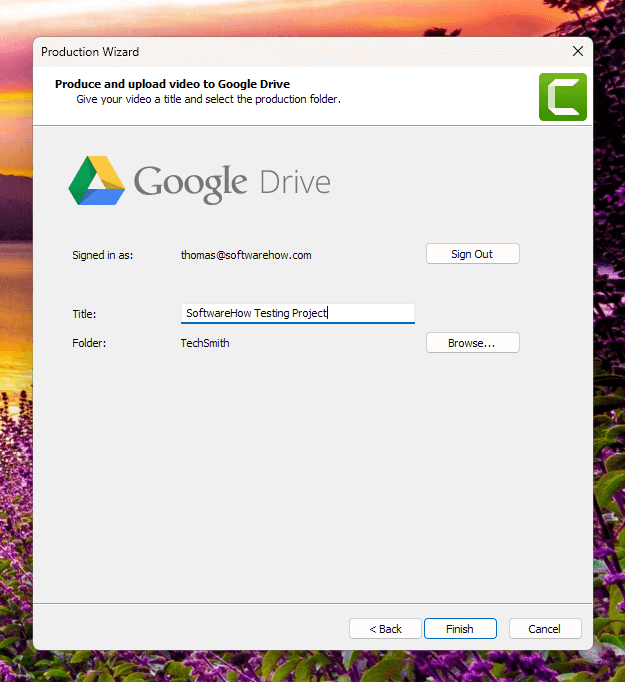
I don’t have an account with any of those services except Google Drive, so let’s take a look at how it works. A quick sign-in and approval from my two-factor authentication (enable this for your own Google account if you’re not already using it – it’s a dangerous web out there), and we’re off!
The file was rendered and uploaded with no problems at all! The program even opened a window in my Google Drive to preview, although it all went so fast that Google was still processing the video by the time the preview window opened.
The Reasons Behind Our Ratings
Features: 5/5
Camtasia is an incredibly powerful video editor, allowing you to do almost anything you want to create a professional-quality result. You have total control over every aspect of arrangement, animation, color, timing, and anything else you might want to adjust in your video. The
Pricing: 4/5
Camtasia is available as a yearly subscription or as a one-time purchase, although the one-time purchase price is extremely high. Because the app is already so polished, I’m not convinced that TechSmith is providing enough regular updates, new features, and new content to justify using a subscription model, but the high cost of the one-time purchase makes it seem more appealing.
Ease of Use: 5/5
Considering how powerful and capable it is, TechSmith has done a great job making the program so easy to use. The interface is clearly and consistently laid out, and the software is packed with thoughtful little features that really improve the user experience.
Support: 5/5
There’s a helpful quick start guide and access to support directly from the Camtasia account hub that displays when you first load the software, and TechSmith seems to be quite committed to providing training resources on the web. They are continually developing and updating the software to fix bugs, and they’re good enough at it that I didn’t run into any issues at all during my review.
Camtasia Alternatives
Filmora: If you’re overwhelmed by the number of features that are found in Camtasia, a slightly simpler program might fill your requirements. It’s also easy to use and well-designed, although it does have a couple of technical issues with some of the more non-essential features. It’s also much cheaper.
Adobe Premiere Pro: If you’re an Adobe user for other creative purposes, you might feel more at home with Premiere Pro. It’s a robust video editing program that has almost all the same features as Camtasia, and a few that Camtasia doesn’t such as access to TypeKit, Adobe Stock and Adobe After Effects integration. Adobe recently changed its top-level software over to a subscription model, but you can get access to Premiere alone for $19.99 USD per month.
ScreenFlow (Mac Only): ScreenFlow is another great competitor to Camtasia for Mac. With video editing being its core feature, the app also allows you to capture screen recordings (from both Mac desktop and mobile devices), and share the edited videos to the web or download them directly to your Mac hard drive. The only downside to ScreenFlow is that it’s only compatible with Mac machines, so PC users have to select another option. See the best Windows alternatives to ScreenFlow.
Movavi Video Editor: This software sits somewhere between Filmora and Camtasia in terms of capabilities and is less expensive than either of them. It’s designed for more of a hobbyist than a professional video editor, but you can still create good-quality results despite the lack of control that it allows.
If you are on a Mac computer, you can also find more alternatives from our best Mac video editing software roundup.
Final Verdict
For users looking for professional-quality video editing with an easy-to-use interface, TechSmith Camtasia is an excellent piece of software. It’s quite easy to learn to use, and it’s possible to go from downloading to creating and uploading your first movie in less than an hour. The added bonus of a companion mobile app Fuse makes for easy file transfers from your mobile device to your workflow.
If you create tutorial videos or other screen-based content, then Camtasia has all the tools that you’ll need for creating polished videos that are easy for your viewers to follow along with.
Do you have a question about Camtasia that I didn’t answer in this review? Let me know in the comments below, and I’ll do what I can to help.
I’ve been using Camtasia for over 5 years but I would ditch this in a heartbeat if I could find something better. About 1 in 10 recordings get ruined because I forget to check the recording setting and this last time somehow the “record system audio” was not selected so I got NO sound. I am furious! The recording is totally useless. I always have that setting selected but I was in a hurry and just forgot to check it.
So how and why did it change? Did I fat finger it at some point. Maybe but they should have little lights or something so you don’t have to keep opening the selector dialog to confirm everything is the way it was set the last 10 times you made recording. Usually I do check it because I’ve gotten burned before, but I forgot this time and of course I got burned again. I really HATE this product when that happens. And I’m a practicing Taoist and we try our best not to hate anything!
If you have another product that makes it more fool proof I’d love to know. Even though I paid for this piece of junk I would switch in a heart beat because I don’t want to get screwed again due to the unfriendly and uninformative GUI. Especially when people are depending on my to record something. Thank you and sorry for venting but I just got burned again!
I’ve been using Camtasia for a long time, although not very often. In terms of video editing, it doesn’t hold a candle to Adobe Premiere Pro CC which I use, so not worth its price in that sense. Its value is in being able to screen record , but while it can capture in 4K, it cannot process or export in 4K – it gets processed down to 1920×1080.
If it could screen capture, process, and export 4K I would consider an upgrade, but as it stands it I won’t. I’m not sure why you chose to give it 5 stars.
Hey Thomas, I am launching an educational video business and looking for the simplest, most cost-effective software for producing webinars. I need more than simply voice-over PowerPoints. Does Camtasia allow me to simply record whatever is on my screen so that I can easily alternate between speaking, reviewing notes on PowerPoint, and adding clips from eg Ted Talks?
Many thanks, David
What would you recommend for debian Linux in order to create screen video how to’s with the ability to edit audio or cut out the audio and add in audio while the video is playing?
Hello! I am new to video editing. I would like your unbiased advice on which video editing software to use. Let me begin by stating that I am a volunteer trying to help a non-profit organization with their video editing needs and as such I do not have much money to invest ($100 max). Here are the most important things for us: 1) We need to do scrolling text / news ticker much like you see at the bottom of the screen on CNN & BBC. 2) We need to add text to the video much like you see a news broadcaster’s name appear on CNN or BBC. 3) Much of the text will NOT be in the English alphabet (it will be in Amharic – an Ethiopian language). I mention this because I tried using Sony Vegas Studio and the text did not come out well. It was distorted. 4) The end product has to be high quality video as it’ll be exported to YouTube/Facebook and other social media outlets. 5) And of course, it has to be an easy video editing software as I am not the best with technology. And if the software has the ability to save the above referenced things so that I do not have to recreate it each time I edit a video, that will be fantastic. I truly appreciate your help. I have spent hours going thru YT videos and trying free trials but I have not been able to find a video editing software that accomplishes what I listed above. Thanks again!
Can you please tell me what type of PC I need to use Camtasia that won’t break my wallet? I want to do tutorials and videos for a book my girl wrote. I have an old PC a Toshiba which is over ten years old, I know I need a new one but would like some recommendations.I’ve been looking around but they are trying to sell me very expensive PCs over $1000. Can get something for less that will work?
You need to review PowerDirector, its an excellent fast tool.
Much much easier to use.
I’m sorry but how the hell is Camtasia expensive? If I have to use the Adobe alternative you propose I’m out 240 the first year. With Camtasia you can 2 to 3 years before an upgrade becomes necessary…. So in wordt case: say I can include use it for 2 years before having to upgrade… It’s still cheaper then your alternative…
Great review but your math needs work….
I have just been researching Movavi and Camtasia (and many other screen recorder/video editing softwares), trying to find in depth reviews. Yours is the best I’ve found so far, so thank you. While Movavi is promoted as being a lot cheaper than Camtasia, if you want to sell tutorials you have made with their software, you have to buy their business licence. It is not much cheaper than the Camtasia licence, and only allows for installation on one computer. Camtasia allows for installation on two computers.
I was interested to read that you think Movavi is less professional. I wondered if you could elaborate on that briefly for me. At this point I am pretty sure I am going to settle for Camtasia.
Yours Sincerely,
Carol
Saying you’re completely unbiased but using affiliate links? Might want to change that to something more accurate and transparent.
Hey Kelly, you are right. It’s hard to justify that the opinions in the content are totally unbiased. But what will you say if I remove the affiliate links? Anyways, I’ll add a disclosure paragraph when we update the post next time.
Thanks for coming by and taking the time to leave the comment.
hi
when you have finished the end video can it be saved on file then inserted into a third party webpage/site? if i was doing video editing for clients ect? or can you only upload via stated sites? many thanks
Hi Mark,
You may be able to upload the video file to a third-party website and insert it into a webpage, but it all depends on the CMS (content management system) that website is using.
For example, SoftwareHow currently uses WordPress as CMS, and as I remember there’s restriction in WP Setting that max file upload is 32MB — meaning if I wanted to upload a video (probably bigger than 32MB in size), I can’t do this directly unless I turn to use FTP which should work but it’s cumbersome. That’s why I’ve always preferred to export the completed work in Camtasia to YouTube or Google Drive, then embed the video into the content of a page when needed.
By the way, in YouTube you can set the video to be “unlisted”, in case your clients prefer to show the video only to specific audiences. Hope I’ve answered your questions 🙂
– JP
Hello Thomas i badly need your help im too confused to choose. So what i want to do is gaming videos. İm not gonna do detail videos. i will just put some text on it cut the video maybe some nice animations and not much more so i need a software who can do this well and easy for me cause im vey new about editing. What i most care to make videos in high quality. i heard camtasia cant go upper than 30fps is that right ? money is not a problem. please tell me which one i should buy?
Hi Berkay, don’t worry, I know the feeling – I’m here to help 😉 I did a bit of digging into your question, and it looks like you’re right: Camtasia does not currently support 60FPS rendering, although they do have plans to include it in future releases.
You should be able to render 1080P / 60FPS videos using either Adobe Premiere Elements or Cyberlink PowerDirector. They are both one-time purchases, both are designed for casual users, and should be able to do everything you need. My personal choice would probably be the Adobe software, but that’s mostly because I am already comfortable with their style. I haven’t had a chance to do a full review of either one yet, but they’re on my list.
Let me know how it goes!