
Audacity is an impressive audio capture and editing application. The software can record from a variety of inputs as well as import and export several types of file formats. You can even extend Audacity’s functionality using plugins.
Owing in part to its price (free!) and its multitude of features, Audacity is one of the most downloaded applications of all time. Nevertheless, Audacity comes with a fairly steep learning curve for beginners. If that’s you, you’re in the right place. This guide will help you become familiar with the software so you can start recording and editing audio in no time.
I’m Andrew Gilmore, and I’ve been using Audacity to record and edit audio for over ten years. I’ve done everything from recording and producing audiobooks to converting analog media like vinyl records and cassette tapes to digital formats–all using Audacity!
In this guide, I’ll give you the tools you need to get started using the software. We’ll begin with the basics like recording and work our way up to exporting audio and using plugins for audio effects.
Let’s dive in!
Table of Contents
- Chapter 1: What Is Audacity?
- Chapter 2: Installation and Interface Overview
- Chapter 3: How to Record or Import Audio
- Chapter 4: How to Clean Up Audio in Audacity
- Chapter 5: How to Split, Organize, and Mix Audio in Audacity
- Chapter 6: Using Effects and Other Plugins
- Chapter 7: Saving, Exporting, and Converting Audio
- Final Thoughts
Chapter 1: What Is Audacity?
Audacity is a free and open-source audio editor and recorder. In 2021, the Muse Group purchased the rights to Audacity but pledged to keep the program open source. The software is available for Windows, macOS, and Linux.
One of Audacity’s best features is its support for multiple tracks. Multi-track software is not unique in the audio editing sphere, but it is scarce among free applications. (Check out our guide to Audacity alternatives, and see for yourself.) With Audacity, your computer’s hardware is the only limiter of the number of tracks you can have in a single project
Audacity comes with many built-in effects like faders, equalizers, and tools for cleaning up your audio, but you can also extend the program’s functionality with a large library of plugins. The program supports a wide variety of add-on formats including VST2, VST3, Audio Unit (AU) for macOS, and Nyquist–Audacity’s homegrown plugin format.
As you can see, Audacity is packed with features few, if any, free programs can match, but the software is not without limitations. Although the program has a robust feature set, the editor pales in comparison to the likes of full-fledged digital audio workstations (DAWs) like Adobe Audition and Logic Pro.
The software has three primary deficiencies holding it back from achieving pure DAW status. First is the application’s lack of support for musical instrument digital interface (MIDI) instruments and effects. Audacity can import existing MIDI files, but it can’t edit them.
Second, Audacity lacks VSTi support, a popular implementation of MIDI technology. The software can make use of VST3 and VST plugins, but not VSTi.
Last is the software’s inability to detect and manipulate tempo. Audacity is working on implementing tempo detection, but at the moment, the feature is not available.
Chapter 2: Installation and Interface Overview
To install Audacity, go to https://www.audacityteam.org/download/ and click on the download link that corresponds to your operating system.
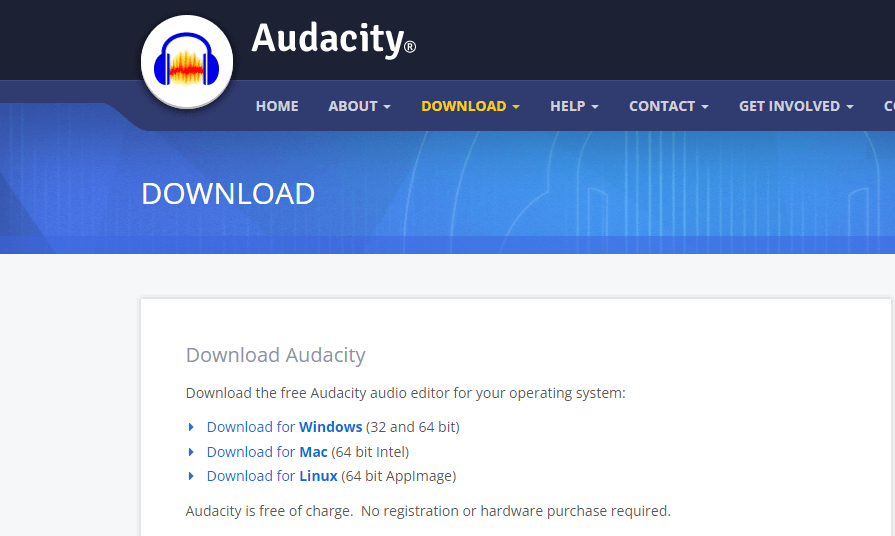
The default download for macOS is a “Universal” package–one that works for both Intel and Apple Silicon Macs–but you can also select specific installers for either Intel or ARM (Apple Silicon).
After downloading the appropriate DMG for your Mac, double-click the downloaded file then drag the Audacity program to your Applications folder.
The Windows download link will give you the 64-bit version of the application. You should use this version if your operating system supports it. If not, the Windows page has a 32-bit installer you can use.
Once downloaded, double-click the EXE file to start the installer. Select your language then click OK to proceed. Choose all the default options in the installation wizard then click the Install button. Click Finish.
Regardless of your operating system, Audacity’s interface is mostly the same. One difference is the menu bar, which resides at the top of the screen (as opposed to the top of the application window) in macOS versions of Audacity.
The menu bar is one of the most essential elements of the software. I find myself using Edit and Effect menus the most, but all are useful when recording and editing audio. Edit > Preferences will allow you to customize Audacity to suit your needs. It’s worthwhile to look around in the preferences pane to get a feel for the options available.
Next are the toolbar areas. These are the top and bottom portions of the Audacity window. Toolbars provide quick access to frequently used functions so that you don’t have to use the menu bar to access them.
Audacity provides default toolbars like transport, playback and recording meters, time, and edit to name a few. Not only can you remove toolbars and add additional ones to Audacity, but you can also move and rearrange the tools to fit your workflow.
To add or remove toolbars, click View on the menu bar and go to Toolbars. Click on items to select or deselect them as desired. Those items with a checkmark next to them will be displayed.
To rearrange toolbars, hover your cursor over the vertical bar to the left of the toolbar then click and drag the bar to your desired location. You can move the toolset just about anywhere in the Audacity window, including floating it inside the main pane.
This middle area of your application holds the audio tracks. Each track has a name and can be mono or stereo (one or two channels, respectively). With audio present, you’ll also notice the tracks’ waveforms which show how loud or soft the recording is.
Keyboard shortcuts are another important component of Audacity. These are not part of the interface, but they are worth mentioning because they can save you a lot of time.
For instance, if you’re anything like me, you’ll find yourself constantly zooming in and zooming back out when editing. You can click on the zoom buttons in the edit toolbar, but using Ctrl+1 and Ctrl+3 to zoom in and out,respectively, can save you time. (Use Command instead of Ctrl on macOS.)
You can see keyboard shortcuts to the right of the function’s option in the menu bar. Or you can consult the master list of shortcuts in Audacity’s documentation. I highly recommend you take some time to learn the keyboard commands for any task you find yourself performing often.
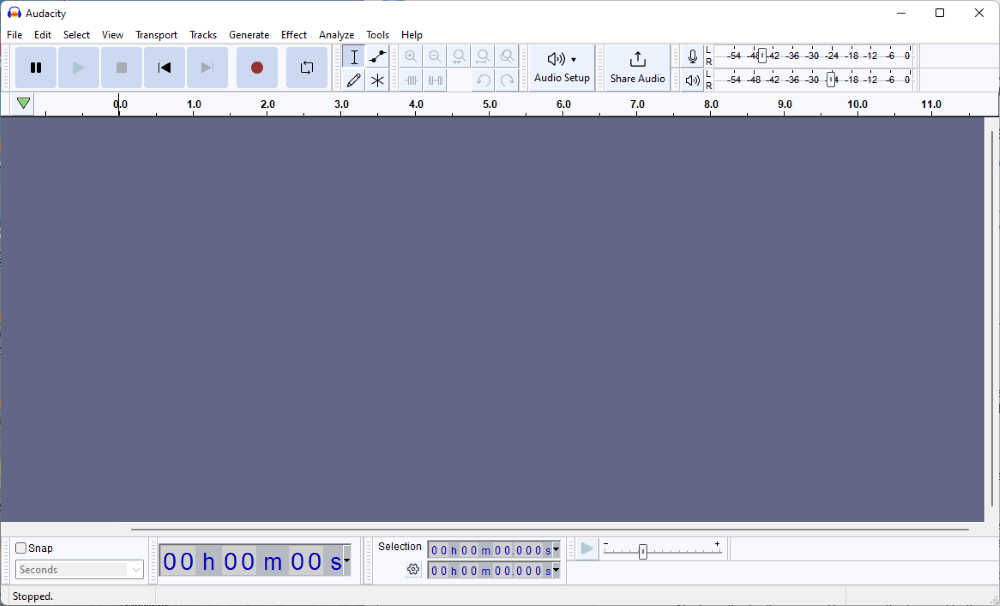
The default Audacity toolbar layout.
Chapter 3: How to Record or Import Audio
Recording audio is straightforward in Audacity.
First, click on the Audio Setup button and select Recording Device. From there select the microphone you want to use to record. Selecting the correct microphone is critical because of differences in recording quality.
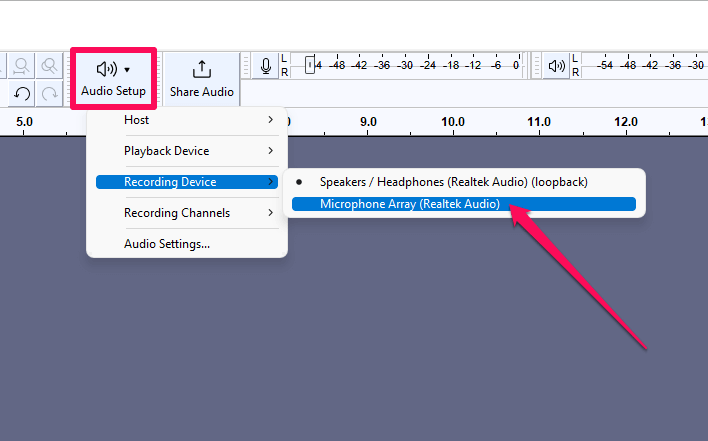
If, for example, you have a nice USB microphone connected but your computer also has a built-in mic, Audacity might default to the built-in recording device.
With the right input device selected, all you have to do is click the record button to start recording. But before clicking record, you should test your recording levels to avoid clipping. Clipping occurs when recorded input reaches or exceeds 0 dB.
You can test recording levels by clicking on the microphone icon on the Recording Meter Toolbar and then clicking Start Monitoring.
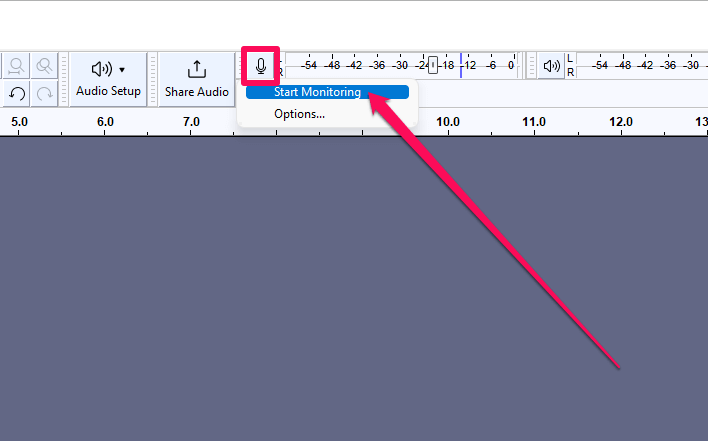
Then begin speaking with the same volume at which you intend to record. If your audio is louder than -6 dB, click and drag the gain slider to the left.
Once your input volume reaches an acceptable level, you’re ready to record. If you want to get the most out of your microphone, check out our article on how to improve microphone quality in Audacity.
It is also possible to record your computer audio using Audacity (link here once the article is published). You can read our full article on the subject, but, in short, you need to create a loopback audio input and set it as your recording device in Audacity.
Importing audio is also easy with Audacity. Click File > Import > Audio… then browse to the audio file you want to import, click on it, then click Open. Audacity will import the audio file as a new track in your project.
You can use File > Open… to import audio, but Audacity will create a new project for the imported audio rather than add the file as a new track in the existing project.
Out of the box, Audacity can import WAV, AIFF, MP3, Ogg Vorbis, FLAC, and MP2 files. Due to licensing issues, Audacity does not natively support some common file types like M4A, MP4, and WMA, but installing the free FFmpeg plugin resolves the problem. (See chapter 6 for details.)
Chapter 4: How to Clean Up Audio in Audacity
Whether you import audio or record your own, you’ll probably need to clean up the tracks to produce the best possible sound. Audacity has several built-in plugins to help with this process.
Before performing any kind of edits on your audio, I always recommend creating a copy of your recording.
While Audacity does not directly modify your source files, if you record audio directly into the program, then any edits you make to the audio will be permanent. You can undo changes, but only up to the last time you opened the project.
You can create a backup in two ways:
- After recording, go to File > Export and choose some type of uncompressed format such as WAV. Select the destination for the export, give the file a name, and click the Save button.
- Create a copy of the Audacity project by clicking File > Save Project > Backup Project… Give the project a name and click Save.
Option 1 is better for your original recording because you’ll have an uncompressed version of the audio that you can always re-import into a new Audacity project if disaster strikes. Nevertheless, it is not a bad idea to create backups of your projects at certain milestones as well.
Be sure to give your files descriptive names so you’ll know what they are.
With your audio backed up, you can proceed to editing.
Cleaning up audio can be a complex task, but at its core involves just a few basic concepts:
- Noise removal.
- Volume normalization.
- Equalization.
Noise removal is critical because no matter the quality of your microphone or how clean your environment is, you’re bound to have some level of background noise.
Audacity’s Noise Reduction effect is a good place to start. The process involves selecting a few seconds of “silence” and then allowing Audacity to analyze the audio for background noise. Once analyzed you can apply the reduction effect to your entire track.
Normalizing volume involves setting a peak amplitude on your audio track. The effect will give your audio a consistent gain across the track while preserving differences between quiet and loud moments.
Equalization is also important because it can give your tracks a warmer, more professional sound. Equalization means adjusting the amplitude of frequencies. Lower range frequencies we refer to as bass and higher frequencies we call treble. I recommend applying the RIAA EQ filter curve, but Audacity has several other curve presets for you to try.
Beyond these three basic techniques, you can use other effects like Notch Filter and Click Removal to remove pesky background noises.
Chapter 5: How to Split, Organize, and Mix Audio in Audacity
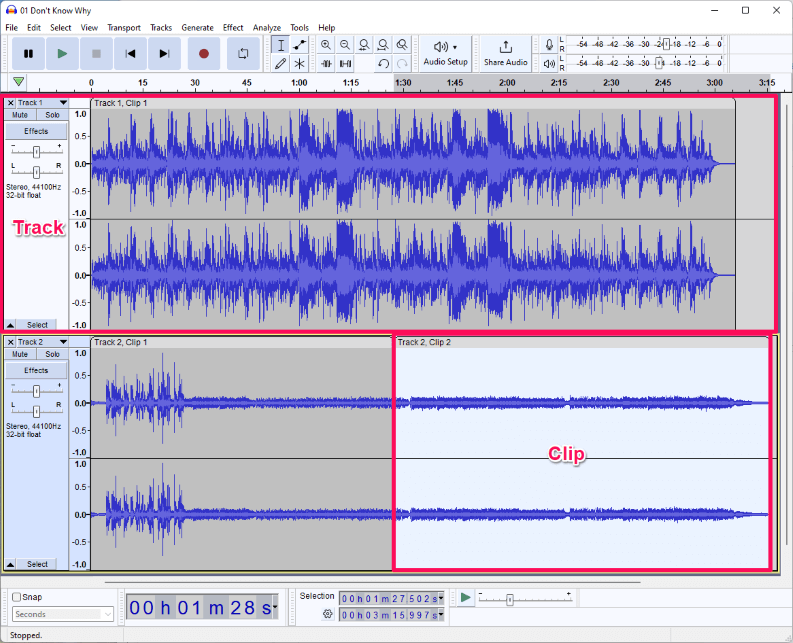
Audacity audio has two basic components: clips and tracks. Tracks are separate audio units in your project. For example, if recording music you might have a track just for vocals and one for each instrument. If recording an interview, you would have a track for each microphone.
Tracks appear on different lines in Audacity and can have two channels (stereo) or one (mono). You can give your tracks names and move them up or down to keep your project organized.
Clips are sections of audio contained within a track. Tracks can contain multiple clips.
With individual tracks, you can adjust the gain for each to achieve the right balance. You can also duplicate tracks as a backup if necessary and mute individual tracks if you want to focus on just one portion of your audio.
To rename a track, click the dropdown arrow next to the track name and select the Name… option. Enter the new name and click OK.
To rename clips, double-click the clip handle, type in your new clip name, and press the Enter or Return key on your keyboard.
Another helpful feature is the ability to change the color of a track’s waveform from the default blue. This can be helpful when organizing your project. For example, you could change all vocals to green, percussion to red, and leave the rest of the instruments blue.
Audacity provides four colors: blue, red, green, and black. To change a track’s color, select Waveform Color from the track’s dropdown menu (next to the track title).
Splitting tracks into multiple clips can be helpful in a variety of ways. Doing so is another method for keeping your audio project organized. Say, for example, you are recording an audiobook. You could break your track into multiple clips by chapter.
Splitting clips also allows you to move them to their own tracks. To split a clip, place your cursor at the point you want to split, right-click, and choose Split Clip. You can also use the Split New option from the Edit > Audio Clips menu if you’d like to automatically move the clip to a new track.
Last, you can move clips around on your timeline or even to other tracks by clicking and dragging the audio via the clip handle drag bar (i.e., the light gray title bar).
Chapter 6: Using Effects and Other Plugins
Effects are Audacity’s most powerful features. We’ve already looked at some effects that come pre-packaged with Audacity like Normalize and Noise Reduction. I’ll run down some other useful effects, and we’ll look at adding additional plugins to Audacity.
You can access most plugins (native or not) from the Effect menu.
Some of the most common are noise removal and repair functions, Fade In and Fade Out, and equalization effects. But Audacity comes with many others including the ability to speed up or slow down your audio, distortion effects, and even more specialized functions like vocal isolation and removal.
To use most effects, select the portion of audio you want to change, then select the function from the Effect menu to apply it.
As I mentioned in the introduction, you can extend the functionality of Audacity with third-party plugins. Audacity supports many industry-standard formats like VST3, which means you can use a variety of extensions to help enhance and manipulate your audio.
Some of these plugins are free. Others cost money. Some developers adhere to the freemium model, allowing you to use some of the features of a plugin but requiring you to pay for full functionality.
Audacity’s own Nyquist format (.ny) is the easiest to install and use, but don’t feel limited to this file type.
Here are some Audacity plugins to consider:
FFmpeg allows Audacity to read and export to additional file types like M4A and WMA.
If you’re producing an audiobook, the ACX Check plugin will verify your audio meets Audible’s standards.
Audacity has its own EQ effects, but MEqualizer is an excellent option for getting your EQ curve just right.
These three options are just a sampling of the myriad plugins available.
Chapter 7: Saving, Exporting, and Converting Audio
You’ve probably heard the phrase, “Save early. Save often.” Such is sage advice, and I would apply it to Audacity as well. Few things are worse than spending hours on a project, only to lose all of your work because of a computer crash.
Use the File > Save Project to save your project or, better yet, use the keyboard shortcut Ctrl+S to do the same. As mentioned above, you can also use the Backup Project option to create a duplicate of your project at that point in time.
When importing audio to Audacity, the software does not modify the original source file but instead stores a copy of the audio inside the project. Audacity projects have a .AUP3 file extension and can only be opened in Audacity.
If you want to be able to play your audio in other media players, you’ll need to export your project to an audio file format. To do so, go to File > Export and choose your preferred format. If you’ve installed the FFmpeg extension, you can access those additional file formats by choosing the Export Audio… option.
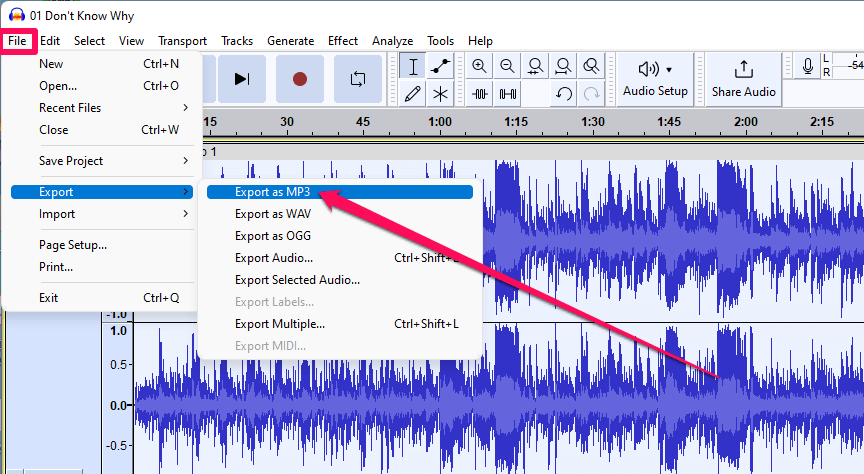
MP3 is the most common format, but it is also compressed. This means that the file size will be smaller, but you also will lose some of the quality of a lossless format like WAV or FLAC. I recommend exporting your project to one of these lossless formats first and then exporting to a more portable format for consumption. In this way, you’ll preserve the quality of the audio.
Final Thoughts
After reading this beginner guide to Audacity, you can now import, record, edit, and export audio. Congratulations!
Audacity is jam-packed with so many features that it would be impossible to cover everything in one article. Nevertheless, this guide should serve as a great starting point for you to get acclimated to the software and begin editing and producing audio.
The best way to learn is through experimenting, but if you get stuck, the Audacity manual and SoftwareHow’s library of tutorials are great sources of help. With some practice and patience, you’ll be editing audio like a pro in no time.
Do you have other tips, tricks, suggestions, or advice for beginners on using Audacity? How did you first learn to use the program? I’d love to hear your thoughts in the comments below.