
To clean up audio in Audacity, use the following built-in effects: Noise Reduction to eliminate unwanted noise, Normalize to attain proper volume levels, and Filter Curve EQ to produce great-sounding audio frequencies.
I’m Andrew Gilmore, a long-time Audacity user, and in this article, we will look at some best practices for cleaning up your audio recordings. So whether you’re a podcaster, audiobook narrator, or just want to clean up a recording, follow the steps below to produce great-sounding audio.
Let’s get started.
Table of Contents
Preventing Noise Is Your Best Option
Have you ever heard that old saying, “An ounce of prevention is worth a pound of cure”?
It may be cliche, but with audio production, the saying rings true. It is so much easier to start with a noise-free environment and a good microphone than to try to clean up the audio in post-production.
Nevertheless, even the best quality studio recordings still require mastering to sound their finest. So if you haven’t yet recorded your audio, do yourself a favor and read our article on how to make your recording sound great.
But if you’re stuck with the recording you have, never fear. Here are the best tips to clear up audio in Audacity.
1. Remove Noise
Before modifying your recording in Audacity, you must create a copy of the file first. Audacity’s changes are destructive, and you want to preserve the original in case you mess something up while editing your audio.
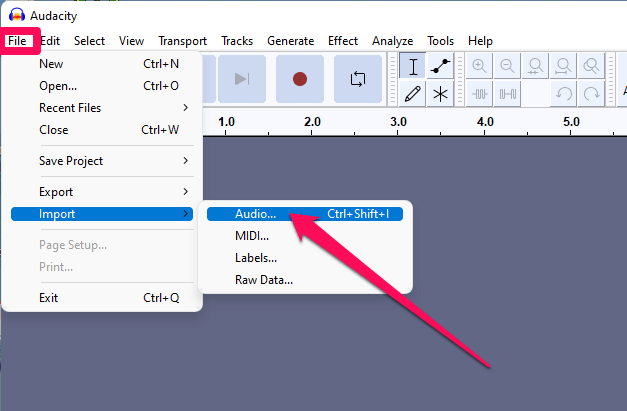
With that caveat, let’s proceed to noise removal. Open Audacity and click on File > Import > Audio… from the menu bar. Browse to your audio file, click on the file, then click Open.
The first thing you want to do is remove noise from your recording.
To do so:
- Find and select a section of your audio that should be silent, i.e., a section that contains only noise.
Audacity says this sample of noise must be at least .05 seconds, but a longer section of audio is better. This selection will teach Audacity what sounds should be removed from your recording.
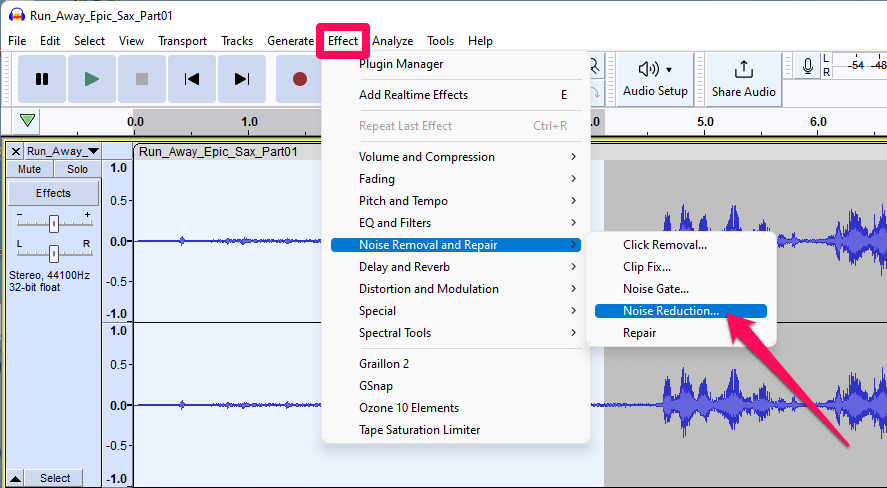
- Click Noise Reduction… from the Effect > Noise Removal and Repair menu.
- Click the Get Noise Profile button.
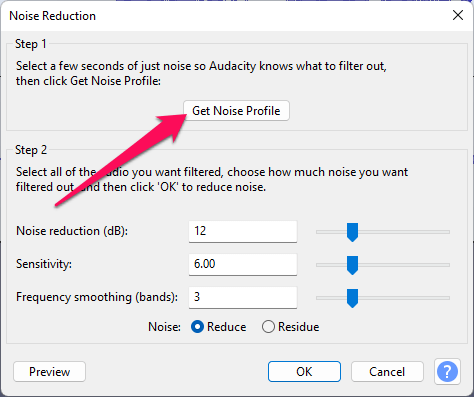
- Now select your entire track and go back to the Noise Reduction effect.
- Click the OK button.
You can adjust the settings if necessary. The more aggressive the noise reduction, the more Audacity will filter out sounds and frequencies you might actually want to keep.
2. Normalize Your Audio Levels
Next, you will want to set the peak amplitude of your audio using the Normalize effect.
Normalizing your audio applies a constant gain to your entire track (or multiple tracks) and corrects DC offset errors which can cause clicking sounds in your recording. Here’s how to apply the effect:
- Select your entire audio recording.
- Click on Effect > Volume and Compression > Normalize… from the menu bar.
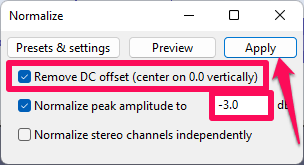
- Leave the Remove DC Offset box ticked, but change the Normalize peak amplitude to setting to -3.0 dB.
The default setting is -1.0 dB, which is normally preferable. Still, because the equalization step we will apply next can increase the amplitude of your audio, this setting will give us some headroom to work with.
- Click Apply.
3. Adjust Equalization
The Noise Reduction effect we applied in step one can leave your recording sounding hollow or tinny if the sampled noise contains frequencies similar to audio in your recording. Applying equalization (EQ) can help restore your sound.
Equalization sets levels in your audio based on frequency. Lower frequencies we call bass; higher frequencies are known as treble.
To adjust the EQ of your audio:
- Select your audio.
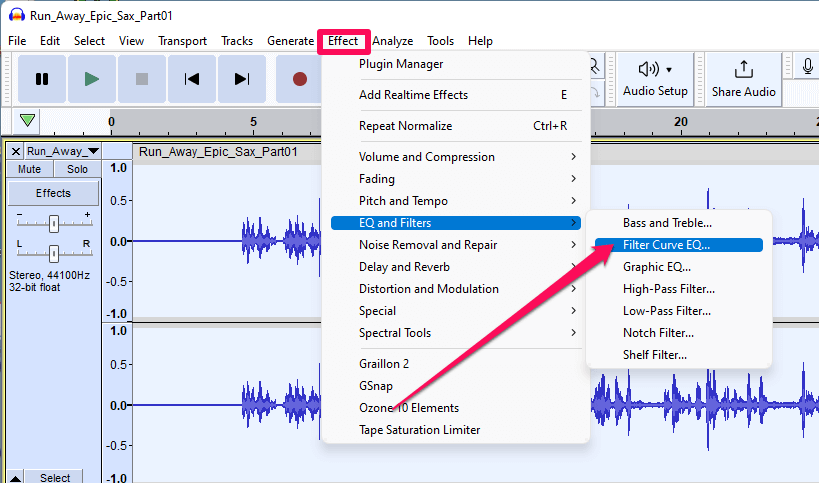
- Click on Effect > EQ and Filters > Filter Curve EQ…
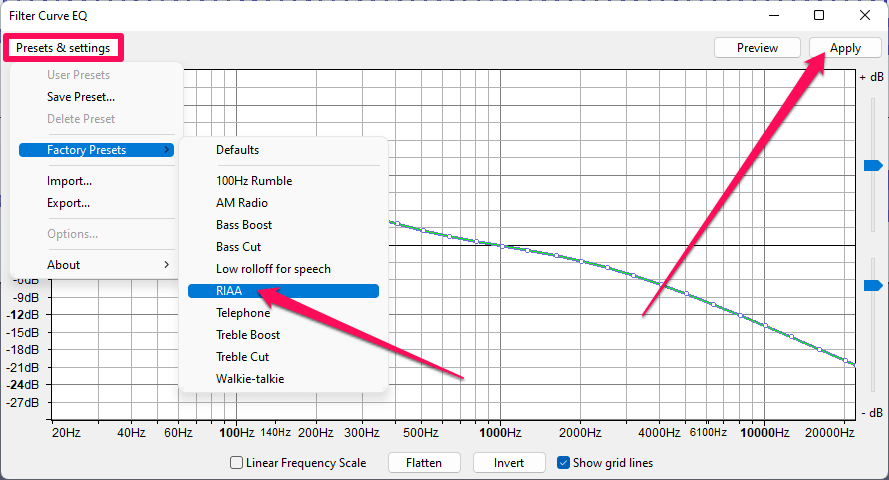
- Click the Presets & Settings button, then select Factory Presets > RIAA.
The RIAA is a standard created by the eponymous Recording Industry Association of America to provide EQ consistency in recordings.
That said, there are nearly endless possibilities for equalization, so feel free to choose another preset, import one, or manually create your own EQ curve if you don’t like the sound resulting from the RIAA effect.
- Click the Apply button.
If applying EQ to your track causes clipping–audio that is too loud–undo the EQ by clicking Edit > Undo Filter Curve EQ, then reapply the normalization effect with a lower amplitude. Then go back and reapply the RIAA EQ curve.
Can Audacity Make Audio Clearer?
As you can see, Audacity has several tools and effects at your disposal to help produce a good quality sound.
To recap: to clean up audio in Audacity, import your file, remove noise using the Noise Reduction effect, normalize the audio levels, and then adjust the equalization.
You can accomplish all of these tasks with just a few clicks, allowing you to quickly clean up your recording.
I’ll turn it over to you now. Do you have any additional tips for cleaning up audio in Audacity?