
Aurora HDR
Summary
Aurora HDR takes the complex process of HDR compositing and makes it extremely simple. The new Quantum HDR Engine does an excellent job of automatically tone mapping your images, and automatic alignment and de-ghosting correct any camera or subject movement between your bracketed images. Compositing is fast, even with automatic noise removal enabled across 5+ high-resolution source images. Once the tone mapped image is ready, making further adjustments is just as simple and intuitive as editing a typical RAW image.
Aurora HDR is easily one of the best HDR software available today. Many of the other dedicated HDR editors available are virtually unusable and produce terrible composites, but Aurora takes all the hassle out of the process. New users will love the simple workflow, and users of Aurora’s previous versions will appreciate the tone mapping improvements provided by the Quantum HDR Engine. Batch processing could be improved, and it would be nice to get a bit more control over the compositing process with layer-based editing, but these are fairly minor issues in an otherwise excellent program.
What I Like: Excellent tone mapping. Fast compositing of large brackets. Solid editing tools. Plugin integration with other apps. Can use on up to 5 different devices.
What I Don’t Like: Localized retouching a bit limited. No lens correction profiles. Add-on LUT packs are expensive.
Table of Contents
Why Trust Me for This Review
Hi, my name is Thomas Boldt, and I’ve been experimenting with HDR photography since I first got serious about digital photography over a decade ago. Accessible HDR photography was in its very early stages then, as most people outside of science labs hadn’t even heard the term before.
I’ve watched the technology mature and felt its growing pains as the software gradually became more and more popular – and even (eventually) user-friendly. Rather than wasting your time with an endless series of bad HDR editors, follow along with my review process and use the time you save for more photoshoots!
Detailed Review of Aurora HDR
Despite the fact that only a year has passed since the release of the previous version, Aurora HDR 2019 has some great new additions. The biggest change is their new compositing method known as the Quantum HDR Engine, which they describe is being ‘powered by AI’.
Oftentimes when companies claim to be using artificial intelligence it’s just marketing hype, but in the case of the Quantum HDR Engine it really does seem to have some merit. Image processing is one area where machine learning has really taken incredible strides even in just the last year.
According to their press release for the launch, “Whether you’re working with bracketed shots or a single image, the Quantum HDR Engine tones down oversaturated colors, loss of contrast, and noise, as well as reduces unnatural lighting caused by halos and unstable deghosting.”
My testing certainly bore out these claims, and I was quite impressed by the quality of the composites that the new engine creates without any help from the user.
In addition to working as a standalone program, Aurora HDR can also be used as a plugin for other programs if you’ve already got an established workflow that you’re happy with. It’s compatible with Adobe Photoshop CC and Adobe Lightroom Classic CC on both Windows and Macs, and Mac users can also use it with Adobe Photoshop Elements, Apple Aperture, and Apple Photos.
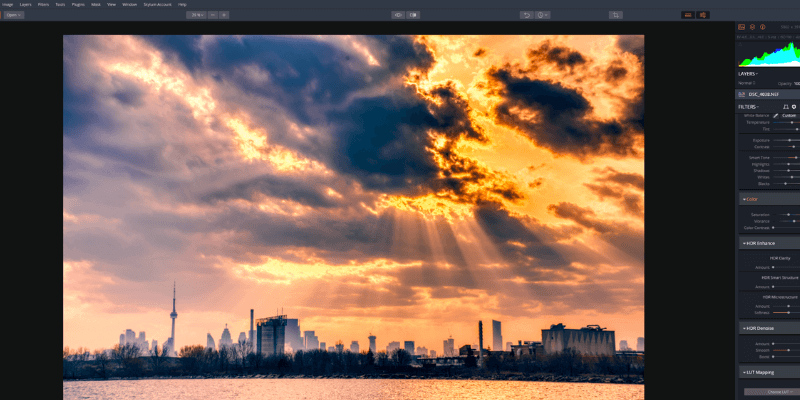
Editing Your HDR Photos
The HDR compositing process was often a frustrating experience in the past. Most of the settings were determined manually, which seems ideal on the surface – but the process was often overly technical and very poorly explained. As a result, the composites created tended to be unnaturally lit, messy, or just plain ugly. The Quantum HDR Engine handles the tone mapping process automatically and does an excellent job, creating dramatic but natural-looking images without any additional editing.
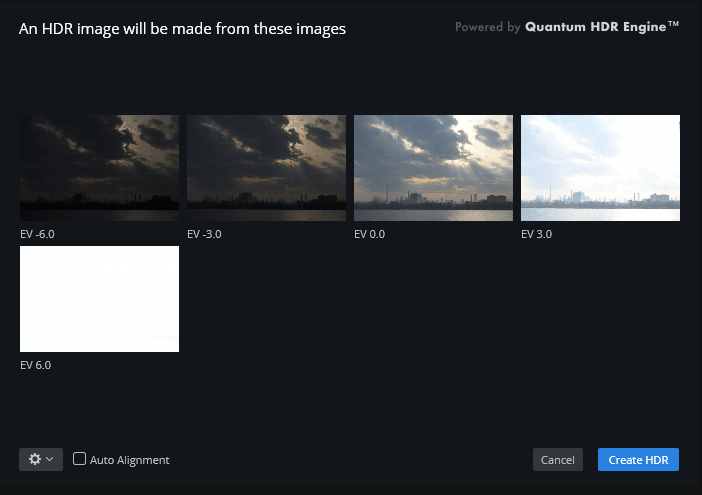
The compositing process only takes a few clicks. Once you select your series of images, Aurora will automatically sort them based on exposure values (EV) and offer you the option of auto alignment. If you shot your images carefully using a tripod, you probably won’t need to align them, but if you shot handheld then it’s definitely a good idea to enable it. Even the smallest amount of shift in your camera position will be immediately noticeable if you leave it disabled, creating undesirable halos around all the objects in your scene. Larger movements in your scenes such as people or other moving objects create artifacts known as a ‘ghosts’, hence the ‘deghosting’ option.
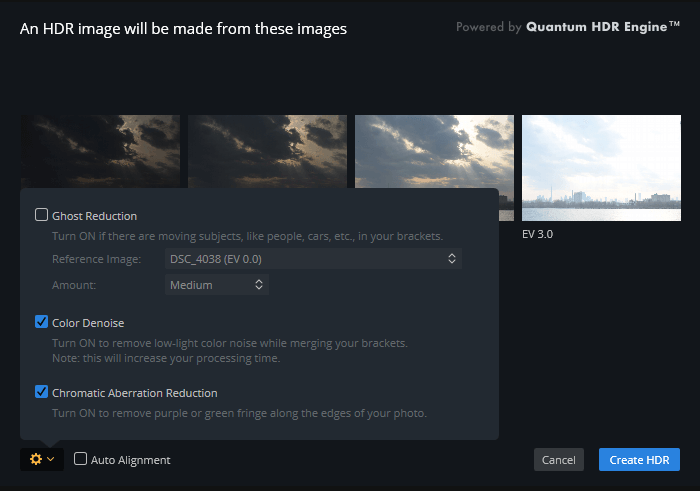
The settings icon offers you a few extra choices, although I’m not sure why it was necessary to hide these options in a separate window. Color Denoise is enabled by default, but I always want to remove chromatic aberrations as well, and it’s definitely a good idea to experiment with the deghosting options available if any moving objects crossed the frame while you were shooting.
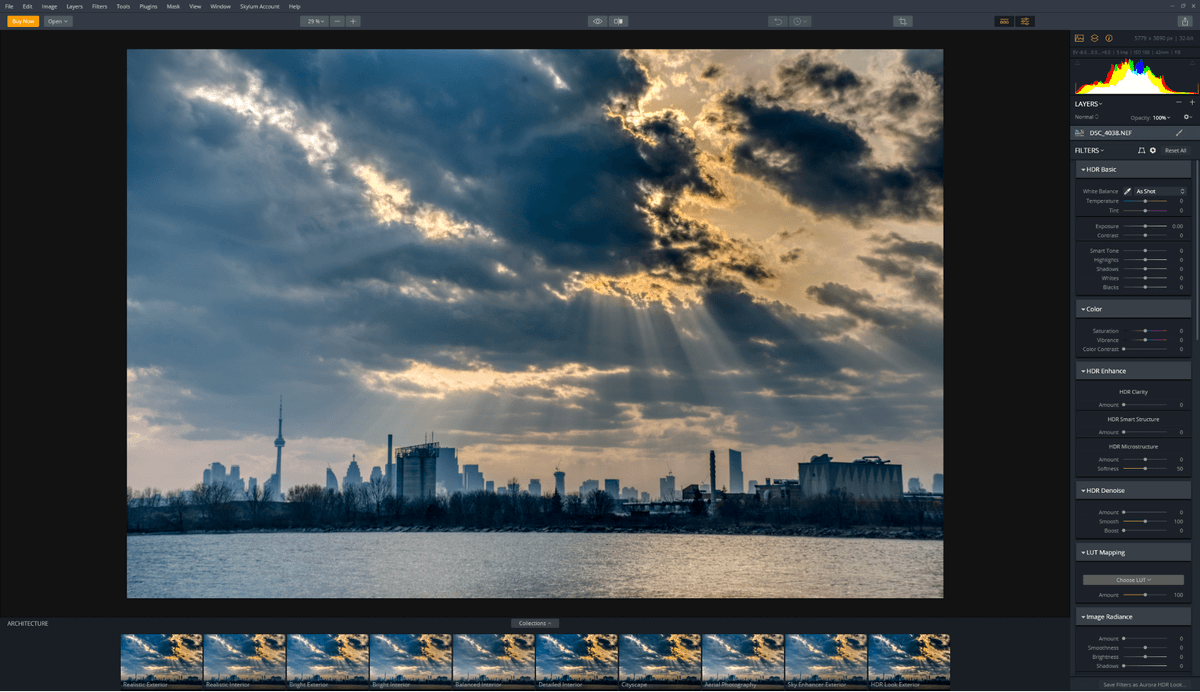
Unfortunately for my sample photo series, no amount of deghosting can keep up with the constantly shifting small waves in the bottom of the frame, and the end result is going to be a bit messy in that section of the image no matter what. A longer exposure could have blurred the water to create a smooth-seeming surface, but I was handholding for these shots and the resulting blur from camera movement would have been too obvious.
This issue isn’t unique to Aurora HDR, as it’s an unavoidable consequence of having excess movement in the shot. One simple way to overcome it for a bracketed series would be to open the composite in Photoshop alongside the photo with the best exposure of the water. A quick layer mask could hide the rest of the photo and just show the non-HDR-composite version of the water. Ideally, this could be done within Aurora HDR itself, as Skylum offers layer-based editing in their Luminar 3 photo editor. Perhaps that’s something to look forward to in the next release (if you’re listening, devs!).
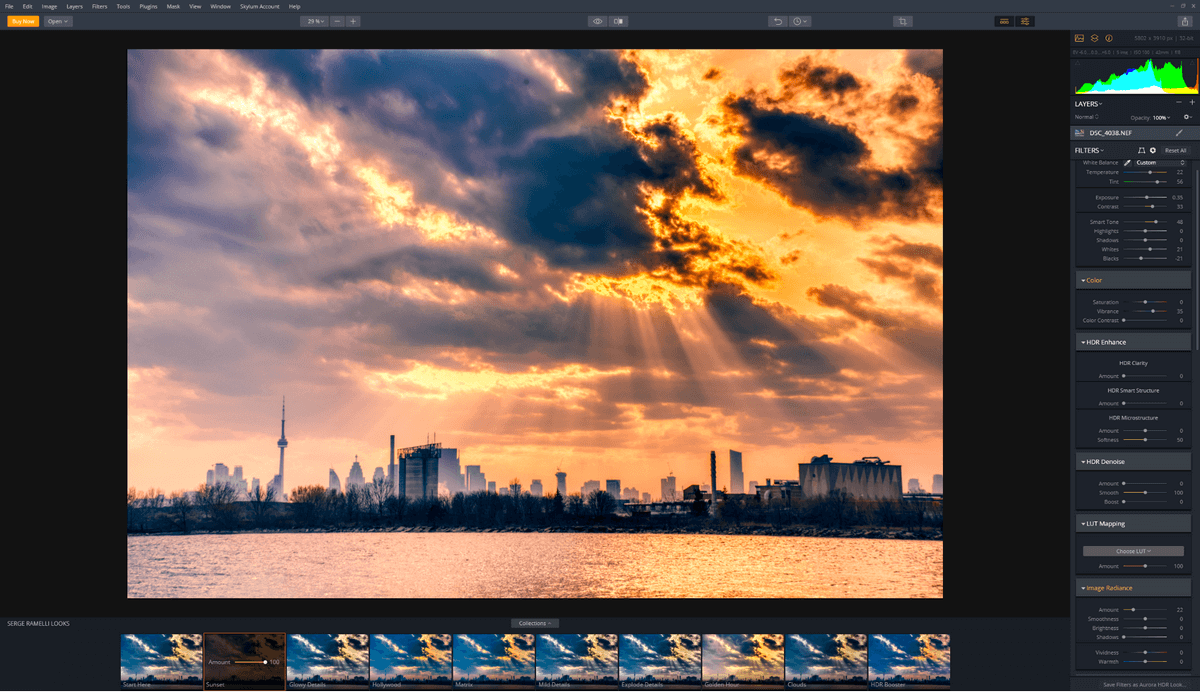
HDR photography is often used as a means of properly exposing both foreground subjects and bright skies, and Aurora includes a handy tool designed to mimic the effect of a graduated filter. The ‘Adjustable Gradient’ filter has preset (obviously adjustable) gradients established for the top and the bottom of the image, allowing you to quickly fix blown out highlights in the sky without adjusting the bottom half of the image.
Aurora HDR isn’t just limited to working with bracketed photos, although they provide the widest possible dynamic range to work with. Single RAW files can be edited using the same process, although much of the unique value Aurora provides is lost. However, if you’re comfortable working with Aurora’s editing and development tools and don’t want to switch programs, it is still a perfectly capable RAW developer.
One feature I really wish Aurora HDR offered is automatic lens correction. There are manual correction options available, but these need to be applied individually to every image you edit, and the process is time-consuming and tedious. I have a fair amount of experience working with manual lens correction because I started doing photo editing before automatic correction profiles were widely available, but I’ve always hated the process as it’s too easy to second-guess yourself.
Looks and LUTs
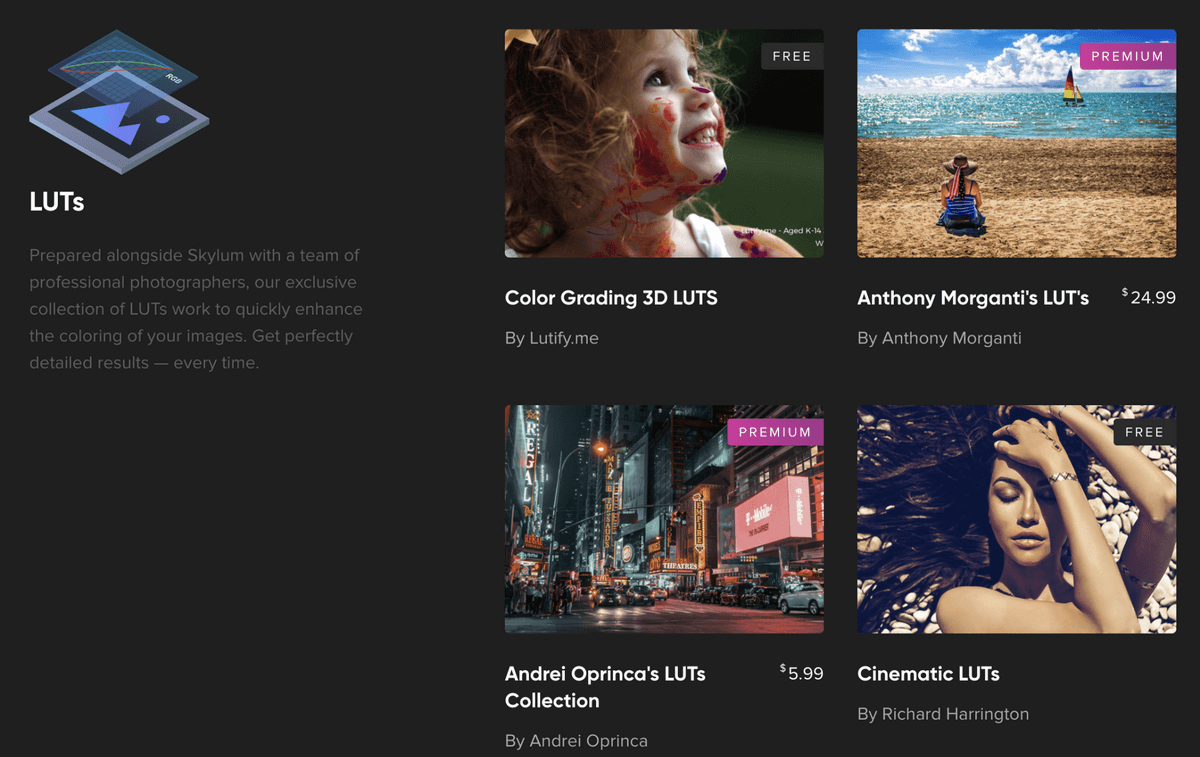
Maybe it’s part of the nature of working with composite images, but HDR photography tends to bring out a lot of different visual styles in the photographers who pursue it. Aurora HDR has devoted an entirely new feature to this fact using a process known as lookup tables or LUTs. This is something that other programs and apps like Instagram typically refer to as ‘filters’, but Skylum uses the word filter to refer to all of the various adjustments you can apply to your image.
In essence, a LUT maps every pixel of your image into a new colorspace, allowing you to create a very consistent style across multiple images with only a single click. It’s possible to import custom LUTs if you have a program that can create them (such as Photoshop) and you can also download additional LUT packs from Skylum. The packs are quite pricey for what you get, in my opinion, at up to $24.99 USD each, although there are also a couple of free packs.
“Looks” are the Aurora HDR name for presets, which can contain typical RAW adjustments as well as LUT adjustments. Looks can be customized and saved for easy access, and they are also how adjustments are applied during batch processing.
Several well-known photographers who have dedicated themselves to HDR photography like Trey Ratcliffe (also a co-developer of Aurora) each created a series of Looks available for free included in the 2019 release, and additional Look packs are available for download from Skylum. They are priced more reasonably than the LUT packs, but I’m not sure they’re really necessary. Any Look that doesn’t contain a unique LUT can be recreated in Aurora for free, although it will definitely take a bit of time and patience to get them right.
A lot of the presets included with Aurora create an extreme change in your images. There are a large number of options to choose from, and the impact of the Look can be modified using a simple slider.
I am not a big fan of the more dramatic Looks and LUTs, as I find them easy to overdo and tough to do well. I tend to prefer a more natural look in my HDR photographs, but many photographers love them. If they are used carefully and in moderation, there are some situations where they can create a pleasing image, but you should always ask yourself whether it’s really necessary to create such a dramatic change.
Batch Processing
While it may not be the first thing many photographers think of, real estate photography is one of the most common uses of HDR photography in a commercial setting. A bright and sunny day creates beautiful light inside, but it also lends itself to blown out highlights in the windows and reflections. Processing the hundreds of images required to shoot a house in HDR one by one would take forever, and batch processing makes the process much simpler.
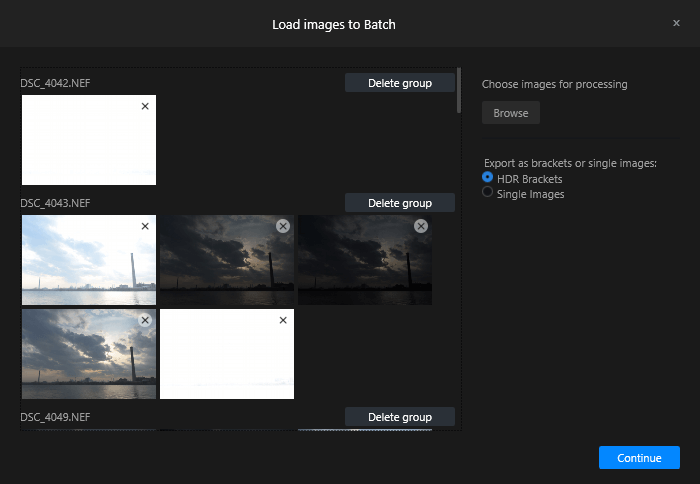
Aurora scans your bracketed photos and places them into single image ‘groups’ based on exposures, and generally does a pretty good of getting the groups correct. My only quibble with this process is that the ‘Load images to Batch’ window is quite small and can’t be resized. If you’re handling a large number of images, you may find it an almost claustrophobic working environment, especially if you have to re-arrange images between groups.

Again, Skylum has hidden useful compositing features such as color denoise and deghosting in a separate window. Using a larger dialog box for this whole process would enable you to see everything in a single glance, and you’d never forget to apply any of the settings. When you’re working on a batch of hundreds of photos it will take some time to process, and realizing halfway through that you forgot to enable auto-alignment because it was hidden in the Advanced panel would be quite frustrating.
Fortunately, these options do get saved if you create an export preset, so it’s best to take advantage of that feature to ensure you never forget to enable them.
Aurora HDR Alternatives
Photomatix Pro (Mac & Windows)
Photomatix is one of the oldest HDR programs still available today, and it does a good job of tone mapping HDR images. The part where Photomatix really drops the ball is its ease of use, as the interface is clunky and definitely long overdue for a redesign based around modern user experience principles. Read our full Photomatix review here.
Nik HDR Efex Pro (Mac & Windows)
Rather than operating as a standalone program, HDR Efex Pro is part of the Nik plugin collection by DxO. This means that it requires additional software to run, but it’s only compatible with Photoshop CC, Photoshop Elements, and Lightroom. If you’re already an Adobe subscriber that’s not a problem, but if not then that’s an additional monthly cost just to use HDR Efex.
Adobe Lightroom Classic CC (Mac & Windows)
Lightroom has had HDR merging for quite a while now, and the results tend to be a bit more conservative and ‘naturally’ colored than what you get with Aurora. Alignment and deghosting could use some work, and the default results aren’t as satisfactory as those found in Aurora. Many users are strongly opposed to the software subscription model, and Lightroom is no longer available as a one-time purchase. Read our full Lightroom review for more.
Reasons Behind My Review Ratings
Effectiveness: 4.5/5
Aurora HDR does an excellent job processing bracketed images, with fast compositing and intuitive editing tools. The initial results are better than any other dedicated HDR program I’ve tested, and making further adjustments is just as simple as it is in a typical RAW image editor. I wish there was a bit more control over how the images are composited, perhaps using layer-based editing, but overall Aurora is an excellent HDR editor.
Price: 4/5
Priced at $99, Aurora HDR is a bit on the pricey side for a dedicated HDR editor, but anyone who shoots a lot of HDR will appreciate the simple workflow that it provides. Skylum also allows you to install Aurora on up to 5 different devices (Mac, PC or a mixture of both), which is a nice touch for people who use a mix of operating systems like yours truly.
Ease of Use: 4.5/5
One of the best things about Aurora HDR is how easy it is to use. HDR compositing used to be done manually and still produces bad results, but thanks to the new Quantum HDR Engine compositing is entirely automatic. The entire workflow is that simple, making it very quick to start working with Aurora immediately after installation. The only slightly difficult aspect of editing is lens correction, which must be done manually instead of using automatic lens correction profiles.
Support: 5/5
Skylum has done an excellent job of creating introductory materials, walkthroughs, and tutorials for new users. They’ve also created a complete support system through your Skylum account, which enables you to contact their support team directly if you have a more technical problem.
The Final Word
Aurora HDR is a program from Skylum, a company that develops photo-related software (for example, Luminar). It uses the three exposures taken during an HDR shot to allow for more comprehensive and detailed edits of your photos. The program has the range of editing tools you would expect to see in a basic photo program, as well as dozens of HDR-specific features.
If you’ve dedicated yourself to HDR photography, then Aurora HDR is a great way to simplify and streamline your editing process while still achieving great results. If you’re only dabbling in HDR, you may want to experiment with the 14-day free trial to see if the price tag is worth it for a dedicated HDR editor. If you’ve already got a previous version of Aurora HDR, the new Quantum HDR Engine is definitely worth a look!
So, do you find this Aurora HDR review helpful? How do you like this HDR editor? Leave a comment below.
What is the maximum number of images Aurora HDR will allow you to merge into a HDR Batch? Photomatix Pro only allows 5 images. As a real estate photographer, there are occasions when I need 7 images to batch. Can Aurora manage 7 or more and can it delineate 5 and 7 in a single batch. For the sake of speed, I try to batch and them work the images independently in Lightroom.