
There are a few ways in which you can create hand lettering in Procreate. You can practice your freehand lettering by using a Drawing Guide grid as a reference or downloading a worksheet. Alternatively, you can hand trace over Procreate text.
I’m Carolyn and I’ve been using Procreate for over three years to run my digital illustration business. As I’m drawing on the app every day, I’ve had a chance to experiment and practice with hand lettering, which is the most important part of learning how to write in Procreate.
There is no quick fix or easy way to learn how to perfect your handwriting in Procreate because in this case, practice really does make perfect. Writing in Procreate isn’t as easy as writing on paper. The only way to get better is by dedicating your time and effort.
However, I do have some useful tips to get you started in the process and I’ll be sharing them with you in this article.
Note: Screenshots are taken from Procreate on iPadOS 15.5.
Table of Contents
Key Takeaways
- You can practice hand lettering using a grid or tracing over a practice sheet or original Procreate text.
- You can purchase and download different hand lettering brushes online.
3 Ways to Do Hand Lettering in Procreate
Below are three ways that I have used to practice my hand lettering technique in Procreate. Try them all so that you can find the best one that will work for you.
Method 1: Using a Drawing Guide Grid
This method is the best option if you are already confident enough with freehand lettering. You can create a grid to use as a reference to ensure your lettering is aligned and the sizing remains consistent. Here’s how:
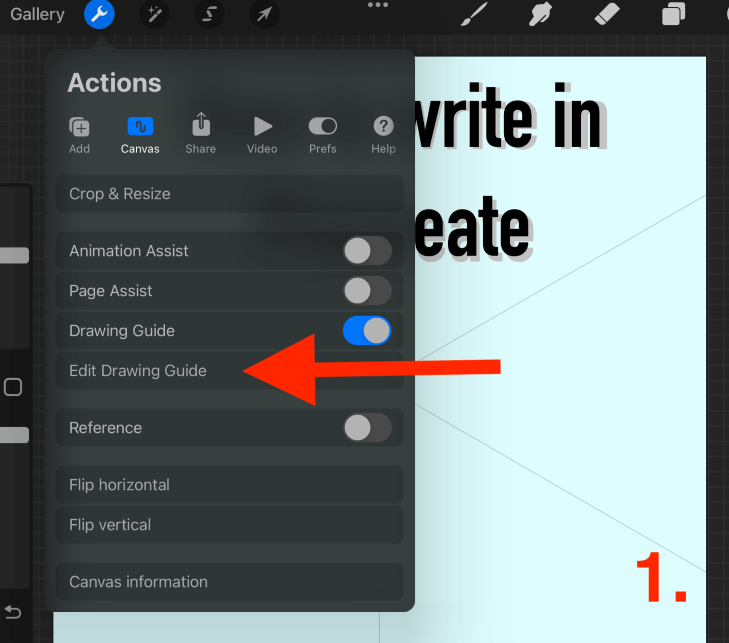
Step 1: Open your Actions tool by tapping on the wrench icon. Open the Canvas menu and switch your Drawing Guide toggle to on. Then tap Edit Drawing Guide.
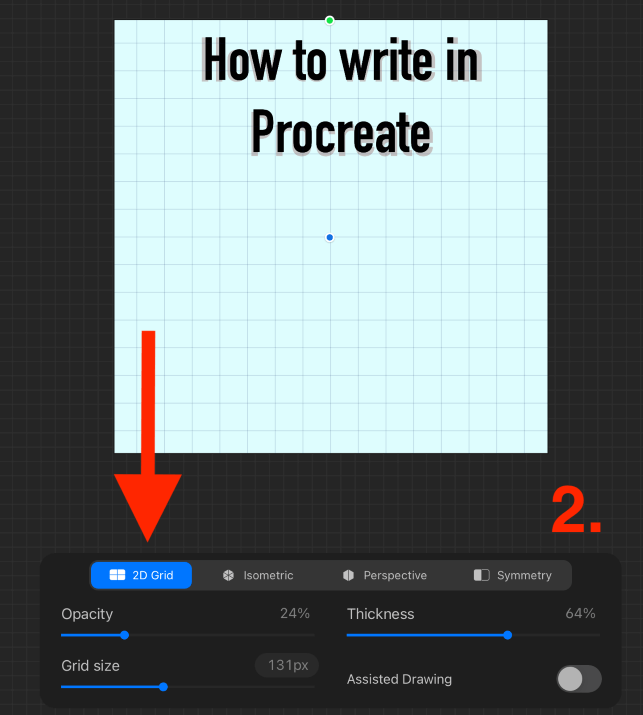
Step 2: Select the 2D Grid option and adjust the Grid Size to suit the size of lettering you want.
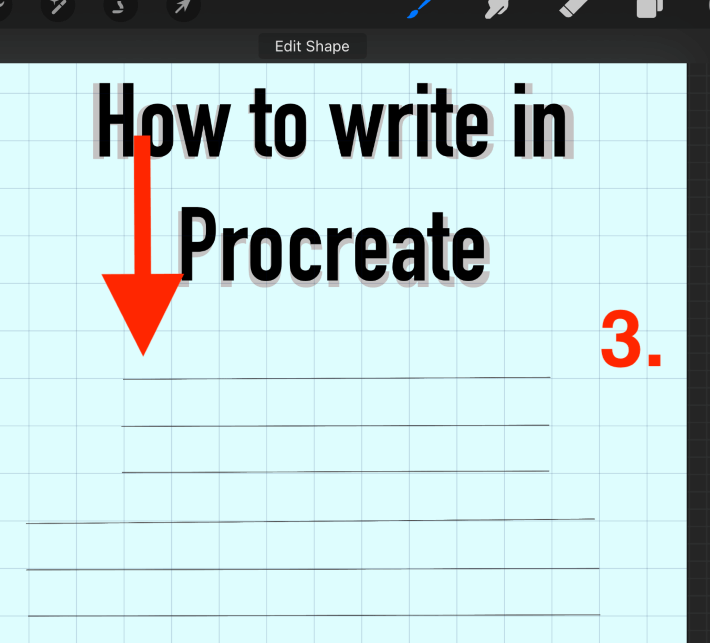
Step 3: Using your brush, draw a grid reference for your lettering by drawing a straight line and holding down until the QuickShape tool activates and straightens your lines.
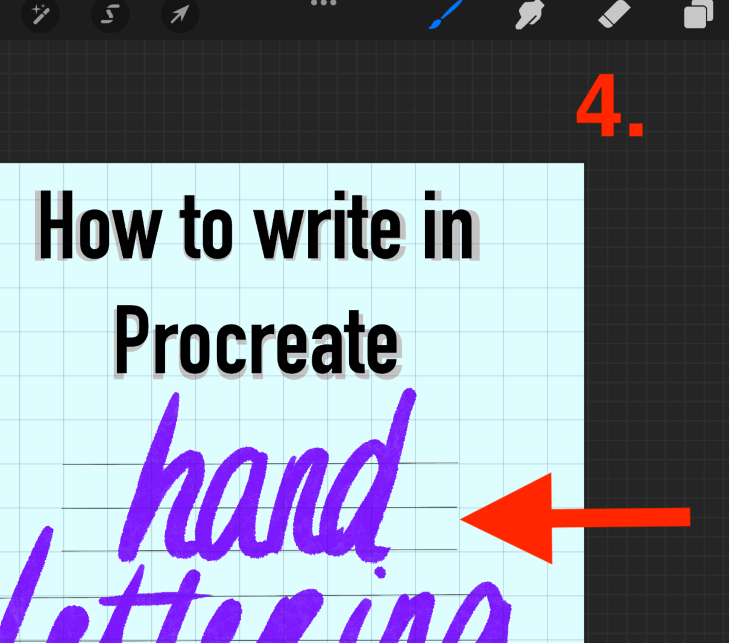
Step 4: Add a new layer on top of your grid layer. Choose a brush and draw your lettering using the grid as a guide.
When you are finished using the grid, you can deactivate the layer by unticking it or swiping left to delete it completely.
Method 2: Tracing Text
This is a great method to use if you’re new to hand lettering and need a more defined guide in order to get your lettering right. Here’s how:
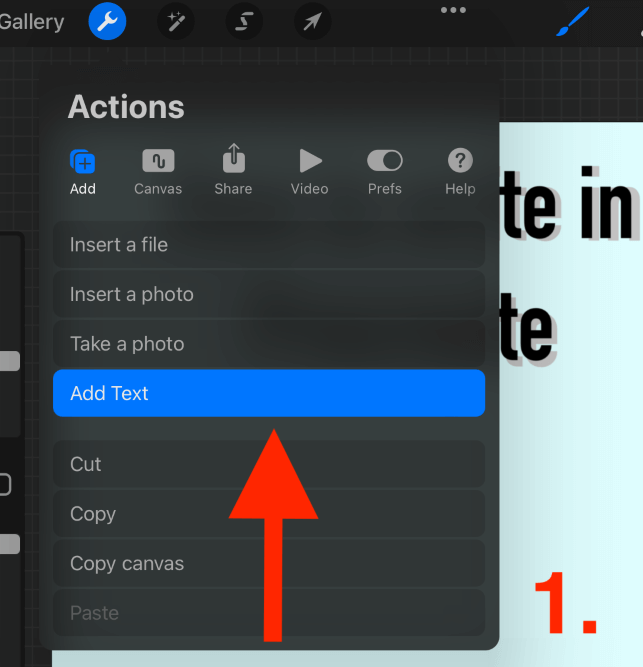
Step 1: Open your Actions tool and select Add Text from the Add menu.
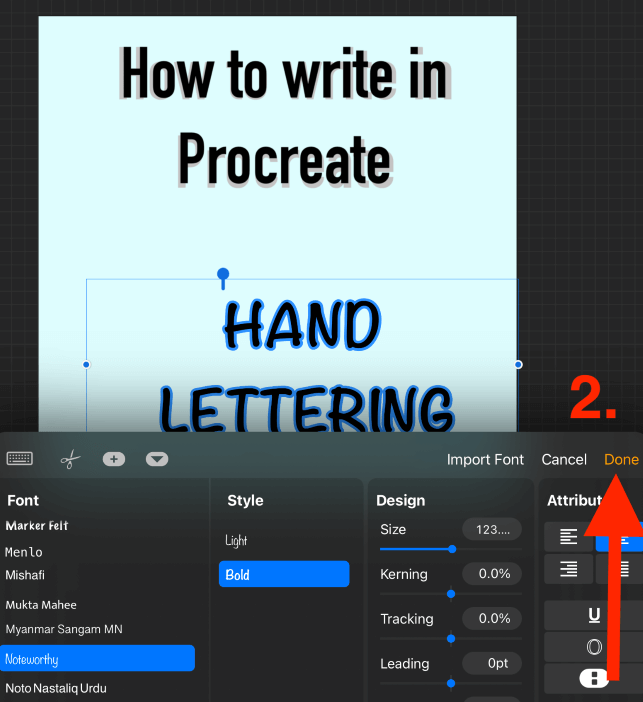
Step 2: Add the text content, choose a font style that you would like to replicate with your hand lettering, and tap on the Done button.
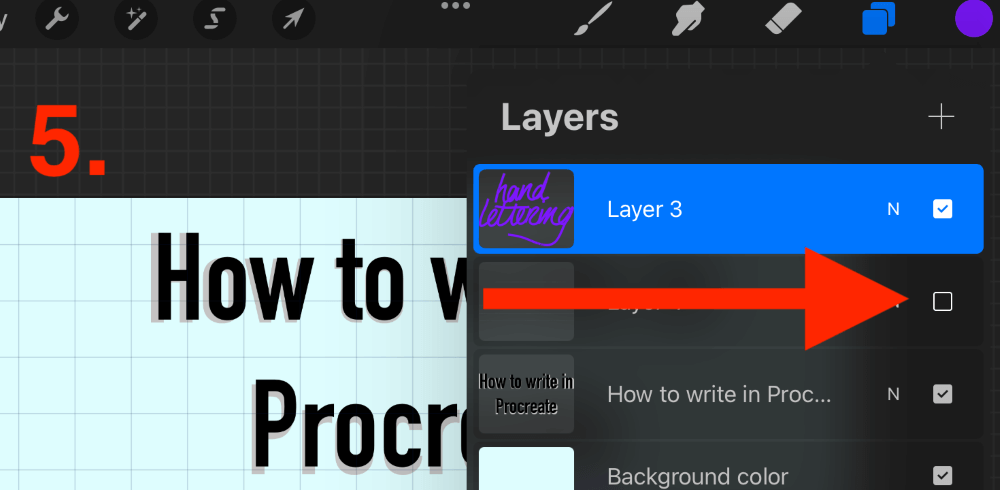
Step 3: Add a new layer on top of your text layer by tapping on the + symbol in the top right-hand corner of your Layers menu.

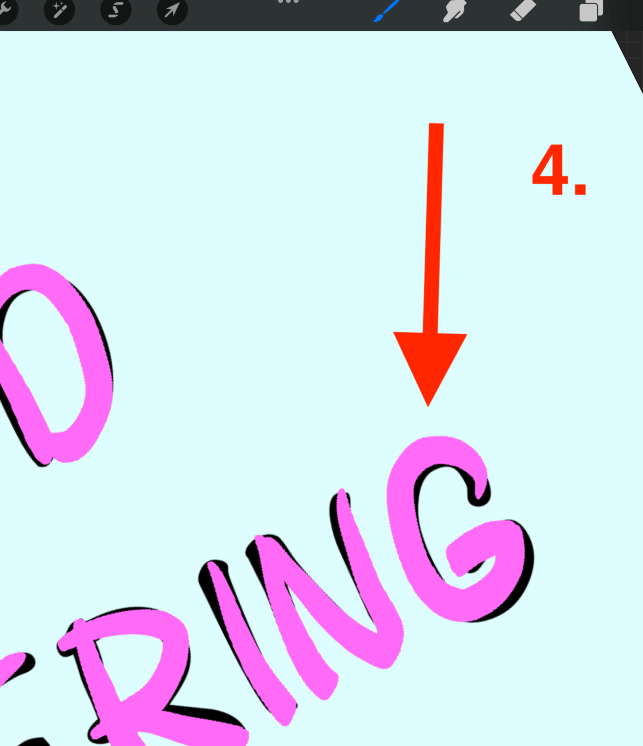
Step 4: Choose a brush and trace over each word carefully. Try to replicate the pressure and stroke of each letter. I recommend using a different color brush for the text layer so that you can see the path you’re working on.
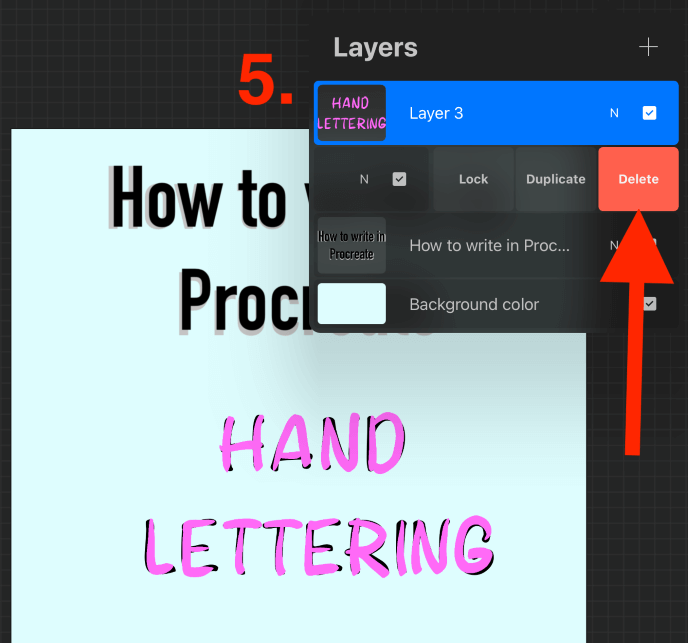
Step 5: When you are done with your handwritten lettering, you can deactivate the sample text layer by unticking it or swiping left to delete it completely.
Method 3: Using Practice Sheet
There are resources online that help you practice your hand lettering too. To use this method, find the right practice sheet of lettering style for you and save it to your device. Once you have done this, follow these steps:
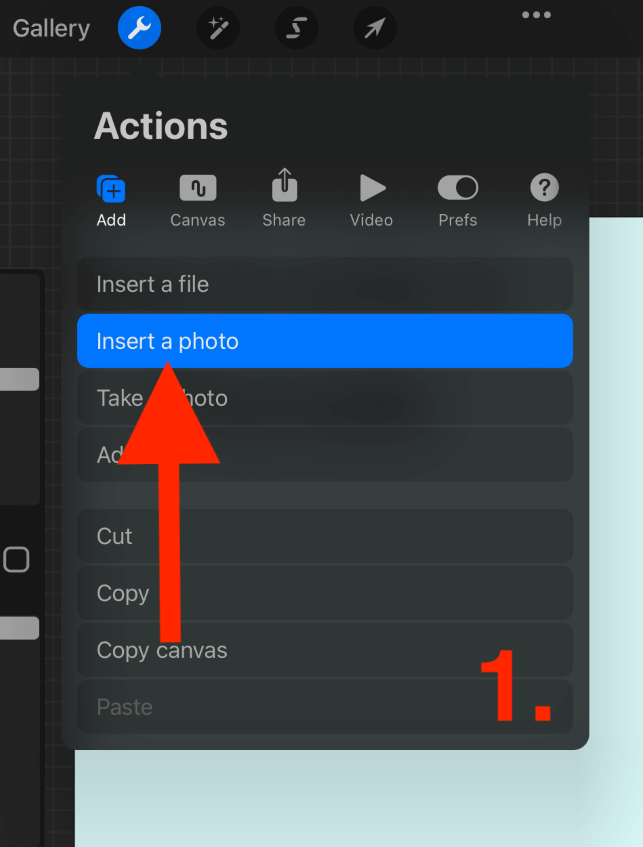
Step 1: Open your Actions tool by tapping on the wrench icon. Select Insert a Photo in the Add menu. Select your saved practice sheet from your device.
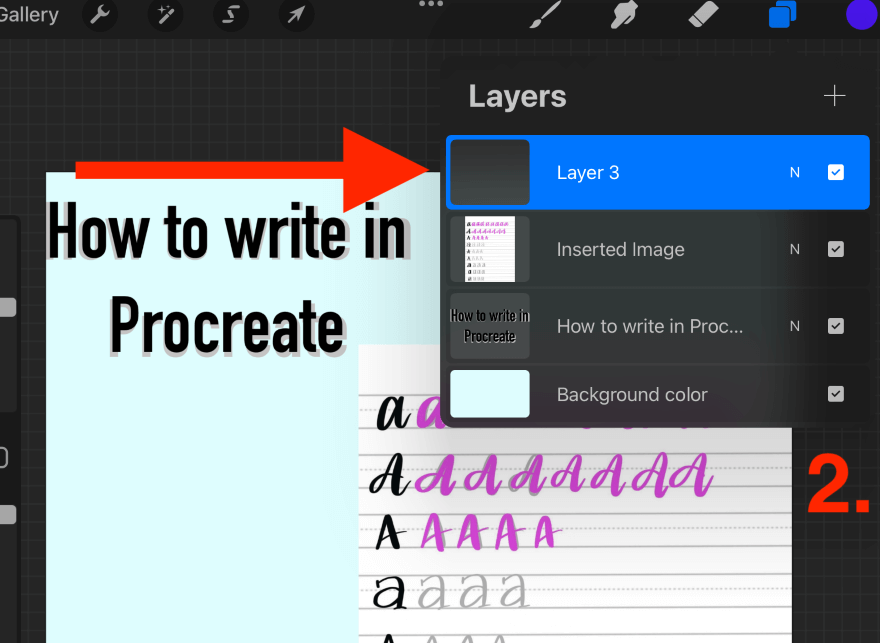
Step 2: Add a new layer on top of your practice sheet layer by tapping on the + symbol in the top right-hand corner of your Layers menu.
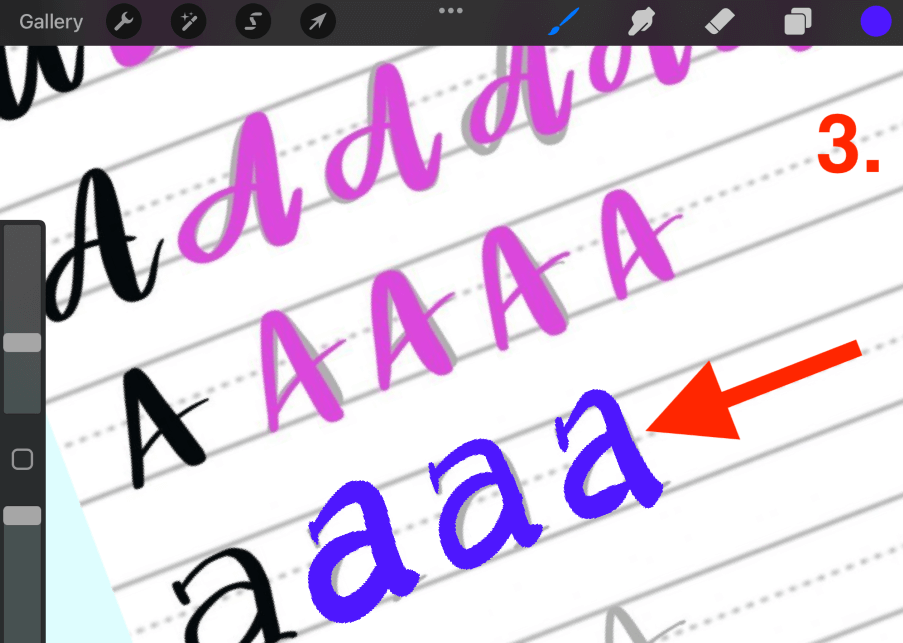
Step 3: Using your brush of choice, start to trace over the letters on your practice sheet until they start to resemble the example. When you are finished practicing, you can deactivate the layers by unticking them or swiping left to delete them completely.
Pro Tip: You can search online for helpful practice sheets for almost any style of lettering you could ever possibly want. The one I used is from Awesome Alice’s website.
FAQs
Below is a list I have gathered of some of your frequently asked questions about the topic of hand lettering in Procreate.
How do you do hand letters in fonts?
I recommend adding the font of choice to your canvas by using the Add Text function. Then add a layer on top of it and trace the shape of the letters by using a brush that is closest to your chosen font style.
Are there Procreate hand lettering templates?
There are so many resources online from some amazing digital artists. There are many templates to choose from that you can purchase and download from other artists and insert as a photo into your canvas.
How to fill in lettering in Procreate?
You can edit the color of your text in Procreate by ensuring the Edit Text menu is open and adjusting the color of your Color Wheel. Alternatively, you can zoom in on your lettering and drag and drop your desired color onto each individual letter to fill it.
How to add shadowing to lettering in Procreate?
Duplicate the text layer and change the color of your bottom layer. Then use the Transform tool to expand the size or angle of your bottom text layer until it provides a shadow effect.
Conclusion
Hand lettering in Procreate is one of the hardest skills to improve in Procreate. Just like calligraphy, training your wrist to create smooth, confident, and consistent strokes is a challenging task but at the same time, it is 100% achievable by any and all artists.
If you’re interested in enhancing your hand lettering skills and creating freehand text within your own digital artwork, I recommend starting now and dedicating a large volume of your time to it. It will be worth all of the hard work as the results are incredibly unique and versatile.
Do you do your own hand lettering in Procreate? Share your process and experience below in the comments section as I would love to hear from you.