
The Quick Shape tool on Procreate is activated when you draw a line or shape and hold it down. Once your shape is created, tap on the Edit Shape tab at the top of your canvas. Depending on what shape you created, you will be able to amend it here.
I’m Carolyn and I’ve been using this tool for over three years in my digital illustration business to create sharp, symmetrical shapes within a matter of seconds. This tool allows me to easily alternate between hand-drawn work and professional graphic design.
This tool really is a designer’s dream and it can elevate your work to another level. You do need some time to familiarize yourself with it and learn about all of its settings and functions to be able to make the most of it. Today, I’m going to show you how.
Table of Contents
Where is the Quick Shape Tool in Procreate
This tool is a bit of a magic trick. You must create a shape in order for the Quick Shape toolbar to appear. When it does appear, it will be in the center of your canvas, up the top directly underneath the main settings banner on Procreate.
Depending on which shape you create, you will get a different selection to choose from. Below I have selected three common shape types that you may use, so you can see what kind of options will appear and where.
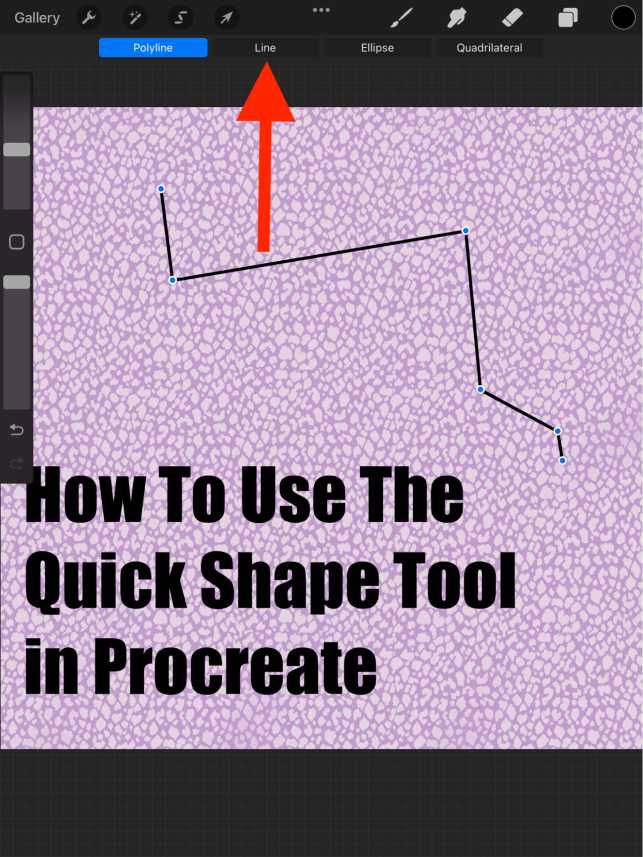
Polyline
For any shape that is slightly abstract, not defined by sides, or open-ended, you will get the Polyline option. This allows you to take your original shape and redefine the lines to be clear and sharp, looking more mechanical than organic.

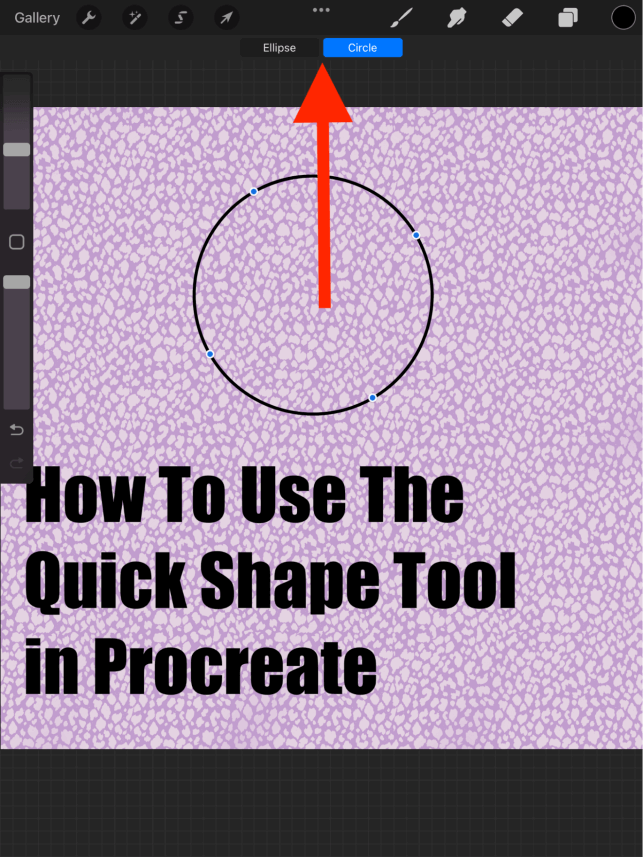
Circle
When you draw a circular shape, you will have the option to morph your shape into a symmetrical circle, ellipse, or oval shape.
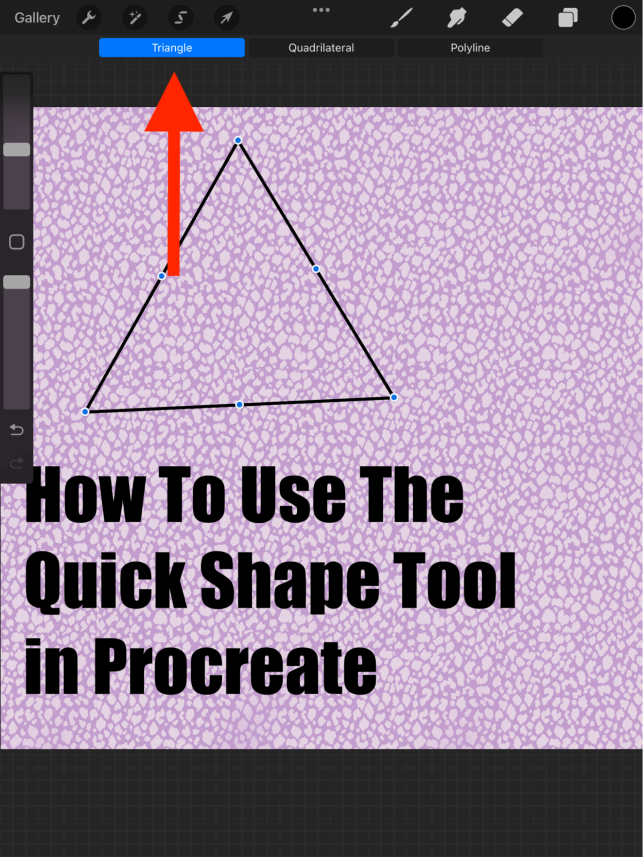
Triangle
When you draw a three-sided shape like a triangle you will have three options. You can choose to morph your shape into a triangle, quadrilateral, or polyline shape.
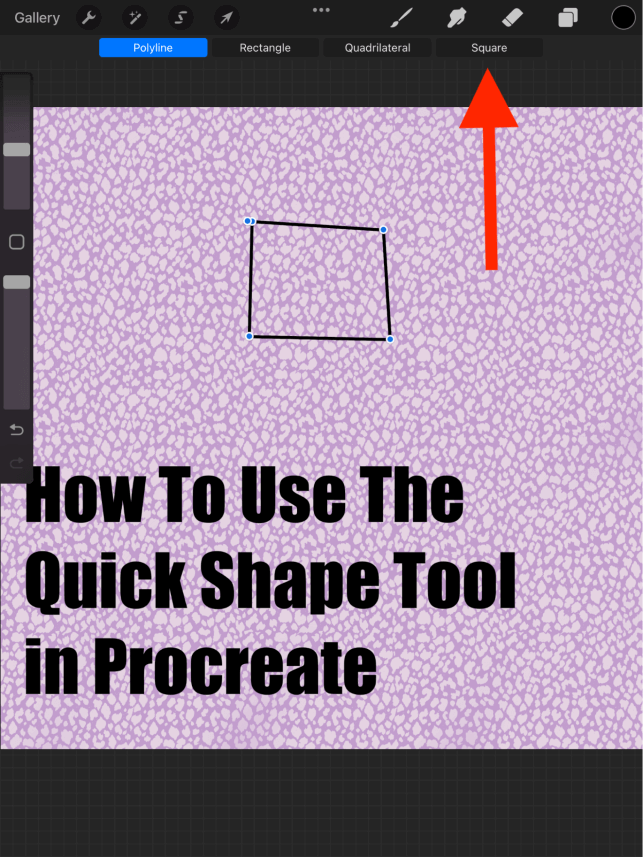
Square
When you draw a four-sided shape like a square or a rectangle, you will have four options to choose from. You can morph your shape into a rectangle, a quadrilateral, a square, or a polyline shape.
Line
When you draw one connected straight line, you will have the Line option. This creates a perfectly straight, mechanical line in the direction that you drew it.
How to Use the Quick Shape Tool
This tool is very easy and quick to use once you get the hang of it. Follow the step-by-step below to start experimenting with this tool until you get the shape you want. You can repeat this method as many times as needed.
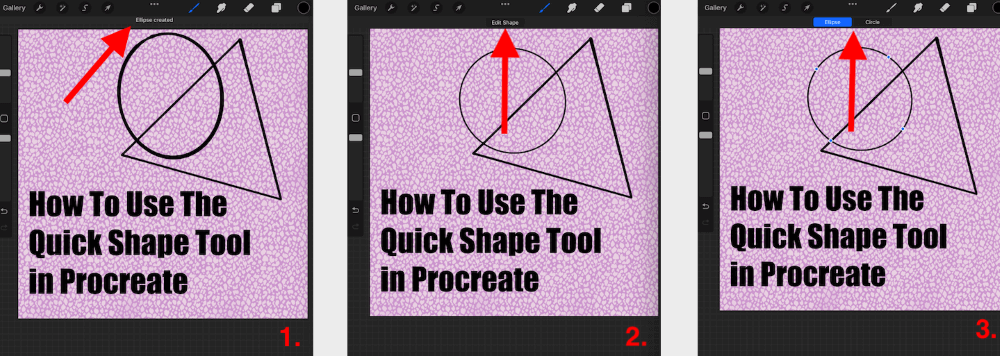
Step 1: Using your finger or stylus, draw the outline of your desired shape. Once you have done this, continue to hold down on your shape until it flips to a symmetrical shape. This should take about 1-2 seconds.
Note: Procreate will auto-recognize what shape you have created and it will appear at the top of your screen after you release your hold.
Step 2: Once you have completed step one, release your hold. Now a small tab will appear in the top center of your canvas that says Edit Shape. Tap on this.
Your shape options will now appear at the top of your canvas. You can tap on each shape option to see which one you wish to use. Once you have chosen, tap anywhere outside of your shape on the screen and it will close the Quick Shape tool.
Note: You can now use the ‘Transform’ tool (arrow icon) to move your shape around the canvas. You can also duplicate it, change the size, invert it or fill it if you wish.
Quick Tool Shortcut
If you’re looking for a quicker, simplified way of using this tool, look no further. There is a shortcut however, it doesn’t give you as much control or options over the outcome of your shape. But if you’re in a rush, try this method:
Step 1: Using your finger or stylus, draw the outline of your desired shape. Once you have done this, continue to hold down on your shape until it flips to a symmetrical shape. This should take about 1-2 seconds.
Step 2: Keeping your hold, use your other finger to tap on the screen. Your shape will flip to a symmetrical version of the shape you created. Hold this down until you’re happy with the size.
Step 3: You must release your first finger before you release the hold of your second finger. If you don’t do this, your shape will revert to its original shape and you will lose the symmetrical shape that you chose.
Helpful Notes About Quick Shape Tool
You cannot use this tool for organic shapes. It will automatically default to a Polyline shape. For example, if I draw a love heart shape and use the Quick Shape tool, it will not transform my love heart into a symmetrical shape. It will recognize the organic shape as a Polyline instead.
When you draw your shape and hold it down for 2 seconds to get your mechanical shape, you can adjust the size and angle of it by dragging it inwards or outwards on your canvas.
If you are looking for perfect symmetry, ensure you are closing your shape before using the Quick Shape tool. This means making sure that all lines are touching and connected and that there are no visible gaps in your outline shape.
Procreate has created a series of useful video tutorials on YouTube and I found the Quick Shape tool very helpful when I was learning. Here’s a good example:
FAQs
I have answered a small selection of your frequently asked questions about the Quick Shape tool below:
How to add shapes in Procreate Pocket?
Great news, Procreate Pocket users. You can use the exact same method above to create shapes in Procreate Pocket using the Quick Shape tool.
How to turn on quick shape in Procreate?
Simply follow step one listed above. Draw your shape and hold it down on your canvas. The Quick Shape toolbar will appear in the top center of your canvas.
How to edit shape after drawing in Procreate?
Once you have hand drawn your shape, hold down on your canvas to activate the Quick Shape tool. Once you have created your desired shape, you will be able to select it and edit it afterward. You will be able to edit the size, shape, position, and color of the shape.
How to turn off quick shape in Procreate?
Sometimes this tool can get in your way if it’s not what you’re looking for. You can temporarily disable this feature in your Preferences in Procreate. Ensure the toggle is switched off under the Quick Shape title in Gesture Controls.
How to undo quick shape in Procreate?
You can easily go back or undo your mistake in Procreate by tapping the screen with two fingers or clicking on the Undo arrow icon on the left of your canvas. Alternatively, you can just delete the entire layer if the shape has been isolated into its own layer.
Conclusion
Personally, I adore the Quick Shape tool. I love having the option to create and manipulate perfect circles, rhomboids, and patterns. You can create some really awesome things with this tool and it’s incredibly useful for graphic design projects.
Spend a few minutes on Procreate exploring this tool if you want to bring your expertise to the next level. This may even allow you to expand your skill set and open up some new opportunities for yourself and your artwork.
Do you have any helpful hints for using the Quick Shape tool? Share below in the comments so we can learn from each other.