
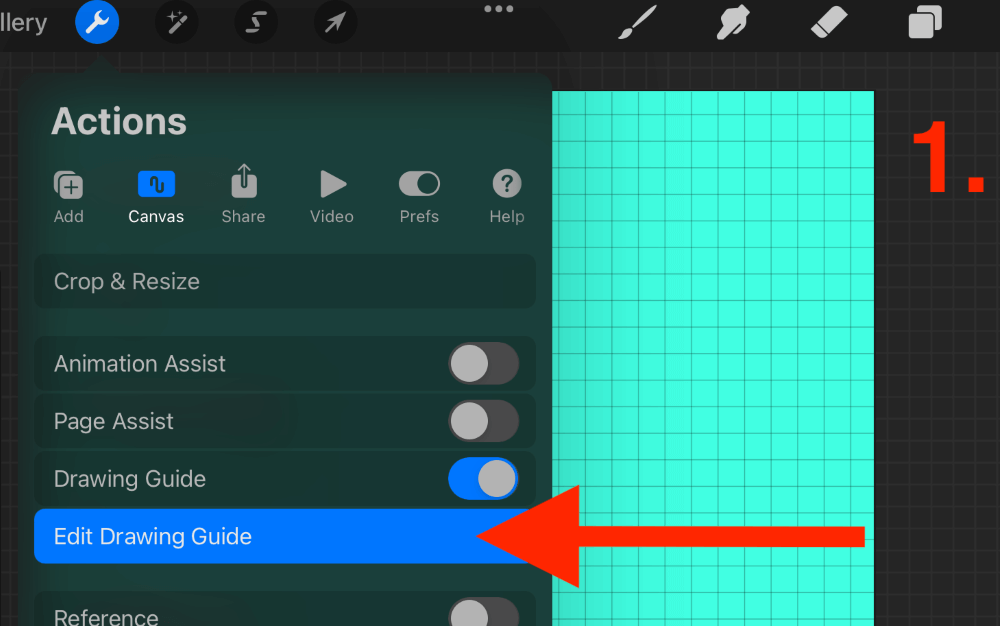
Tap on the Actions Tool (wrench icon) and open your Canvas menu. Turn on your Drawing Guide and tap on Edit Drawing Guide. Activate the 2D Grid option and adjust your Grid Size, Opacity, Thickness, and Color accordingly. Then tap on Done.
I’m Carolyn and I’ve been using Procreate for over three years to create digital artwork for the clients I receive from my digital illustration business. It’s my job to know the ins and outs of the app as I have to use it every day to create anything and everything you could ever think of.
Creating a grid in your Procreate canvas can be used for many different purposes. Today, I am going to show you how to activate and edit a drawing grid and also explain some of the reasons you may need to use this feature in the future.
Note: Screenshots are taken from Procreate on iPadOS 15.5.
Table of Contents
Key Takeaways
- You can easily create your own grid by selecting the Edit Drawing Guide option in your Canvas menu.
- Using a grid can help you with creating symmetry in your work or creating patterns and making the composition perfect.
- You need to manually turn your Drawing Guide on and off.
- Assisted Drawing can help you with guiding your brush along the direction of your grid and needs to be activated on every layer individually.
How to Make a Grid in Procreate – Step by Step
This process doesn’t take long to complete and it can be used for a wide variety of things when it comes to drawing on your canvas. Here’s how:
Step 1: Tap on the Actions tool (wrench icon) and open your Canvas menu. Scroll down the drop-down list and turn on your Drawing Guide. Then tap on Edit Drawing Guide.
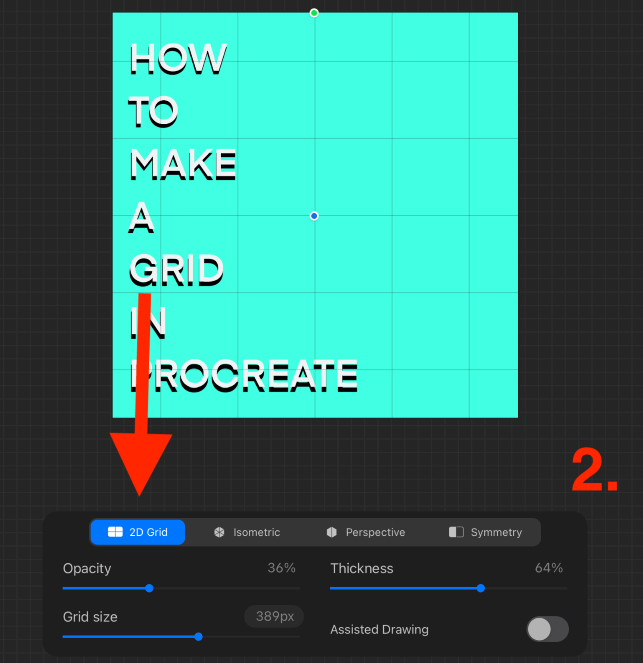
Step 2: In your Edit Drawing Guide window, select the 2D Grid option in the bottom left-hand corner of your canvas. Here you can adjust the Color, Opacity, Thickness, and Grid Size to your liking.
Step 3: You can choose to turn on/off your Assisted Drawing Function. When active, this will guide your strokes in the direction of your grid. When deactivated, your strokes will not be adjusted. When you have made your choice, tap on Done to start drawing.
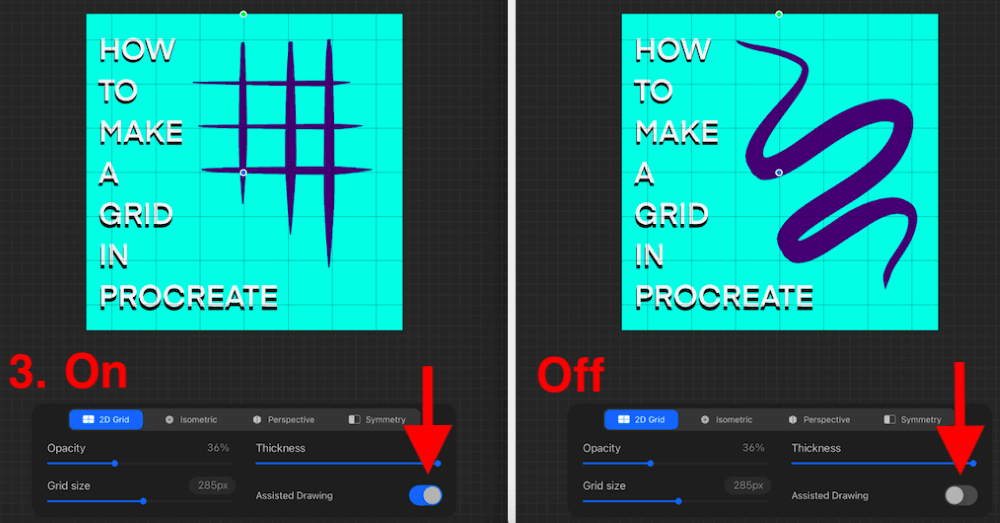
Pro Tip: Assisted Drawing will only remain active on the current layer. You must manually activate Assisted Drawing on each layer you want to use it on.
Why Make a Grid in Procreate
There are many uses for creating a grid in Procreate. Below are some of the reasons that I use the grid function and how it can benefit your work.
Proportion
Using a grid when drawing portraits and facial features can help you to get your proportions correct and minimize any edits you may need to make down the road.
Composition
When creating abstract artwork, the grid function can help you to keep your composition focused and ensure you don’t get carried away and have to move your artwork around your canvas in the future.
Symmetry
I like to activate the 2D Grid in its largest format when working on logos and graphic design work as it helps me to align the symmetry and angles of shapes and forms when I’m drawing.
Straight Lines
When you’re using a Grid and have your Assisted Drawing feature activated, this makes it so much easier when creating straight lines or perspective shapes. This is especially useful when working on landscapes like sunsets or mountain ranges.
Patterns
I often use the large grid option if I want to create my own pattern or checkered effect. Using the little boxes as a guide can lead to some really trippy effects and cool outcomes.
Measuring
The grid function is also useful when creating artwork that may need to be measured before, during, or after the design process because it divides your canvas into exact and equal measurements depending on which adjustments you make.
FAQs
I have gathered a selection of your frequently asked questions about creating your own grid on Procreate.
How to use Procreate grid templates?
If you’re looking for a grid type that you can’t create yourself, like a circular grid, you can explore some options online. Once you find the one you want, save it as an image to your device and add it to your canvas and reduce the opacity.
How to make a table in Procreate?
I recommend adding a grid to use as a reference in your canvas and then manually drawing the table size you want and activating the QuickShape tool when drawing. There is no table-making feature in Procreate yet.
How to put a grid on Procreate Pocket?
You can follow the same method above to add a grid in Procreate Pocket, however, you need to tap on the Modify menu to access your Guide options.
How to export the grid in Procreate?
There is no option to export the grid that you created with your Drawing Guide. The alternatives are either taking a screenshot of your grid or adding a grid pattern to your artwork by using the Materials brush in your paintbrush menu.
How to get rid of the grid in Procreate?
Open your Canvas menu in your Actions tool menu. Scroll down to the Drawing Guide and slide your toggle off. This will remove the grid from your canvas.
Conclusion
Learning how to add and manipulate your own grid in Procreate is a feature that every user should spend some time getting used to. This is one of the best ways to ensure professional and accurate artwork, especially if you’re specializing in any form of Graphic Design project.
This feature provides users with endless opportunities for new concepts and drawing assistance which can take your work to the next level. It only takes a second to learn and it may benefit you greatly in the future. It has certainly helped me in many ways in the past.
Do you use the grid function in Procreate? Leave your tips in the comments section below so we can learn from you too.