
Snapheal
Summary
Snapheal is an awesome tool that allows you to fix your photos by removing unwanted people and objects. The process is extremely fast, taking no more than 30 seconds for most tasks. You can clean up your images further with retouching and adjustment tools to bring out better colors and other elements. Your finished image can be exported in a variety of formats or worked on in another program with ease.
Whether you are a portrait photographer or an Instagram star, you’ll benefit from Snapheal CK’s photo retouching software. While the app isn’t a full-fledged photo editor, and you may have trouble with complicated and diverse images, the program is very effective at its job and is a breeze to use. I would highly recommend purchasing a copy for your photo retouching needs.
What I Like: Clean, easy-to-navigate interface. Multiple selection modes for erasing. Retouch brush for adjusting part of an image. Standard photo editing adjustments. Plenty of file sharing options and export types.
What I Don’t Like: Less effective on pictures with complex backgrounds.
What is Snapheal?
It is a Mac app that uses the nearby pixels to replace unwanted content in an image with what appears to be the original background. You can use it to remove strangers or objects from your photos without cropping the photo.
Instead of cropping, you “erase” them, replacing their visual data with material from other parts of the photo. Snapheal is made by a company called Skylum and comes as part of the Creative Kit package, which includes a few other useful utilities.
Is Snapheal free?
Snapheal CK is not a free program. It can be purchased as part of the Skylum Creative Kit, which starts at $99. Please Note: The App Store version of Snapheal is NOT the same as Snapheal CK, and has a different price.
Is Snapheal for Windows?
Snapheal and Snapheal CK are exclusively available on Mac. It appears there are no plans to release a Windows version anytime soon. While this is unfortunate, the “Alternatives” section below may assist you in finding something similar.
Snapheal vs Snapheal CK
There are two versions of the program available for purchase.
Snapheal CK is included in Creative Kit, and cannot be purchased separately without special accommodations. It can be used as a plugin for several other photo programs including Adobe Photoshop, Lightroom, Apple Aperture, and Luminar, and contains a wide range of editing tools in addition to the erasing function. It is valued at approximately $50.
Snapheal is available on the Mac App Store and is a standalone program. It cannot be used as a plugin and has a narrower range of editing tools beyond the erase function. It typically sells for $8.99.
If you want to upgrade from the App Store version and the CK version, you’ll have to contact the Macphun support team, who will send you a special code so that you only pay the difference between the two programs rather than the full price.
Table of Contents
Why Trust Me for This Review
Hi, my name is Nicole Pav. I’ve been a lover of technology since I first laid hands on a computer as a kid, and appreciate all the problems they can solve. It’s always fun to find a great new program, but sometimes it’s hard to tell if a program is worth purchasing or downloading.
Like you, I don’t have endless funds. I’d rather know what’s in the box before I pay to open it, and flashy web pages don’t always make me feel secure in my decision. This review, along with every other I’ve written, serves to bridge the gap between product description and product delivery. You can find out if a program will meet your needs and see what it looks like once downloaded before deciding to buy it yourself.
While I’m not a professional photographer, I’ve experienced my fair share of unwanted photobombs. Whether it’s the face of a stranger unintentionally appearing out of a subject’s shoulder, or a landmark that’s ruining the composition of your photo, the frustration of an unusable photo is a regular feeling. I tested Snapheal with some assorted photos of mine to see just how effective it would be at restoring the quality of my image. Additionally, I emailed Snapheal’s support team to get a well-rounded view of the program.
Disclaimer: We received a single NFR code to test Snapheal CK. While this means we did not have to pay to test the program, it does not in any way influence the content of this review. All content here is the result of my personal experience with the app, and I am not sponsored by Skylum in any way.
Detailed Review of Snapheal
Setup & Interface
After downloading Snapheal, you’ll need to activate the program by clicking the black “Activate” button.
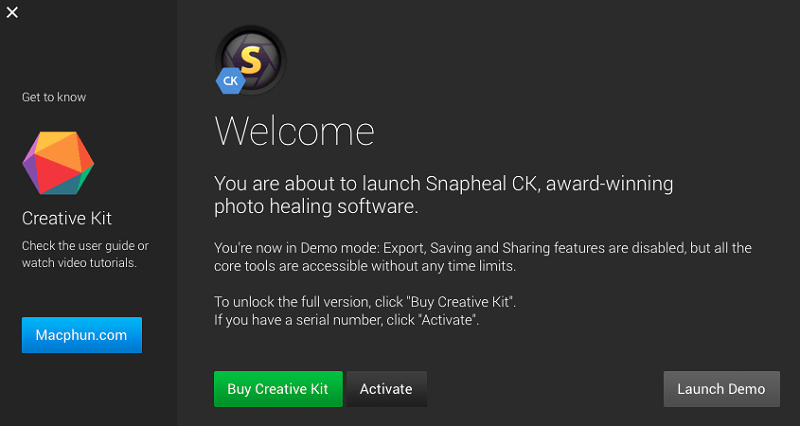
Once you do this, the opening screen will change and allow you to open files to edit in Snapheal.
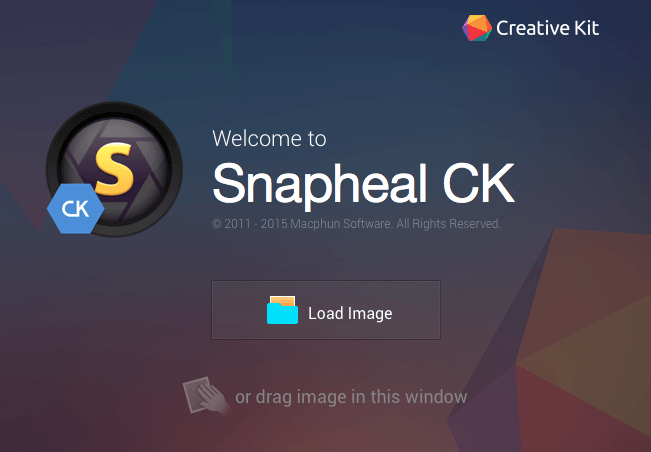
You can drag an image on top of this splash screen, or search through your files with “Load Image”. The first time you open an image, you’ll be prompted to setup the plugin functionalities of Snapheal CK.
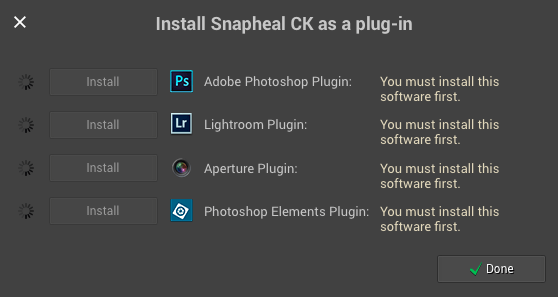
To do this, you’ll first need to have the other programs installed, then choose which you would like to add the plugin to. This may require an administrator password for your computer. The process is quick and automatic. You can also skip this and come back to it later by clicking the “X” in the top left corner of the pop-up.
Whatever you choose, you’ll eventually end up on the main interface.

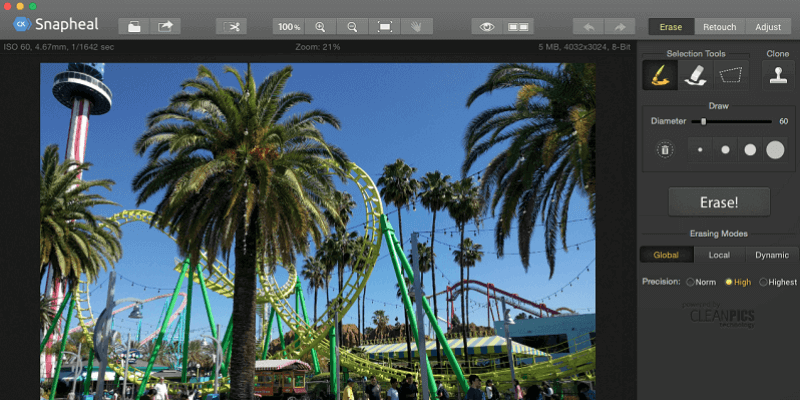
The layout is very simple and intuitive. The top bar contains all your standard program tools: Undo, Redo, Save, Open, Zoom, and other view options. The main section is the canvas and contains the image you are working on. The right-hand panel has three modes (Erase, Retouch, Adjust), and can be used to make edits to the image.
Anytime you make an edit that requires processing time, such as erasing a large section, you’ll be given a fun pop-up window that displays a random fact while the program loads.
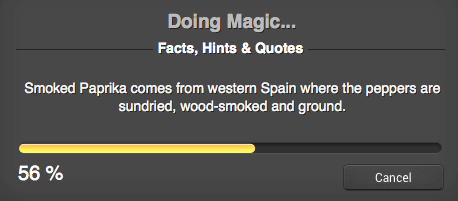
However, processing speeds are very fast (for reference, I have a mid-2012 8GB RAM MacBook) and usually you barely have time to read the fact before it finishes loading.
Erase
Erasing is the main function of Snapheal. It allows you to select objects and replace them with content from the area nearby. Here’s a snapshot of the erase tool panel. It contains several selections modes, precision, and replacement options.
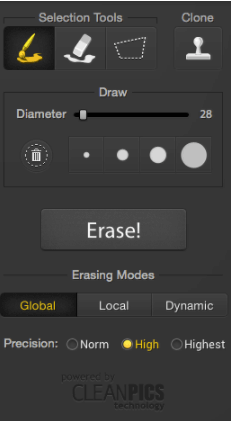
The first tool is the brush. To use it, simply left-click and drag your mouse across the areas you want to erase.
The lasso tool is furthest to the right. It allows you to draw around an area you want to erase. Connecting the ends of the lasso line will select the contained area.
The middle tool is the selection eraser. This tool allows you to fine-tune your selections. When you select something, it will be highlighted in a red mask to differentiate it from the rest of the image before removal.
Once you have selected what you want to remove, click the large “Erase” button. The results are affected by the replacement and precision options you have chosen.

Global mode replaces the content by using material from the entire image, while local draws on pixels near the selected object. Dynamic uses a mix of both. The precision level refers to how much specificity is needed in removing the selection (does it contrast distinctly from the background, or does it blend in?).
Once you erase, you’ll need to wait a few seconds to see your result. Here’s what it looked like when I removed a bystander from part of my image at a theme park.


As you can see, the final result was fairly neat. The shadow where his feet would have been is somewhat distorted, but erasing here again will fix that. If you look closely, a person in the background also had their legs duplicated, but not their torso- this is due to local sampling mode. However, this is much less noticeable when one considers that it is part of a much larger image.
The program is most effective against backgrounds that are more uniform, but if you’re having problems, you can manually use the clone stamp tool in the right corner of the erase panel to cover up areas.
It works like the cloning tool in any other photo editing program. You select a source area, then copy the content to the new location of your choice.
Retouch
When you’ve removed everything you don’t want, you may want to retouch your photo to create artistic effects or edit specific sections. Similar to masking a layer in Photoshop so that changes only affect part of the image, the retouching feature requires you to select part of the image before you make changes.
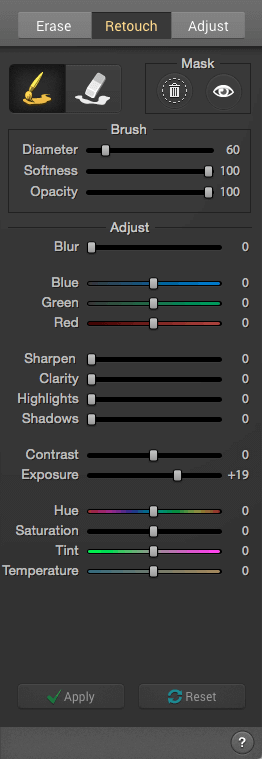
The mask is red, like for selections when removing content, but you can turn the visibility off to allow a clear view of your changes. Using the sliders, you can make standard color and tone corrections to part of the image without changing the entire composition.
With everything from hue changes to shadows, you should be able to create any desired effect. For the sake of example, I used this feature to select part of a palm tree and alter it to a bright magenta color. While this would clearly be unhelpful in the actual editing of the image, it should give you an idea of how the feature only affects one area.

Adjust
While you may want to do your final adjustments in another program with dedicated tools, Snapheal CK does offer a rudimentary adjustment panel for making changes to the composition and colors of your entire image.

It doesn’t have a curves or layers functionality, but you will be able to alter some photo editing standards such as contrast, shadows, and sharpness. Combined with the other tools, this can create a great final touch to your image.
As you can see here, I have my original image, complete with plenty of random strangers and unwanted background elements. It’s also a little harsh on the eyes due to the brightness and contrast between the green of the scene and the blue of the sky.

Using the eraser and adjustments, I created this image shown below. The colors are slightly more realistic and warmer. I’ve removed some large groups of tourists as well as one of the roller coasters in the background on the right side.

The final result took only around 30 minutes to create from start to finish. It probably would have been done more quickly if I had known exactly what I was looking for. While there are some imperfections, particularly near the right edge of the main roller coaster, the overall image is clean and simple.
When your image is complete, you’ll want to export it by clicking the icon in the top left of the program. This will bring up a small window with export and sharing options.
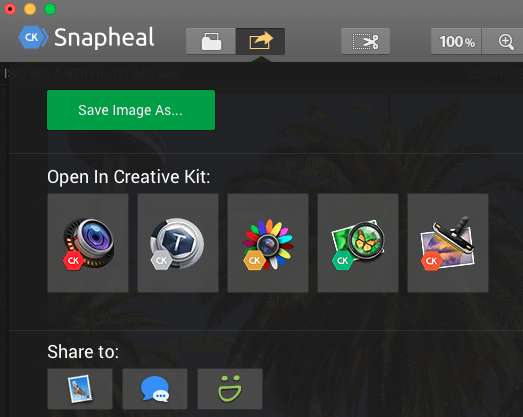
You have three main options:
- Save your image as a shareable file that can be reused (i.e. jpeg, PSD).
- Open your image in another program (you’ll need the other Skylum apps pre-installed).
- Share it directly to a social platform such as Mail or Messages.
Whatever you choose, you’ll probably want to create a file copy as backup using “Save Image As”. When you choose this option, you’ll be asked to name your file and choose a save location.
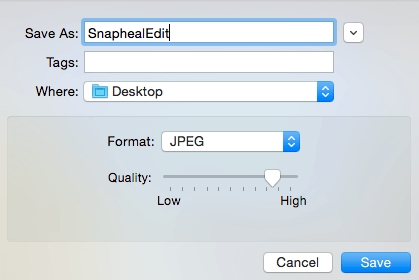
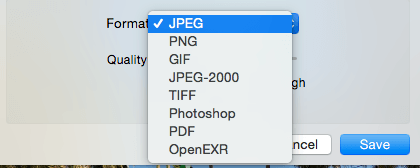
You’ll also have a plethora of options for file types. The classic JPEG, PNG, and TIFF options are available, along with the more advanced PSD if you want to reuse the image and edit it again later. You can even save as PDF.
Regardless of what you choose, your file will save immediately and you can either continue editing or move on to the next task.
If you want to keep working with a Skylum Creative Kit program, you can use the second option and pick which one you want to work with. This will send the file over and open the selected program right away, saving you time and trouble.
You can also export directly to Mail, Messages, or SmugMug. This is great if you’re looking for feedback without creating a permanent version of your image. However, you’ll probably want to save a copy just in case.
Snapheal covers all the bases when it comes to exporting, so you won’t be stuck with a great image in an unusable format.
Reasons Behind My Ratings
Effectiveness: 4/5
Snapheal is extremely effective at removing unwanted objects from images. With multiple selection modes and content fill modes, it usually replaces content in such a manner that you would never know something was there in the first place. The process is also very fast. However, the more complex your image is, the more trouble you will have. The more an object contrasts from the background it is set against, the easier it will be to make a replacement. In some cases though, you will have a difficult time using the automatic features and need to make heavy use of the clone stamp, reducing productivity.
Price: 3.5/5
Many would consider $49 a bit on the expensive side for a program with one specific purpose in photo editing, but Snapheal CK lives up to its claims and delivers an excellent piece of software. Additionally, using the discount link will give you a significant price cut and make the program much more competitively priced. It’s also one of the most advanced and cleanest options currently available, so if you consistently need a solution for removing photo objects, Snapheal would probably be your best option.
Ease of Use: 5/5
Without fail, Skylum creates clean and easy-to-use products like Aurora HDR and Luminar. A consistent layout across all of their products makes it easy to transition between programs or learn a new one. Snapheal is no exception, featuring a prominent toolbar and simple editing panel. Everything is extremely intuitive and one can get started with the program without reading any tutorial material. I especially enjoyed the way the interface is divided. You only see those toolbars that are relevant for a specific action. The division between erasing, retouching, and adjustment is arranged in such a way that you do not need tools from multiple panels at once, which prevents buried and hidden tools.
Support: 5/5
The support resources for Skylum’s products are abundant, and Snapheal CK has a wide variety of support options available to users. The FAQ section for the product is descriptive and well written, making it easy to find and solve your problem. If you can’t find the answer, you can always contact customer support via email, which produces fast and descriptive responses. For example, I sent the following query and received a response in less than 24 hours:
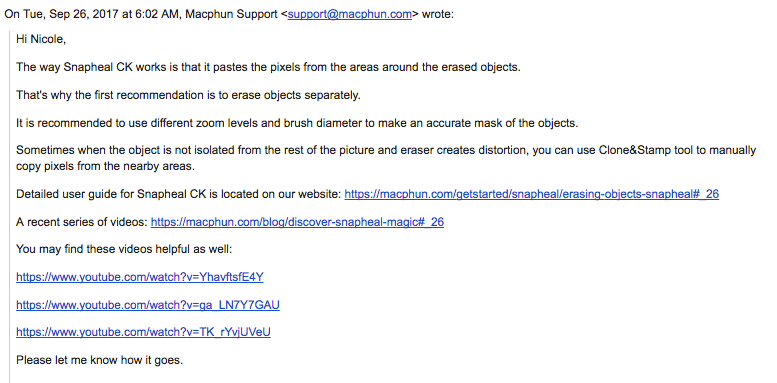

Not only was the response detailed and explanatory, their support team provided links to several tutorial videos for further reference as well as details on access to written FAQ materials. I found this extremely helpful and was very satisfied with their response. Overall, Snapheal CK has plenty of support to keep you on the right track with the program.
Snapheal Alternatives
Adobe Photoshop CC (Mac & Windows)
The newer versions of Photoshop have created some buzz with the addition of “content aware fill”, a feature that works in a similar fashion to Snapheal’s removal functionality. While it may not be worth $20 a month to purchase Photoshop for this function, if you already have the program it may be worth experimenting with. Read our full Photoshop review here.
Movavi Picverse Photo Editor (Mac & Windows)
A lesser-known brand, but still featuring a clean design and the ability to remove unwanted objects from photos, Movavi Picverse Photo Editor will help you clean up photos quickly. You can download it for free, but the paid version costs about $40.
Inpaint (Mac, Windows, Web)
Functioning only to remove objects in a photo, Inpaint is available on multiple platforms for $19.99. You can demo the program first if you’re unsure. There are also several different packages for multiple-photo functionality and batch editing.
Also Read: Best Photo Editing Software for Mac
Conclusion
If you have ever been photobombed — even if unintentionally, whether human, animal, or part of the landscape — an unwanted element can ruin an otherwise perfect picture. Snapheal allows you to restore the picture you were trying to take by replacing unwanted content with pixels from the surrounding area to match the rest of the image.
It’s a great app for everyone from travel bloggers capturing the beauty of their destination to real estate agents removing personal items from an image to portrait photographers erasing skin marks on a subject’s face. Snapheal does its job effectively and is extremely fast and easy to use. The app also provides a few extra tools for making color and tone adjustments after you remove all unwanted features. I recommend it.
So, do you find this Snapheal review helpful? Leave a comment below.
Opened snapheal from photos in the new High Sierra 10.13.1. While I was able to get the app open and select that which I wanted to remove I got the message “NO OBJECT SELECTED” What now?
Hi,
I have had and used Snapheal for a few weeks but it has decided not to work with me anymore!
Whenever I attempt to remove objects from an image after highlighting the areas to be cleaned, I am given an error message to “Please select objects to remove with Selection Tools first”.
This is an iterative process.
Can you please help as I have several images awaiting edit.
Roger
Hi Roger,
This is Yana from the Macphun Customer Support Team.
This issue is already fixed in the newest update of Snapheal CK. In order to get the latest version, please, launch the app, load an image into it and then, go to the Top Menu Bar and choose Snapheal CK->Check for updates.
If you need any assistance, please feel free to contact our tech team via support [at] macphun [dot] com.
Cheers!