
Zoner Photo Studio X
Summary
Zoner Photo Studio X might just be the best PC photo editor that you’ve never heard of. I’m not sure how they managed to fly under the radar for so long, but if you’re in the market for a new editor, ZPS is definitely worth a look.
It combines good organizational tools with fast RAW photo handling and adds layer-based editing to the mix to create an excellent all-around editor that is perfectly positioned to take on both Lightroom and Photoshop. It even includes some extras like cloud storage and some creative options for using your edited images like photo books and calendars, and there’s even a basic video editor included.
It’s not completely perfect, but to be fair, none of the other image editors I’ve ever tested is perfect, either. ZPS support for automatic correction profiles is sometimes limited, and the way preset profiles are handled could use some improvement. The initial RAW rendering is a bit dark for my taste when viewing images from my Nikon D750, but that can be corrected with a few simple adjustments.
The only downside to ZPS is that the developers have not included any of the newest automatic tools like AI noise reduction, sharpening, or upscaling. If you can live without those features, then ZPS is definitely worth a look – and they may be added soon.
What I Like: Unique tab-based interface. Great non-destructive and layer-based editing. Pixel-based editing is very responsive. Packed with additional features.
What I Don’t Like: Camera & lens profile support needs work. Some areas could improve performance. A few odd interface choices.
What is Zoner Photo Studio?
Zoner Photo Studio is one of the less-known photo editors that have appeared in recent years, as many photographers grow unhappy with the more mainstream options like Photoshop. It provides a complete RAW development workflow, including layer-based editing and the ability to convert your finished images into physical products or digital video slideshows.
How much is Zoner Photo Studio?
Zoner Photo Studio is only available as a subscription, but it is extremely affordable at $5.99 per month or $59 per year.
Is Zoner Photo Studio legit?
Yes, Zoner Photo Studio is totally legit software. If you haven’t heard of it before, it’s probably just because it’s created a smaller company that doesn’t have the same marketing budget as some of the larger competitors. The software itself is completely safe and passes security checks from Windows Security and MalwareBytes AntiMalware.
Table of Contents
Why Trust Me for This Review
Hi, my name is Thomas Boldt, and I’ve been shooting RAW digital photos ever since I got my first DSLR. By this point, I’ve tested almost all the major photo editors out there and quite a number of hungry up-and-comers eager to play in the big leagues.
I’ve also used and reviewed a previous version of ZPS in the past, so that gives me a longer-term perspective on the developer, how the software works, and how regularly it gets updated.
I’ve worked with great photo editors, and I’ve worked with bad editors, and I bring all that experience to this review. Rather than wasting your time testing them all out for yourself, read on to find out if this one is what you need.
Detailed Review of Zoner Photo Studio X
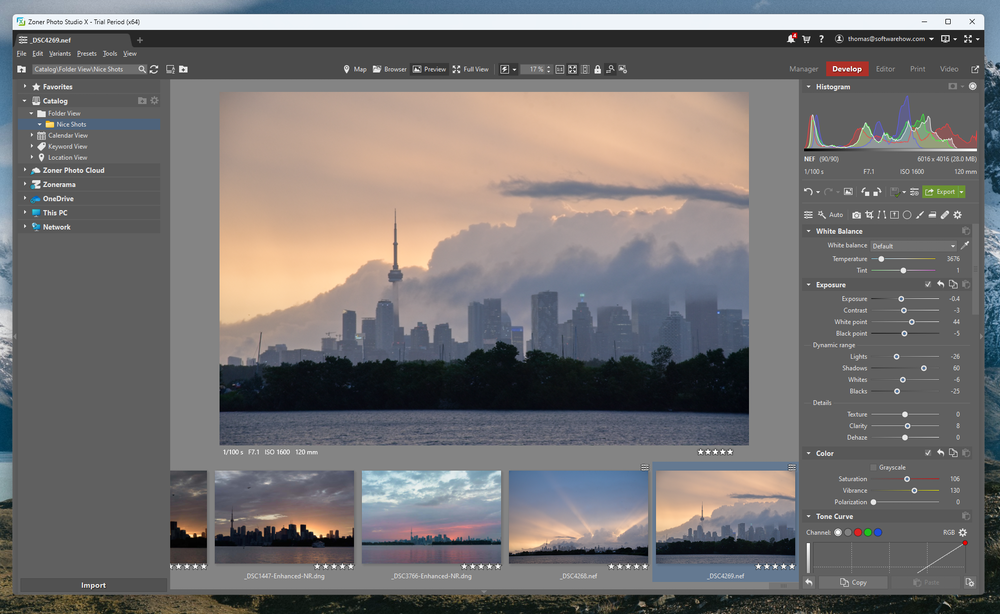
Zoner Photo Studio (or ZPS, as it’s known) has an interesting blend of old and new ideas in its basic structure. It’s broken down into several main modules, similar to many RAW editors: Manage, Develop, Editor, Print, and Video. It then bucks the trend by also incorporating a tab-based window system that works just like the tabs in your web browser, allowing you to run as many separate instances of each module as your computer can handle.
If you’ve ever had to choose between 3 extremely similar images at once without being able to pick your favorite, now you can edit them all simultaneously by simply switching tabs. Having second thoughts about not including that fourth image? Open up a new Manage tab and scroll through your library at the same time without losing your place in the editing process.
The rest of the interface is also quite flexible, allowing you to customize many aspects of the layout, from icon size to what’s in your toolbars. While you can’t completely re-arrange every element of the UI, the way it’s designed is simple enough that you won’t run into any issues.
There’s actually too much included in this program to cover every single feature in the space we have, but Zoner Photo Studio is definitely worth a look. With that in mind, let’s take a look at the main features of the app.
Organizing With the Manage Module
The Manage module offers a wide range of options for accessing your photos, no matter where they happen to be stored. Generally, photographers store high-resolution images locally, and you can access your photos directly in their folders if you desire. There’s also the option to use the Zoner Photo Cloud, OneDrive, the Zonerama online photo gallery, and even your mobile phone.
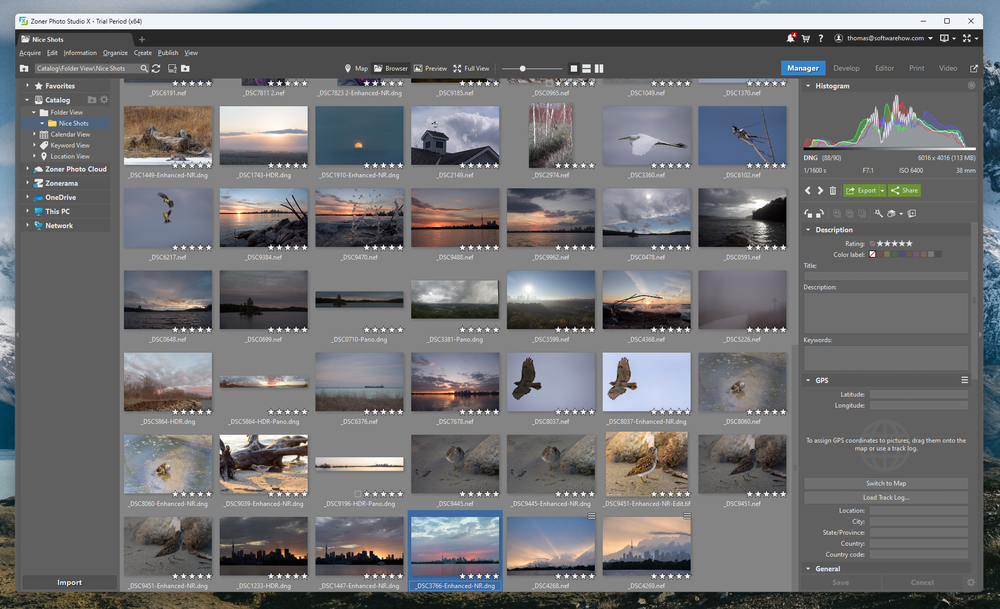
Much more useful is the ability to add your local sources to your Catalog, which offers you some additional ways to browse and sort your images. Probably the most useful of these is the Keyword view, but that, of course, requires you to have tagged all your images (which I’m always too lazy to do). There’s also a Location view if your camera has a GPS module, which could be useful as well, but I don’t have one for my camera.
Adding your photo library to your Catalog can be a time-consuming process, but the best reason to do it is the eventual boost to browsing and previewing speeds. Simply right-click the folder you want to add in the browser and choose Add Folder to Catalog, and away it goes in the background, adding everything and creating previews. As with any program processing a large library, this will take a while, but the rest of the program still works just fine while it’s running in the background.
Regardless of where you’re viewing your images, you can filter and sort your images by any of the associated metadata. Quick filters for color labels and basic text searches can be performed in the search box, although you may not notice it at first since it also is used to display the path of your currently selected folder. This doesn’t really make sense to me from a design perspective, as there’s plenty of horizontal space for them to work with, but once you know what you’re looking for, it works well enough.
My personal take: Overall, the Manage module is a good organizational tool, although it does have a few odd quirks to its design that could use a bit more refinement to make them more user-friendly. It takes a bit of getting used to if you’re switching from the Adobe ecosystem, but anyone who’s new to photo editing won’t have that problem.
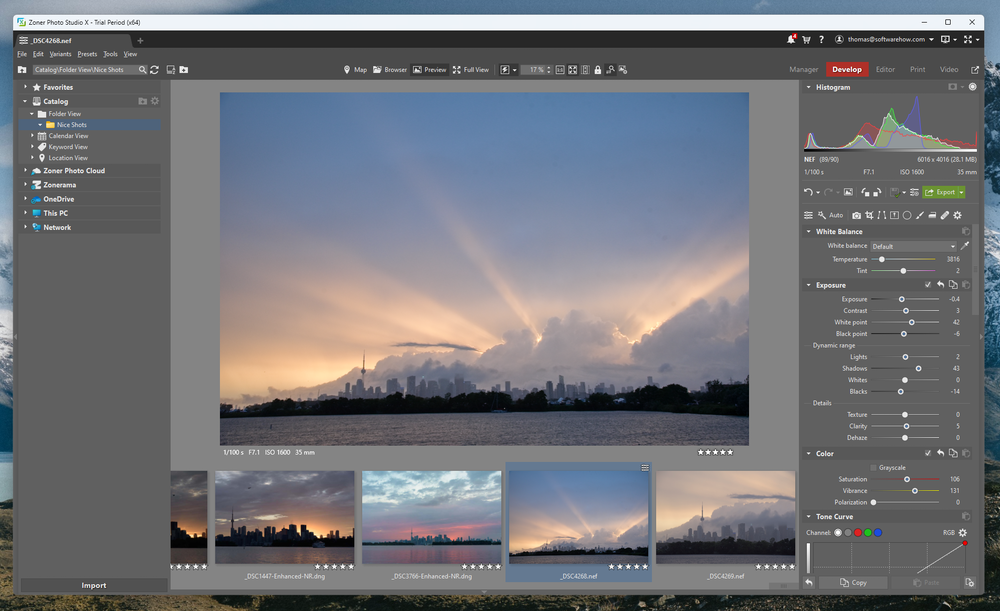
Non-Destructive Editing in the Develop Module
The Develop module will be instantly familiar to anyone who’s used another RAW editor. You get a big main window to display your working image, and all your non-destructive adjustment tools are located on the right-hand panel. All the standard developing options are there, and they all work as well as you’d expect.
The first thing that struck me when opening up images was that the initial rendering of the RAW file at full size was different than the smart preview I’d been looking at in the Manage tab.
In some cases, the colors were wildly off, and at first, I got disheartened that a promising program had made such a big mistake. The difference is that the Manage module uses a smart preview of your RAW file for faster performance but switches to the full RAW when you start your editing process.
After some research, I discovered that Zoner does have camera profiles that can match your in-camera settings (Flat, Neutral, Landscape, Vivid, etc.) which brought things more into line with what I would expect to see. These really should be applied automatically, but the first time you’ll have to configure things yourself in the Camera and Lens section.
This is also where you’ll configure your lens profiles for distortion correction, although they often don’t get applied automatically either. Fortunately, I have found that the selection of lens profiles has dramatically improved since the time I first used ZPS.
Most of the development tools that you’ll find will be instantly familiar to other RAW editors, but ZPS puts its unique twist on this aspect of the program as well. It allows you a much finer degree of control over some of the editing processes that are often limited to single sliders in other programs, especially in the areas of sharpening and noise reduction.
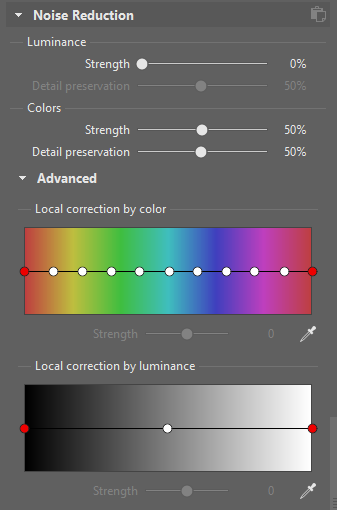
One of my favorite features is also one I’ve never seen in another editor: the ability to control noise reduction based on color. If you’ve got a noisy green background but you want to retain maximum sharpness on all the rest of the subjects in your scene, you can increase the noise reduction just for green sections of the image.
You can also do the same thing based on brightness, reducing noise only in dark areas of the image or wherever else you need. Of course, you could get the same effect with a masking layer in other programs, but it’s a very convenient feature that can save you from creating a time-consuming mask.
The green areas above have maximum noise reduction, preserving detail in the foreground subjects but automatically removing it in the background. The flowers in the background don’t have the effect applied, as you can see from the color selector on the right – and by their additional noise. If you’re not sure where the area you want to correct falls on the color spectrum, the handy eyedropper tool will highlight the section for you.
My personal take: It’s now been several years since I first tested ZPS, and I’m a bit disappointed that they have not yet corrected some of the issues that I found, but they’re still fairly minor issues when you consider the cost of the software.
Working with the Layer-Based Editor Module
If you want to take your image beyond what you can accomplish non-destructively, the Editor module offers a number of layer-based tools for putting the finishing touches on your images. If you want to create digital composites, do pixel-based retouching, work with liquify tools, or add text and effects, you’ll find an array of tools with snappy response times.
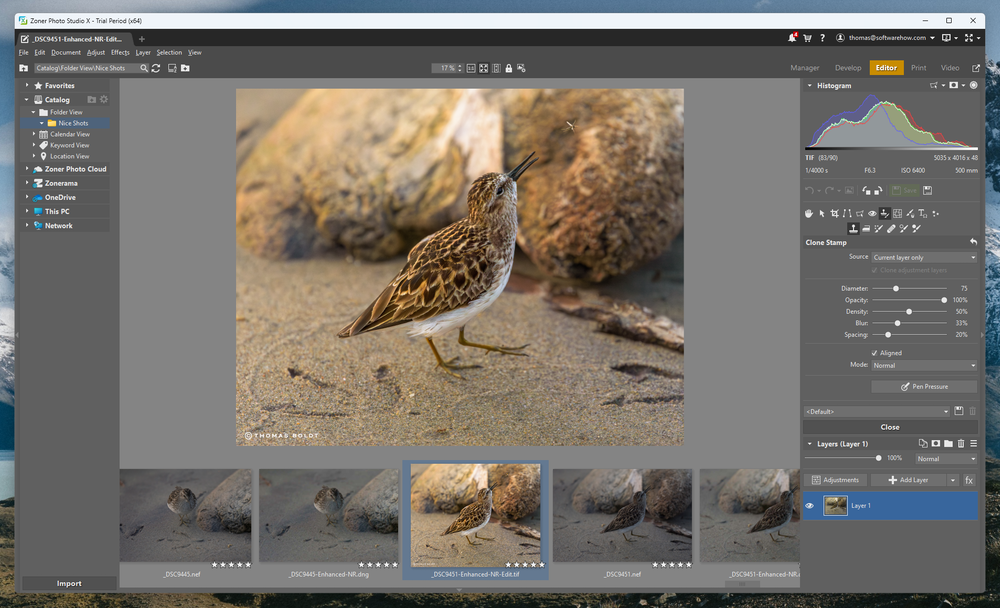
Poorly-programmed Liquify tools will often display a noticeable lag between the location of your brush and the visibility of the effect, which can make them nearly impossible to use. The Liquify tools in ZPS are perfectly responsive on my 24mpx images and also include face-aware options for those of you who are into professional portrait retouching (or just making silly faces).
Clone stamping, dodging, and burning all worked flawlessly as well, although I did find it a bit confusing that all layer masks are initially hidden by default. If you find yourself confused about your inability to add a mask, it’s because they’re already there; you just have to set them to show on each layer with ‘Reveal all.’
That’s not really a big deal, just more of a unique quirk I didn’t expect, as otherwise, the tools are quite good. I believe the layer system is relatively new to ZPS, so hopefully, they’re going to continue refining it as they continue to develop the program.
My personal take: I’ve used a number of other photo editors that could learn a thing or two from ZPS in terms of responsiveness, but this part of the program feels the least well-developed. The UI is a bit cramped since the developers chose to fit all the tools and options into the right sidebar instead of using both sides. If you’re in the middle of editing layers, you probably don’t need quick access to your catalog section in the same tab, after all.
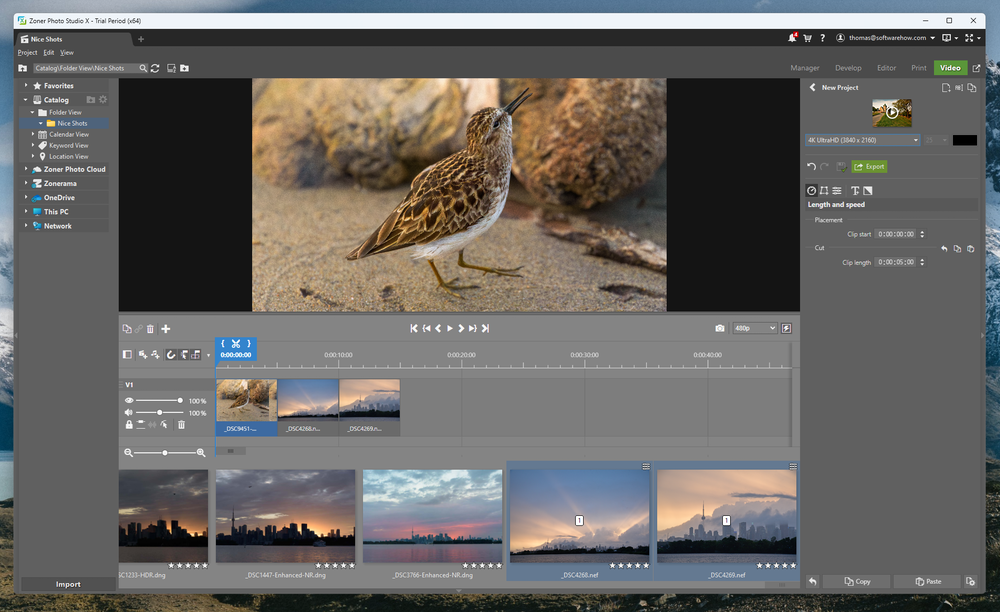
Last but not least is the ability to turn your images into a variety of physical products, as well as to create a quick video of your images using the built-in video editor. I’m not entirely sure how useful these features will be for professionals, but they’re probably fun for the home user.
Unfortunately, we’re running out of space in the review, so I can’t go through each individual option, as each module could probably have its own review. It’s worth pointing out that each of the templates seems to be branded with the Zoner logo and a bit of promo material about it too, which might be enough to put you off – but maybe not. I’m used to designing these materials myself from scratch, but you may not mind using their templates.
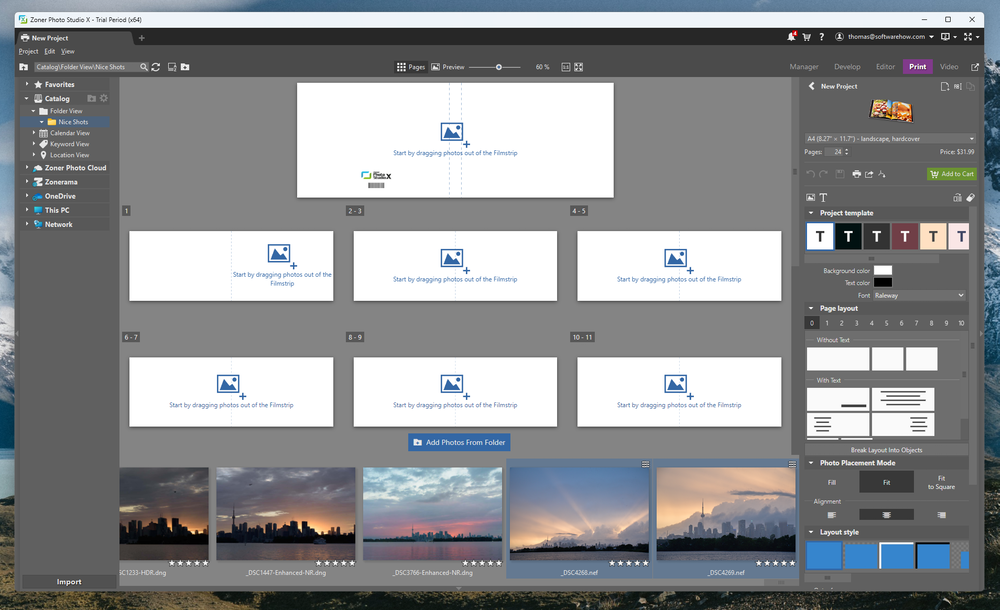
Each option does have its own on-screen guide to walk you through the process of filling out each template, and there’s a convenient link to order them online when you’re finished with the creation process. Of course, you can export them to a file type of your choice and print them yourself if you’d prefer.
My personal take: These tools are intended more for casual quick projects rather than professionally designed commercial usage, but if you don’t have any experience in graphic design or video editing, they will give you a quick way to show off your work.
The Reasons Behind My Ratings
Features: 4/5
It’s hard to argue with the core editing and organizational capabilities in ZPS, but it’s starting to fall behind a bit due to the complete lack of any of the new AI-powered tools that are taking over the world of photo editing. It offers the same toolsets you usually find in multiple programs, all combined into one, and still manages to handle each of those functions quite well.
Pricing: 5/5
When I first got Photoshop and Lightroom together for $9.99 a month, I was amazed by how affordable it was – but ZPS offers most of the same functionality that you get from those two industry-leading apps at half the price. It will be an even better deal if Adobe raises its subscription prices, as they’ve been discussing.
Ease of Use: 4/5
Overall, ZPS is extremely easy to use and offers very helpful on-screen guides. You can customize the interface a great deal, although there are some areas where I’d like to have a bit more control. There are also a couple of odd interface design choices, but you’ll get used to them very quickly once you figure out how they work.
Support: 5/5
Zoner provides a great on-screen introductory tutorial for each aspect of the program. Additionally, they have a massive online learning portal that covers everything from how to use the program to how to take better photographs, which is quite unusual for a developer of this size.
Zoner Photo Studio X Alternatives
- Adobe Lightroom is sort of a combination of the Manage and Develop modules found in ZPS, allowing you great organizational tools and excellent RAW editing. It doesn’t offer layer-based editing, but it’s bundled with Photoshop, which is the gold standard of image editors.
- Adobe Photoshop offers a more expansive version of the tools you’ll find in the Editor module of ZPS. It excels at layer-based editing, but it doesn’t offer the kind of non-destructive RAW editing tools from the Develop module, and it has no organizational tools at all unless you’re willing to include a third program in your workflow, Adobe Bridge.
- Affinity Photo is also something of a newcomer to the world of image editing and offers a one-time purchase model for those who are turned off by the subscription model. It has a decent set of RAW editing tools and some pixel-based editing tools as well, but it has a more confusing interface. It’s still an option worth considering.
- Luminar Neo has a great deal of potential as a RAW editor with a similar set of features: organization, RAW development, and layer-based editing. Unfortunately, the Windows version of the program is still in need of a great deal of optimization for performance and stability.
Final Verdict
It’s not often that I’m so surprised by a program I’ve never heard of, but I’ve been extremely impressed by the capabilities of Zoner Photo Studio. It’s a shame that they don’t have a wider audience, as they’ve put together a great program that’s definitely worth a look.
They’re still using a subscription model, but if you’re unhappy with Adobe’s subscription games, you should definitely give Zoner Photo Studio X a look – just keep in mind that you won’t find any fancy AI denoising, sharpening, or upscaling tools.
Do you have a question about Zoner Photo Studio that I didn’t answer in this review? Let me know in the comments below, and we’ll try to help.
Does the ZPS support raw files from newer cameras like Nikon Z6 and Z50?
Great article, finally someone mentioned this great program. Although it looks funny from my (Czech) point of view, because this Czech program is very well known here and used in Central Europe, from ordinary amateurs to schools and professionals.
Like we said “big fish in a small pond” 😀
Looks good, thanks for the info. I work with Photoworks now but maybe I will look at Zoner just in case.