
Tap on the Brush Library (paintbrush icon) on the top right-hand side of the canvas. In the drop-down menu, scroll down and open the Airbrushing menu. Here you can select from a series of options to use. A good one to start shading with is the Soft Brush.
I’m Carolyn and I’ve been using Procreate to run my digital illustration business for over three years. A big part of my business is creating portraits of humans and animals so my shading game needs to be on point at all times. And lucky for me, there are so many options to use.
There are three ways to shade in Procreate. My favorite way to add shade to a canvas is to use an Airbrushing tool from the Brush Library. Alternatively, you can also use the Smudge tool or the Gaussian Blur function. Today, I’m going to show you how to use all three.
Table of Contents
Key Takeaways
- You can use three tools to add or create shade in a canvas; the Airbrush, Smudge tool, and the Gaussian Blur function.
- Learning how to add shade is one of the most technical and difficult techniques to master on Procreate.
- It’s always best to create a new layer on top of your original artwork to apply shade so you can avoid any permanent changes on your canvas.
3 Ways to Shade in Procreate
Today I’m going to show you three ways to add shade to your canvas in Procreate. They all work for specific reasons so read on to find out which tool is the best one to use for your project.
I find that adding Shade to a canvas in Procreate is one of the least straightforward things you can do. It’s quite a subjective task and it may take multiple attempts to get the effect you want, especially if you’re a beginner or using this technique for the first time.
Pro Tip: For all three methods, I suggest creating a new layer over your original artwork and activating the Clipping Mask or duplicating your original artwork layer and adding shade to this layer. This way if you make any mistakes, your original artwork will still be preserved.
Method 1: Airbrushing
This is the best method to use if you are applying shade for the first time to your project or if you are using different colors or tones to the original artwork. This is a very hands-on method so if you are looking for complete control, this is the tool to use. Here’s how:
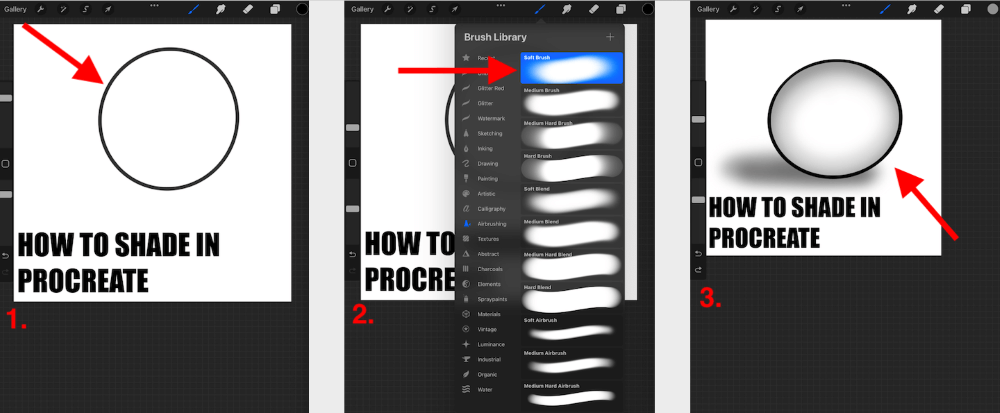
Step 1: Draw your shape. If you deem it necessary, you can duplicate your layer or add a new layer on top or underneath your shape if you want to preserve the original.
Step 2: Tap on your Brush Library (paintbrush icon) in the top right hand of your canvas. Scroll down to the Airbrushing category. I always start by selecting the Soft Brush.
Step 3: Once you have chosen the color, size, and opacity of the shade you want to create, manually draw on your layer with the Soft Brush until you achieve the desired effect. You can go in afterward and clean up the edges if needed.
Method 2: Smudge Tool
This method is best to use if you have already applied color or tone to your artwork but you want to create a shaded effect to it. You can use any of the Procreate Brushes to blur with so you have a lot of options when it comes to different types of shading. Here’s how:
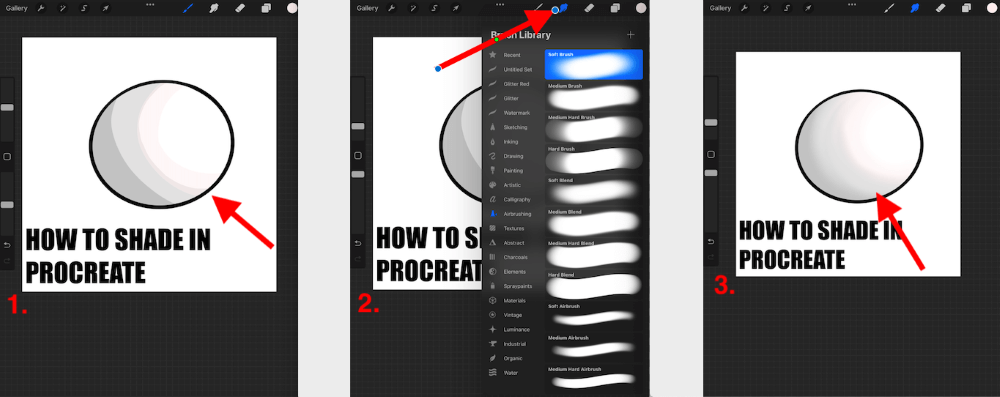
Step 1: Using any brush of your choosing, apply the tonal colors in the area of your canvas you would like to create shade. You can start with the darker areas and move your way to the lighter colors. Ensure you Alpha Lock your layer if necessary.
Step 2: In the top right hand of your canvas, tap on the Smudge tool (pointed finger icon). Now scroll to the Airbrushing category and select Soft Brush.
Step 3: You can now use your Soft Brush to blend the different tonal areas together by swiping your stylus or finger where the two colors meet. I recommend starting this process slowly and working with small sections at a time until you achieve the desired results.
Method 3: Gaussian Blur
This tool is best used if you want to apply bigger or more striking shapes of tonal shades to an artwork and you can use this tool to do a general layer blur to create a shaded effect. Here’s how:
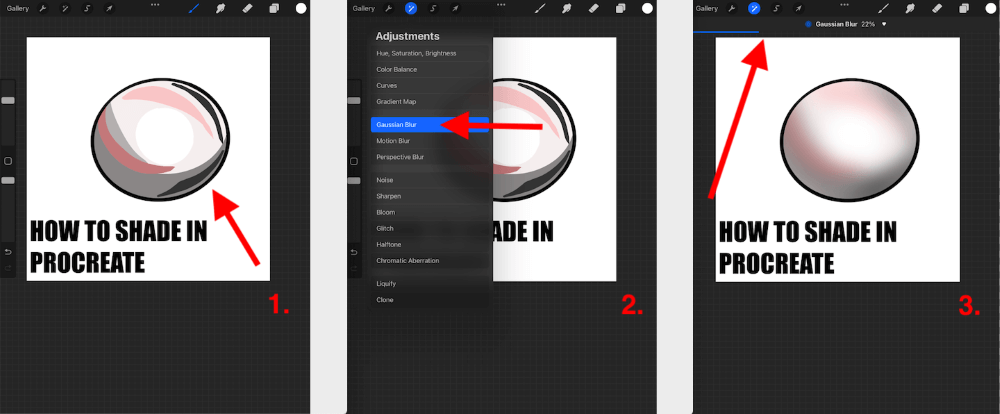
Step 1: Using any brush you like, apply the tonal colors to the shape you want to add shade to. You can start with the darker areas and move your way to the lighter colors. Ensure you Alpha Lock your layer if necessary.
Step 2: Tap on the Adjustments tool (magic wand icon) and scroll down to select the Gaussian Blur option.
Step 3: Using your finger or stylus, drag your toggle to the left or right of your canvas until you achieve the desired results in your Gaussian Blur percentage bar. This will automatically blend all of the tones together softly.
Note: If you don’t apply the shading to a separate layer when using the Smudge tool or Gaussian Blur methods, the original colors will also be blended together with your tonal additions. This will affect the final color results.
FAQs
Below I have briefly answered some of your frequently asked questions when it comes to adding shade in Procreate.
What is the best brush for adding shade in Procreate?
In my opinion, the Soft Brush tool is the best brush to use when adding shading in Procreate. This gives a subtle result and you can build up on it to increase your darker areas.
Are Procreate shading brushes free?
There is absolutely zero need for anyone to purchase additional brushes when it comes to shading in Procreate. The app comes with more than enough pre-loaded brushes that are more than sufficient to create any shading effects you may want or need.
How to shade skin in Procreate?
I suggest using the Soft Brush and applying tones that are just ever so slightly darker than your original skin tone. I always make sure to use at least three tones: darkest, medium, and lightest.
How to shade tattoos in Procreate?
Personally, for drawing tattoos in Procreate, I like to draw them using my Studio pen brush and then lighten the opacity of the entire layer. This way the tattoo is clear but subtle and looks natural over a skin tone.
How to shade a face in Procreate?
You can use any of the methods above but focus on using natural skin tones that are just slightly darker than the original skin color of your artwork. I like to add dark shading around the features, cheekbones, and shadowy areas and then use lighter shades as highlights.
How to add shade in Procreate Pocket?
Procreate Pocket follows the exact same methods as the Procreate app so you can use any of the step-by-step above to add shading to your artwork.
Conclusion
This is probably one of the hardest techniques to master in Procreate and it may take some time to get the hang of it. It’s definitely not an easy skill to grasp but it is an essential one especially if you plan on working with portraits or 3D images.
Just remember not to get discouraged if you don’t pick it up immediately as this is a time-consuming method but it also can produce amazing results. Don’t be afraid to experiment and persevere because it will be totally worth your time in the long run.
Do you have any further questions about shading in Procreate? Add them in the comments below.