
Alpha Lock allows you to isolate the painted area of your artwork and essentially disable the blank area around your drawing. You can activate the Alpha lock on your layer by tapping on the layer’s thumbnail and selecting the ‘Alpha Lock’ option.
I’m Carolyn and I’ve been using Procreate to create all kinds of digital artwork for my illustration business for over three years. I’m always looking for shortcuts and features that allow me to create high-quality artwork quickly so I always have the Alpha Lock in my toolbox.
The Alpha Lock tool allows me to do a variety of different things including coloring inside the lines quickly, adding texture to sections of a layer, and changing colors and shades of selections in a matter of seconds. Today I’m going to show you what it is and how to use it.
Table of Contents
Key Takeaways
- It’s a great way to color in the lines easily.
- Alpha Lock remains on until you manually turn it off again.
- You can use Alpha Lock on individual layers but not the entire project.
- Procreate Pocket also has the Alpha Lock feature.
What is Alpha Lock in Procreate?
Alpha Lock is a way to isolate a section of your layer. Once you turn on Alpha Lock on your layer, you will only be able to draw or apply any changes to the part of your layer that you have drawn on.
This essentially deactivates the background of whatever you have drawn. This makes coloring inside the lines quick and easy. It’s also a great way to fill a shape or apply shading to a specific area without having to clean up the edges afterward.
How to Use Alpha Lock in Procreate – Step by Step
It’s very easy to switch on Alpha Lock. However, once you turn it on, it will stay on until you switch it off again so keep that in mind. You can only activate Alpha Lock on individual layers, not entire projects. Here is a step-by-step guide on how to use it.
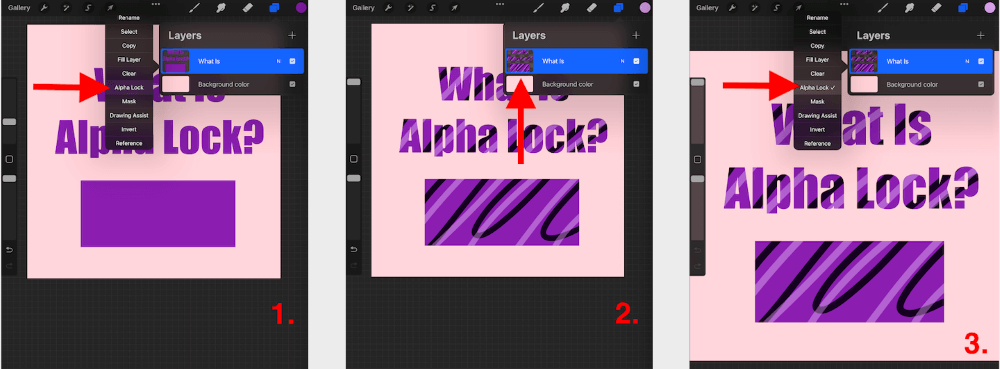
Step 1: Open your layers tab in your canvas. On the layer of the shape that you wish to isolate, tap on the thumbnail. A drop-down menu will appear. Tap on the Alpha Lock option. Your Alpha Locked layer’s thumbnail will now have a checkered appearance.
Step 2: You will now be able to draw, add textures or fill the color of the contents of the Alpha Locked layer while keeping the background blank.
Step 3: When you are finished adding to the locked layer, repeat Step 1 again to unlock the layer. You must always manually switch off the Alpha Lock option by tapping the option in the drop-down menu.
Alpha Lock Shortcut
You can activate or deactivate Alpha Lock by using two fingers to swipe left and right on a layer.
Why Use Alpha Lock (Examples)
You could go a long time without using this feature but trust me, it’s worth investing the time as it will save you hours in the long run. Here are some common reasons I use Alpha Lock on Procreate:
Color Inside the Lines
By using this tool you can easily and quickly create almost a stencil for your own artwork. This allows you to color inside the lines without worrying about spending hours erasing the edges afterward.
Instantly Change the Color of a Shape
When your layer is Alpha Locked, you can select the Fill Layer option on your layer to quickly drop a new color into your shape. This saves you from having to paint by hand and allows you to try multiple different shades at once.
Add Pattern
When your shape is Alpha Locked, you can use different brushes to create different patterns or effects without applying them to other layers or the background.
Add Shading
This is super handy when you’re applying shade using the airbrush tool. The airbrush tool is notorious for having a wide path so it’s great to use Alpha Lock to avoid applying the brush all over your canvas.
Gaussian Blur Blending
I use this tool all the time when completing portraits. I will apply skin tones on top of my portrait layer using my pencil brush. Then when I blend the tones using Gaussian Blur, it keeps them separate from the colors beneath and creates a more natural appearance.
FAQs
Below I have answered some of your frequently asked questions regarding the Alpha Lock feature in Procreate.
What’s the difference between Clipping Mask and Alpha Lock in Procreate?
Clipping Mask allows you to draw on the isolated shape of the layer below. But Alpha Lock only affects the current layer and will isolate your shapes within it.
How to color within the lines in Procreate?
Follow the Alpha Lock directions above to easily color within the lines of your drawing in Procreate.
How to use Alpha Lock in Procreate Pocket?
Lucky for us, the Alpha Lock tool uses the exact same process as the one listed above for the Procreate app. It’s another one of Procreate Pocket’s similarities.
Final Thoughts
It took me too long to figure out what Alpha Lock was when I first started learning how to use Procreate. I wasn’t really aware that this kind of feature even existed so once I spent time researching it and figuring it out, my drawing world got brighter.
I highly recommend using this tool on your next project as it can enhance your work and may even change your existing process, for the better. This tool will absolutely be a part of your toolbox once you have spent the time to learn all of its amazing uses.
Do you have any other suggestions or uses for the Alpha Lock feature? Leave them in the comment section below.