
Using your finger or stylus, manually draw the shape you want to create. Once you have closed the shape, keep holding down on the canvas for 2-3 seconds until the QuickShape tool activates and turns your rough drawing into a perfect shape.
I’m Carolyn and I’ve been creating digital artwork using Procreate for over three years. This is an essential part of running my own digital illustration business so it’s my job to know the ins and outs of the Procreate app and use them to the best of my knowledge.
One of my favorite Procreate features is being able to create perfect shapes in a fluid motion within a matter of seconds. This tool allows users to manually draw and then automatically fix their own shapes into professional entities without slowing down the drawing process.
Note: Screenshots from this tutorial are taken of Procreate on my iPadOS 15.5.
Table of Contents
Key Takeaways
- Draw and hold on your canvas to create a perfect shape.
- Once your shape is made, you can change its color, size, and angle.
- To create a pattern of shapes, duplicate your shape layer.
- If you want to measure your shape, use the Drawing Guide.
How to Make Shapes in Procreate: Step by Step
Once you master this process, it will become a part of your natural drawing method and will feel like second nature to you. It’s an awesome way to quickly modify your own drawings and create symmetrical and pleasing shapes easily. Here’s how:
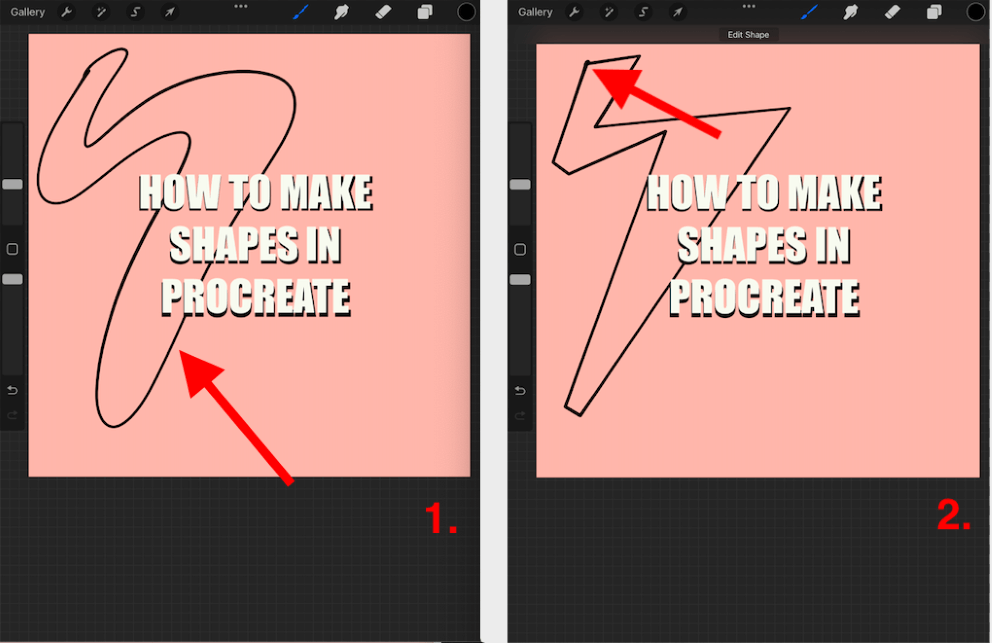
Step 1: Using an Inking brush like Technical or Studio Pen, draw an outline of the shape you want to create.
Step 2: Once you have closed the shape (no gaps in the lines) hold your finger or stylus down for 2-3 seconds until your shape automatically corrects. This means your QuickShape tool has been activated.
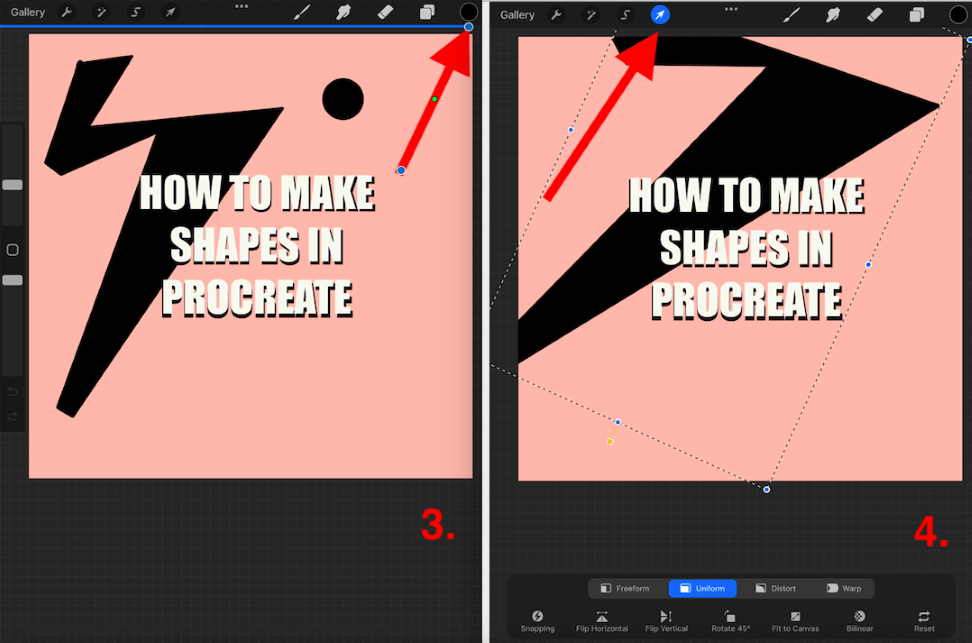
Step 3: Now you can do whatever you want with your shape. You can fill it with a color by dragging your Color Disc from the top right-hand corner of your canvas and dropping it into the center of your shape.
Step 4: You can adjust the size and angle of your shape by selecting the Transform tool (arrow icon) at the top of your canvas and ensuring your Uniform setting is active. Now use the blue dots to make your shape bigger or smaller and change its angle of it.
How to Measure a Shape in Procreate
If you want to be able to measure your shape or use a grid to create it, there is a fantastic way to do it. You can use your Drawing Guide to create any size grid or ruler in order to measure anything on your canvas. This is particularly useful when creating shapes. Here’s how:
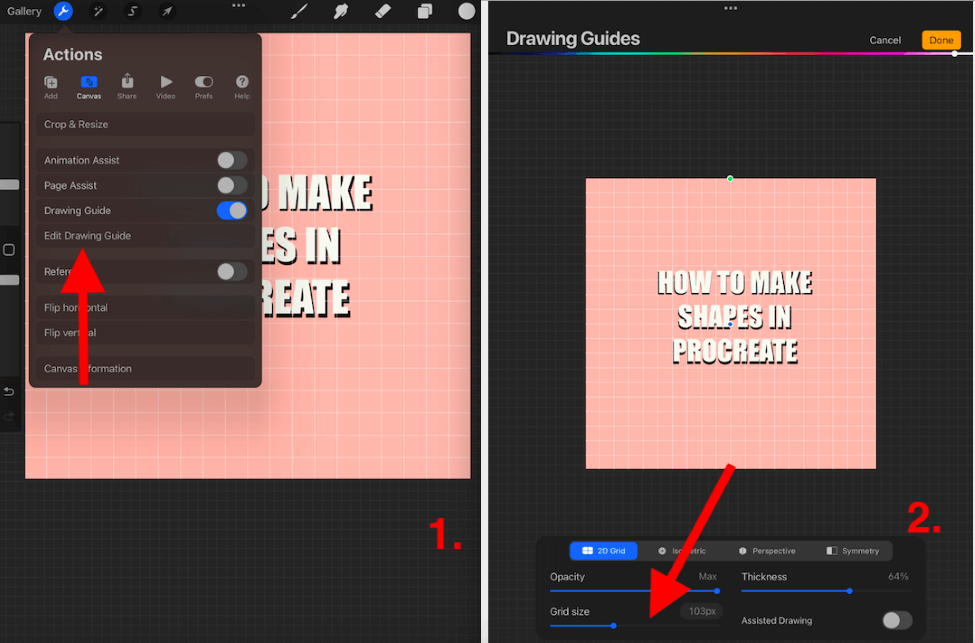
Step 1: In your canvas, tap on the Actions tool (wrench icon). Scroll down and switch your Drawing Guide toggle to on. Underneath your Drawing Guide toggle, tap on Edit Drawing Guide.
Step 2: Here you will have the opportunity to create whatever size grid you want to use. Select 2D Grid from the options and down the bottom, you can adjust the Grid Size to suit your needs. Once you have chosen, tap Done.
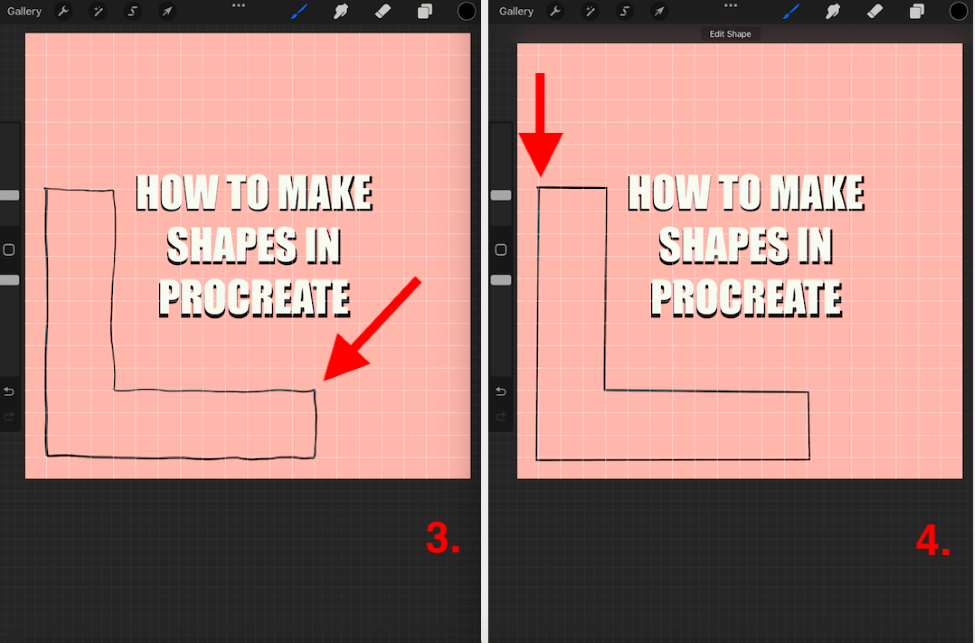
Step 3: Your grid will now appear on your canvas until you turn it off again. Use your finger or stylus to draw over the grid lines in your desired shape. When you save your image, these lines will not be visible so don’t worry if you forget to turn it off.
Step 4: Once you have closed your shape, hold down on the canvas for 2-3 seconds until your shape autocorrects. You can now edit your shape how you wish.
How to Create a Pattern of Shapes in Procreate
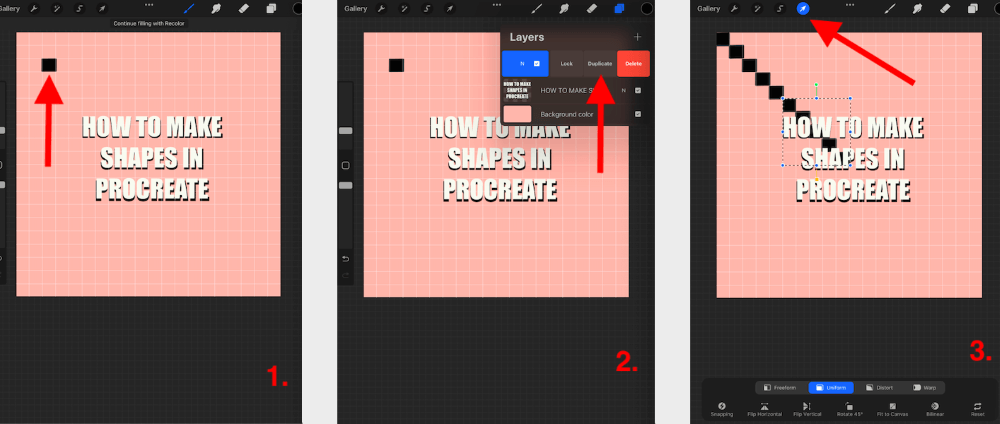
You may want to create multiple versions of your shape or even enough to create a pattern. Doing this manually can be incredibly time-consuming but there is an easier way. You can simply duplicate your shape layer and repeat this process. Here’s how:
Step 1: Create your shape using a grid and the method above. This will ensure symmetry and consistency by measuring your shape when creating it.
Step 2: When your shape is ready, open your Layers menu. Slide the layer you want to use, to the left and tap on Duplicate. This will create an identical copy of your shape.
Step 3: You can repeat this step and start combining multiple layers together and move them using the Transform tool, in order to create your pattern.
FAQs
Below I have answered a small selection of your frequently asked questions about creating Shapes in Procreate:
How to add shapes in Procreate Pocket?
You can use the exact same method shown above to create shapes in Procreate Pocket. The iPad-compatible app shares this unique feature with the iPhone compatible app so you don’t have to learn it twice.
How to fill shapes in Procreate?
Once you have created the outline of a shape you are happy with, simply drag and drop the color you want to fill it with. You can do this by dragging the Color Disc from the top right hand corner of your canvas and releasing it in the center of your shape.
How to copy shapes in Procreate?
You can do this by adding a photo of the shape you want to copy into a new layer in your canvas. Add a new layer above it and using a brush, trace over the shape. You can still hold and press on the shape to create a symmetrical shape here too.
How to make shapes perfect in Procreate?
You can use the method shown above to create and edit your shapes so that they are symmetrical and perfect.
Conclusion
This is an awesome tool that Procreate offers that allows you to incorporate perfect, symmetrical shapes into your drawing process. This only adds a couple of seconds to your time so it won’t have a negative impact on your workload.
I use this tool almost every day, it’s like second nature to me. Spend some time today with this tool figuring out how to add it to your method so you can reap the rewards and create striking imagery at the drop of a hat.
Have you used this method before? Share your hints and tips in the comments below so we can learn from each other.