
Keeping your Mac in sync with the latest macOS update is always recommended for both the health and security of your machine. We sometimes hesitate to do this, especially when our system is running nice and smoothly. We don’t want to change anything.
There are valid reasons to be hesitant because often an update like this will cause our system to run slow once it has been completed and this can be very frustrating. The good thing is that this slowdown is usually only temporary and there are some things you can do to fix it.

My name is Eric. I have been a computer and technology enthusiast since the late 1970s and as a software engineer, I know a little about software updates and how they can slow down your system. Beta releases like macOS 12 Monterey can often be buggy and affect system performance.
I recently updated my MacBook Pro (with M1 chip) with Monterey. Though I have not seen any slow down issues, I have seen this happen with other updates, so I can relate and I do know what usually causes these problems and how they can be fixed.
There are often things going on behind the scenes that most people are unaware of and slowdowns like this can usually be fixed or alleviated. Thankfully this is only temporary. The last thing that we want in a software update is to make our Mac slower than it was before.
Keep reading if you would like to find out more!
Related: How to Speed up macOS Ventura
Table of Contents
Why Your Mac Can Run Slow after macOS Monterey Update?
macOS updates can be two-fold. On one hand, it is exciting to see what has changed and what new features are available. On the other hand, your system was running fine the way it was, so it can be scary to mess with it and possibly cause an issue like this in which your system slows down. To try and help solve this problem, let’s first look at why this may be happening.
Update process
Operating system updates can be a complicated process. As I mentioned above, there are often things going on behind the scenes that we don’t see. In fact, the process could still be continuing or completing even though it indicates it is done and you can use the computer.
For example, the Spotlite application could still be re-indexing to optimize searches or it may still be downloading or configuring new drivers or system files. These behind-the-scenes activities can definitely slow your system down but they are normally temporary.
It’s also possible that the update could have turned on some settings or configured something that is slowing you down. It may have turned on indexing or changed something with your display and desktop. It could be a new feature, but the new feature may hurt performance.
One last item that we have to consider is that the update could have bugs or unfixed issues. This can especially be the case if this is a beta release, which means it has not been fully tested and is still in the process of being developed.
Your Mac Machine
It could be that the update is only partially responsible for the slowdown and that your laptop is really the problem. Of course, I am not trying to point fingers, it’s just that sometimes when your system has possible issues, they become more evident after doing an upgrade.
If your system is getting kind of old and out of date, you may not have the hardware to keep up with the new macOS. It could also be that your system needs to be cleaned up. Taking a look at your system and what’s on it, could lead you to the cause of the problem.
Coincidence
It’s also very possible that this is just a coincidence and has nothing to do with the upgrade. Something somehow happened at the same time or near the same time you did the upgrade. Something with your internet connection, malware, or other issue is slowing it down.
macOS Monterey Slow: Possible Fixes
As we saw above there are numerous possibilities when doing any update, but here we will focus on some of the most common that have been seen with the Monterey update. So Let’s get started.
1. Check Requirements
If you didn’t check this before you updated or even if you did, you should verify that your Mac meets the minimum specs to do the update. If the installer lets you do the update without them or even if your system is at the lower end of them, it may be causing the slowdown.
More modern operating systems often require more modern hardware. That’s just the nature of technology and it is hard to avoid. If you find that this is your problem you will either need to revert back to your previous macOS (hopefully you made a backup) or use a newer Mac.
According to Apple, macOS Monterey runs on these Macs:
- MacBook (Early 2016 and later)
- MacBook Air (Early 2015 and later)
- MacBook Pro (Early 2015 and later)
- iMac (Late 2015 and later)
- iMac Pro (2017 and later)
- Mac mini (Late 2014 and later)
- Mac Pro (Late 2013 and later)
2. Wait and Restart
Your system restarted after the update was completed but all parts of the update may not have really been completed and your system may still be doing some things in the background such as reindexing or configuring settings.
In this case, it’s best to use a little patience and let your system sit idle for a little while. Then do a full restart. Make sure you do a complete shutdown. It doesn’t hurt to do this 2 or 3 times as it will ensure that processes shut down and finish normally.
Once your system has stabilized, it will hopefully be back to normal operating speed. If not you may have to investigate further.
3. Updates to the Beta Release
Remember that Monterey is a beta release. This means it is still a work in progress, so there are bound to be bugs and unresolved issues with the OS. These issues could be the cause of your slowdown.
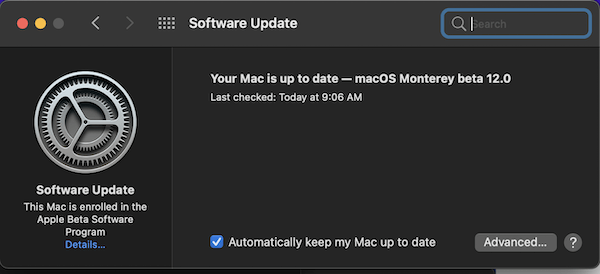
Since beta releases are closely monitored by the Apple Beta Software Program, there is a good chance that these issues will be fixed with an upcoming update to Monterey. Your problem could be fixed by checking and doing an available update. Just use the steps below.
Step 1: Click on the Apple symbol in the upper left corner of the screen and select About This Mac.
Step 2: In the About This Mac window, click on the Software Update button.

Step 3: If there are updates available, it will give you the option to install them. If your Mac is already up to date you will see a message saying that your system is up to date as shown below.
4. Kill Running Apps & Remove Startup Apps
Apps running on your system may be the cause of the slowdown. Whether it is just a coincidence or one of them is not yet compatible with macOS Monterey, we can check this by killing all your currently running applications and see if that fixes the problem.
You can easily do this with the steps below.
Step 1: Press the Options+Command+Esc keys at the same time. This will bring up the Force Quit Applications window.
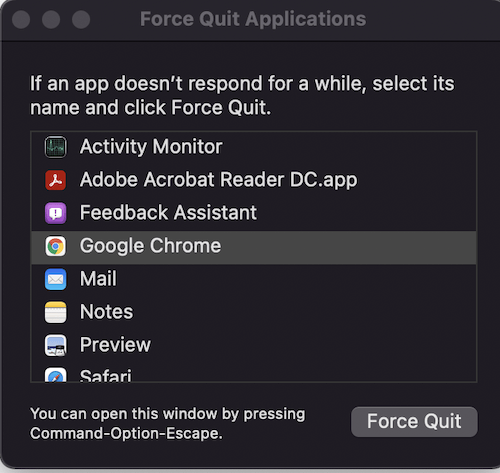
Step 2: Select each application listed and click on the Force Quit button. You can select all the apps at once by holding down the shift key and clicking on each one.
If your system now speeds up, you will know that it is one of the applications you had running. Try to keep track of what applications you use in the future and if your system slows down when using any of them. You may need to get an update of the application or stop using it.
You might also remove any startup apps that you have. This will prevent them from always running when you restart your computer.
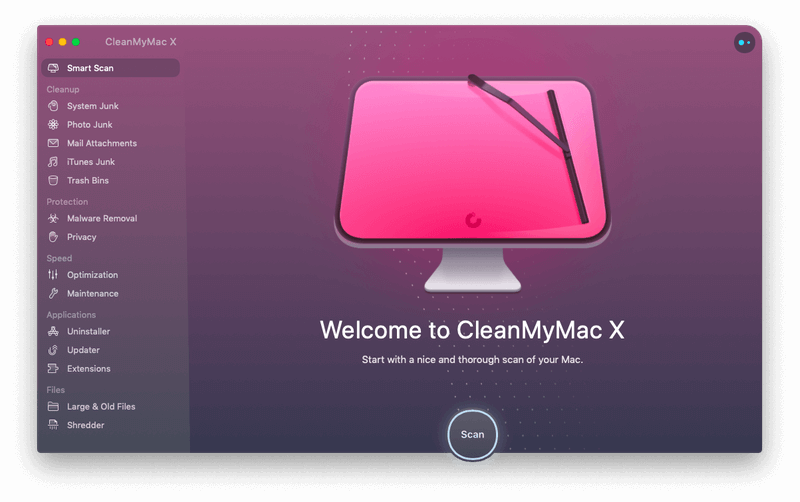
5. Clean up your System
Apple suggests that you should have at least 35 GB of free disk space before trying to update. It could be that your system is too cluttered. The update probably used up quite a bit more disk space and if space is getting very low it can cause a slowdown. You might also have lots of unused apps, that may or may not be running and even a cluttered desktop may slow you down.
Remove unused files to clear space. Clean up your desktop by removing unused apps and icons. You can even clear your cache to make your system run more smoothly.
If you are not a computer person or don’t have the time to do these manually, you can also use a tool like CleanMyMac X (review) which will help clean up your system more intelligently. Once your Mac is decluttered, it will run much faster.
6. Check your Wifi or Network Connection
This may not really have anything to do with the update, but you should check it just in case there is a problem. Make sure your wifi is connected and that you can reach websites on the internet. It may be a coincidence but it could be the cause of your problem.
Also Read:
- Having Wi-Fi Problems with macOS Catalina? Here’s the Fix
- How to Forget a Wi-Fi Network on Mac
- How to Increase Download Speed on Mac
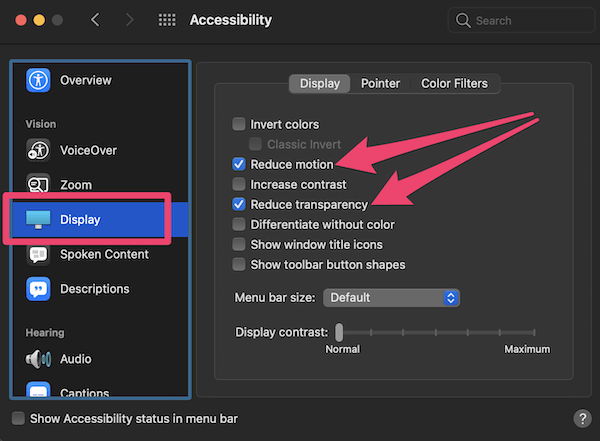
7. Turn off Transparency and Motion Effects
These new features do look cool but they can also eat up a good deal of processing time, especially if your Mac machine is on the older end of the scale.
This can slow down your entire system if resources get low. Try turning these effects off and you could see a significant performance boost.
Follow these steps to reduce these effects.
Step 1: Go to the Apple menu, select System Preferences, and then click on Accessibility.
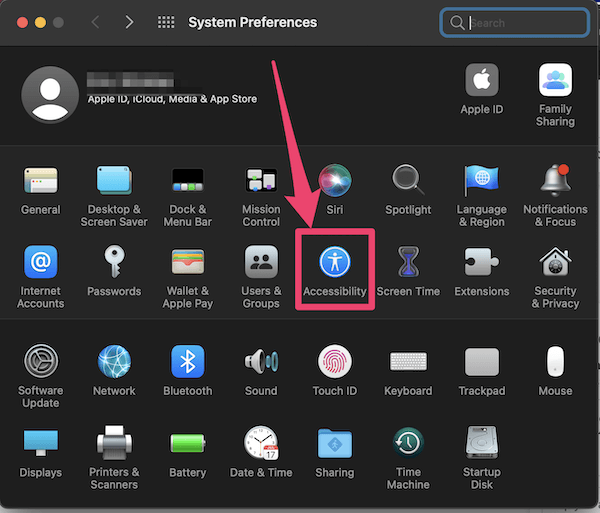
Step 2: Click on Display on the left side menu and then check the checkboxes that say Reduce Transparency and Reduce Motion.
8. Reset SMC and PRAM/NVRAM
If you have been using Macs for a while, you probably already know that resetting SMC and PRAM/NVRAM can cure a variety of system problems.
SMC
There are different methods of doing this depending on the type of Mac you are using. Take a look at the recommendations from Apple Support to see how to do this with your system. If you have a Mac with Apple Silicone this is done automatically every time you reboot your system.
PRAM/NVRAM
Macs with Apple Silicone also reset this on normal reboots. Other Macs can be reset with the steps below.
Step 1: Shut down your Mac.
Step 2: Turn it back on and immediately press and hold down the Option + Command + P + R keys all at the same time until you hear the startup sound.
9. Try Another Install
If all else fails you might want to try a clean new install of macOS Monterey. Make a backup of all your important data. You can then reset your system to its original factory settings.
When you reinstall your macOS, you will have to install Big Sur first. Once you have that installed you can then follow the same process you did before installing Monterey.
I hope the tips above have helped you with your performance issues after the macOS Monterey update and this hasn’t discouraged you from trying future beta releases. Let me know how your experience with Monterey is going. I would love to hear from you!
Thank you for the concise info on these upgrades. I recently installed Big Sur on my late 2015 iMac and noticed right away the loss of speed across the board. I use CC Adobe and am a heavy LR and PS user and with 8mgs of RAM and it’s the worst performance Ive had in many many years. Reading the above I am convinced to not upgrade to Monterey unless I am missing something? Gotta love that I can keep ye ole Zap Le P RAM trick from last century.
I have used an M1 Mac Mini for several months now started with Big Sur just recently upgraded to Monterey. Honestly, I think my problems all started with the upgrade and everything just feels more sluggish than with Big Sur. Safari has a lot of issues with loading certain websites at times. Sometimes it will just do nothing for about 10 seconds before loading a page. Other times it will load a page improperly. I have even seen sites with stuff overlaps each other. Some of this may be caused by a site not properly supporting Safari. Other browsers like Microsoft Edge don’t have this problem in Monterey. While I think Apple silicon in many ways is a positive for Mac’s. I am a bit disappointed overall in usability. Many times I end up using my Windows PC because my Mac Mini doesn’t have the ports, or doesn’t support software, or seems to be having a bad day overall.
I have noticed that Apple seems to be getting sloppier with its OS releases which to me have way more bugs than they should have for a release. Is this because they are supporting Intel and Apple silicon with Mac OS? The hardware is definitely great, but the OS and software not so much.