
Final Cut Pro is not the only professional-grade movie making app out there, but it is the best one for somebody looking to make their first movie.
I have been making home movies, and professional films for nearly a decade. I feel lucky I made my first movie in Final Cut Pro because it made me love editing and while I have since made movies in Adobe Premiere Pro and DaVinci Resolve, I am always glad when I can come home to Final Cut Pro.
In this article, I want to share with you some of the ways Final Cut Pro makes editing your first movie not just easy, but enjoyable and, hopefully, inspires beginners to get started editing.
Table of Contents
Why Final Cut Pro is Good for Beginners
Making a movie isn’t a science. It is a process of putting different movie clips into a sequence that tells your story. You want that process to be as free from distraction, complication, and technical problems as possible. Welcome to Final Cut Pro.
1. Intuitive Interface
In every video editing software, you start by importing a bunch of video clips into the editor. And then the fun begins – adding them to, and moving them around in, the “timeline” that will become your movie.
The picture below shows part of a completed timeline for a movie I made about Yellowstone National Park. On the top left, you can see my pool of video clips – in this case mostly shots of buffalo disrupting traffic. The bottom window with the horizontal strip of clips is my timeline – my movie.
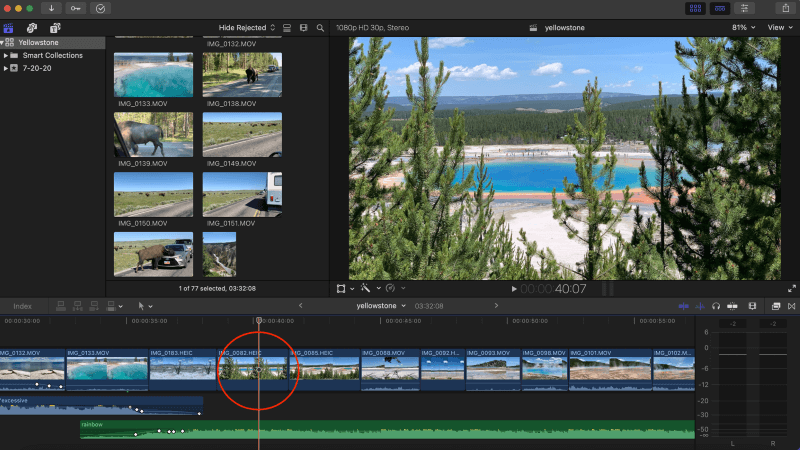
On the top right is the viewer window, which plays the movie as you’ve constructed it in the timeline. Right now, the viewer is showing a beautiful colored lake (Yellowstone’s “Grand Prismatic Spring”), because that is where I paused the movie, indicated by the red/white vertical line in the red circle below. If I press play, the movie will continue in the viewer from exactly that point.
If you decide you want to change the order of your clips in the timeline, you simply click on a clip and drag it to where you want it to go, hold it for a second, and Final Cut Pro opens the space you need to insert it. It really is that simple to change your mind and experiment with different arrangements of your clips.
2. Trim Editing
As you are placing the different clips you want in your movie, you will surely want to trim them. Maybe one is just too long and slowing the movie down, or maybe there is a second or two at the end of another clip where the camera shakes or loses focus.
Regardless, trimming clips is what most editors spend most of their time doing – finding exactly the right time to stop a clip and start the next one.
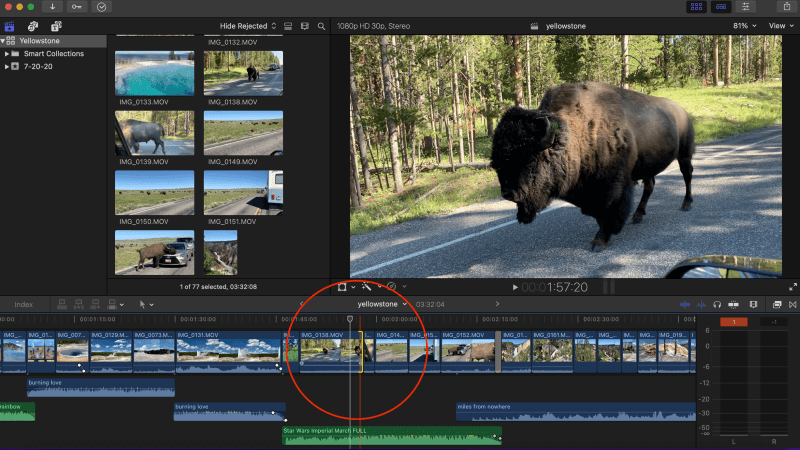
Trimming is easy to do in Final Cut Pro. Just click on the start or end of the clip and a yellow square bracket will appear around the clip, as can be seen in the picture below. To trim, just drag this yellow bracket left or right to shorten or lengthen the clip.
And just like when you insert a clip, shortening a clip doesn’t leave empty space and lengthening it won’t overwrite the next clip. No, regardless of the changes you make to a clip, Final Cut Pro will automatically move all the rest of your clips so everything fits together neatly.
3. Adding Audio And Effects
Your clips may have audio already, which is shown as a blue wave just below the clip. But you can add more layers of audio just by dragging an audio clip from your pool of clips and dropping it into your timeline. You can then trim it to the length you want just like you would trim a video clip.
In the screenshot above you can see I added the Star Wars Imperial March theme (shown as a green bar just below the red circle) to play during my clips of marching buffalo. Whether it is music, sound effects, or a narrator talking over the movie, adding audio in Final Cut Pro is just dragging, dropping, and of course, trimming.
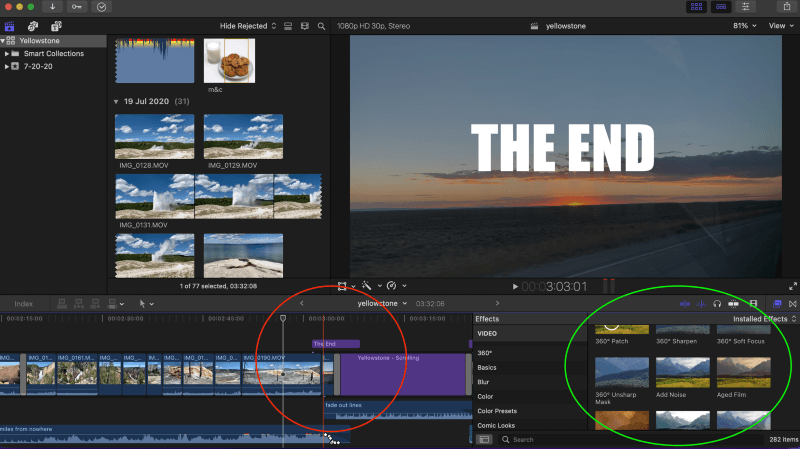
In the screenshot below you can see in the red circle that I added some text (“The End”) over a clip of the sun setting. I could have also added a special effect to the clip by clicking on any one of the many premade effects shown in the green circle on the right and dragging them over the clip I wanted to change.
Dragging, dropping, trimming – Final Cut Pro makes the basics of editing easier, and thus is perfect for beginner movie makers.
Final Thoughts
The faster you work, the more creative you can be.
As a long-time movie maker, I can tell you that your idea about what your movie should look like will evolve as you assemble and trim clips, and as you play with adding different audio, titles, and effects.
Now consider a novelist who can’t type so has to hunt for each key for each letter of each word they want to write. Something tells me that hunting and pecking will disrupt the story’s flow. So, the easier your tools are to use, and the better you know how to use them, the better your movies turn out, the more fun you will have, and the better you’ll want to be at making them.
To get better, read more, watch more tutorial videos, and let me know if this article helped or could be better. We are all learning, and all comments – particularly constructive criticism – are helpful.