
If you have ever wondered or worried about where all the work you have done on your latest iMovie project is being stored on your computer, the very short answer is: In your iMovie Library, which is a file stored in your Movies folder.
And the good news is that iMovie is constantly saving your work in that file. If you ran out of battery, your computer crashed (yeah, right), or you just snapped the lid of your MacBook closed because you didn’t want your partner to see what you are working on – your work is saved.
And with over a decade making movies in iMovie, Final Cut Pro, and other professional Mac video editing apps, I have come to relish the comfort that programs – like iMovie –provide by automatically saving my work.
But all this time making movies has also taught me that issues do come up and knowing exactly where your work is being saved and how to manage or move those files can be helpful and, sometimes, very necessary.
So below I will cover the basics of where your iMovie projects are stored and how to find them. Then I’ll cover the (important) implications of iMovie storing your files on your hard drive, including a few tips for freeing up space when you (and you will) eventually need it.
Table of Contents
Your iMovie Project is Saved in the iMovie Library
Each of your iMovie projects contains all the video clips, audio clips, music, special effects, titles, and so on that make up your movie.
The project also contains files that tell iMovie how you want all those clips and effects assembled. That is, all the edits you’ve made on your video and audio clips, and the exact location of any titles, effects, and transitions that you’ve so carefully built in your iMovie timeline.
All of your projects are collectively stored in the iMovie Library file.
A Library file is a single file that secretly contains as many folders and files needed to organize big projects that have tones of files. Like movies.
And remember, iMovie is automatically saving everything you do in your project to the iMovie Library. Whether that is importing new media, moving clips around, or tweaking an effect, everything is being saved as you work.
Where is the iMovie Library Saved?
To access the iMovie Library file, no library card is needed. You just need to open Finder, select the Movies folder, and there she lives.
Where is the Movies folder, you ask?
Technically, it lies in your User folder, which can be found by selecting your Macintosh HD (hard drive), then selecting Users, then Your Name.
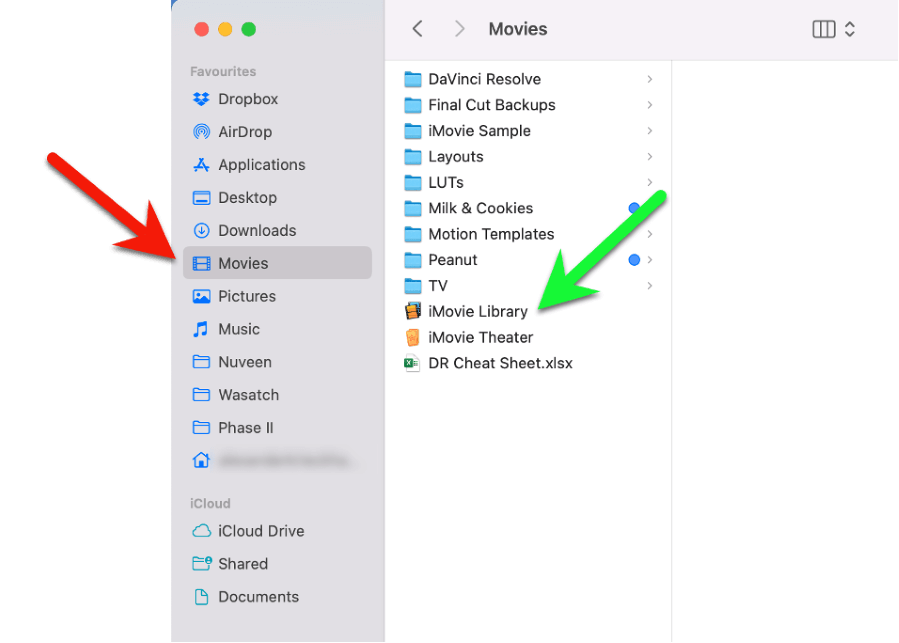
But you probably (and should if you are editing movies regularly) have the Movies folder visible as a shortcut in your Finder’s Sidebar, as shown in the screenshot of the Finder main window below, where the red arrow shows the Movies folder, and the green arrow shows your iMovie Library file.
If you do not see the Movies folder in your Finder’s Sidebar, you can change the Settings in Finder to make it a permanent addition to the Sidebar. Simply select Settings from the Finder menu and the following window will pop up.
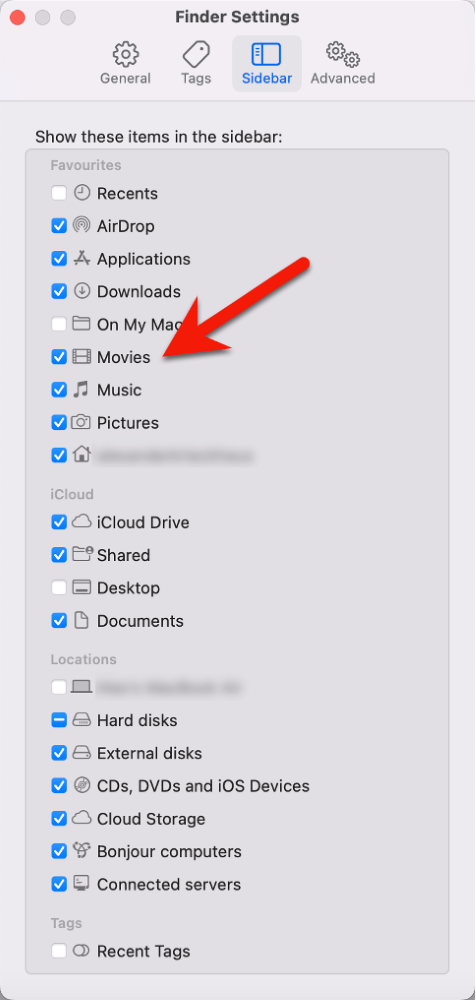
If your window does not look like the screenshot above, make sure you have selected the Sidebar icon among the four options at the top of the window.
Selecting any item in this list will place a blue checkmark to its left, and the item will thereafter appear in your Finder’s Sidebar whenever you open it.
Selecting Movies, highlighted by the red arrow in the screenshot above, makes accessing the Movies folder as simple as opening Finder and selecting Movies.
Remember: The iMovie Library is on Your Hard Drive
The iMovie Library is stored on your Mac’s hard drive. It is not stored in your iCloud Drive. Nor can it be.
iMovie won’t allow you to store its Library file on your iCloud Drive and I am not sure why. It may be that the hard drive is faster, or it may be that Apple is nervous that a loss of internet connectivity will mess with how iMovie runs or possibly even corrupt the Library.
Regardless of the reason, the implication is important: Files on the iCloud Drive are stored in the cloud, and thus can be downloaded to a new Mac if yours spontaneously combusts or you happen to spill coffee into the keyboard (which, yes, I have done).
But your iMovie Library, like all other files stored on your Mac’s hard drive, are not being automatically backed up. You need to manually copy them to an external drive or use a program like Apple’s Time Machine to back them up.
What if I am Running out of Hard Drive Space?
This is an unfair question, because – assuming you are happily making lots of movies – it really isn’t a question of if, but when, you will run out of hard drive space.
Tip 1: You can save hard drive space by deleting the render files iMovie stores in the iMovie Library.
What is rendering in video editing? Rendering is the process by which iMovie turns your timeline into a movie that can play in real-time or be exported. You can think of rendering as creating temporary versions of your movie. Versions that take up lots of space.
To delete the render files, select Preferences from the iMovie menu. A window will pop up that looks like the screenshot below.

Just by pressing the Delete button (highlighted by the red arrow in the screenshot above), you can usually free up oodles of space on your hard drive.
Tip 2: You can manually move your iMovie Library to an external hard drive, a Dropbox folder, or some other location off your hard drive.
Because moving the iMovie Library off your hard drive can save a ton of space (how much obviously depends on how many movies you have in it and how long they are), it is an attractive option.
But note that if you move the iMovie Library file, iMovie will not know where it is so will create a new one in the usual spot when you next open iMovie.
Sometimes this is just what you want – all your old projects moved off your hard drive and a brand new (and tiny) iMovie Library put in its place.
But if – for whatever reason —you want to access the projects in your old iMovie Library, you can select OpenLibrary from the File menu, and select “Other…”, as shown in the screenshot below.
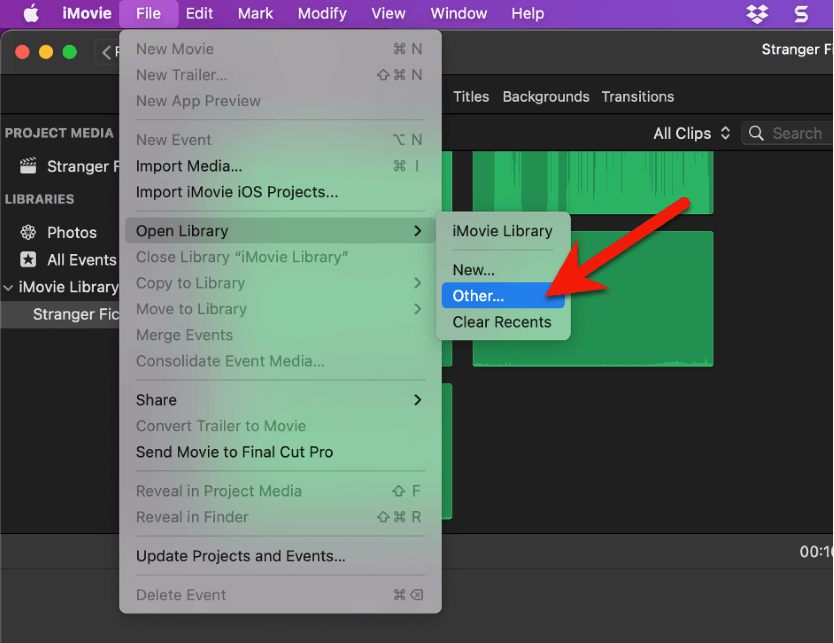
This will open a new window that will contain a button to Locate a Library. Pressing the Locate button opens the usual Finder window and you can navigate to whatever external drive you have connected to open the old Library. Voila!
Related: 4 Ways to Fix “iMovie not enough disk space” on Mac
Final File Thoughts
iMovie is wonderfully simplistic for storing all your work in one file and automatically saving all your work in that file as you play – I mean, work – in iMovie.
But that file is on your hard drive, so remember to back it up now and then!
In the meantime, I hope my tips for managing your Library file when it gets too big have been helpful.
And if you have other thoughts, questions, tips, or happen to know why Apple still calls the hard drive on your computer the “Macintosh HD” when everywhere else in the Appleverse your computer is just your “Mac”, please drop a note in the comments section below. Thank you.