
Rendering in video editing is simply the act of transcoding video from the “Raw” camera source format into an intermediate video format. There are three primary functions of Rendering: Previews, Proxies, and Final Output/Deliverables.
By the end of this article, you’ll understand what these three functions are and when you would need to use them in your edit process.
Table of Contents
- What is Rendering?
- Why is Rendering Important in Video Editing?
- What is the Difference Between Rendering and Exporting?
- Does Rendering Affect Video Quality?
- What is Video Rendering in Adobe Premiere Pro?
- How to Check If Render Previews Are Playing in Real-time?
- How to Render My Final Export?
- Final Thoughts
What is Rendering?
As stated above, rendering is a process by which your NLE will transcode your source/raw video assets into an alternative codec/resolution.
The process is quite simple for the end-user/editor to execute and is nearly as essential to the editor as that of cutting and editing itself.
If you aren’t rendering at some stage in your process, you are not likely using the software as intended or to its full extent. Naturally, not everyone will need proxies or edit previews, but everyone producing content will ultimately need to render/export their final deliverable.
And while this may not be new to many reading this, the fact remains that there are many factors and variables that come into play with regard to rendering video throughout the video editing process, and they differ greatly depending upon the task (whether speaking to Proxies, Previews, and Final Output).
We’ve already learned a great deal about Proxies and all of the various means and methods for their generation and usage in Premiere Pro. Still, we’ll be sure to recap slightly here about generating them and where they fit in the overall hierarchy of rendering.
Why is Rendering Important in Video Editing?
Rendering is a vitally important tool and process in video editing. The processes and means can vary from NLE to NLE and even from build to build within a specific software, but the main function remains the same: to allow for faster editing, and previewing of your final work prior to final export.
In the early days of NLE systems, everything and virtually any modification to a video clip or sequence had to be rendered prior to previewing it and seeing the results. This was maddening to say the least, as you would constantly have to render previews, then modify as needed, and preview again, and again until the effect or edit was correct.
Nowadays, thankfully this process is largely a relic of the past, and renders are either done in the background as you edit (as in the case of DaVinci Resolve) or they are largely unnecessary unless doing substantial or wildly complex layering/effects and color grading/DNR and the like.
Speaking more broadly though, rendering is integral to the video editing system as it can reduce the overall taxing effects of high-resolution source footage and bring it down to a more manageable size (ex. proxies) or simply transcode your source footage into a high-quality intermediate format (ex. video previews).
What is the Difference Between Rendering and Exporting?
There is no way to export without rendering, but you can render without exporting. This may sound like a riddle, but it’s not as complex or confusing as it may sound.
In essence, rendering is like a vehicle, it can take your source footage to many different places and destinations for a variety of reasons.
Exporting is simply the end of the line or final destination for a video edit, and you get there by rendering your edit in its final master quality form.
This differs from both proxies and previews in that the final export is generally of the highest or higher quality than either your proxies or render previews. However, you can also use your render previews in your final export to greatly expedite your export times, but this can be problematic if not set up correctly.
In the simplest of terms, exporting is rendering, but just at the highest and slowest speed (typically) and rendering can be applied to many processes throughout the editing pipeline.
Does Rendering Affect Video Quality?
Rendering absolutely does affect video quality, regardless of the final codec or format, even ones that are of the highest quality. In a sense, even when exporting in an uncompressed format, you will still be experiencing some level of quality loss, though it should not be readily visible to the naked eye.
The reason for this is that the source footage is being transcoded and debayered, with a substantial portion of the master data being discarded, and you cannot simply rewrap the source footage with all of the modifications you’ve made in your editing suite, and output this in the same format that your camera raws came in as.
This is fundamentally impossible to do, though it would be akin to the “holy grail” for video editing and imaging pipelines everywhere if this were so. Until that day comes, if ever, when this is possible, some level of quality loss and data loss is inherently inevitable.
It’s certainly not as bad it sounds however, as you would likely not want to have all of your final outputs clocking in well in excess of gigabytes or even terabytes, which otherwise total in the hundreds of megabytes (or far less) through the massively efficient and near lossless compression codecs we have available at our disposal today.
Without rendering and these lossless compressed codecs, it would be impossible to store, transmit and easily view any of the edits that we are watching everywhere. There simply wouldn’t be room enough to store all of the data and transmit it effectively without rendering and transcoding.
What is Video Rendering in Adobe Premiere Pro?
Rendering in Adobe Premiere Pro used to be necessary to preview anything you were doing in the timeline/sequence you were building. Especially when using any effects or modifying the original clips in any conceivable way.
However, with the advent of the Mercury Playback Engine (circa 2013) and the substantial overhaul and upgrade of Premiere Pro itself, the need for rendering prior to preview and playback of your edit was reduced dramatically.
In fact, in many cases, especially with today’s cutting-edge hardware, there are fewer and fewer instances where one would need to render previews, or rely on proxies, in order to get real-time playback of their sequence or edit.
Despite all the advancements in both software (via Premiere Pro’s Mercury Engine) and hardware advancements (with respect to CPU/GPU/RAM capabilities), there still remains a need for rendering both proxies and previews within Premiere Pro when handling complex edits, and/or large format digital footage (ex. 8K, 6K, and more) even when cutting on the best and most powerful edit/color rigs available today.
And naturally it stands to reason that if cutting-edge systems can struggle to achieve real-time playback with large format digital footage, then many of you out there may be struggling to achieve real-time playback with your edit and footage, even if it is 4K or lower in resolution.
Rest assured though, there are two primary means of achieving real-time playback of your edit within Premiere Pro.
The first is via Proxies, and as stated above, we have covered this extensively and will not be expanding further here. However, the fact remains that it is a viable solution for many, and one that many professionals use, especially when cutting remotely or on systems that are underpowered with respect to the footage they are tasked with handling.
The second is via Render Previews. While the merits and benefits of Proxies have been well established, it’s important to understand that Render Previews represent a potentially higher fidelity option than Proxies, and as such are more often used especially when needing to critically review something approaching or nearing the quality of your final output target.
By default, a sequence will not have master quality render previews enabled. In fact, you may be reading this and thinking, ‘my render previews look awful, what is he talking about?’. If this sounds familiar to you, then you’re likely relying on the default setting for all sequences in Premiere Pro, which is “I-Frame Only MPEG” and at a resolution that is likely far below your source sequence.
How to Check If Render Previews Are Playing in Real-time?
Thankfully Adobe has a nifty little tool for checking for any frame dropouts through your program monitor. It isn’t enabled by default, but it is quite easy to enable.
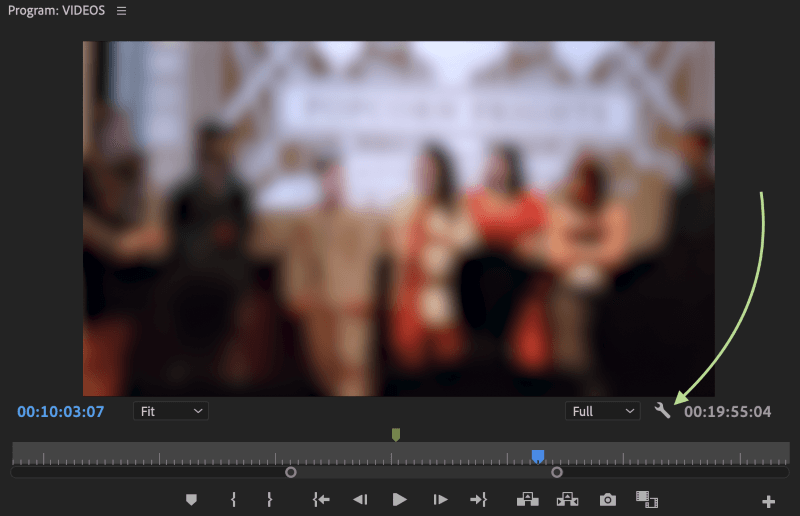
To do so, be sure you’re out of the “Sequence Settings” Window altogether, and head to the Program Monitor window. There you should see the tried and true “Wrench” icon, click that and you will call up the extensive settings menu for your Program Monitor.
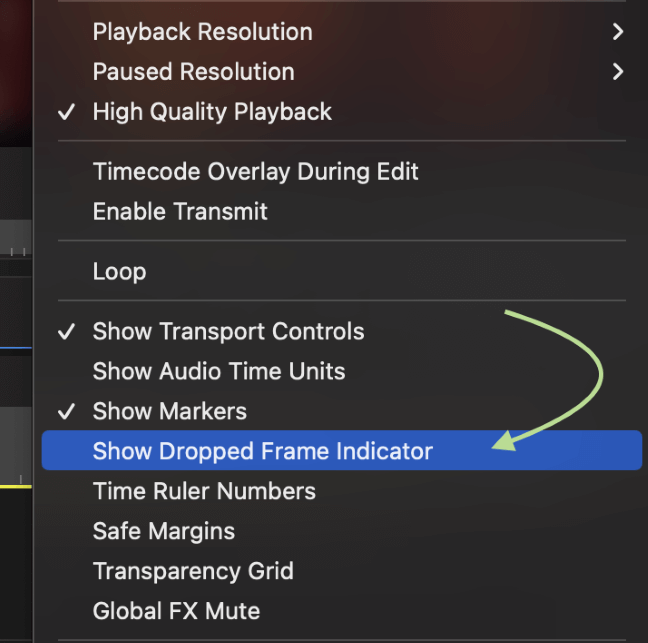
Scroll about midway down, and you should see an option for “Show Dropped Frame Indicator” available as highlighted below here:
Click that and you should now see a new subtle “Green Light” icon like this in your Program Monitor:

And now that it is enabled, you can use this tool to fine tune your Render Previews to your heart’s content as well as tweak your sequence settings and overall edit performance should you wish to do so.
This tool is immensely powerful and can help you diagnose all manner of issues at a glance, with the light turning from Green to Yellow whenever dropped frames are detected. If you wish to see the number of frames dropped, you need only hover your mouse over the yellow icon, and it will show you how many have been dropped so far to date (though you should take note that it doesn’t count in real-time).
The counter will reset when playback stops, and the light will return to its default Green color as well. Through this, you can really dial in any playback or preview issues and ensure that you are seeing the highest and best quality previews throughout your edit session.
How to Render My Final Export?
This is at once, a very simple and complicated question. In one sense, it is relatively easy to export your final deliverable, but in another sense, it can at times be a dizzyingly and maddeningly labyrinthine process of trial and error, trying to find the very best/optimal settings for your designated outlet, while also trying to hit a highly compressed data target.
I anticipate that we may indeed dive further into this subject in a later article, but for the time being the crucial and most fundamental aspect of Rendering as it pertains to final export is that you simply need to follow the requirements for each and every media outlet that you are seeking to traffic your edit on, and you will need to likely create a slew of deliverables to match each outlet’s requirements, as they can vary wildly.
It is unfortunately not the case where you can print a single final export and apply/upload it uniformly to all social or broadcast outlets. This would be ideal, and in some cases, you may be able to do so, but by and large, you will need to study the network and social outlet’s requirements carefully and follow them to the letter in order to pass their internal QC review process with flying colors.
Otherwise, you risk having your hard work kicked back to you, and incurring not just time loss, but also potentially damaging your reputation with your client as well as with the outlet in question, to say nothing of your bosses/management (if that applies to you).
All in all, the Render process with respect to final outputs can be quite tricky and potentially perilous and far exceeds the scope of our article here. Again, I hope to expand a bit more on this in a future piece, but for the time being, the best advice I can give you is to ensure that you’ve read your outlet’s spec sheet thoroughly and be sure to import your final prints and check them thoroughly in an isolated sequence (and project) to ensure that your final outputs are glitch free and looking perfect in every way.
If you do this and follow their guidelines, you should be able to pass QC without any issues whatsoever. The old adage applies quite well here: “Measure twice, cut once”. When it comes to final outputs, it’s crucial to review and check everything many times before shipping it off to QC and final delivery.
Final Thoughts
As you can see, Rendering is a vital and crucial element of video editing, at all stages and stations of the process.
There are so many uses and so many various applications for using it to expedite your edit, ensure quality throughout your edit, and ensure the proper specifications and requirements for your final deliverables as well.
In the end, there is an almost infinite array of possibilities for all of the various uses, whether in proxy, preview, or final print rendering, but the unifying method is to use what works best for each of these instances.
Your goal is to ensure the highest quality, and highest fidelity at the best data size – thus taking your massive raw video assets which could total in the terabytes, down to something manageable, lightweight, and as close to source quality as possible.
What are some of your favorite proxy and preview settings? As always, please let us know your thoughts and feedback in the comments section below.