
Proxies are transcoded approximations of original camera raw files that are typically generated at a much lower resolution than the source material (though not always) and used for a multitude of reasons in post-production workflows.
While there are many positives to generating and working with proxies, there are nearly an equal number of negatives to working in proxy-only workflows.
By the end of this article, you’ll have a firm grasp on all the pros and cons, and ultimately know if they are a fit for you and your post-production workflow/image pipeline.
Table of Contents
What Are Proxies Used for?
Proxies are not new to the video editing world, but they are certainly more prevalent in post-production workflows today than ever. Transcoding in some form or fashion has long been the way to get a resolution and/or file format into a compatible form for a particular editing system.
The primary reason for the creation of proxies is to ensure or achieve real-time editing of the source media. Often it is not feasible for editing systems (or the computers they are running on) to handle the full resolution camera raw files. And other times, the file format simply isn’t compatible with the operating system, or even the non-linear editing (NLE) software itself.
Why Should I Generate Proxies?
Sometimes the camera raw files are transcoded prior to editing in order to get all of the media to share a specific desired common attribute, such as a target frame rate that matches the final deliverable specifications needed for distribution or for some other specific editorial requirement throughout the imaging/editorial pipeline (ex. getting all footage to 29.97fps from 23.98fps).
Or if not seeking a common frame rate, often the frame size/resolution is simply too high for VFX to be applied at a cost-effective rate, so the master raw files of say an 8K R3D file are transcoded down to something less massive, like 2K or 4K resolution.
In doing this, the files are not only easier to work with in the editorial and VFX pipelines, but the files themselves are more easily and quickly transmitted and exchanged between vendors and editors.
Additionally, storage space can be saved by both parties – the cost of which can balloon quickly, even today as most camera raws can be massive, especially at higher resolutions like 8K.
How Do I Generate Proxies?
In the past, all of these methods and means were traditionally handled in the NLE or their counterparts like Media Encoder (for Premiere Pro) and Compressor (for Final Cut 7/X). The process itself was incredibly time-consuming, and if not prepared perfectly, could result in proxies that were themselves incompatible, leading to further post-production and editorial/VFX delays.
Nowadays, there are a couple of different hardware and software solutions that have permeated the post-production world and changed this archaic method for the better, much to the delight of creatives everywhere.
Many professional cameras now offer the option to record proxies simultaneously alongside the original camera raw files. And while this can be immensely helpful, it’s important to note that this option will greatly increase the data usage on your camera’s storage media.
You will accumulate data much faster than you would otherwise because you are capturing every shot twice. Once in the standard camera raw format, and the other in the proxy of your choice (ex. ProRes or DNx).
Want a quick and easy how-to-video guide to generate proxies? This one below does a great job of explaining how to generate them easily in Premiere Pro:
What If My Camera Doesn’t Generate Proxies?
When the camera doesn’t offer this option, there are several other hardware solutions available as well. One of the most impressive and cutting-edge solutions is offered by Frame.io, titled Camera to Cloud, or C2C for short.
This novel innovation does precisely as it says. By using compatible hardware (more information can be found here regarding the hardware requirements) timecode accurate proxies are generated on set and sent immediately to the cloud.
From there the proxies can be routed wherever needed, whether to producers, the studio, or even video editors or VFX houses looking to get a head start on their work.
To be sure, this method may be out of reach for many independents or beginners, but it’s important to note that this technology is still new and will likely become more accessible, ubiquitous, and affordable as time unfolds.
Why Should I Not Use Proxies?
There are a few reasons why proxies may present issues.
The first is that the reconnect and relink process to the camera raw originals can sometimes be difficult or nearly impossible depending upon the nature of the proxies being used, and how the proxies were created.
For example, if the file names, frame rates, or other core attributes do not match the original camera raws, often the relink process in the Online Edit stage can be quite difficult, or worse, impossible to do without manually retracing and seeking the matching source files by hand.
To say that this will be a headache, is an understatement of grand proportions.
Poorly generated proxies can often be more trouble than they are worth, so it’s good practice to test the workflow before you get too deep into your edit. Otherwise, you could be in for some long days and nights to find your way back to the camera raws and ultimately print your final deliverables.
Aside from this, proxies are inherently not high quality and do not have the full latitude and color space information that the raw files will have.
This may not be a concern for you however, especially if you are not looking to do work outside of your NLE system and are not interfacing with outside VFX/Color Grading or passing the sequence to a finishing/online editor.
If you’re keeping everything in your system, and yours alone, you likely won’t need to worry about the quality concerns of proxies and can simply generate them to your liking – i.e. whatever gets the footage cutting and handling for you in real-time.
Still, you should never make a final output based off your proxy files alone, as this can lead to a massive loss in quality on final output.
Why? Because the proxy files are already substantially compressed, and if you are going to further compress them again on the final output, regardless of your codec (lossless or not) you will be discarding even more image detail and information, and it will make for a final product that is rife with compression artifacts, banding and more.
In short, you must go the route of relinking/reconnecting to your camera raw files prior to final output whenever using proxy media, regardless of the quality that they may be in.
To do otherwise is a grievous sin against the hard work and tireless effort that went into acquiring these high-resolution source images you’re handling. And that is a surefire way to never get hired again in this industry.
What If I Don’t Want to Generate Proxies But Still Want Real-Time Playback and Editing Functionality?
If the above options are too expensive, too time-consuming, or you simply wish to work with the original camera raw files and get editing immediately, there is a relatively simple way to do so in your NLE of choice.
It may not always work, especially if the footage you are handling is simply too intensive or data-heavy for your computer to keep up with, but it is worth a try if you’re not interested in working with proxy files in your post-production imaging pipeline.
First, create a new timeline and set your timeline resolution to something like 1920×1080 (or whatever resolution your system typically handles well).
Then place all of the high-resolution source media in this sequence. Your NLE will likely ask you if you wish to change the resolution of your sequence to match, be sure to select “No”.
At this point your footage will likely look as if it is zoomed in and generally wrong, however, the fix to this is easy. Simply select all media in the sequence and resize it uniformly so that you can now see the full frame in the preview/program monitor.
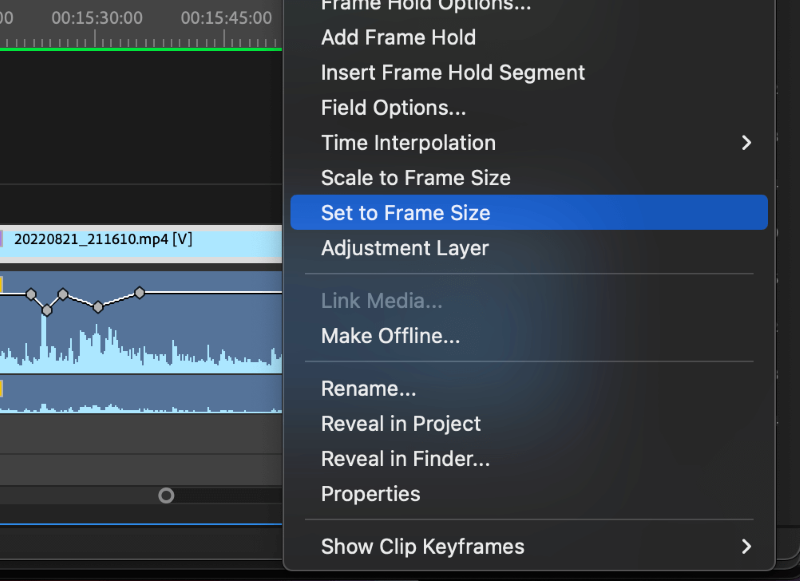
In Premiere Pro, this is easy to do. You can simply select all footage, and then right click on any clip in the timeline, select “Set to Frame Size” (taking care not to select “Scale to Frame Size”, this option sounds similar but is non-reversible/modifiable later).
See the screenshot here and note how dangerously close these two options are together:
Now all of your 8K footage should be displayed correctly in the 1920×1080 frame. However, you may note that the playback hasn’t improved much just yet (though you should likely still see slight improvement here vs editing in a native 8K sequence).
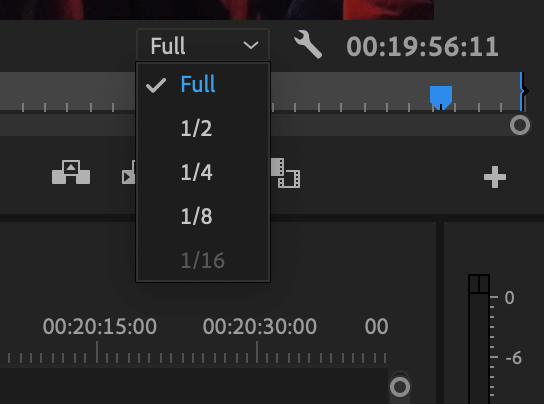
Next, you should head to the program monitor, and click the dropdown menu just below the program monitor. It should say “Full” by default. From here you can select a variety of playback resolution options, from half, to quarter, to one eighth, to one sixteenth.
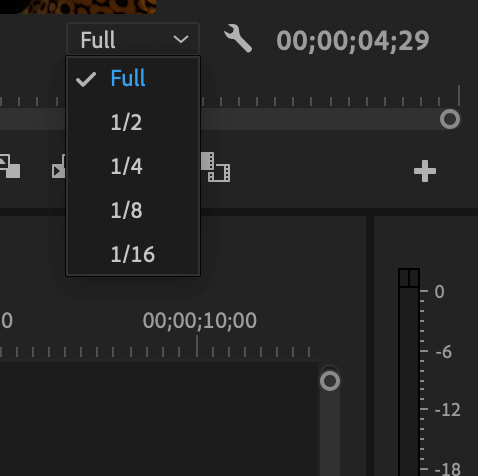
As you can see here, it is set to “Full” by default and the various options are available here for lower resolution playback. (1/16th may be grayed out and unavailable in your sequence if your source footage is less than 4K, as you can see in the second screenshot included here.)
Some level of trial and error is necessary here, but if you can get your camera raws to playback and edit in real-time via this method, then you’ve effectively circumvented the entire proxy workflow entirely, and dodged myriad hurdles and headaches in the process as well.
The best part? You won’t have to reconnect or relink and perform a cumbersome online edit from your offline proxies, and you can scale the media up or down as you need to, should you later wish to move your sequence back up to 8K for final output (which is precisely why you should never “Scale” your shots in the HD timeline, only “Set”, otherwise this shortcut method is not possible).
To be sure, this process can be a bit more complicated than I’m simplifying it here, and your mileage may vary, but the fact remains that it does enable the highest fidelity from end-to-end in the imaging pipeline.
This is so because you are cutting and working with the camera original raw files, and not transcoded proxies – which are by their very nature inferior approximations to the master files.
Still, if proxies are necessary, or there is simply no way to get playback with the camera raw files, then cutting with proxies may be the best solution for you and your post-production workflow.
Final Thoughts
Like everything in the post-production world, proxies work best when they are generated properly, and the workflow is well designed. If both of these factors are maintained throughout, and the reconnection/relink workflow is buttery smooth, you likely will never have issues on your final output.
However, there are plenty of times when proxies will fail you, or they simply aren’t a good fit for the needs of the editorial workflow. Or perhaps you have an edit rig that can handle fourteen parallel layers of 8K with effects and color correction applied and not even drop a frame.
Most folks do not fit into the latter category however and will need to find a workflow that best suits their hardware, and the needs of the editorial workflow or client. For this reason, proxies remain a great solution, and one that (with a bit of practice and experimentation) can yield a real-time editing experience on systems that would otherwise be hindered or simply unable to keep up with the original camera raw files.
As always, please let us know your thoughts and feedback in the comments section below. What is your preferred method for working with Proxies? Or do you prefer to bypass them altogether and cut only from the original source media?