
Yes, Procreate can edit photos and the app offers a lot of similar editing tools that Photoshop has. In Procreate, you can make changes like removing objects from photos, converting to black and white, and many other common editing techniques.
I’m Carolyn and I’ve been running my digital illustration business for three years using the Procreate app. I have a wide range of clients who all require different things from me whether it’s graphic design, company branding, or photo editing. I have to know how to do it all.
When most people think of photo editing software, their first thought is probably Photoshop. But today I’m going to show you some of the fantastic photo editing tools in Procreate for all of your creative needs.
Note: Screenshots are taken from Procreate on iPadOS 15.5. All photos used in this article are my own.
Table of Contents
- Key Takeaways
- How to Edit Photos in Procreate
- Removing Objects or People in Procreate
- Adding Illustrations to a Photo in Procreate
- Cropping Image Size/Orientation in Procreate
- Converting a Photo to Black & White in Procreate
- Changing Photo Shape in Procreate
- Changing Focus & Background in Procreate
- Adjusting Color Balance in Procreate
- Duplicating or Adding Objects in Procreate
- Things to Note
- FAQs
- Final Thoughts
Key Takeaways
- You can edit photos on Procreate.
- The photo editing tools available on Procreate are very user-friendly and easier to use than other photo editing software.
- You can add and remove objects, crop, change the color, size, and orientation of a photograph in Procreate.
How to Edit Photos in Procreate
You may be surprised to discover that although Procreate is a platform focused on digital artwork, it also possesses most of the same tools for editing your photos as Photoshop does. Below are the six most common photo editing tools that I love and how to use them.
Before practicing any of the techniques below, make sure you know how to import your chosen image into your canvas. You can do this by opening the Actions tool (wrench icon), opening the Add menu, and selecting Import a photo from your device.
Removing Objects or People in Procreate
This is probably the most commonly requested photo editing tool. This is used for removing aspects of an image like a beautiful photo of a couple but there is a stranger in the background or a scenic landscape ruined by a rogue truck passing by. Here’s how to do it:
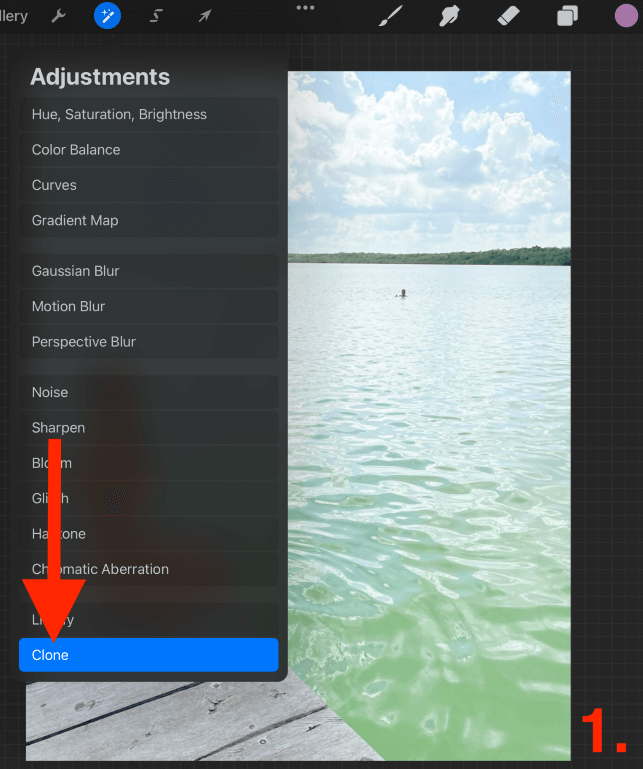
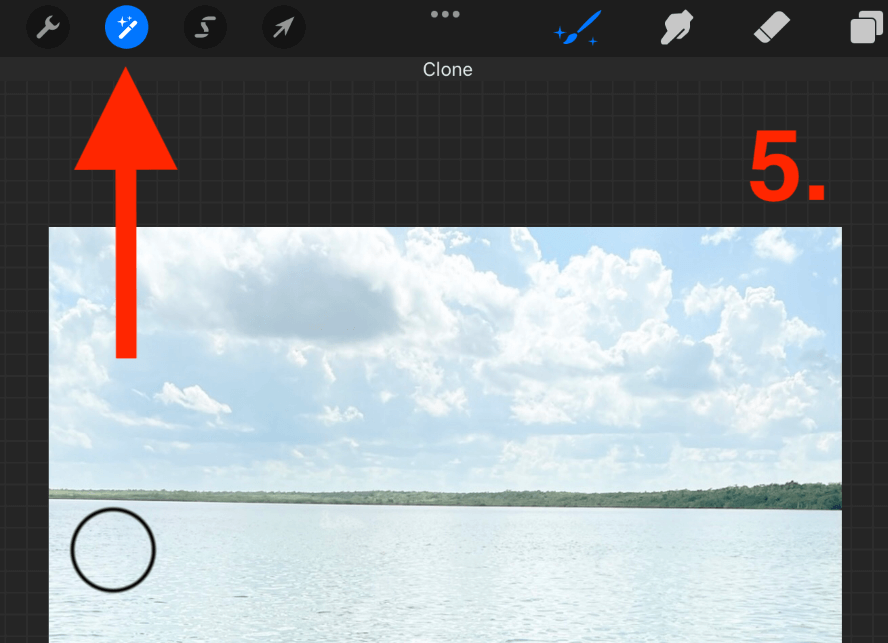
Step 1: Once your photo has been imported into your canvas, identify the parts you want to remove or crop out. Then open your Adjustments tool by tapping on the magic wand icon and scrolling down to select the Clone option.
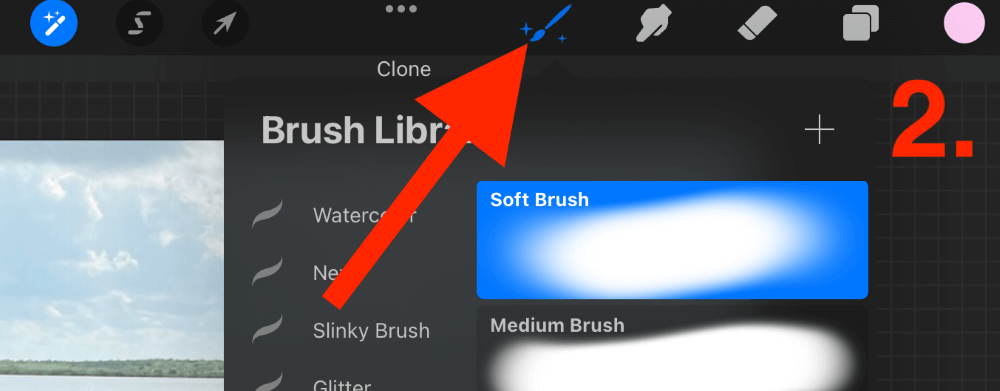
Step 2: Before you do anything, you need to decide what Clone brush to use. I like to use the Soft Airbrush as it blends the subject better. Your Brush Library is now Clone enabled, so you will notice little stars beside your paintbrush icon.
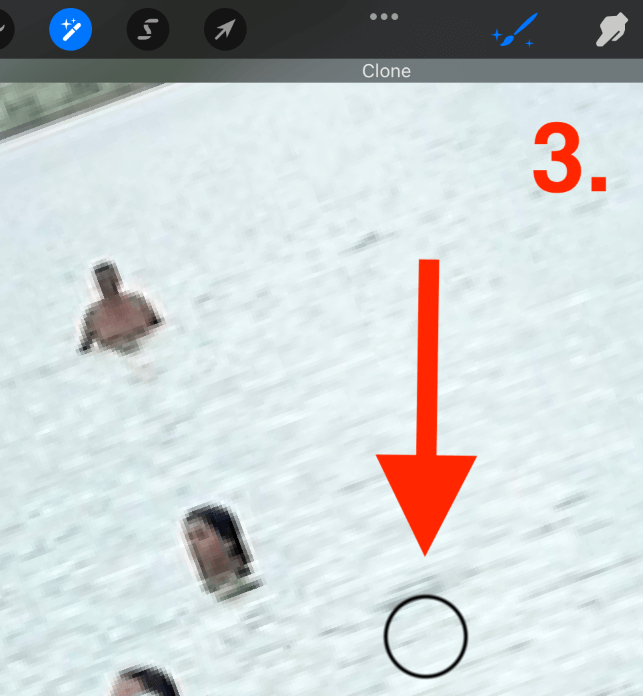
Step 3: A dark circle will now appear on your canvas. Where you place this circle is very important as the contents of this circle are what your brush will produce when you paint over your photo. This is similar to the EyeDropper tool.
Whatever is inside of this circle will be duplicated wherever you paint. Remember to move it frequently by tapping on it and dragging it to a new location which should be near the surroundings of the object you are trying to cover so it will blend in better.
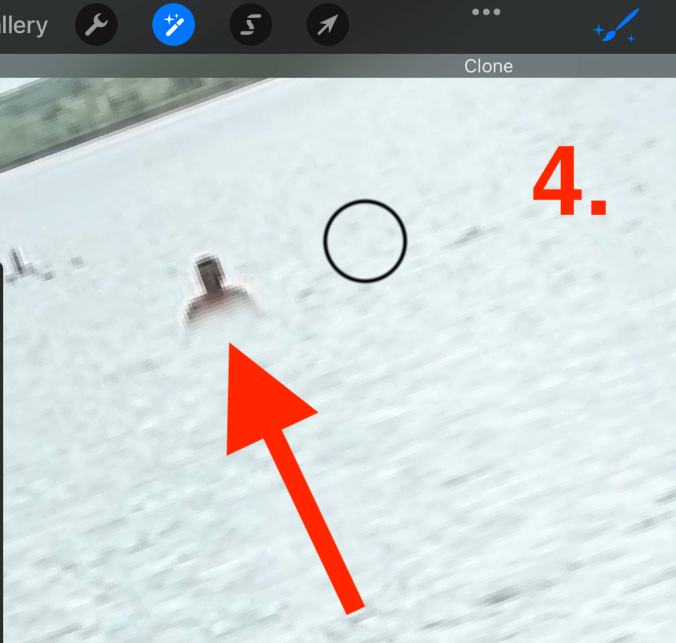
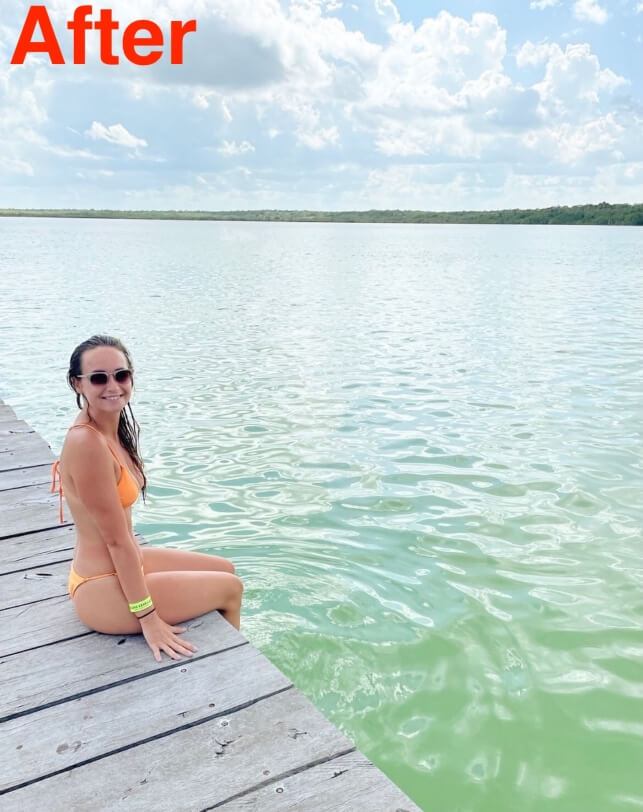
Step 4: Using your Soft Brush, slowly and carefully paint over the objects you want to remove. In my example, I wanted to remove the people swimming in the background and the sticks coming up from the water.
Step 5: Once you have removed all of the unwanted people or objects from your photograph, tap on the Adjustments tool (magic wand icon) again to confirm your changes and close the tool.
Once you are finished with your edits, you can save your image as a JPEG by tapping on the Actions tool and selecting JPEG under the Share menu. Your finished photograph will now be saved to your device.

Adding Illustrations to a Photo in Procreate
A popular photo editing tool that people like to use to jazz up their existing photographs is to add drawings or digital details to an image. This can turn a basic photograph into a fun and eye-catching design. The blend of real-life and digital design creates a really striking contrast.
Step 1: Add a new layer on top of your imported image by tapping on the + symbol in the top right-hand corner of your Layers Menu.
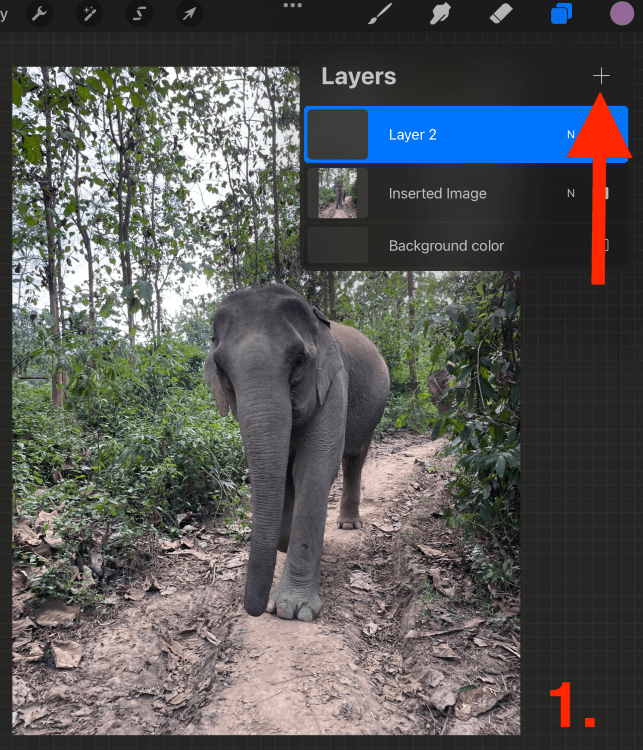
Step 2: Using any of your brushes, you can add patterns, colors, designs, or text you like to your photograph. Save your image as a JPEG by tapping on the Actions tool and selecting JPEG under the Share menu. This will now be saved on your device.

Cropping Image Size/Orientation in Procreate
Changing the orientation, shape, or size of an image is a very common photo editing technique. It’s simple, yes but doing it in Procreate rather than a device allows the user to have more control over specific measurements rather than a random drag and crop function.
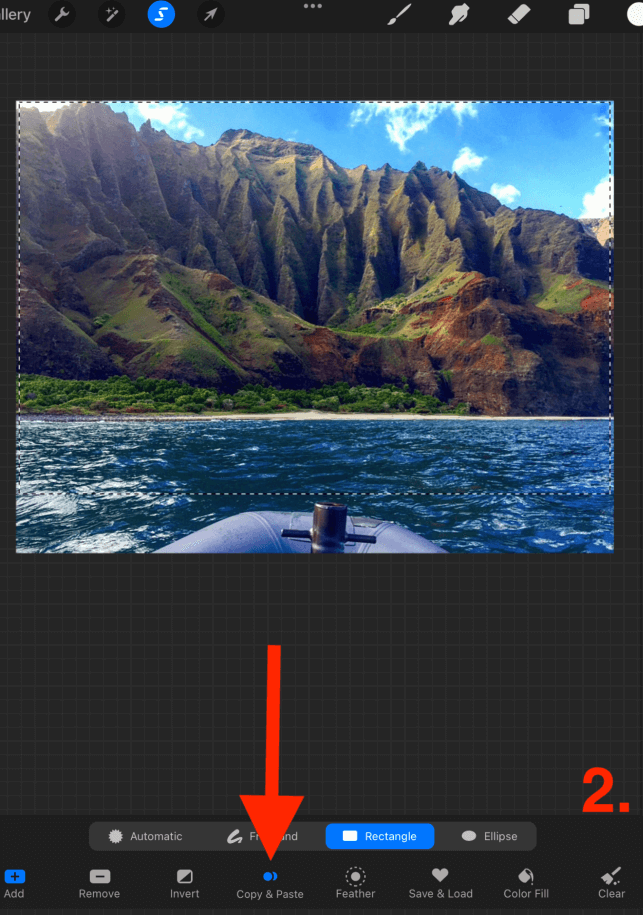
Step 1: Open your Selection tool by tapping on the S icon in the top left-hand corner of your canvas. In the bottom settings window, select the Rectangle setting.
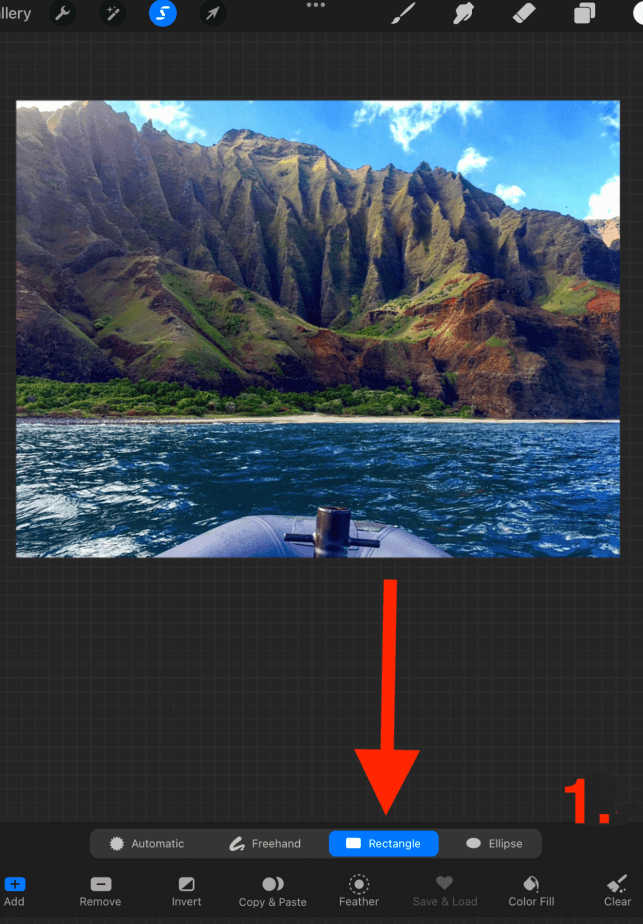
Step 2: Using your finger or stylus, tap on the top left-hand corner of your photo and drag down and to the right until you achieve the shape you desire. Once you are happy with the selection, tap on the Copy & Paste function in the bottom window.
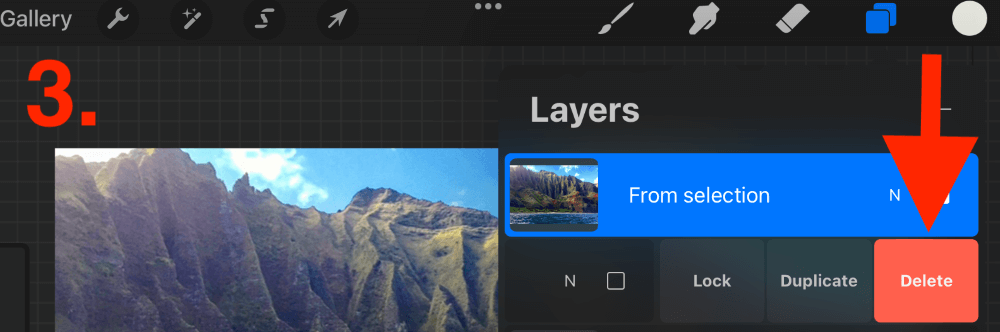
Step 3: Your copied selection will now appear in its own layer on top of your imported image. Now you can delete the original image by swiping left on the layer title and selecting the red Delete button.
Converting a Photo to Black & White in Procreate
You can easily convert a colored photograph to a classic-looking black-and-white or sepia image by adjusting the saturation in Procreate. Here’s how:
Step 1: Open your Adjustments tool by tapping on the magic wand icon in the top left-hand corner of your canvas. Open the Hue, Saturation, Brightness menu.
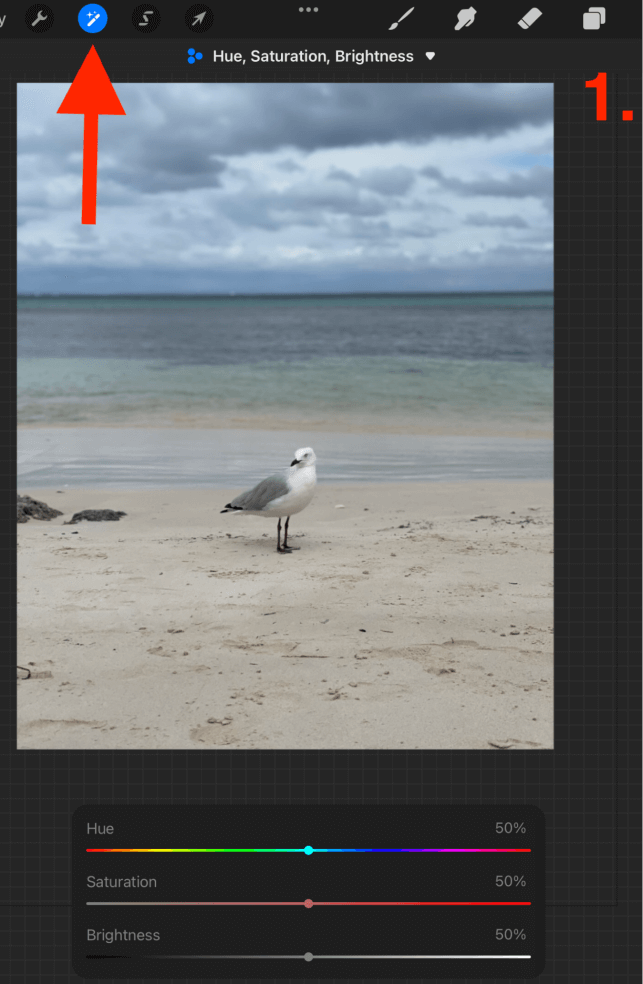
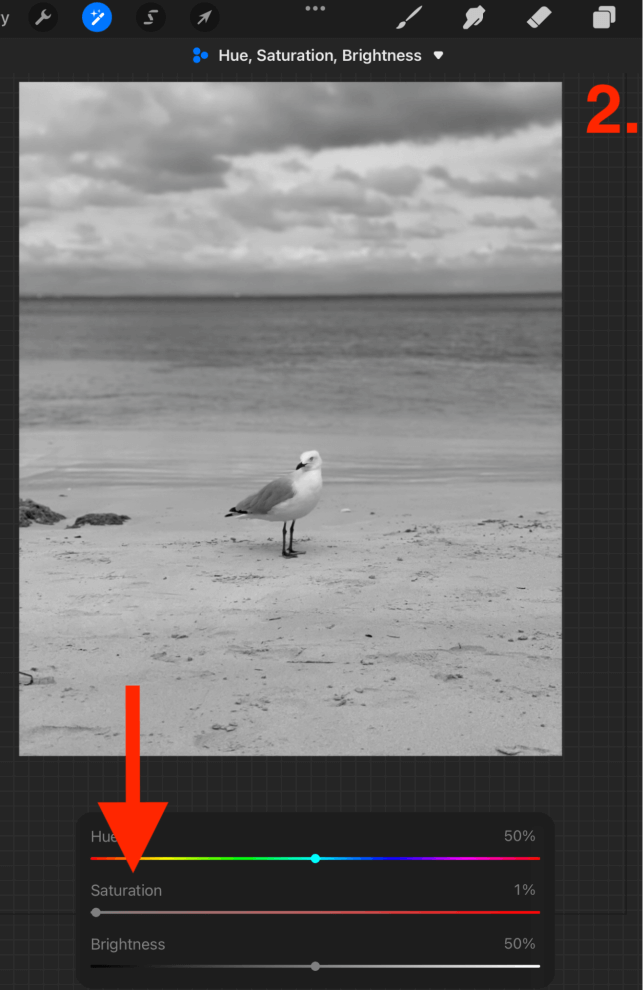
Step 2: Drag the Saturation toggle all the way down to 1%. Once you are happy with the new color of your image, tap on the magic wand icon again to close the Adjustments tool.
Changing Photo Shape in Procreate
This method is ideal if you want to select a certain portion of your image and discard the rest of it. I use this for adding parts of images to birthday invitations or greeting cards. Here’s how:
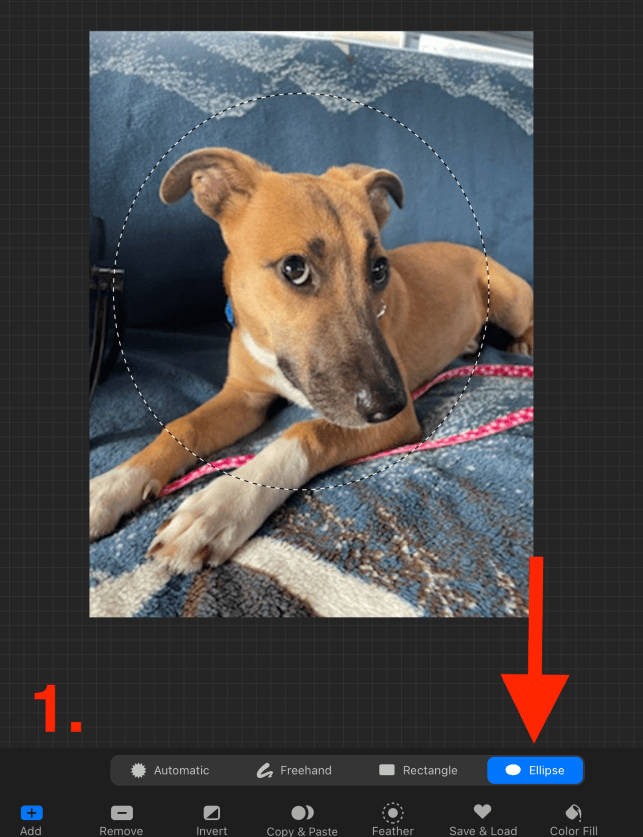
Step 1: Open your Adjustments tool by tapping on the magic wand icon. In the bottom window, select the Ellipse setting. Tap on a point to the upper left of your photo and drag it down to the right until you get your desired shape.
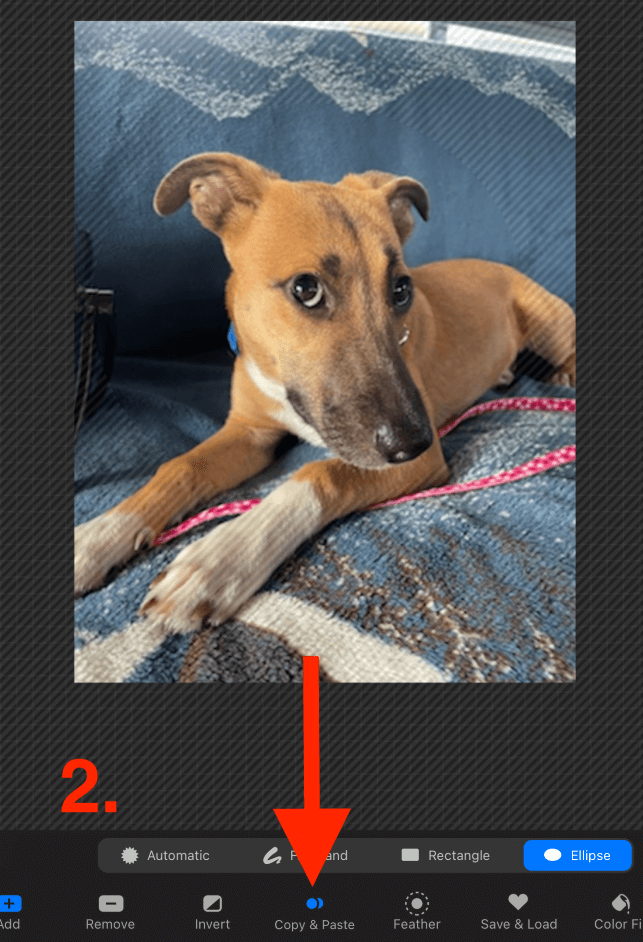
Step 2: In the bottom window, tap on the Copy & Paste function. This will create a new layer consisting of the contents of the circle you just created.
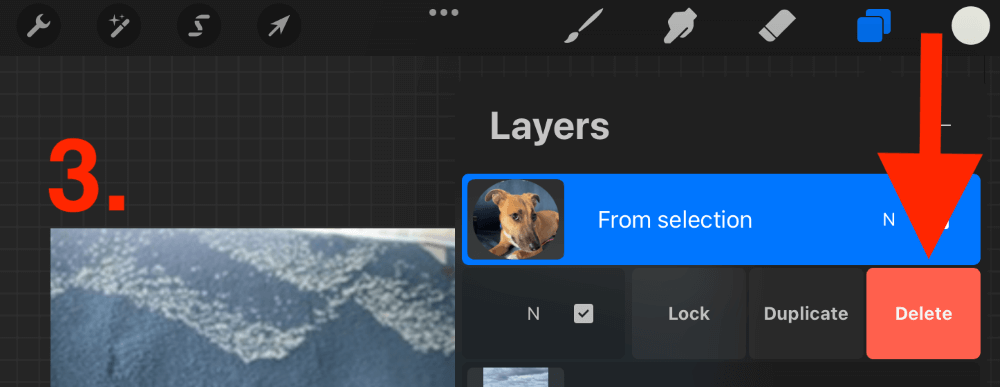
Step 3: In the Layers menu, delete the original imported image by swiping left on the layer title and tapping on the red Delete button.
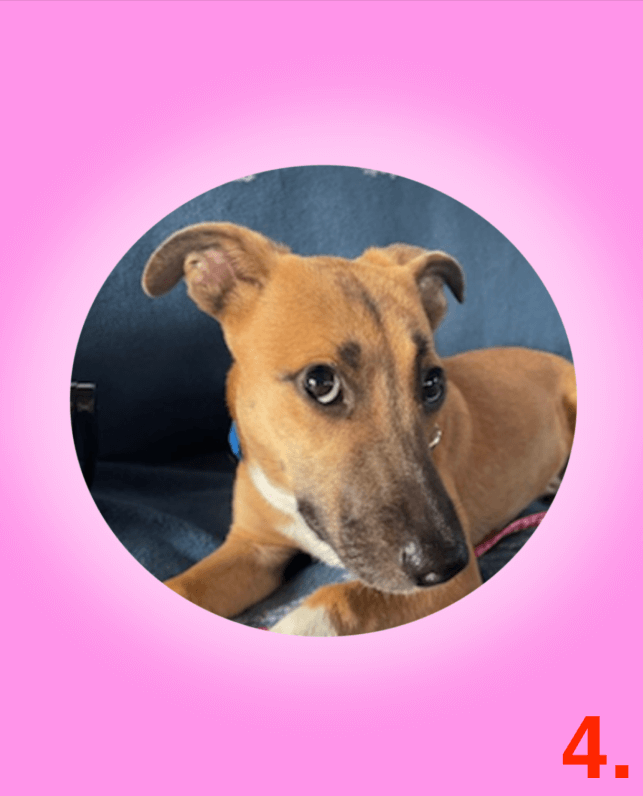
Step 4: You can now use the Transform tool (cursor icon) to reposition your new selection within your canvas and add other details like a colored background, text, or a frame.
Changing Focus & Background in Procreate
This is a long process but can provide a series of various different results. This is a great way to highlight a specific object or person within your image and leave the background out of focus or more subtle. Here’s how:
Step 1: Open your Selection tool and select the Freehand option. Using your finger or stylus, carefully trace a line around the object that you want to keep in focus.
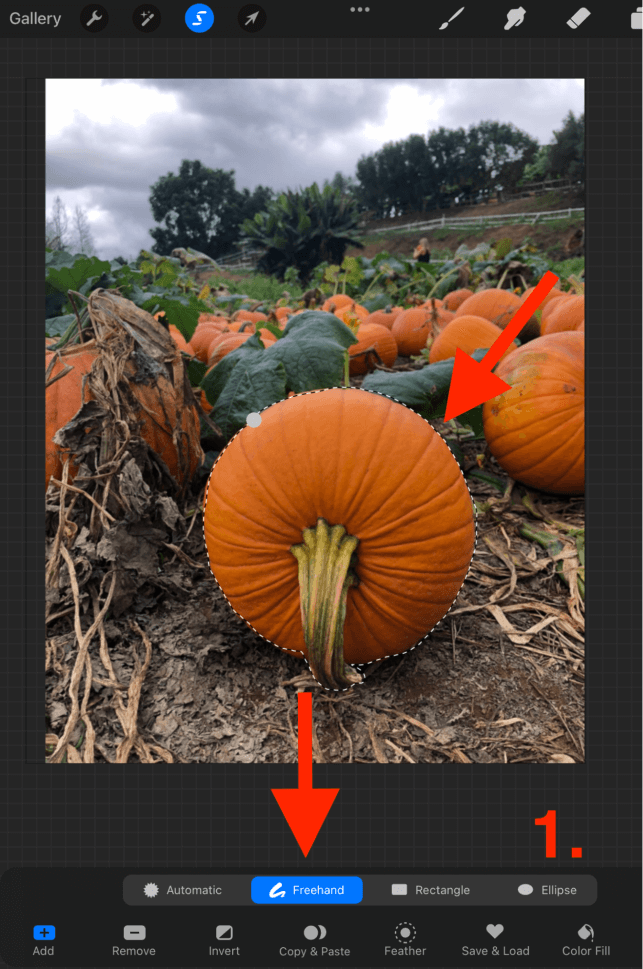
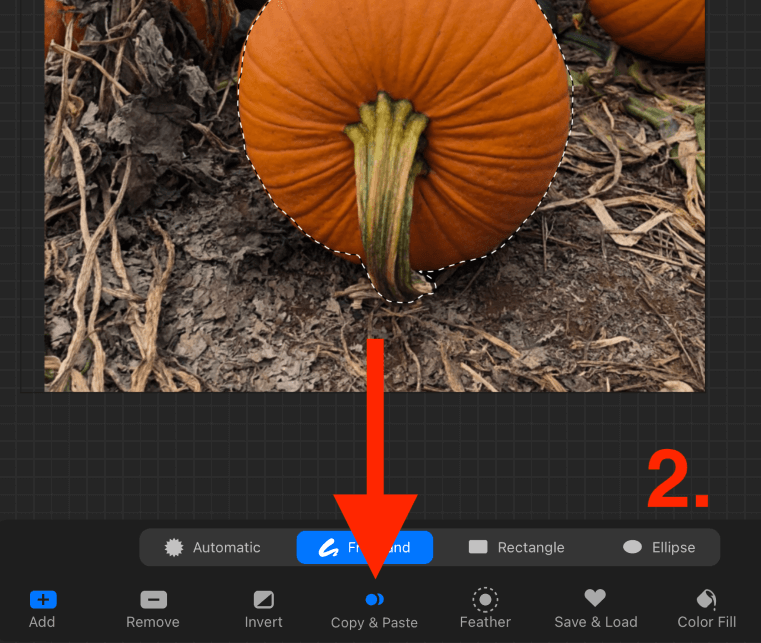
Step 2: Once you have finished connecting your traced lines around your chosen object, tap on the Copy & Paste option in the bottom window. This will create a new layer consisting of the contents of your traced outline without removing it from the image.
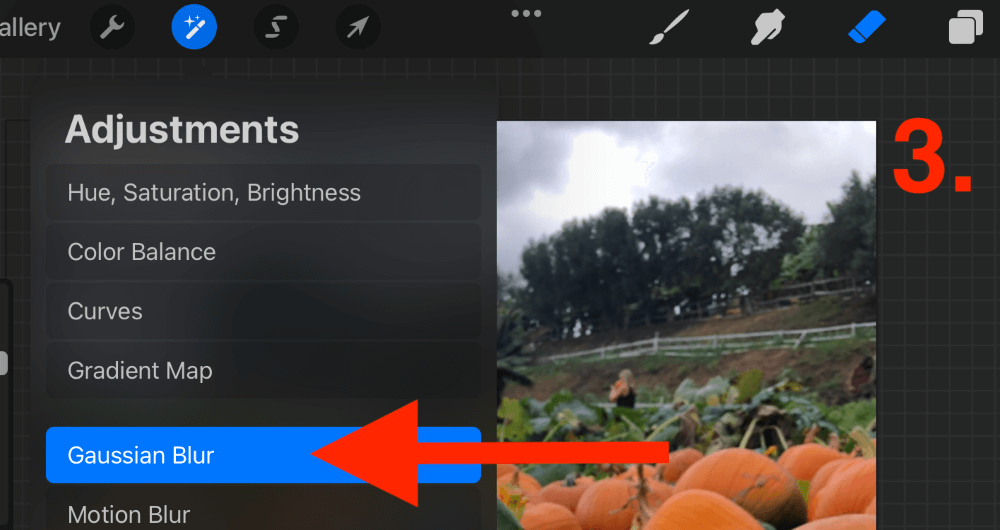
Step 3: Click back on your original layer to activate it. Then open your Adjustments tool and select Gaussian Blur from the drop-down menu.
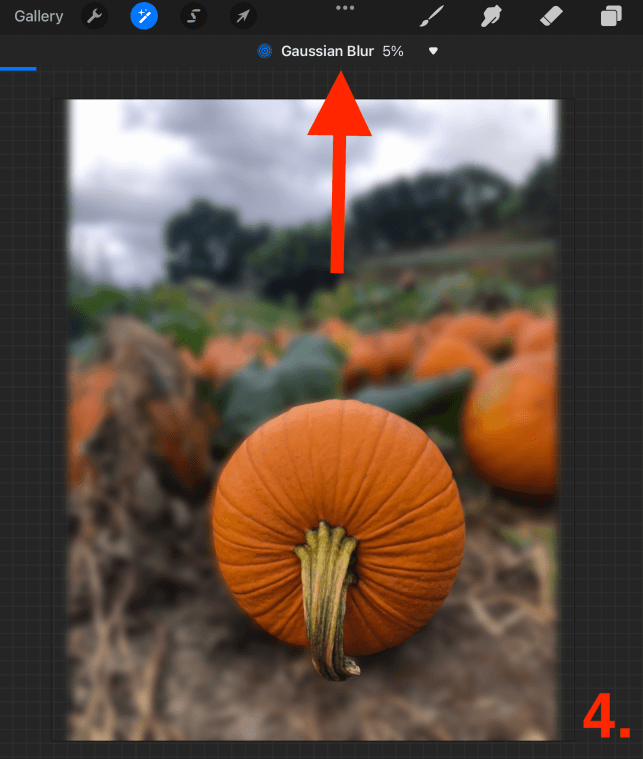
Step 4: Tap and drag right anywhere on your image to increase the Gaussian Blur. Once you are happy with the percentage of the blur, tap on the magic wand icon again to close the adjustments tool.
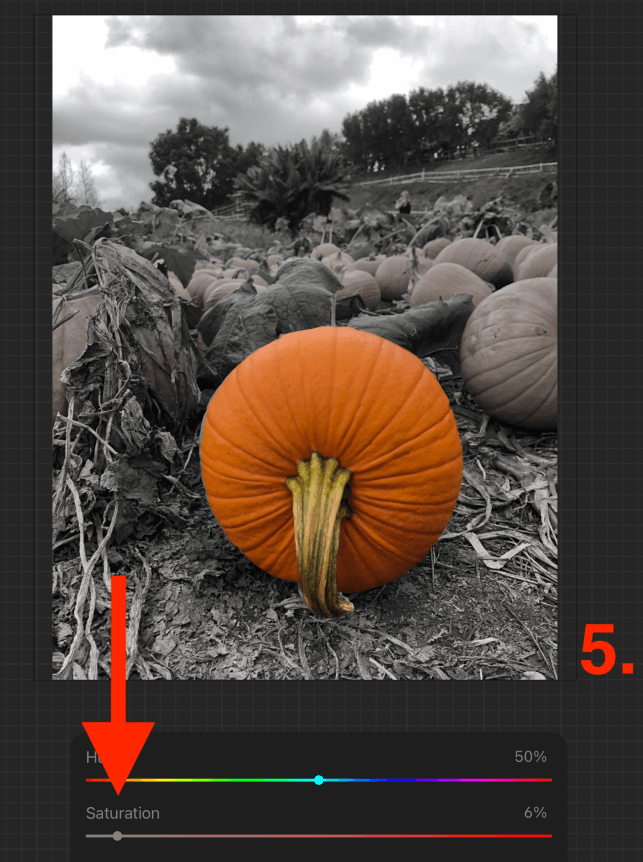
Step 5: Alternatively, you can adjust the color of the background instead by opening the Hue, Saturation, Brightness menu in the Adjustments tool. Reduce the Saturation to 1% on the imported image layer and keep the selection layer on top the same.
Adjusting Color Balance in Procreate
You can intensify and manipulate the colors and tones within an image by adjusting different levels in the Color Balance menu. This can completely change the look of an image and make it more striking or even less realistic if that’s what you’re after. Here’s how:
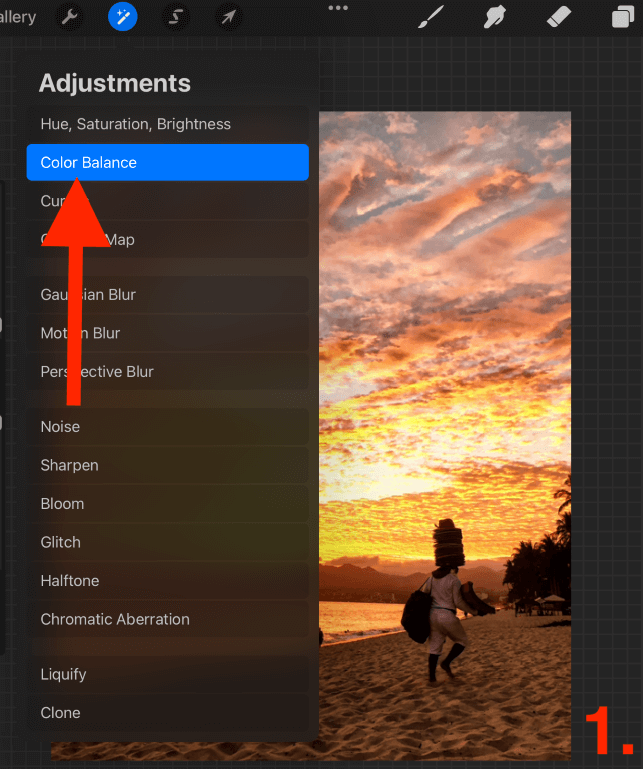
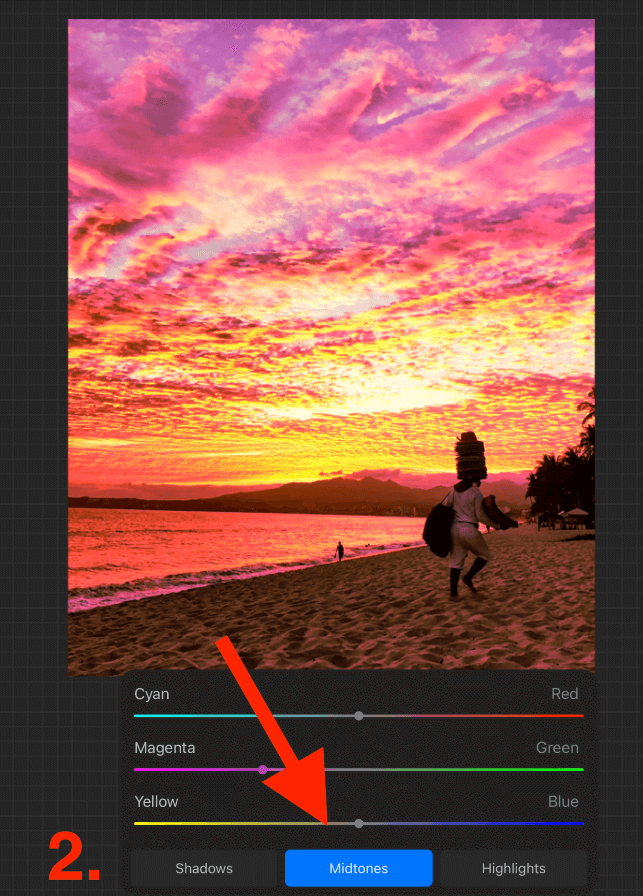
Step 1: Open your Adjustments tool and in the drop-down menu, tap on Color Balance.
Step 2: In the settings window at the bottom, you can adjust the levels of the Shadows, Midtones, and Highlights and manipulate each individual color within the photo. Once you are happy with your changes, tap on the magic wand icon again to close the tool.
Duplicating or Adding Objects in Procreate
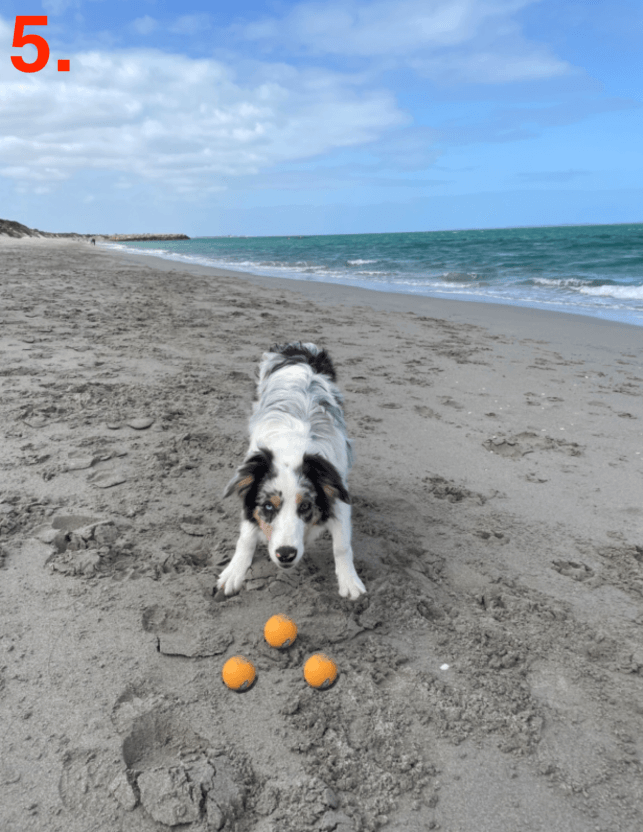
Another popular tool is adding something to a photograph that may not have been there before. You can duplicate a part of the original image or add something from another image. In my example, I duplicated and multiplied the ball in the foreground of the photo. Here’s how:
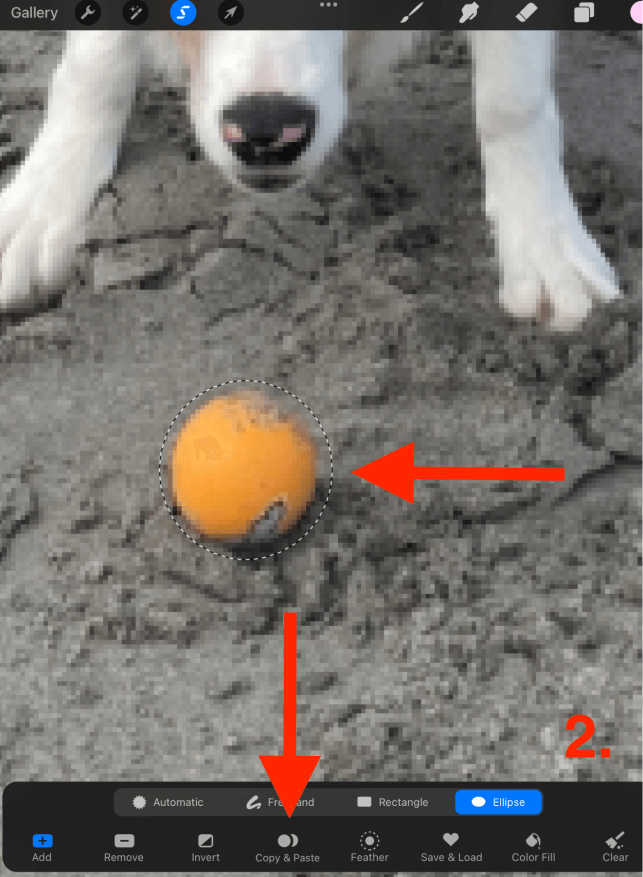
Step 1: Open your Selection tool and select the Ellipse option.
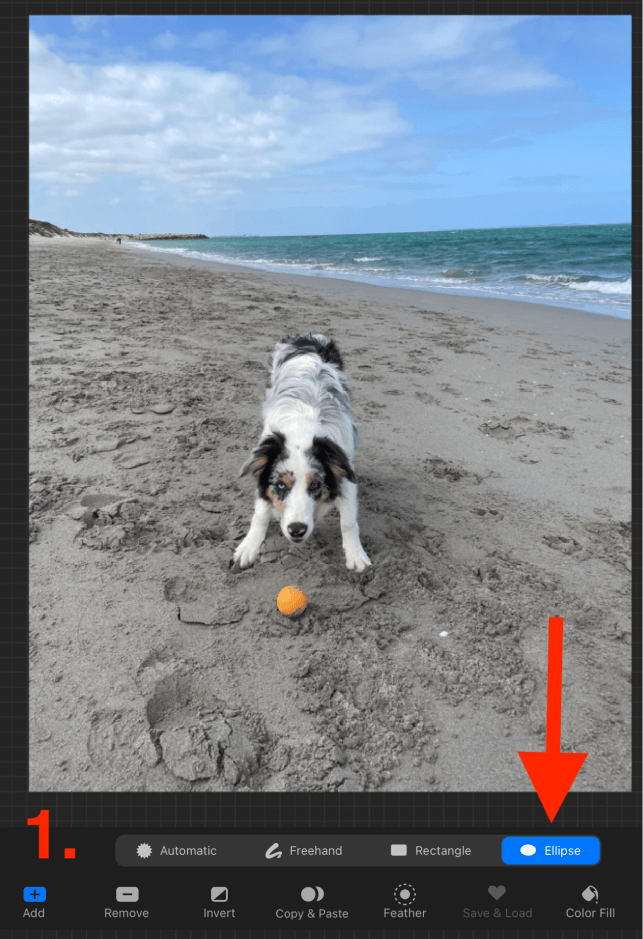
Step 2: Using your finger or stylus, carefully drag a circle around the object you want to duplicate. When you are done, tap on the Copy & Paste function in the bottom window. The contents of your traced object will now become a new layer.
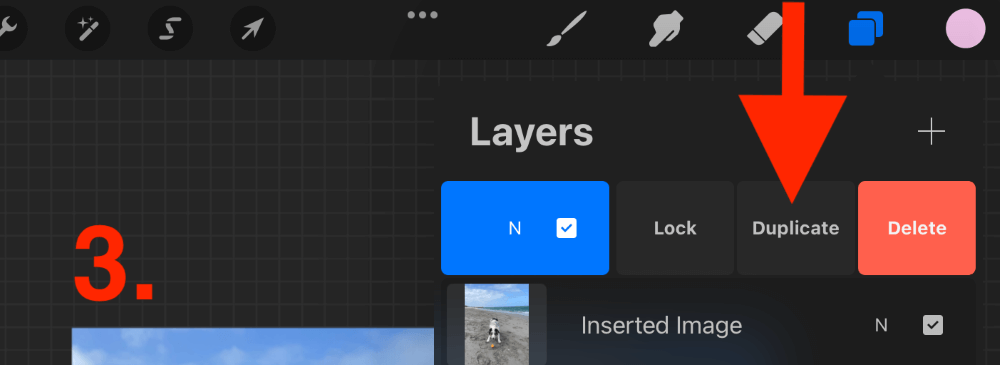
Step 3: Duplicate your new selection layer as many times as you need by swiping left on the layer title and tapping on the Duplicate option.
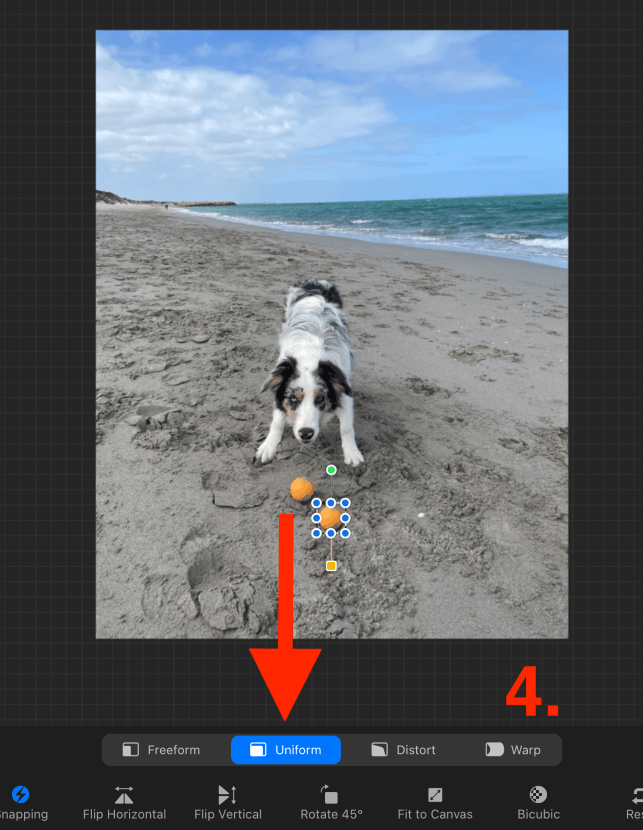
Step 4: Open the Transform tool by tapping on the cursor icon. In the bottom selection window, activate the Uniform setting. This will ensure your shape does not change in the moving process. Move each object layer to its new location within the image.
Step 5: Once you are happy with the image edits, tap on the cursor icon again to close the Transform tool and save your image to your device.
Pro Tip: When using the Transform tool to move your selections, always ensure Snapping is activated. This will preserve the quality of your selection if you choose to adjust the size of it.
Things to Note
There are a few small things I always keep in mind when it comes to editing photographs whether they are my own or someone else’s. I have added them below so you can take note if any of them apply to you:
Permission & Ownership
If you do not own the photo yourself, ensure you either have the original owner’s permission to edit the image or ensure you credit the original owner wherever you are displaying the finished project. This is not only out of respect for others but can protect you legally too.
Integrity
Learning these editing skills gives you the power to manipulate any image into any message. You can create something that is not real but appears to be. Always ensure you’re upfront about what edits you have made to a photograph so your audience receives full transparency.
And always remember to use your powers for good, not evil. Never use your editing skills to create false information or anything that may have a negative impact on another person.
Work Slowly
The most crucial part of creating high-quality edits in a photograph for me is to take my time and work slowly. I do everything bit by bit to ensure the outcome is the best it can be. You can always tell when a photo edit has been rushed and needs to be redone.
FAQs
Below is a selection of your frequently asked questions about photo editing in Procreate:
How to use Procreate to draw over photos?
Import your photo as a new layer in your canvas. Tap on the + symbol in the top right-hand corner of your Layers menu to create a new layer on top of your image. Using a brush, complete your drawing. You can combine these two layers together once you are done.
How to convert photos to line drawing in Procreate?
Duplicate your photo and tap on the N beside the layer title and scroll down to select Color Dodge. Then invert your layer and open your Adjustments tool (wrench icon). Select Gaussian Blur and increase the level until you achieve your desired results.
Final Thoughts
Many people are unaware that Procreate offers many of the same photo editing tools as some other apps like Photoshop. However, on top of its incredible illustration and digital art tools, this amazing app also comes with a wide range of functions to edit photos professionally.
For some artists, this is a whole new world that can enhance your offerings to your clients without having to purchase and learn a new program. I recommend trying out some of the methods shown above to see how easy these editing tools are to use, you’ll be surprised.
Do you edit photos in Procreate? Leave your favorite tools in the comments section below.