
The need to edit a photo can often arise these days, whether for marketing materials, tutorials, or casual photos.
Luckily, macOS includes a native app for photo editing called Photos! In addition, there are also many third-party Mac photo editor apps to fit your needs.
Hi, I’m Devansh. As a content creator, I often edit photos on my MacBook for my writing projects. So, I know the ins and outs of Photos and other editing apps quite well.
This article will first give you a brief walkthrough of the native Photos app on macOS. I’ll also introduce you to three paid third-party photo editing apps if you need a more premium option. After that, I’ll answer some common questions.
Want to edit a photo on your Mac but have a hard time figuring it out? Read on!
Table of Contents
1. Edit Photos on Mac With the Photos App
If you want to edit photos and have a Mac machine, the solution is right in front of you: the Photos app! Introduced in 2015, it allows you to change the look of any photo with a set of easy-to-use editing tools.
To access these tools, simply drag and drop the preferred image into the app, double-click on it, and click the ‘Edit’ button at the top-right corner.

Once in the editor, there are three main sections of editing tools available to you: Adjust, Filters, and Crop.
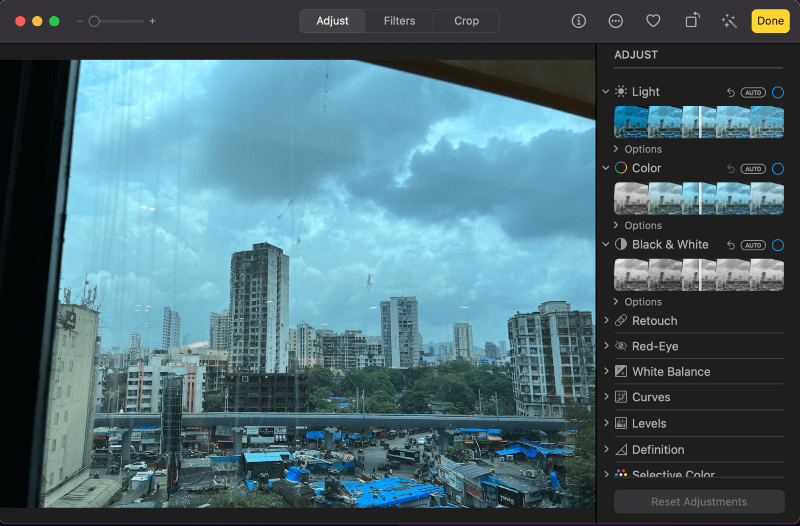
Clicking on any of these three opens up more editing options in the menu on the right. Let’s discuss all three of these in more detail.
Adjust
Since most photo editing features are packed into this section, let’s briefly review some of them.
- Light: Control exposure, contrast, brightness, and more.
- Color: Increase or decrease the color temperature by changing color saturation, vibrance, and cast.
- Black & White: Make your picture monochrome by eliminating color and adding grain.
- Retouch: Make your picture sharper.
- Red-Eye: Eliminate red spots in the picture.
- White Balance: Make your picture warmer or cooler.
- Beyond this, there are also Curves, Levels, Definition, Selective Color, Noise Reduction, Sharpen, and Vignette.
Whew! A bit too much to wrap your head around at once? You can play around with a live demo here. Just click on a feature to get more info about it.
Filters
If messing around with all adjustment features isn’t your cup of tea, you can also use filters. With just one click, you can completely change the look and feel of an image without getting into the exact settings required for it.
Once you’re in the filters tab, simply pick the one you like. There’s Mono, Vivid, Silvertone, and Noir, just to name a few. To adjust their intensity, you can move the slider as required.
Crop
This tab packs a few features on top of cropping, which you can do by dragging the selectors of the frame to make the desired selection. You can also change the aspect ratio of the image, flip and rotate it, and use the straightening dial to adjust the horizon.
Keep in mind that it’s natural to make some mistakes when it’s your first time using these features. Fortunately, the Revert to Original button is available for that. You can click the Done button when the image looks as you envisioned.
If you found that Photos lacked a few features which you required, you can click Edit in the Menu Bar and choose Edit With to use an external editor. Now, let’s look at three great third-party photo editors.
2. Use Third-Party Mac Apps to Edit Photos
The Photos app can be enough for most users out there, but if you have more high-end requirements, you’ll do better by going for a more premium option. So, let’s look at three paid photo editors available for macOS.
Luminar Neo
Does tweaking dials and adjusting effects bore you to no end? With Luminar Neo, you can delegate all that hard work to AI! It contains various AI-powered features like AI sky, foliage, and landscape enhancer. It also has many filters (called ‘Looks’) and a template marketplace. The user interface is similar to that of Photos, so you should feel right at home.
CameraBag
If you’ve ever Googled ‘Lightroom alternatives,’ you’re most likely familiar with CameraBag! It includes many features like curve-based color adjustments, advanced grain controls, and many high-quality included presets.
The most popular version is CameraBag Pro, which is available for $59. If you’re only going to be editing photos, you can instead opt for CameraBag Photo for a lower price of $35. Free trials of both versions are available too! Check out their website for more info.
Capture One
If you’re a professional iPhone photographer but need more features than Photo offers, Capture One might be worth looking into. There are plenty of settings you can tweak to your liking, a layers system, and advanced color grading. It’s also available on iPad and has a Live version for collaboration.
These are all paid apps, but what if you’re looking for something free? In that case, you can check out GIMP or Darktable.
FAQs
Here are some common questions related to Mac photo editing features.
Can you Edit Videos and Live Photos in the Photos App?
Yes! You can add them into the app the same way you add photos. You also get access to most of the same tools, including light, color, brightness, and more. Live Photos has four viewing options: Live, Loop, Bounce, and Long Exposure.
Can You Edit Photos in Preview Too?
The Preview app on Mac could be sufficient for the task if you only need to get some basic editing done, like cropping or adding text. As you may know, it’s the default app that displays an image when you double-click on it.

Once the image is open, just click the pen icon in the app’s top-right corner, and you’ll get access to various editing features.
What’s the Best App for Editing Photos in Bulk?
If you want to edit a batch of photos at once, check out PhotoBulk. It allows you to add watermarks, resize images, and even compress and convert them to different formats. It’s free too.
Conclusion
Trying to edit photos on Mac without knowing what to look for can be challenging. But the easiest way to do it is with macOS’s Photos app.
I hope this article helped you out. Although I believe most users will be happy with Photos, it’s worth looking into third-party options if you want more features!
Which is your favorite photo editing app? Please let me know in the comments!