
DxO PhotoLab
Summary
PhotoLab is a RAW editor from DxO, a company famous for its precision testing of optical equipment. As you might expect from them, PhotoLab provides excellent automatic lens corrections and a truly incredible noise reduction algorithm they call PRIME. A number of other excellent automatic adjustments simplify the editing process, and newly-added localized editing tools allow you to fine-tune their results more effectively than in the past. For photographers focused on color accuracy, this latest version also includes support for DCP profiles.
PhotoLab includes an updated library management tool, but it still needs a lot of additional features before it’s actually ready to replace your current digital asset manager. DxO offers a Lightroom plugin with the goal of allowing users to keep Lightroom as their catalog manager, but conflicts between RAW processing engines prevent this from being a viable solution. As a result, PhotoLab is best used as a secondary editing option to supplement an existing workflow rather than replacing your existing one.
What I Like: Excellent noise reduction with PRIME. Excellent lens correction. Local editing through U-Points & masks. Good multi-core CPU optimization.
What I Don’t Like: PhotoLibrary still lacking key features. Lightroom “plugin” isn’t a useful workflow.
Table of Contents
Why Trust Me for This Review
Hi, my name is Thomas Boldt, and I’ve been a digital photographer since the days when you could measure your megapixels with a single digit. During that time I’ve tested just about every image editor under the sun, from free open-source software to industry-standard software suites. I’ve used them for work, for my own photography practice, and purely for experimentation. Rather than going back in time and repeating all that work yourself – which sounds super difficult – you can read my reviews and benefit from all that experience right away!
DxO did not provide me with a special copy of the software in exchange for this review (I used the unlimited free 30-day trial), and they had no editorial input or oversight on any of the content.
Quick Note: DxO PhotoLab is available for Windows and macOS, but I tested the Mac version in this review. For some inexplicable reason, the Windows version of my download kept stalling repeatedly, despite the fact that the Mac version finished its download without any problems from the same server at the same time. I did eventually manage to get the Windows download to complete, and the two versions are effectively the same aside from the usual differences between Windows and Mac style choices. The only noticeable difference that I saw during my platform comparison was that the mouseover popups on the Windows version contained far more metadata about the photo than the Mac version.
Detailed Review of DxO PhotoLab
PhotoLab is available in two editions: Essential and Elite, and as you can probably guess, there is a fairly significant price difference between the two: Essential costs $139, while Elite will cost you $219. Anyone who shoots a lot of high ISO photos will definitely want to spring for the Elite edition as it offers the fantastic PRIME noise removal algorithm, one of DxO’s pride and joys, as well as a couple of other added benefits.
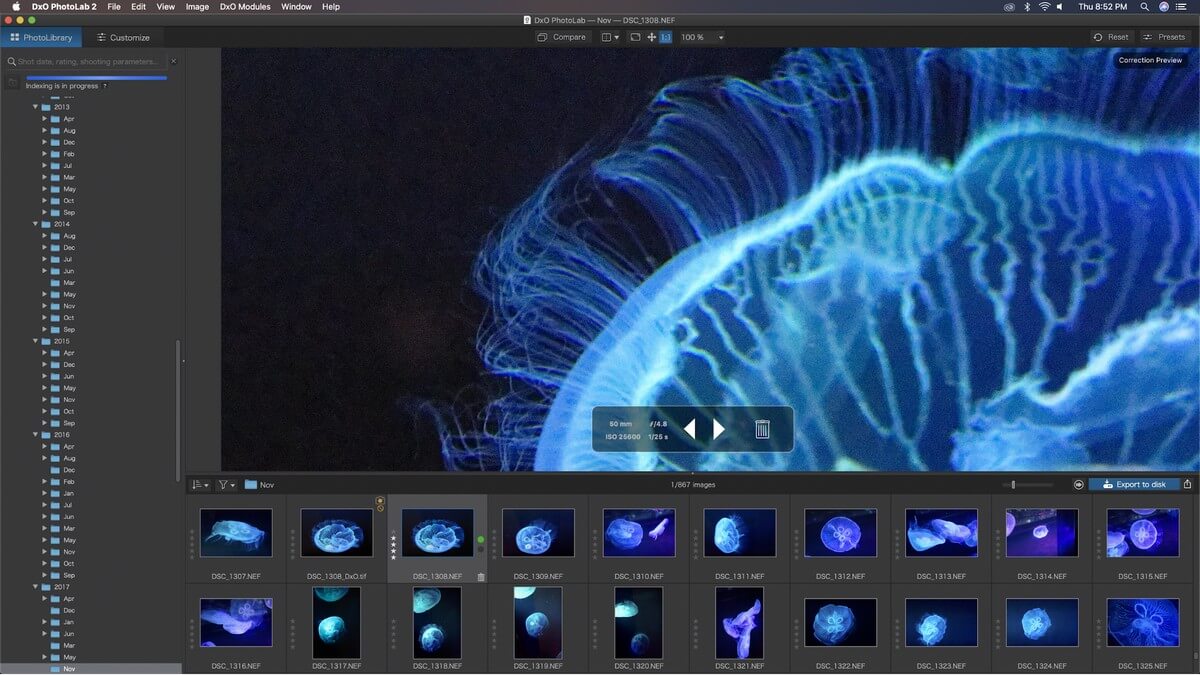
This continues the tradition DxO established with their previous RAW editor OpticsPro. I’m glad to see that they’ve improved on the old editor in many ways, although the library management and organization feature still seems neglected. In OpticsPro it was really nothing more than a glorified file browser, and the PhotoLab isn’t much better, but at least now you can add star ratings, pick/reject flags, and search your library based on a range of shot parameters.
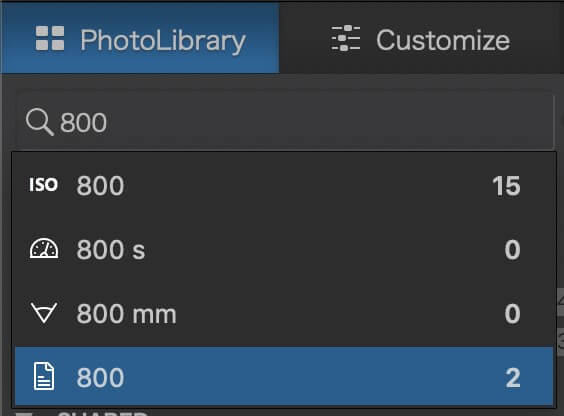
The search feature is an odd blend of brilliant and frustrating. You can simply type in any parameter you want, and it will immediately provide you with a range of options along with how many images fit each search filter. Typing in ‘800’ detects potential meanings and offers the option of showing all images shot at ISO 800, 800mm focal length, 800-second exposures, or file names containing 800.
This is a handy feature, except I am baffled by the fact that there’s no way to actually view your metadata for each image within the PhotoLibrary, despite the fact that it’s obviously reading and processing at least some of that data to make those fancy searches possible in the first place. There is a small overlay window showing basic shot parameters, but nothing else from the metadata.
There’s even a dedicated EXIF metadata viewer in the main editing window, but there’s no way to display it in the library. After a bit of digging in the User Manual, it seems like there is supposed to be a floating overlay with image information, but enabling it and disabling it in the menus doesn’t seem to change any part of the interface that I could see.
Also included in the PhotoLibrary is the Projects feature, which essentially acts as custom groups of images that you can populate as you see fit. Yet for some reason, the search feature doesn’t work within Projects, so you’ll definitely want to keep them to a smaller size rather than going wide with something like ‘all 18mm photos’.
So all in all, while the PhotoLibrary tool is an improvement over previous versions, it still really needs some dedicated attention. If you’re a photographer with a huge catalog of photos, you’re definitely not going to change your digital asset manager, but it does make things a bit easier for those of you who are more casual about your organization habits.
Working with Images
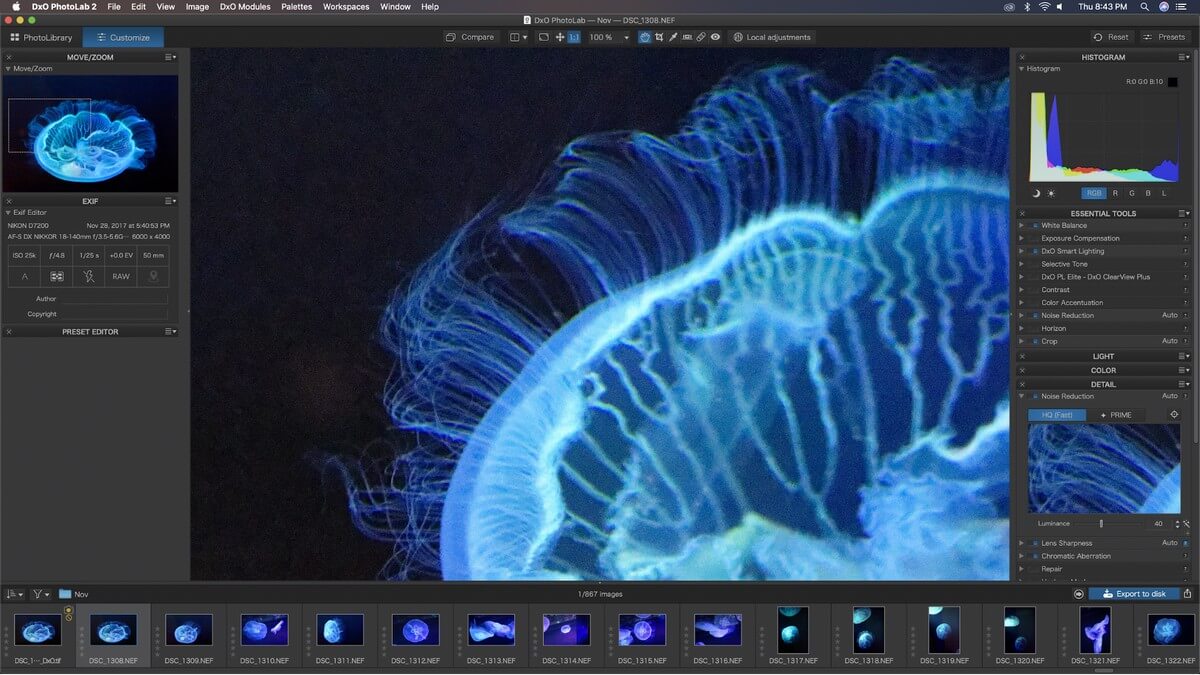
The editing process happens in the ‘Customize’ tab, and editing is where PhotoLab really shines. A number of automatic adjustments are applied to your images by default, and they’re usually quite good, although of course you can customize them or disable them entirely to match your creative vision. In general, I quite like the look of the default DxO RAW conversion engine and adjustments, although this can really depend on your personal taste and your intentions.
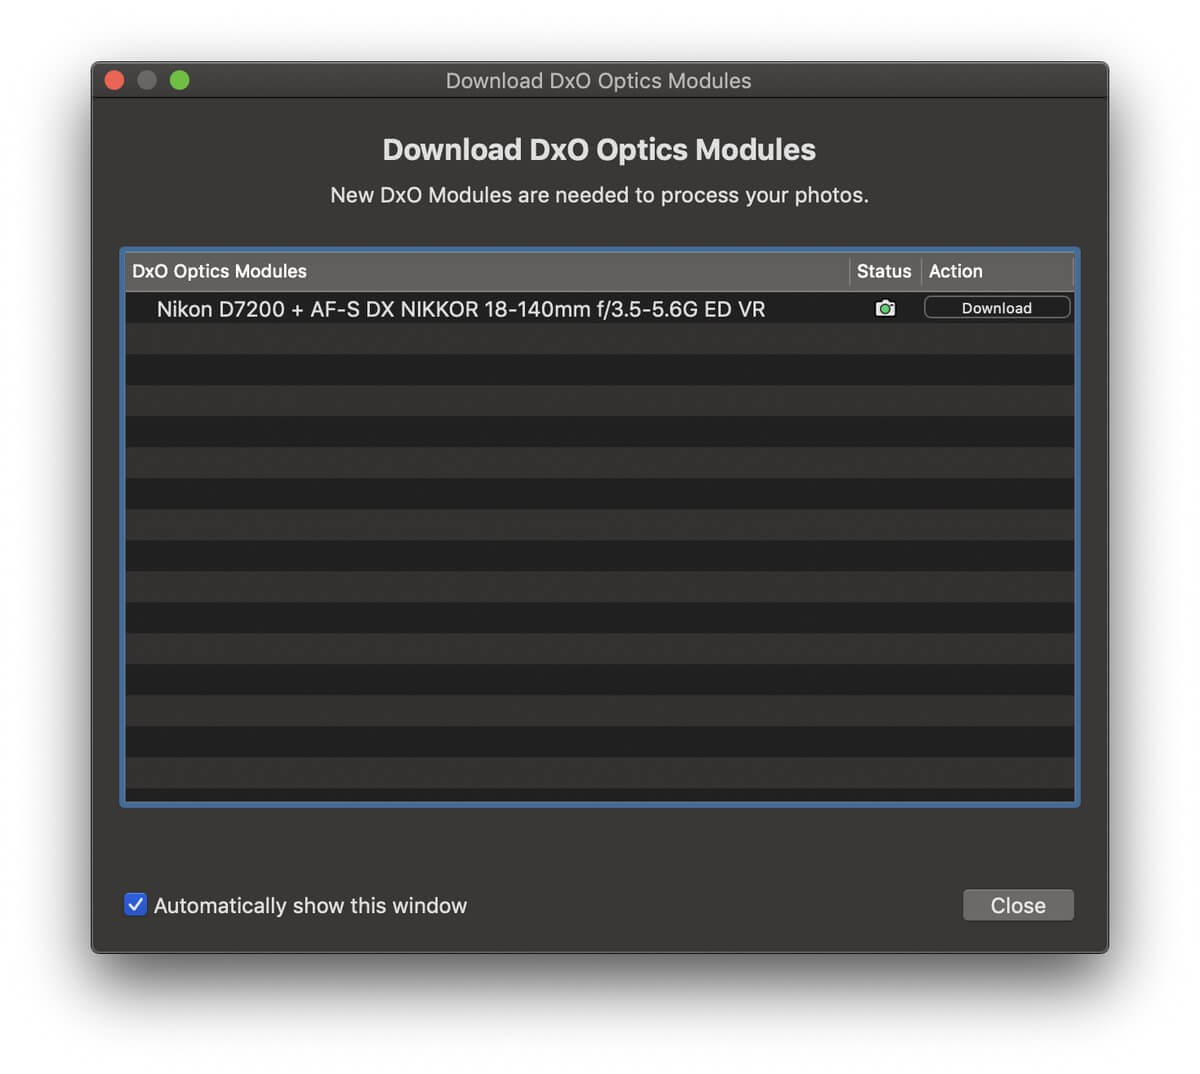
DxO is well-known for conducting extensive in-house tests on a huge range of lens and camera combinations, and as a result, their lens correction profiles are the best out there. Whenever you navigate through a folder in PhotoLibrary or open a file in the customize tab, PhotoLab checks the metadata to determine the camera and lens combination that shot the image. If you’ve got correction profiles installed for it, they’re applied immediately – if not, you can download them automatically through the program. There are something like 40,000 different supported combinations, so DxO saves disk space and loading times by only downloading the profiles that you’ll actually use.
In addition to correcting geometry problems like barrel and keystone distortion automatically, their lens profiles also automatically adjust sharpness. You can tweak this as you see fit, but the automatic adjustment seems to do quite a good job on its own.
Once your lens corrections have been applied, you’re ready to continue with your image, and the editing interface will be immediately familiar to anyone who’s worked with a RAW editor in the past. You’ll find all the tools you need for basic adjustments like white balance, highlight/shadows adjustments, and color tweaking, but DxO includes a couple of custom adjustments that are worth exploring.
Smart Lighting quickly balances high-key images, bringing out details that are lost in the shadows from heavily backlit subjects. The Uniform mode does a good job of boosting local brightness and contrast, while the Spot Weighted mode is intended for portraits and includes a face-detection algorithm. If you’re not shooting portraits, you can set a custom point for spot weighting. Most if not all of this could be accomplished manually, but it’s convenient to have a quick method of handling it.
Clearview does what you might expect – haze reduction – which has the effect of also boosting local contrast. It does this quite well, especially compared to the more limited haze reduction features available in other editors such as Lightroom. Lightroom’s haze removal is only available as part of an adjustment layer and seems to have an unfortunate tendency to turn things blue instead of actually removing haze. Although having tested both the old version and the new version of Clearview, I’m not sure I’m able to see all that much of a difference, but I couldn’t compare them directly side by side as the previous versions are no longer available. ClearView Plus is only available in the ELITE edition.
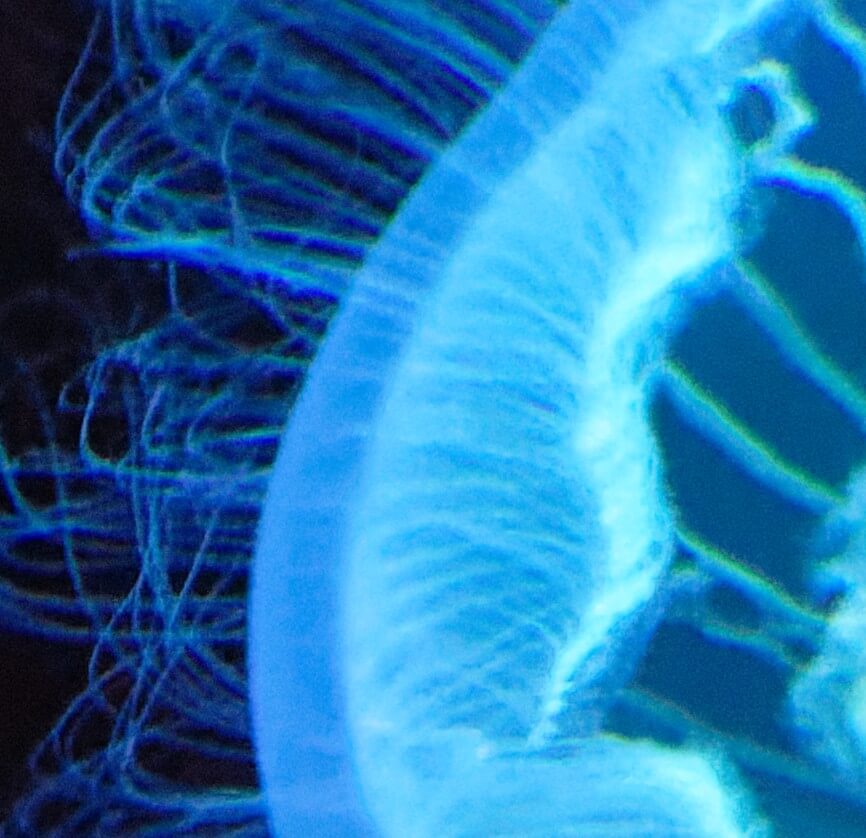
While the default automatic noise removal is quite good, the real star of the show is the PRIME noise removal algorithm (also restricted to the ELITE edition). It does an excellent job of removing noise at extremely high ISO ranges, but as a result it does increase your export time rather significantly, depending on your CPU. It took my 4K iMac 50 seconds to export a 24megapixel image as a 16-bit TIFF file, while the same image without PRIME enabled took 16 seconds. On my PC with a beefier processor, the same image took 20 seconds with PRIME and 7 seconds without.
Because PRIME is so processor-intensive, you’re only able to see a preview of the effect in the small thumbnail on the right rather than the full image, but in general, it’s worth it for any high ISO shot. See the comparison below of the same jellyfish image, shot at ISO 25600 on a Nikon D7200. Without noise correction, the black background was so speckled with red noise it made me ignore the entire series, but I may go back and revisit them now that I have access to better noise removal.

One of the big issues with previous DxO RAW editors was their lack of localized editing features, but PhotoLab incorporates a system known as U Points. U Points were originally developed by Nik Software and incorporated into Nikon’s now-defunct Capture NX editor, but the system lives on here.
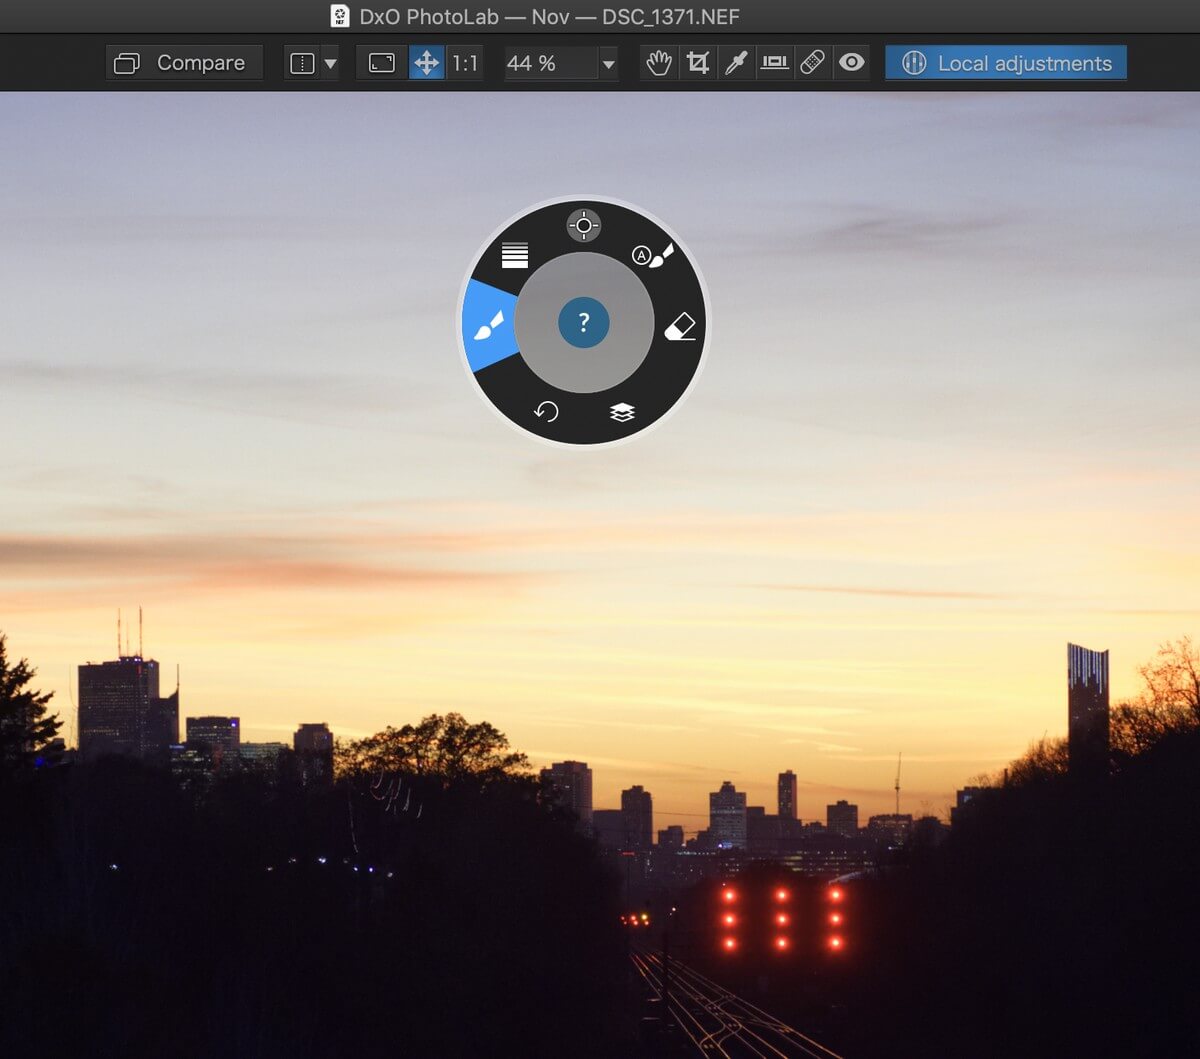
Selecting ‘Local adjustments’ in the upper toolbar moves into the corresponding mode, and then you right-click (even on a Mac) to bring up this handy control wheel with different local options. You can use a simple brush or gradient mask, or use the Auto mask feature, although this last one works best when there is a clearly defined background.
If you want to use the U Point system, you choose the ‘Control Point’ option at the top of the control wheel. A movable control point is dropped onto the image that brings up a range of options that you can adjust locally, and all similar pixels in the adjustable radius get the same adjustment. As DxO says, “When you click in the image to create a control point, the tool analyzes the luminosity, contrast, and color of the pixels at that point and then applies the correction to all pixels with the same characteristics within an area you define.”
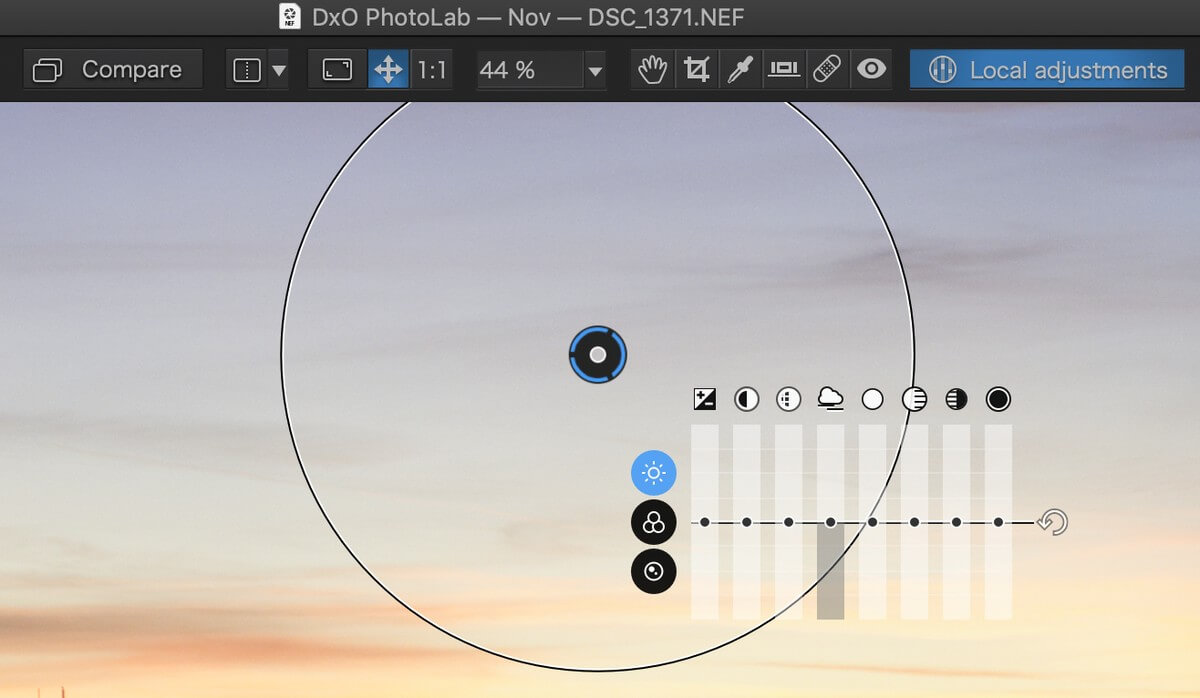
In effect, this is a sort of wide-scale auto mask, and it’s effective in some situations, but it’s important to choose the right tool for the job. In the image above, a gradient mask would be much more effective. U points are quite cool, but I am a bit too used to working with masks, and so I prefer a bit more precision from my localized editing.
Unless you’re working on extremely high-resolution photos that will be printed out at a large scale, you probably won’t notice the inconsistencies in most situations. Of course, if you are working on images that large, you’re probably using something like Phase One’s Capture One instead of PhotoLab.
Using PhotoLab as a Lightroom Plugin
PhotoLab definitely has an uphill battle to really capture any share of the RAW editing market. Many photographers have embraced Lightroom’s excellent library management tools and will be unwilling to change, so the ability to quickly bring DxO’s powerful noise reduction and lens corrections into a Lightroom workflow seems very useful.
Or at least, it would be useful, if they had done real integration into Lightroom. At first, it seems that you can use PhotoLab as a replacement for Lightroom’s ‘Develop’ module, but you are really just using Lightroom to open each file in PhotoLab rather than actually integrating PhotoLab’s capabilities into Lightroom. Maybe I’m just old-fashioned, but that doesn’t really sound like a plugin to me.
Both PhotoLab and Lightroom edit files non-destructively, but they each have their own RAW processing engine – so the changes you make in one aren’t visible in the other, which sort of defeats the entire purpose of using Lightroom’s catalog module. Maybe you don’t need to view thumbnails to know which of your files have been edited, but I tend to determine things a bit more visually, and not being able to tell if I’ve already edited a file in my catalog seems like a big waste of time to me.
This lack of full integration may be due to the way that Lightroom’s plugin functionality works, but it makes a promising collaboration less effective than it could have been.
DxO PhotoLab Alternatives
Adobe Lightroom
(PC/Mac, $9.99/mth subscription bundled with Photoshop)
Despite the fact that PhotoLab offers a Lightroom plugin, it’s still a valid competitor in its own right. It has excellent library management tools, as well as solid RAW development and localized editing options. Available as a bundle with Photoshop, you’ll be able to make any kind of edit you can imagine – but the automatic options are not quite as good, and the noise reduction can’t compare to the PRIME algorithm. Read my full review of Adobe Lightroom here.
Luminar
(PC/Mac, $69.99)
If you’re looking for a more affordable non-subscription RAW editor, Luminar might be more your speed. It offers decent RAW editing tools, although my testing found that the Mac version was far more stable than the PC version, so PC users may want to try a different option. Read my full review of Luminar here.
Affinity Photo
(PC/Mac, $49.99)
An even more affordable option, Affinity Photo is a powerful editor that is a bit closer to Photoshop than other RAW editors. It offers excellent local editing tools, although it doesn’t offer library management tools of any kind. Read my full review of Affinity Photo here.
For more options, you can also read these roundup reviews:
Reasons Behind My Ratings
Effectiveness: 4/5
On the surface, it initially seems like DxO PhotoLab deserves a 5/5 for effectiveness, considering that the noise reduction, lens correction, and automatic adjustments are excellent. U-Points are reasonably effective as local editing tools but you may ignore them in favor of masking, and the unfortunate PhotoLibrary module still feels neglected by DxO. They suggest that you can circumvent these few issues by combining PhotoLab with Lightroom as a catalog manager, but you still have to wonder why DxO doesn’t simply improve their organization tools.
Price: 4/5
PhotoLab is priced a bit high compared to most of its competition, as the RAW photo editing market gets more and more crowded with affordable options. For some unexplained reason, they keep the price of upgrades hidden except for existing customers, which suggests to me that they may be rather expensive. However, even with the high price tag, it’s hard to argue with the excellent value provided by its unique features, especially since you own your copy of the software outright as a one-time purchase rather than as a licensed subscription.
Ease of Use: 4/5
I found PhotoLab quite easy to use, and it will be immediately familiar to anyone who’s used a different RAW editor in the past. The ease of automatic adjustments is quite appealing, although there are a couple of little interface issues that seem to show a lack of thought in the UI design. These aren’t dealbreakers, but keep PhotoLab from getting a higher grade.
Support: 4/5
DxO provides helpful introductory guides for new users, although they probably won’t be necessary. Each adjustment and local editing tool offers a quick in-program explanation of its features, and there is easy access to a user guide if you need more information. However, because PhotoLab doesn’t have the same market share as some of the competition, there isn’t much third-party support or tutorial available.
The Final Word
It’s a bit unfortunate, but I have to say that DxO PhotoLab seems like it functions far better combined with Lightroom than it does as a standalone program. Despite that, it’s still worth your time because you’re never going to find a better noise reduction system or more accurate lens correction profiles.
If you’re a Lightroom user looking to polish your images even further, then PhotoLab is an excellent addition to your workflow; casual photographers who want a simple but capable RAW editor won’t be disappointed. Professional users with an established workflow probably won’t be tempted to switch things up due to the limited organization and local editing tools, but running PhotoLab as a new Develop module for Lightroom plugin is definitely worth a look.
DxO built a program that showcases their PRIME noise reduction and lens correction profiles, but those two elements still shine far brighter than the rest of their PhotoLab surroundings.
So, do you find this PhotoLab review helpful? Share your thoughts below.