
There are two ways to change the color of your drawing in Procreate. You can drag and drop your new color directly from your Color Disc onto your layer or shape. Or you can select the entire layer, open the Adjustments tab and adjust the Hue and Saturation.
I’m Carolyn and I’ve been using Procreate to run my own digital illustration business for over three years. Because I spend so much time on the app, I have to be aware of all the shortcuts and features that can help me to create high-quality work for my clients at a fast pace.
Changing the color of a drawing is a relatively simple task and Procreate has provided users with a few different ways to do so. It just depends if you want to recolor an entire layer or just a section of the layer. Today, I’m going to show you my two different methods for doing either.
Note: Screenshots are taken from Procreate on iPadOS 15.5.
Table of Contents
Key Takeaways
- You can quickly change the color of a shape within your canvas by dragging and dropping your active color from your Color Disc directly onto your shape.
- You can change the color of an entire layer by changing the Hue in your Adjustments tool.
- Always create a duplicate of your layer before making any adjustments in case you make any errors or changes that cannot be reversed.
2 Ways to Change the Color of Drawing in Procreate
There are more ways than one to change the color of your drawing in Procreate. The two methods below will provide you with options whether you’re changing the color of an entire layer or just a shape. Here are my two favorite methods for changing the color in Procreate:
Method 1: Color Drop Tool
This is a quick and convenient way to change the color of an object quickly in your canvas. I recommend using this tool for individual objects or for experimentation to see how different colors react or work together.
You should be aware that this can change the values of your original color palette and sometimes produces different results depending on which tone or shade you drop the color onto. Here are the steps.
Step 1: Activate the color you want to change your object to by tapping on the Color Disc in the top right-hand corner of your canvas. Glide your finger or stylus around the color wheel until you find your desired shade.

Step 2: Tap and hold on to the Color Disc in the top right-hand corner of your canvas. Drag it directly onto the shape you wish to recolor.
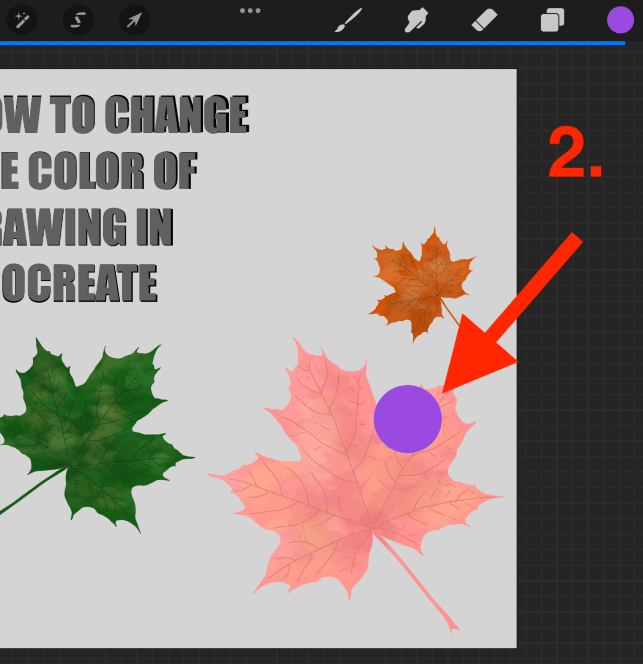
Step 3: Once the Color Disc is hovering over the shape you wish to recolor, drop it by releasing your hold on the canvas when lifting your finger or stylus. This will automatically recolor the entire shape with the color that you dropped.
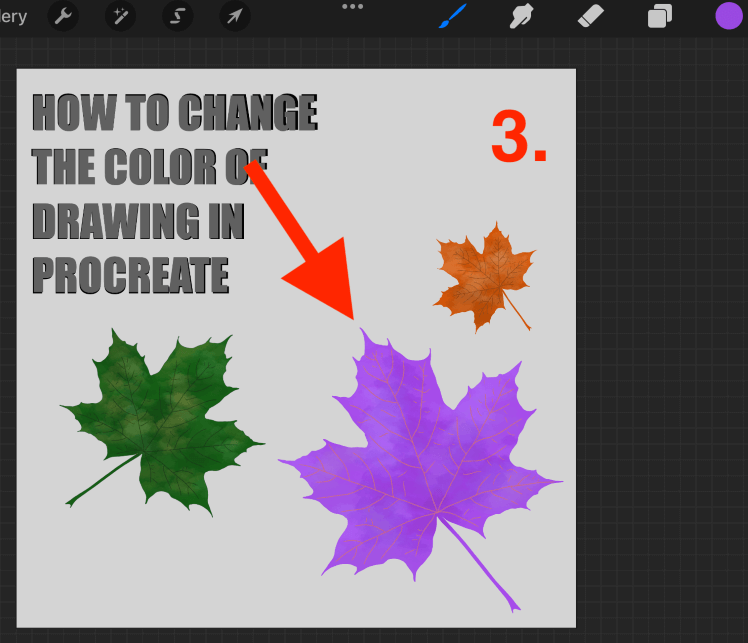
Pro Tip: You can also use this method to recolor an entire layer. If there is no drawing or isolated shape within the canvas, it will fill the entire layer with your color.
Method 2: Adjustments Tool
This method is a slightly more technical and sophisticated way to adjust the color of an entire layer within your canvas. I recommend using this method if you want to preserve the values of your original colors or need more in-depth adjustments of color.
This way will give you more control over your color by allowing you to adjust the Hue to change the color, the Saturation to change the intensity of the color, and Brightness to adjust how bright or dark you want your color to be. Here’s how:
Step 1: Firstly you need to activate the layer that you want to adjust. Out of habit, I like to Alpha Lock my layer. If you need to preserve the original layer, I also recommend duplicating the layer in case you make any errors that cannot be reversed.

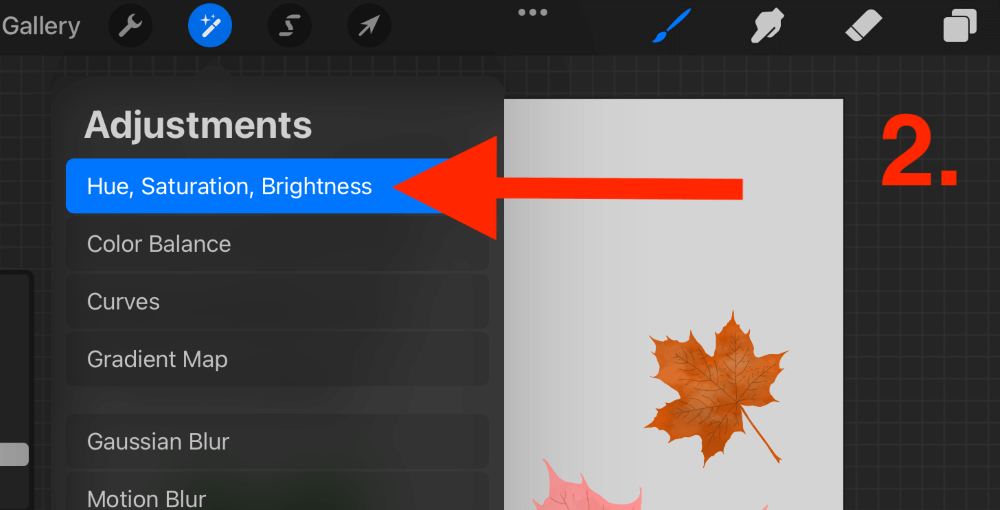
Step 2: Open your Adjustments tool and select Hue, Saturation, Brightness.
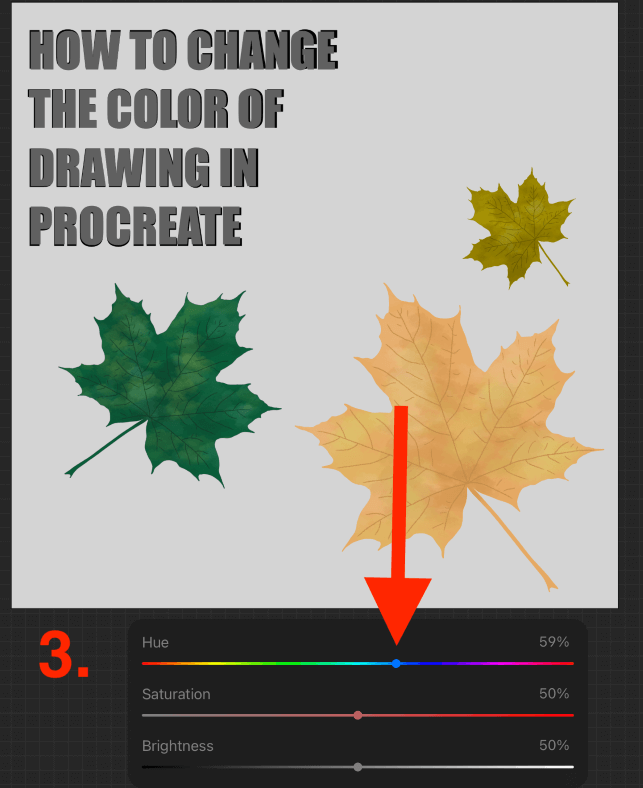
Step 3: Drag the toggles to the left or right to adjust the color of your layer. As you slide each toggle, your layer will automatically adjust so you can see the changes before confirming them. When you are done, tap on the Adjustments tool again to close it.
Pro Tip: This can be easily reversed by double-finger tapping on your canvas or tapping on the reverse button underneath your Sidebar.
Adjustment Settings
When you open your Adjustments tool, at the top of your canvas you will see a tab that says Hue, Saturation, Brightness. When you tap on this a drop-down menu will appear that will allow you to choose from two options:
Layer
This is the default setting for this tool. When active, it means it will automatically adjust the color of your entire layer when you slide the toggles around.
Pencil
Activating the Pencil setting will only adjust the color of the areas on your canvas that you touch with your stylus or finger. This is in case you don’t want to adjust the entire layer and just want to focus on one particular area.
In the bottom window of your Adjustments tool, you will see three toggles that you can adjust by sliding from left to right. Here is a breakdown of what they do:
Hue
The color Hue will determine the overall shade or tone of the color that you slide it to. This should be used for choosing a base color.
Saturation
The Saturation determines the intensity or vibrancy of color. You can make a color deeper or weaker by adjusting the toggle.
Brightness
Adjusting the Brightness of the color will change its lightness or darkness and can be used to change the shade intensity of each color.
Pro Tip: When making any adjustments at all to your project, always create a duplicate of your layer in order to preserve the original. This will save your original layer in case you make any changes or errors that cannot be reversed.
FAQs
Here is a selection of your frequently asked questions about changing the color of a drawing in Procreate.
How to change the color of a line in Procreate?
You can use the drag-and-drop method to change the color of a line in Procreate. Zoom in closely to your line and then drag your Color Disc and drop it in between the space of your line in order to change the color.
How to change the color of a brush in Procreate?
Once you have selected your brush, tap on the Color Disc in the top right-hand corner of your canvas in order to choose the color you want to use. Once you have chosen, tap back onto your canvas and your brush will now be the color you chose.
How to change the text color in Procreate?
During the process of adding the text or when opening the Edit Text menu, tap on your Color Disc and as you move it around the color wheel your text color will change. If you have rasterized the layer already, you can Alpha Lock it and select Fill with your color instead.
How to change the colors to black and white in Procreate?
Add a new layer on top of the layer you want to change to black and white. Fill it with any shade of gray from the color wheel by dragging and dropping it onto your canvas. Adjust the new layer’s blend mode to Hue by tapping on the N to the right of the layer’s thumbnail.
Conclusion
Changing the color of your drawing on Procreate can be as simple as you make it or as complicated as you make it. It all really depends on the level of detail and control you need to have over the changes and how much time you have to dedicate to doing so.
I like to use these two methods above as one is a quick and easy way to see how things may look in different colors and then once I decide, I can use the more detailed Adjustments tool to fine-tune the changes that I need. Hopefully, these two methods will work for you too.
Which method do you use for changing the color of your drawing in Procreate? Leave your answers in the comments section below so I can learn from you.