
AirMagic
Summary
AirMagic offers automatic, AI-powered adjustments for your drone photography in an easy-to-use, streamlined interface. Lens correction profiles for a wide range of drones make barrel distortion a thing of the past, and automatic tweaks for sky enhancement and haze removal can dramatically improve your aerial shots. If you’ve been swapping your batteries all day and got a huge number of photos, AirMagic can batch process them all at once without any additional help. However, this process seems to be a bit buggy, as the crashes I experienced when using the software all occurred when editing multiple images.
You may have noticed that I put automatic adjustments in both the Like and Dislike categories, and it’s not a typo. AirMagic’s automatic correction tools are great for drone users who aren’t familiar with image editing programs – assuming that they create the effect you want. If you want something else, you’re out of luck, since AirMagic offers no control over the effects except how strongly they are applied to the image. While this might appeal to some users, I generally like a little bit more control over my edits.
What I Like: Automatic Adjustments. Drone Lens Correction Profiles. Streamlined Interface. Batch Processing. RAW Support.
What I Don’t Like: Automatic Adjustments. Limited Range of Use for Cost. Batch Process Crashes on Windows.
==> 20% off promotion code: SOFTWAREHOW
Quick Update: AirMagic has merged with Luminar, and there may have some changes on its features and price. We may update the article in the future.
Table of Contents
Why Trust Me for This Review
Hi, my name is Thomas Boldt, and I’ve been an active digital photographer for well over a decade. During that time I’ve worked with just about every photo editing program (Windows or Mac) available, and I’ve learned what separates the good editors from the bad. Rather than wasting your time testing them all out for yourself, follow along with my reviews and get your focus back to your photography!
Skylum did provide me with a review license to evaluate the program, but that hasn’t affected my assessment of the software. For example, I have no hesitation about telling you that my initial experience with AirMagic was not a great one. The first time I tried to use it, the activation servers failed without any error message or explanation, and it took several days before the issue was fixed by the Skylum support team.
Detailed Review of AirMagic
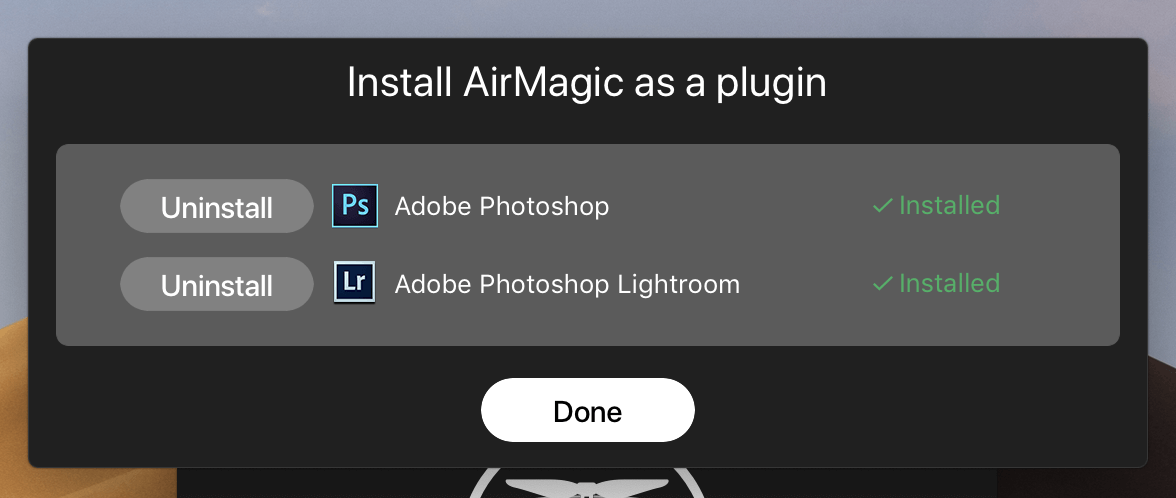
Despite the initial problems I had with the activation servers, once that was sorted out on Skylum’s end, everything went quite smoothly. The installation process is very fast, and if you have Photoshop or Lightroom installed, you can quickly install AirMagic as a plugin for them.
Once you get everything set up, the program itself is quite simple to use with a very minimal interface. The macOS and Windows versions are virtually identical, and both rely on the operating system’s file browser to load images for editing. It would be nice to have a built-in image browser, but this is a minor issue and might clutter up the simplicity of the program.


The Windows version is a bit more compacted because of the differences between how Macs and PCs handle program windows. As a result, the PC version has all of the typical menu options crammed into a single drop-down – although one could also argue that this makes it even easier to use, if slightly less elegant.

Automatic Corrections
I first tested the adjustments using the ‘Open Sample Image’ option, which uses a photo apparently taken with a DJI Mavic Pro drone. Once you’ve selected an image, you’re treated to a stylish little animation and a series of quick sentences roughly explaining what they’re doing, ending with ‘Final touches to make it awesome’ before you see the results of the adjustments. (Every time a program does that I hope to spot ‘reticulating splines’, but I guess not every developer used to play SimCity back in the day.)

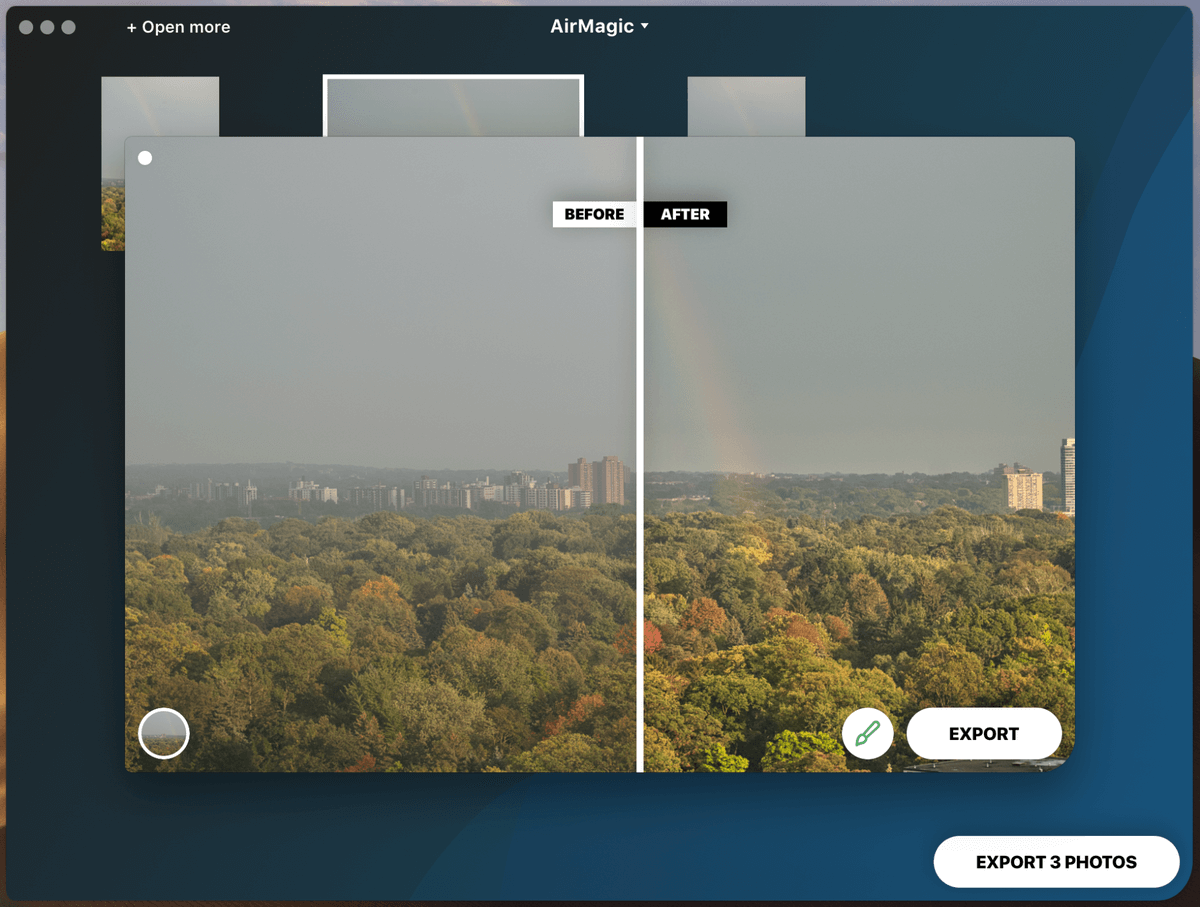
As you can see, the interface is very simple, with access to preset styles in the bottom left and control over the strength of the adjustments in the brush icon next to ‘Export’. The ‘Before | After’ line is a handy draggable slider, allowing you to compare various parts of the image quickly.
As you’ll see later in my tests, my own images had an added ‘Automatic Lens Correction’ option. The automatic lens correction process for Skylum’s sample image seems to happen before any of the other adjustments are added, so you can’t see their effect with the Before and After slider. This may be because mine aren’t shot with a drone, but I’m not entirely sure. The rest of the adjustments are fairly impressive overall, although of course, this image was hand-picked by Skylum to show off AirMagic’s capabilities.
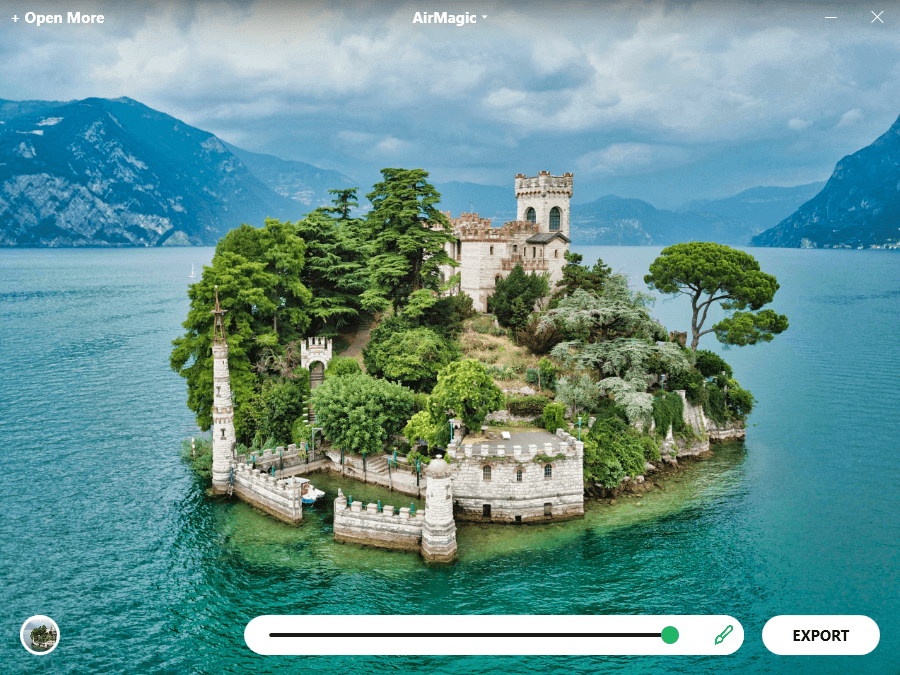
If you crank the adjustment slider all the way to maximum, you can start to see a bit of haloing around the island, most notably between the large canopy of trees on the left and the mountains/water in the background. This is still quite good for an entirely automatic masking process, and I’m pretty impressed with how well AirMagic has handled this. The haze correction has made things a bit too blue-saturated for my taste, but I get the feeling that you will almost never want to crank the adjustment slider to the max in real-world usage.
While I didn’t shoot my aerial photographs with a drone, I put a few of my high-altitude DSLR shots through AirMagic to see how well it handled them. I’m not sure if Skylum just neglects its Windows development or if I just have bad luck, but I managed to crash the program the very first time I opened one of my own photos on my PC. Oddly enough though, it managed to complete all the adjustments and display them before crashing. The macOS version of the software handled the same operations on the same photos without any issues.
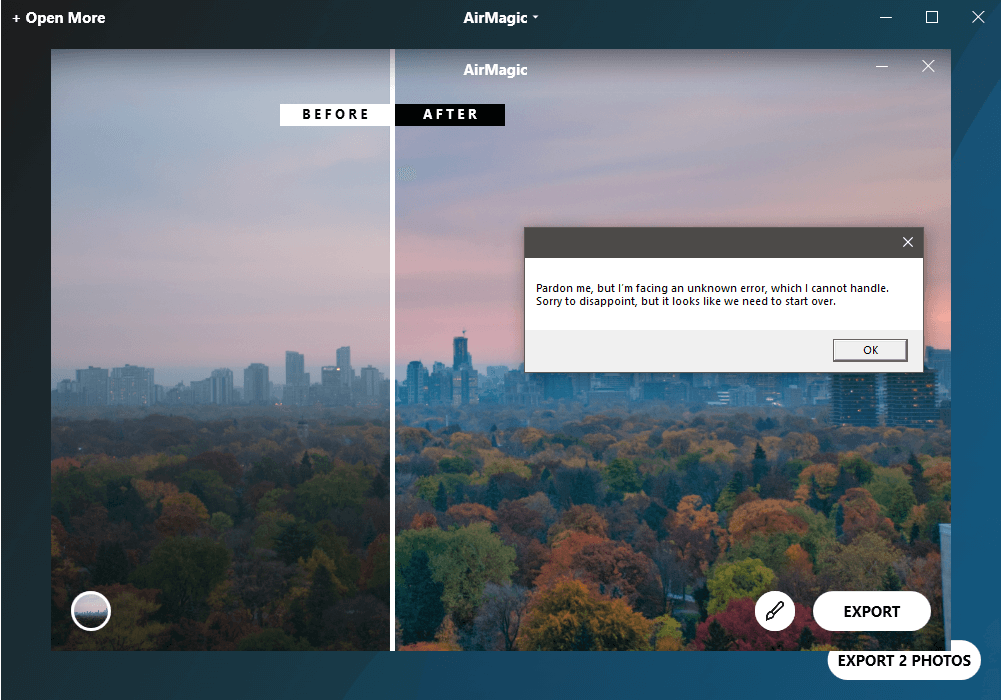
I’m not sure if this is because I dragged and dropped my new file onto the pre-existing edit and it thought I wanted to batch them, but when I opened my photo again after freshly restarting the program there were no issues.

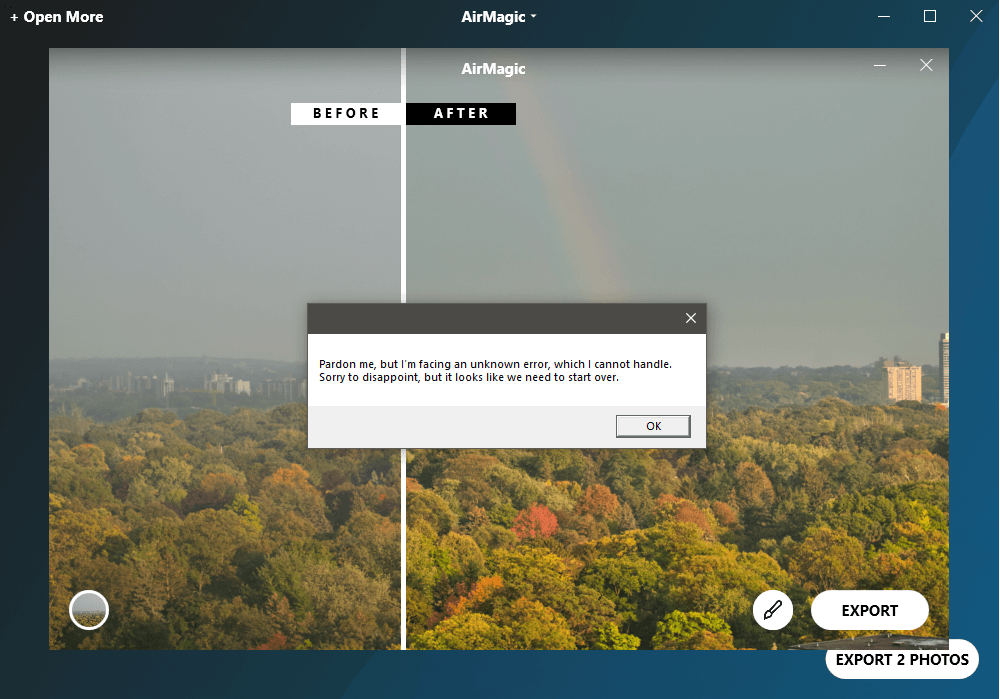
The haze removal has again turned the haze blue, but it did a great job of brightening the autumn trees in the foreground and boosting the saturation across the board.

After turning the adjustment strength up to maximum, there doesn’t seem to be any of the haloing I noticed in the first sample image. There is also the added ‘Automatic Lens Correction’ option for this image, although from my comparisons between the two versions there doesn’t seem to be any difference, as the tiny corner of building in the bottom right is visible and unchanged in both versions. I’m not sure if this is because AirMagic only has correction profiles for drone lenses, or if there just wasn’t enough barrel distortion to be noticeable.
The same crash occurred again while trying to edit the second photo in a batch, so I thought it might have something to do with adding images one by one. But when I added 3 photos all at the same time, I got the same crash again when trying to edit them.
Eventually, I realized that this might be a Windows-specific issue, and I tried the same process on my Mac without any crashes at all. Skylum was formerly known as Macphun, so I wonder if their Mac development team is simply more experienced. I have noticed this problem with their other software that I have reviewed as well, and there’s really no excuse for this happening so consistently.
If you’re hoping to use the batch processing feature of AirMagic on Windows, you may want to wait until Skylum has ironed out this bug. If you’re content to work on images one by one, there doesn’t seem to be any stability problems – and the Mac version seems to be perfectly stable for both types of operation.
Styles
While there is no control over the adjustments except for strength, AirMagic does come with a few preset styles that you can apply to your image. These work the same way that Instagram filters do, and you can download and apply additional presets to expand the set of 5 that comes built-in. The only way to see what they do is to test them, as the names aren’t overly helpful – is Zephyr better than Chinook? They’re both types of wind, but then Cinematic and Emotional aren’t as clear as they seem at first either.
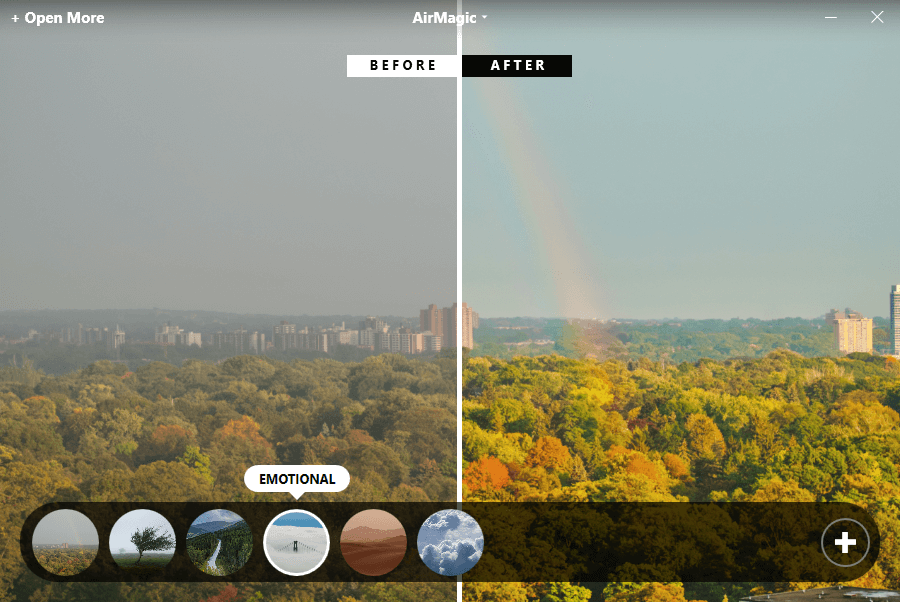
Unfortunately, styles can’t be stacked, so if you want the saturation boost from the ‘Emotional’ style with the ‘Sandstorm’ warmth boost, you’re out of luck unless you download a new preset which combines them. At the moment no additional presets are available, but I assume that Skylum will charge for preset packs the same way as they do for their other software.
Plugin Integration
AirMagic can be installed as a plugin for both Adobe Lightroom Classic and Adobe Photoshop, and works more or less the same way as the standalone version does. AirMagic is accessed through the Filters menu in Photoshop or using the export feature in Lightroom.
However, I’m not entirely sure that using AirMagic in plugin mode has many advantages. Both Lightroom and Photoshop can arguably outperform the automatic adjustments provided by the AirMagic machine learning algorithms, and they both have more powerful batch processing tools. The only real advantage I can see is the automatic AI-powered masking, but if you’re already accustomed to working with professional-level programs like Lightroom and Photoshop, you probably are also accustomed to more serious degrees of control over your editing process.
Of course, there have been times when I’ve been up too late editing and wished I could just click a button to get Photoshop to instantly understand my imagination, and maybe AirMagic’s AI is the first step on that road 😉
AirMagic Alternatives
Luminar (Mac/Windows)
If you like Skylum’s AI-powered editing tools but you want a bit more control over the editing process, Luminar might be what you need. Like AirMagic, though, the Mac version of the software is more stable and reliable than the Windows version.
Affinity Photo (Mac/Windows)
Affinity Photo provides powerful editing tools at a more affordable price point, but it doesn’t include any handy automatic editing features. If you’re looking for a solid editor but don’t want to bother with Photoshop, Affinity Photo might be what you need.
Adobe Lightroom CC (Mac/Windows)
If you don’t have a problem with the Adobe subscription model, Lightroom provides a great blend of automatic editing features and precise control. It has automatic lens correction for some drones, but the range is fairly limited at the time of this writing so be sure to check if your drone is on the list if that’s essential for you.
Reasons Behind The Ratings
Effectiveness: 4.5/5
AirMagic’s AI-powered editing does a great job of handling contrast and color, and I’m impressed by how well the automatic masking process works. Batch processing makes editing multiple photos fast and effective, provided that you’re working on a Mac – the Windows version still has some bugs.
Price: 4/5
This is the only part of AirMagic that gives me a bit of pause. At $39, it’s fairly pricey considering that it essentially only has one editing feature and a few presets, but it regularly goes on sale at a more appealing price point. If you apply the exclusive 20% discount code “SOFTWAREHOW” when checking out, you can get it for $31.

Ease of Use: 5/5
It would be hard to design a program that is easier to use than AirMagic. Clear instructions, a single slider, and a few presets make for a very user-friendly program. The tradeoff for this, as I mentioned earlier, is that it’s fairly limited in terms of what you can accomplish.
Support: 4/5
Skylum always has excellent online support and tutorials for their products, and AirMagic is no exception (despite the fact that it doesn’t really need a tutorial). The only reason it doesn’t deserve 5/5 is for the initial radio silence from Skylum on the activation issues which plagued the launch of the software, although they did eventually make some forum posts that their team was working on a fix.
The Final Word
If you want to process your drone photos quickly, consistently, and with minimal effort, then AirMagic is a great choice. Mac users can batch process plenty of images without issue, but Windows users looking to do the same will want to wait until Skylum releases a patch to fix the crashes I outlined. If you want to have careful and specific control over your photos, you’re better off with a more powerful photo editor.
So, do you find this AirMagic review helpful? Leave a comment and let us know.