
Add the image or shape you are tracing to a layer. Reduce the opacity of your image by double-finger tapping on the title of the layer and sliding to adjust the percentage. Then create a new layer on top of your image and start tracing.
I’m Carolyn and I’ve been running my digital illustration business with Procreate for over three years. I started off my digital drawing career by drawing portraits of people and pets, so tracing photos on Procreate was one of the first skills I learned on the app.
Learning how to trace on Procreate is a great way to get used to drawing on a screen if you’re new to the world of digital art. It can help train your hand to draw steadily and figure out which brushes and thicknesses work best for different types of details in drawings.
Note: Screenshots are taken from Procreate on iPadOS 15.5.
Table of Contents
Key Takeaways
- Insert your image into your canvas and trace over it using a new layer.
- This is useful, particularly for portraits and replicating handwriting.
- Tracing is a great way to familiarize yourself with drawing on an iPad for the first time.
How to Trace on Procreate (6 Steps)
The first thing you need to do to learn how to trace on Procreate is to get your canvas set up. This is the easy part. The hard part is successfully tracing your subject to the best of your ability.
Here’s how:
Step 1: Insert the image you want to trace. In the top left-hand corner of your canvas, select the Actions tool (wrench icon). Tap on the Add option and select Insert a Photo. Choose your image from your Apple Photos app and it will automatically be added as a new layer.
Step 2: Adjust the size and position of your image within your canvas. Keep in mind, if you trace an image small and enhance the size later on down the line, it may come out pixelated and blurry so try to trace it at the size you actually need.
Step 3: Lower the opacity of the inserted image. You can do this by double-finger tapping on the title of your layer or tapping the N to the right of the title of your layer. The reason for reducing the opacity is so that your brush strokes are clearly visible on top of the image.

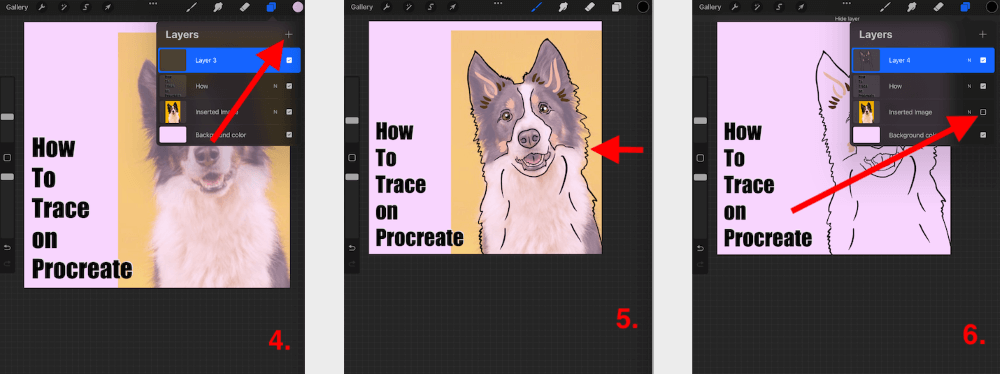
Step 4: Once you’re happy with your image layer, you can now add a new layer on top of the image layer by tapping the + symbol in your Layers tab.
Step 5: You are ready to trace. Begin tracing the image using whatever brush you choose. I like to use Studio Pen or Technical Pen for portraits as I like to have a varied thicknesses in my lines.
Step 6: When you are finished tracing your image, you may now hide or delete your image layer by unticking the box or swiping left and tapping on the red Delete option.
4 Hints & Tips for Tracing Successfully on Procreate
Now that you know how to get started, there are some things to know that may help you when tracing on Procreate. I have outlined some hints and tips below that help me when I’m tracing on the app:
Trace The Size You Need
Try to trace your subject around the same size as you want it in your final drawing. Sometimes when you reduce or increase the size of a traced layer, it can become pixelated and blurry and you will lose some quality.
Correct Errors
When I’m tracing eyes or eyebrows, in particular, the slightest glitch in a line can change a person’s likeness and ruin a portrait. But it may take multiple attempts to fix. This is why I suggest adding a new layer on top of your traced image to add edits.
When you are happy with your edit, combine it with the original traced image. This can eliminate erasing lines or shapes that you may actually want to keep and allows you the control to make comparisons between the two.
Review Traced Drawing Frequently
It’s easy to get lost in a drawing and power through it. But then you could get to the end and realize you’re not happy with the outcome. You’d be surprised how misleading it can be when viewing your original image combined with your traced drawing.
This is why I suggest frequently hiding your image layer and reviewing your drawing to ensure you’re happy with how it looks so far. This will keep you on track and save you time fixing mistakes down the road.
Don’t Forget to Credit Your Image
If you’re tracing a photograph that you got from the internet or a photographer, make sure to credit the source of the image to avoid copyright infringement and to give credit where credit is due.
3 Reasons for Tracing in Procreate
You may be one of those people who think that tracing is cheating. However, this is not the case. There are many reasons why artists will trace from a source image. Here are a few reasons why:
Likeness
Particularly in portraits, tracing can be beneficial to ensure likeness. Little things that we may not notice like a certain twinge of an eyebrow or the shape of a front tooth or hairline can be huge differences for clients when they are so familiar with the finest of details of the person or animal that you are drawing.
Speed
Tracing can sometimes speed up the process of a drawing. For example, if you need to create a pattern with 5,000 plumeria flowers, you can save time by tracing a photo of the flower instead of drawing from memory or observation.
Practice
Tracing/drawing over images can be really helpful in the beginning when you’re first learning how to draw on an iPad or with a stylus for the first time. It can help you get used to the feeling of it, how much pressure you need to use and even how different Procreate brushes react to your drawing style.
FAQs
This is a popular topic when it comes to Procreate users so there are plenty of frequently asked questions about the subject. I have briefly answered a few of them below:
How to convert photos into line drawings in Procreate?
There is no feature that does this automatically. You must manually do this by following the method I have outlined above.
How to trace on Procreate Pocket?
You can use the same method as outlined above to trace on both Procreate and Procreate Pocket. However, it will be more challenging without having the use of an Apple Pencil or stylus to accurately trace your lines.
How to trace letters on Procreate?
You can use the same process as outlined above but instead of inserting an image to trace, you can insert text or a photo of the text you wish to trace.
What’s the best Procreate brush for tracing?
This all depends on what you are tracing the image for. For fine lines, I personally like to use the Studio Pen or the Technical Pen but again, it just depends on what you need.
Conclusion
There are so many purposes for tracing in Procreate so there’s no harm in trying it out now. Particularly if you’re new to Procreate and want to get used to the practice of drawing on a screen or using a stylus for the first time.
I use this method quite frequently as a lot of my projects are portrait based so it’s an excellent way to quickly draw someone’s specific facial features. I highly recommend trying this method if you haven’t already done so.
Do you have other advice for someone learning how to trace on Procreate? Leave your advice in the comments below.