
Suppose you are looking to customize the added graphics in your Canva project even further. In that case, you can rotate elements by clicking on them and using the rotator handle that appears underneath the component.
My name is Kerry, and I have been exploring different graphic designs and digital art platforms for years to find the ones that are best suited for all audiences. One of my favorites is Canva because it is so user-friendly and allows for lots of customization without any of the hassles!
In this post, I’ll explain how you can edit and customize any of the added elements in your Canva projects by rotating them on your canvas. This is helpful when you want to align specific parts of your design or try out some new layouts!
Are you ready to learn about rotating different elements and images on Canva? Awesome- let’s get to it!
Table of Contents
Key Takeaways
- You can rotate an image, text box, photo, or element in Canva by clicking on it and using the rotator tool to spin it to a specific angle.
- Even after you have saved your project, you can go back into it and adjust the elements (such as by rotating them) at any point. Just do not forget to download your revised copy!
Why Rotate Elements in Your Project
Since Canva is such an easy platform to learn and allows users to make lots of different types of professional designs, it has many features that make it easy to change the pieces of your project as you work. For those of you who are like me and want to try out various options, it is super helpful!
This user-friendly focus and ability to go back and change elements is also extremely beneficial if you realize that you want to edit an aspect of your project after logging out of your account or changing anything at a later date.
While you are working on creating your design, (whether it be a calendar, flyer, template for social media, or presentation), you will have the ability to rotate individual elements within your canvas. This feature allows flexibility in designing as you can customize either a single element or a group.
How to Rotate and Image or Element in Your Canva Project
If you are customizing any of the premade templates that are available on Canva or want to adjust the included elements, rotating these pieces can allow you to achieve your project vision easily. This process can be applied to elements or images from the Canva library or through your uploads!
Here are the simple steps to rotate an element or image on Canva:
Step 1: Log into Canva using your regular login credentials. On the home screen, open up a new project on the platform or a canvas that you have been already working on.
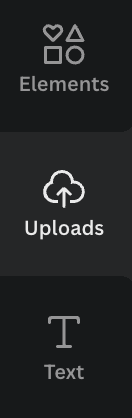
Step 2: Navigate to the left side of the screen to the main toolbox. Insert a photo, text box, or element from the Canva library onto your canvas by clicking on the appropriate icon and selecting the element that you want to use.
You can also include any uploaded images from your device into the library to use while designing!
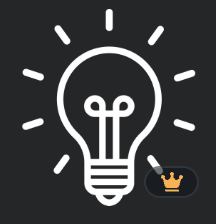
Note that if you see a small crown attached to any of the elements on the platform, you will only be able to use it in your design if you have a Canva Pro subscription account that gives you access to premium features.
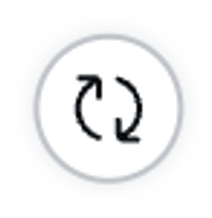
Step 3: Click on the element that you want to rotate and you will see a button pop up that looks like two arrows in a circle. (This will only be visible when you click on the element.) Congratulations! You found the rotator handle!
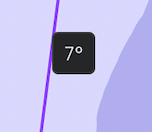
Step 4: As you click on the rotator handle, you can turn and swivel it to change the orientation of the element. You can do this as many times as you want throughout your design process.
Next to the element, you will also notice that there is a small degree symbol that will appear and change based on your rotation. This feature is super helpful when you want to make sure different elements have the same alignment!
Step 5: Once you are pleased with the layout and orientation of your element, just unhighlight the element by clicking somewhere else on the canvas. The good news is that you can go back and rotate your added elements or images at any point!
Final Thoughts
With Canva being such an amazing tool for beginner and more advanced designers, it is helpful to hone in on these easy tricks to make creating projects even easier. Being able to rotate included elements adds to the customization factor that makes this platform so accessible!
Are there any specific projects that you find yourself really using the rotate feature on? Do you have any extra tips, tricks, or even questions about this process? If so, we would love to hear from you! Share your contributions in the comment section down below!