
Tap on your Selection tool (S icon) and choose Automatic. Tap and hold the white background of your image and slide until you achieve the Selection Threshold percentage that you want. Then tap Invert and then select Copy & Paste.
I’m Carolyn and my digital illustration business has been relying on my knowledge of Procreate for over three years. Therefore it is my full-time job to know the ins and outs of this incredible and complex drawing app that we call Procreate.
I’m not going to lie, this was not one of the first things I learned on Procreate in the beginning. Yes, I spent too many hours hand-erasing the background from images instead. But today, I’m going to show you how to do it automatically so you don’t have to follow in my footsteps.
Note: Screenshots are taken from Procreate on iPadOS 15.5.
Table of Contents
Key Takeaways
- There are three ways to remove the white background from an image in Procreate.
- Using the Selection tool on the Automatic setting will remove the white background quickly.
- You will need to touch up the edges after you have removed the background.
- The better quality of the image you use with as few shadows as possible will have the best results.
- You can use the same methods listed below for Procreate Pocket.
3 Ways to Remove White Background of an Image in Procreate
There are three ways to remove the white background of an image in Procreate. The common way is to invert selection and use the Eraser Tool to clean up. Alternatively, you can directly use the Eraser or Freehand Selection Tool.
Method 1: Invert Selection
This is a very elaborate process so make sure you follow these steps slowly and carefully.
Step 1: Ensure your inserted image is the active layer in your canvas. Tap the Selection tool (S icon). In the bottom toolbar, select the Automatic option.
Step 2: Hold your finger or stylus on the white background of your image. Slowly slide it to the left or right until you achieve your desired Selection Threshold percentage. Keep adjusting until the majority of the white background is gone.
Step 3: For gaps or blocked-out shapes of white background, repeat this step except hold your finger or stylus down on the gap you are trying to remove.
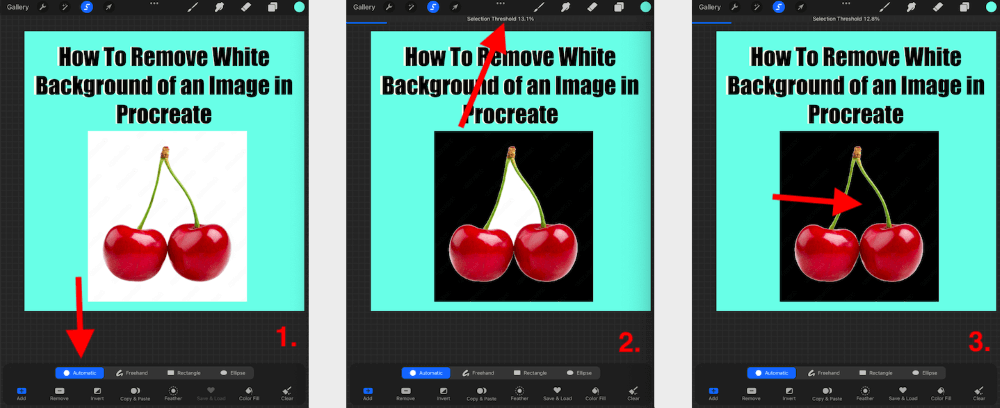
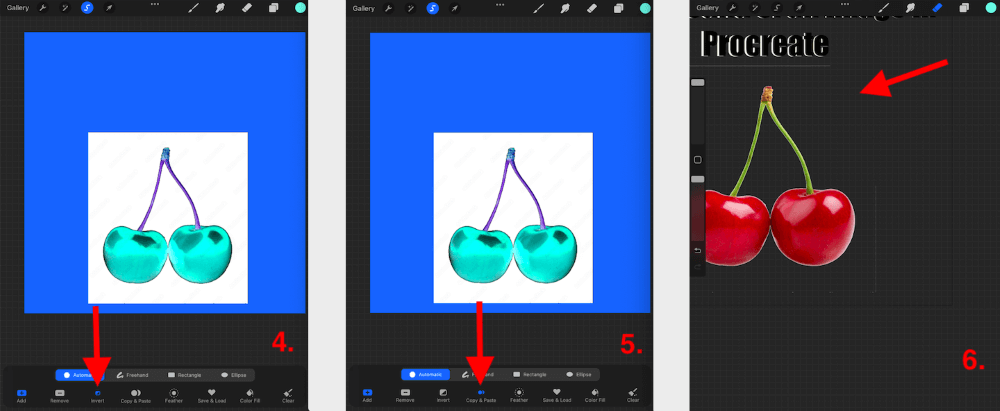
Step 4: Once you are happy with the amount of white background removed, tap Invert at the bottom of the canvas. Your image will be highlighted in blue.
Step 5: Tap Copy & Paste at the bottom of your canvas. Your new selection will be moved to a new layer and the old layer will remain. Now you can choose to delete the original layer to save space in your canvas if you want.
Step 6: Now it’s time to clean up your image. You will notice a faint white line around the edge of where you removed the background. You can use your Eraser tool to manually clean up these edges until you’re happy with the result.
Pro Tip: Deactivate the background of your canvas while you’re doing this process it is clearer to see the edges of your image.
If you don’t like this genius tool and prefer to complete this process manually, there are two alternative ways to remove the background of an image on Procreate.
Method 2: Eraser Tool
You can use the Eraser tool to manually remove the edges of an image in Procreate by hand. This is very time-consuming but some people may prefer it for its precision. I personally like to combine this method with the Selection tool method listed above.
Method 3: Freehand Selection Tool
You can use the method above but instead of selecting the Automatic option, you can use the Freehand tool and manually draw around the outline of your object. This is my least favorite method as it means you cannot lift your stylus and it must be one continuous line.
Video Tutorial: If you’re more of a visual learner, I found this awesome tutorial video from Make It Mobile on Youtube which breaks it down clearly.
Pro Tip: You can also use this method to remove the white background from text images too.
FAQs
There are quite a few frequently asked questions regarding this method so I have briefly answered a few of them below.
How to remove the image background in Procreate Pocket?
You can follow the same method above to remove a background in Procreate Pocket. Tap on the Modify button in order to access the Selection tool in the app.
How to remove objects from photos in Procreate?
You can use the same method as above to do this except instead of tapping and swiping on the white background of the image, you will tap and swipe on the object you want to remove from the photograph.
How to make an image transparent in Procreate?
Be careful not to mix the two of these up. Removing the background of an image is different from saving an artwork with a transparent background. To make an image transparent, tap on the Background to deactivate it in your work before saving it.
Can I remove the white background from an image without Apple Pencil?
Yes, you can. It won’t make a difference if you use a stylus or your finger for the Selection tool method listed above. However, if you are using either of the manual methods then this will be way more time-consuming to do so without a stylus or Apple Pencil.
Conclusion
Yes, this method is intimidating. It even took me months to even attempt it. It also greatly depends on the quality of the image you use as this will make the outcome better and require fewer touch-ups after the fact.
This is another cool trick that changed the game for me. Even if it doesn’t come out perfect, just removing the larger white areas of an image in seconds will speed up your design process immensely. I recommend learning how to use this tool as soon as possible!
Do you use this method for removing the white background from images in Procreate? Leave a comment below and let me know how it works for you.