
To erase anything on Procreate, select the Eraser icon on the top right-hand corner of your canvas. A drop-down menu will appear. Once you have selected the brush you wish to erase with, use your finger or stylus to click on your layer and begin erasing.
I’m Carolyn and I first learned how to use Procreate over three years ago. In the beginning, the Erase tool was my very best friend. And three years later, I still rely heavily on it to create perfection for my clients and their orders.
Not only can you use this tool to erase mistakes or errors you may have made but you can also use it to create some great design techniques using negative space. Today I’m going to show you how to use the erase tool on this awesome app.
Table of Contents
Key Takeaways
- You WILL use this setting frequently
- You can choose any brush shape to erase with
- You can easily Undo what you erase the same way you can Undo what you draw
How to Erase on Procreate – Step By Step
The cool thing about this function is that you can choose any brush from the Procreate palette to erase with. This means you have so many options and effects in which to use this tool.
Follow these steps to erase on Procreate:
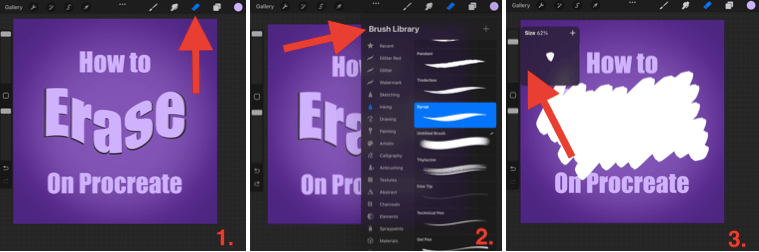
Step 1: On the top right-hand corner of your canvas, select the Erase tool (eraser icon). This will be in between the Smudge tool and the Layers menu.
Step 2: In the drop-down menu, select the brush style you wish to erase with. The Brush Studio menu will appear and you’ll have the option to edit the brush’s stroke path, taper, and so on. I usually keep the original setting and select Done.
Step 3: Tap back on the Canvas. Make sure you have your desired brush size and opacity chosen on the left-hand side and begin erasing.
How to Undo Eraser Tool
So you’ve accidentally erased the wrong part of your layer, what now? The Eraser tool works the exact same way as the Brush tool which means this is an easy fix. Double-click the screen with two fingers or select the Undo arrow on the left-hand side of your canvas to go back.
Erasing Selections of a Layer in Procreate
This is a handy method to use if you need to erase a clean shape from your layer or create negative space quickly and accurately. Here are the steps.
Step 1: Click on the Select tool (S icon) in the top left-hand corner of your canvas. This will be in between the Adjustments and Transform tools.
Step 2: Create the shape you wish to remove from your layer. In my example, I used the eclipse setting to create a clear oval shape.
Step 3: Using the Eraser tool, manually erase the contents of the shape you created. When you’re done, tap on the Select tool again to close down the setting and you’re left with your active layer.
Alternatively, after using the Select tool to create your shape template, you can then select the Transform tool and drag the contents of the shape out of the frame to completely remove it.

FAQs
Below are some frequently asked questions regarding the Procreate eraser tool. I have briefly answered them for you:
How to erase in Procreate Pocket?
Like most other tools on Procreate, you can use the exact same method to erase on the Procreate Pocket app. Follow the steps shown above to use the Eraser tool in the Procreate Pocket app.
What to do when Procreate eraser is not working?
This is not a common issue on the app so the error may be coming from your stylus. I suggest resetting the connection to your stylus and/or charging it. It may be an issue with the device connection rather than the eraser tool.
Alternatively, check your Opacity percentage setting on the left-hand side of your canvas. It can be easy to accidentally lower your opacity to 0% with the palm of your hand without realizing it. (I’m speaking from experience.)
How to erase on Procreate without erasing the background?
There’s no quick shortcut to isolating a shape and erasing it within a layer on Procreate so this must be done manually. Duplicate the layer and manually erase around the shape that you want to keep. Then you can merge the two layers together to form one if needed.
Is Procreate eraser brush free?
The Eraser tool in Procreate comes included with the app. You can choose any brush from the palette whether you’re drawing, smudging, or erasing. This means there is no extra charge or download needed to have full access to this tool.
How to erase on Procreate with Apple Pencil?
You can use your Apple Pencil the exact same way you would use your finger on the Procreate app. You can follow the same method as listed above. Just ensure your Apple Pencil is charged and correctly connected to your device.
Final Thoughts
The Erase tool on Procreate is a basic function that you should familiarize yourself with from the very beginning. Every user creating anything on this app will use it regularly and it’s super easy to learn how.
However, the Erase tool goes beyond being a basic function of the app. I use this tool for a variety of different design techniques. Particularly when creating clean, sharp lines within graphic design projects.
There are endless options in which to use this tool so whenever you have a couple of minutes free, explore and experiment with it. You never know what you’re going to discover.
Do you have any useful tips for using the eraser tool on Procreate? Feel free to leave your comments below and drop any hints or tips of your own that you may have so we can all learn from each other.