
Activate the Animation Assist in your canvas by opening your Actions tool (wrench icon). Create individual frames by drawing on a single layer at a time. Tap on Settings and select Loop. Press play to preview your GIF. Export it as an Animated GIF file.
I’m Carolyn and I’ve been using Procreate to run my digital illustration business for over three years. Over that time I have been able to keep up with all of the new and exciting animation techniques that are available on the app including the awesome GIF creator function.
The term GIF stands for Graphic Interchange Format. This means you can take still images or frames and combine them to create a short slideshow that appears as a quick video. This newish form of visual media is not only fun to make but also a lot easier than you would think.
Table of Contents
Key Takeaways
- Procreate comes with its Animation Assistant which can help you make GIFs quickly and easily.
- You can choose the speed at which your GIF plays by changing the number of frames per second.
- You can also choose the pattern in which you want your GIF to play by selecting Loop, Ping-Pong, or One Shot.
- Procreate can export and save your GIF onto your device as an animated file.
- GIFs are saved as Animated GIF files and can be uploaded onto a variety of platforms.
4 Steps to Make a GIF in Procreate
Some users shy away from this feature as it can be quite intimidating. We see GIFs online almost every day and not everyone is aware of how easy they are to create. But today I am going to break that misconception by showing you how easy it truly is. Here’s how:
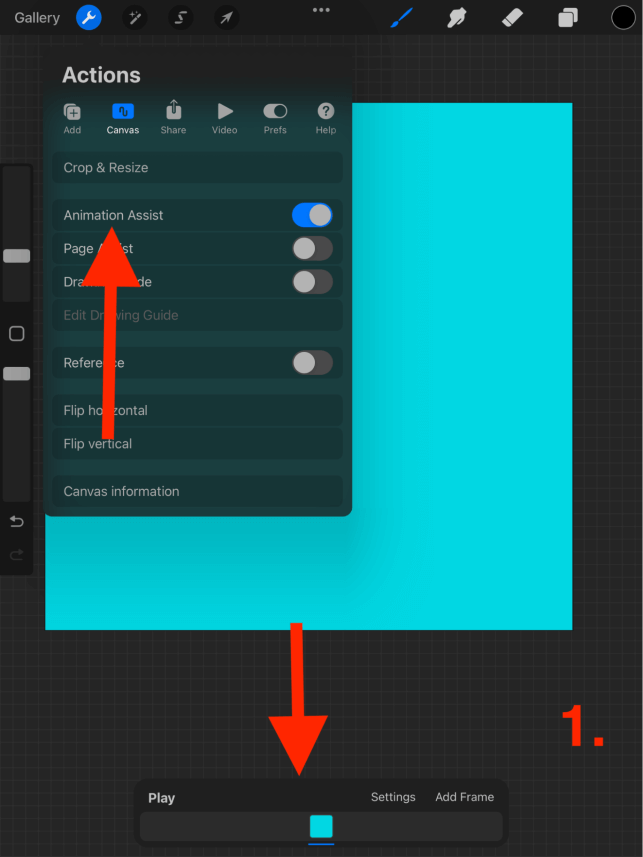
Step 1: On a fresh canvas, tap on the wrench icon to open your Actions tool. Then select the Canvas menu and scroll down to Animation Assist. Switch this toggle on. You’ll know it’s activated when a small rectangular window appears at the bottom of your canvas.
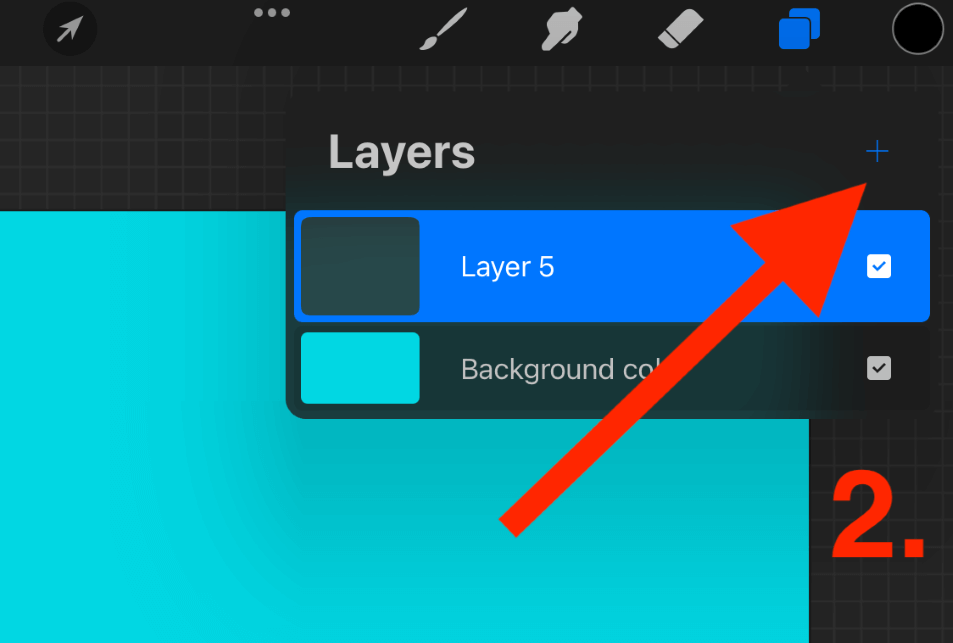
Step 2: Begin adding layers to your canvas by tapping the + symbol in your Layers menu or selecting Duplicate. Each layer will become a frame in your GIF so draw imagery that can progress like a waving hand, moving arrow, or add text to form a sentence.
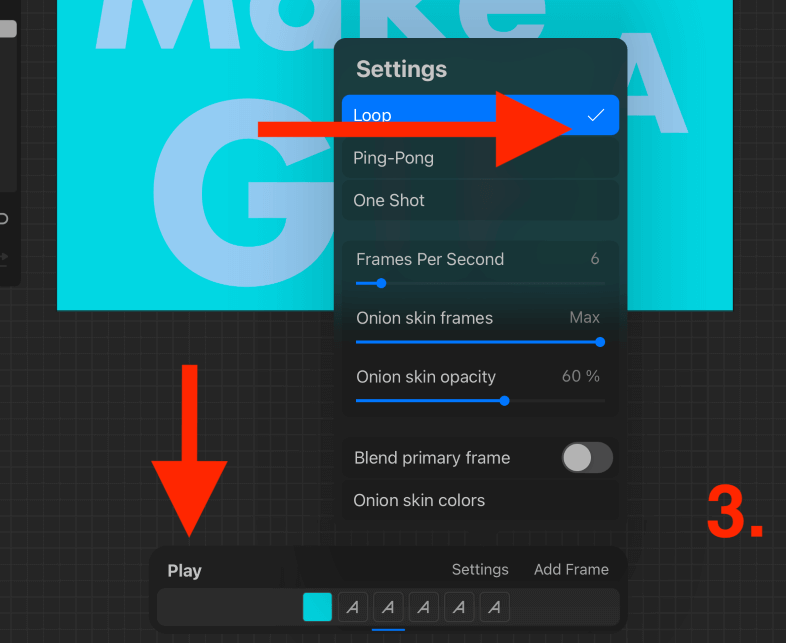
Step 3: Once you have added all of your desired frames, tap Settings in the rectangular box at the bottom of the canvas. Here you can adjust the Frames Per Second and the flow of playback you want. Press Play to preview your GIF.
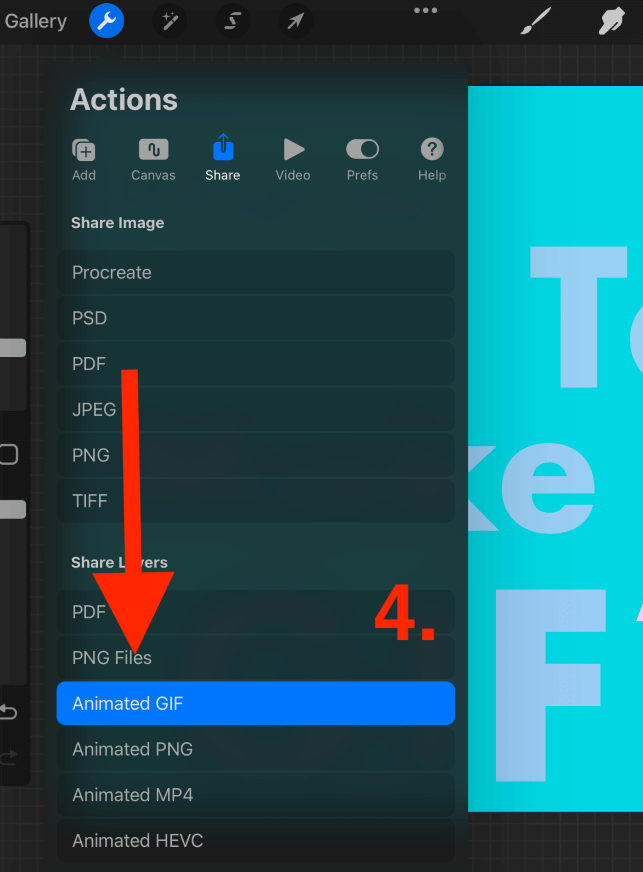
Step 4: Once you are happy with the settings of your GIF, it’s time to save it. Tap on your Actions tool and select the Share menu. Scroll down and choose the Animated GIF option and select where you would like to save the file on your device.

GIF Settings
You have a lot of control when it comes to designing your finished GIF by tapping on the Settings option. Here’s what it all means:
Loop
This setting will play your animation in a loop pattern. This setting is best for GIFs.
Ping Pong
This setting will play your animation from back to forth and vice versa. Meaning it will play each frame from start to finish and then from the finish back to start. This can be useful if your GIF has a component of reversing in it.
One Shot
This will play all of your frames in order only once. It will totally stop playing after your animation has run through once.
Frames Per Second
This will determine the speed at which your GIF plays. The higher the frames, the faster your animation will play, and vice versa.
Onion Skin Frames
Onion Skin is basically each of your frame’s preview color. This can change whether you want your preview frames visible or not.
Onion Skin Opacity
This determines how bright or how dark the opacity of each of your frame previews will be.
Blend Primary Frame
Activating this will blend the primary frame to the same opacity as the remaining frames. By default, this shows the primary frame as a solid color compared to the others.
Onion Skin Colors
You can choose what color the frame’s outer box will display as.
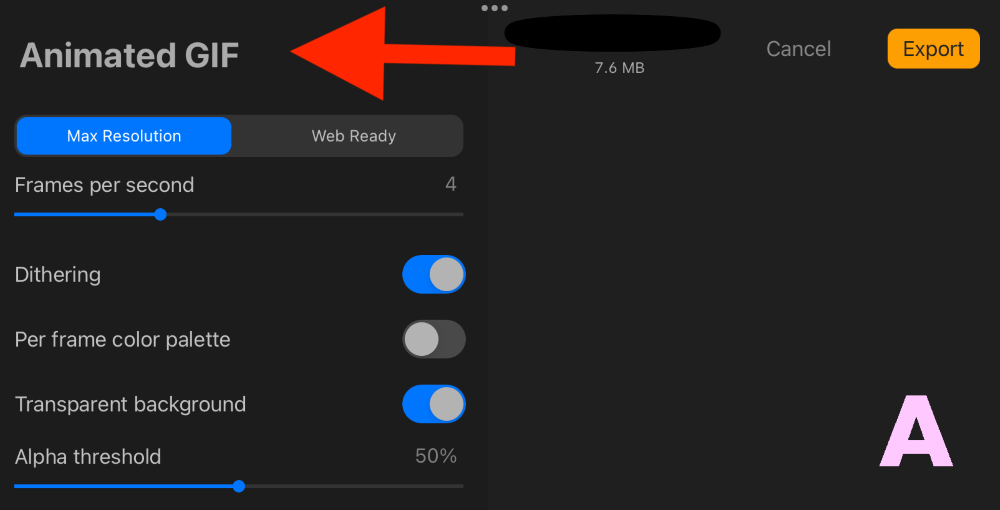
Exporting GIF Settings
When you are ready to export your finished GIF, you will have a selection of settings from which to choose which will determine how your GIF is displayed once saved and shared. Here is a breakdown of what those settings mean:
Max Resolution v Web Ready
Max Resolution does what it says on the tin. It provides you with the highest quality of file while Web Ready is a lower resolution, smaller file. I avoid Web Ready at all costs as it frequently disrupts the quality of my GIF.
Dithering
By activating this setting, you are essentially giving Procreate the permission to add low-level noise to your GIF to avoid errors or disruption and increase the playback quality of your GIF if it loses any in the sharing process.
Transparent Background
This will save your GIF either with or without a background. Ensure you select this option and that your GIF is dark and clear enough to be seen without a background.
FAQs
Here are more frequently asked questions about creating GIFs in the Procreate app. I have briefly answered them for you.
How to insert a GIF in Procreate?
Inserting a GIF into Procreate will not allow you to play the GIF. It will display as an image only.
What to do when Procreate animated GIF is not working?
Have you tried turning your Animation Assist on and off again? If this doesn’t work, I suggest turning your device on and off and restarting the app as this is not a common bug that has been reported in Procreate.
How to make a GIF in Procreate Pocket?
You can make GIFs on Procreate Pocket by using the exact same method as shown above. Tap on Modify in the app to access the same features as the Procreate app.
Final Thoughts
I absolutely love the GIF feature on Procreate. It allows my artwork to come to life which adds an element of fun when creating an animation. I often use GIFs when corresponding with clients and followers on social media as a way to colorfully convey a message in a fun tone.
I guarantee you, you will be shocked when you discover how quick and easy this method actually is. I prepared myself for a mammoth task before researching this method and I was pleasantly surprised by my findings. I highly recommend trying this method for yourself today.
Are you an avid GIF creator on Procreate? Share your expertise and wisdom in the comments section below.