
Like any other OS, Windows 10 has excellent features and frustrating drawbacks. No operating system is perfect (just be glad that we have moved on from Windows Vista!).
One problem I’ve heard about and even experienced myself is not being able to get wifi turned on. While this is a problem not always specific to Windows 10, it seems to pop up frequently.

If you are not yet familiar with Windows 10, or you just can’t seem to figure out how to fix it, don’t worry. Several things can cause this issue. We’ll show you some quick tips to track down and solve Internet connectivity problems.
Table of Contents
Try the Simple Solutions First
Sometimes when we run into wifi problems, we tend to think there is some complicated solution required. As a result, we overlook simple solutions. However, it’s always best to try the obvious first.
That way, you won’t spend an enormous amount of time trying unnecessary, complicated solutions. Here are some of the top things to look into before you dig too deep into other possibilities.
The number one problem that I have seen is also the easiest to solve (it’s happened to me numerous times). Look to see if your computer or laptop has a wifi switch. Many models will have an external button allowing you to turn wireless hardware on or off. It often gets bumped by mistake or reset when your computer reboots.
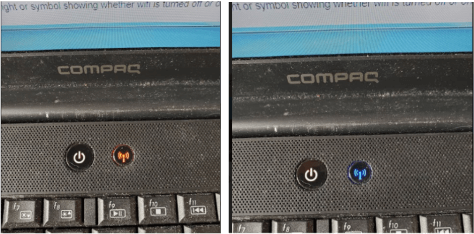
It may also be a function key on your keyboard. If your laptop has one, it will often have a light showing whether the wifi is on.
2. Reboot Your Computer
Believe it or not, sometimes fixing wifi is as easy as rebooting your machine. I have a laptop with a wireless adapter that stops working occasionally. Typically, it goes into sleep mode, then wakes up, and then the adapter doesn’t wake up with it. A reboot fixes the issue every time.
Rebooting can solve problems in several ways. It could be that new drivers have been installed. There can also be situations where hardware and drivers have frozen for some unknown reason. A clean reboot of the system will either finish up an install or just restart the drivers and hardware needed to make the device work.
3. Check Your WiFi Network
If there is no switch and a reboot doesn’t help, the next step is to ensure that your wireless network is functioning. If possible, use another computer, phone, or any device capable of connecting to the internet to verify your wifi’s up.
If other devices can connect, then it’s not the network—the issue’s probably somewhere in your computer. If other devices can’t connect, then the problem resides with your network.
Check your router to ensure that it’s still working. You should also verify that your internet service is working. There should be a light on your router that indicates whether or not it’s connected.
If your router isn’t working, do some troubleshooting to determine its problem. If your internet service is not working, call your ISP to figure out what’s going on.
4. Try Your Computer on Another WiFi Network
If the other fixes above fail, try connecting your computer to another network and see if you still have issues. Go to a coffee shop, a friend’s house, or even your office.
Look for a network with both 2G and 5G wifi bands, then try both of them. It could be that your wireless card doesn’t support the band in your home or that one of those bands isn’t working.
Suppose you can get your computer connected to another network. If that’s the case, there’s a chance your card is incompatible with your network. You may need to look at upgrading your network adapter or your router. Try the following suggestion, which is using a USB wifi adapter.
5. Try Another WiFi Adapter
This may sound complicated, but it’s really not. If you have a spare USB wifi adapter lying around, plug it into your computer and see if it’ll connect to the web. If you don’t have a USB adapter available, they are relatively cheap. You can get one online for under $20.
If the USB adapter works, then you will know that your built-in adapter has failed. This is somewhat common when using the adapter that came with your computer. They are usually cheap and do not have long life spans.
Other Solutions
If one of the above solutions doesn’t work, you still have options. Try changing your driver settings, updating drivers, or even removing drivers and then reinstalling them. More info on how to do that is below.
Changing settings and drivers can affect your system, which can possibly cause other issues. If you’re uncomfortable with that, take your computer to a professional to have it looked at. If you do it on your own, back up your system settings by creating a restore point first. That way, if you make any changes that cause real issues, you can at least get back to where you were at.
It’s also a good idea to take note of any existing settings before you change them. If it doesn’t fix your problem, switch to the original setting before trying the next solution.
Check WLAN Service
This procedure will do a quick check to see if your WLAN service is turned on. If it is not turned on, this is probably the culprit.
1. Click on the Windows icon in the lower-left corner of your desktop.
2. Type “services.msc” to bring up “services.msc” in the search window. Click it to bring up the Services Utility program.
3. Scroll down through the list of services. Find the one called “WLAN AutoConfig.” Its status should say “Started.”
4. If it’s not in the “Started” state, right-click it and click “Start.” If it was, right-click it and click on “Restart.”
5. Wait for the service to start back up.
6. Check your wifi connection. Hopefully, it will now be working.
Network Adapter Properties
Now, let’s take a look at your network adapter properties. We can then adjust them to see if this helps.
- Click on the Windows symbol in the lower-left corner of your desktop.
- Type devmgmt.msc.
- This will bring up the devmgmt.msc application in the search window. Click on it to start the device manager.
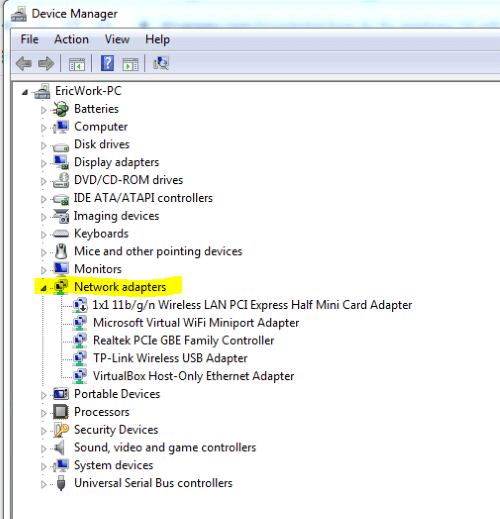
- Expand the Network Adapters section.
- Find your wifi adapter, right-click on it, then click properties.
- Click on the “Advanced” tab.
- In the property window, select “802.11n Channel Width for band 2.4.” Change the value from “Auto” to “20 MHz Only.”
- Click “Ok” and then check to see if your wifi is now turned on.
- If this does not solve the problem, I recommend going back and changing the setting back to “Auto.”
Update the Device Driver
It could be that your wireless adapter needs its device driver updated. You can update from the Device Manager, which you may have already opened in the procedure above. If not, just follow these steps.
- Since your wifi is not working, you will need to connect your computer directly to your router with a network cable to get to the internet. You can also tether your PC to your phone. You’ll need an Internet connection to find the latest driver for your device.
- Click on the Windows symbol in the lower-left corner of your desktop.
- Type devmgmt.msc.
- This will bring up the devmgmt.msc application in the search window. Click on it to start the device manager.
- Expand the Network Adapters section.
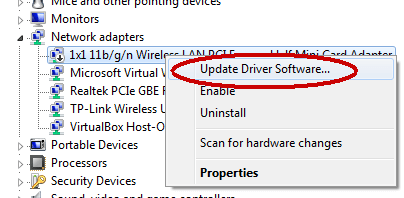
- Find your wifi device driver and right-click on it.
- Click on “Update Driver Software.”
- This will bring up a window that asks you if you would like Windows to search for the best driver for the device or if you would like to locate and install the driver manually. Select the option to have Windows search for the best driver. If you could connect to the internet as described in step 1, Windows will search the internet to find the best and latest driver for your device.
- Once Windows finds the driver, it will give you the option to select and install it.
- Select the driver and continue to download and install the driver.
- Once completed, disconnect your wired connection to the internet and try your wifi again.
Uninstall/Reinstall Your Network Driver
Sometimes device drivers get corrupted. Uninstalling and reinstalling them can sometimes clear them up. Use the following steps to try this.
- Click on the Windows symbol in the lower-left corner of your desktop.
- Type devmgmt.msc.
- This will bring up the devmgmt.msc application in the search window. Click on it to start the device manager.
- Expand the Network Adapters section.
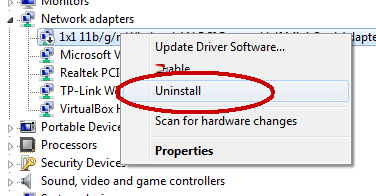
- Find your wifi device driver and right-click on it.
- Click on “Uninstall.”
- Windows will uninstall the driver.
- When the uninstall is completed, reboot your computer.
- When your computer starts back up, it should automatically reinstall the driver.
- Once it has been reinstalled, check your wifi and see if it is on and if you can connect to your network.
- If Windows does not automatically detect and reinstall the driver, your wireless adapter has probably failed. The next step is to replace it.
Network Troubleshooter
The network troubleshooter may be able to find and possibly fix your problem. It’s simple to run but is hit-or-miss in terms of solving network problems. It’s still worth a try if you’re stuck.
- Click on the Windows symbol in the lower-left corner of your desktop.
- Type “troubleshoot.”
- It should bring up the “troubleshoot system setting.” Click on this option.
- Then, in the internet connections section, click on “Run the troubleshooter.”
- Click on the “Network Adapter.” Then “Run the troubleshooter.”
- This will try to fix or find any problem with your network adapter.
- It may say that it was able to fix it or give suggestions.
- Once it has fixed it or you have done what it tells you to do. Check to see if your wifi is now working.
System Restore
If all else has failed, one last thing that you can try is to restore your system settings back to a point in time where you know the adapter was still working. This can be a little risky since you can lose other settings that may have been changed during that time.
If you create a restore point for your current settings, though, you can always get back to where you currently are. This will not affect any of your user files or applications.
To do this, you will need to remember when the last time your wifi adapter was working.
- Once again, click on the Windows symbol in the lower-left corner of your desktop.
- This time, type Recovery.
- In the search panel, click on “Recovery Control panel.”
- In the next window, click on “Open System Restore.”
- Select the “Choose a different restore point” option and then click the “Next” button.
- This will open up a list of restore points. Click on the checkbox in the lower part of the window that says “Show more restore points.”
- This will give you a longer list of restore points to choose from.
- Try to remember the last time your wifi was working.
- Select a restore point just before that.
- Click “Next,” then click “Finish.”
- Once the restore has been completed, you may need to reboot your system. Then, check to see if your wifi is working.
Final words
If none of the above solutions have worked, you have a bad wireless adapter. If you can’t connect to any wifi network, that may further indicate a problem or defect with the hardware. As mentioned above, you may want to purchase a reasonably-priced USB adapter and try plugging it into your computer to see if that solves the problem.
We hope that the steps and procedures above have helped you determine and solve your Windows 10 wifi problem. As always, please let us know if you have any questions or comments.
Helped a lot. Thanks ????
Thank you so much. My problem was actually the wifi switch….found out I turned it off unintentionally.
This was super helpful and I appreciate