
If your Mac gives you a “your startup disk is almost full” error message, you should fix it immediately. If you run out of space, you won’t be able to save files, and your Mac may run poorly. So, how can you clear up your startup disk and get storage space back?
My name is Tyler, and I am an Apple computer expert with more than 10 years of experience. I’ve seen and fixed countless problems on Macs. Helping Mac owners with their issues and getting the most out of their computers is one of the best parts of my job.
In today’s article, we’ll explain the startup disk and a few quick and easy ways to free up space. By the end of this article, you’ll have everything you need to repair the dreaded “your startup disk is almost full” error message.
Let’s get started!
Table of Contents
- Key Takeaways
- What is the Startup Disk on a Mac?
- How to Check Startup Disk Usage on Mac
- Method 1: Move Your Personal Files to iCloud
- Method 2: Empty the Trash
- Method 3: Remove Unwanted Applications
- Method 4: Clear System Cache Folders
- Method 5: Empty the Downloads Folder
- Method 6: Delete Time Machine Backups
- Restart the Mac, then Check Storage Again
- Final Thoughts
Key Takeaways
- The Startup Disk is where your operating systems and files are stored. Over time, your Startup Disk may fill up with unnecessary junk and files. You should check your Startup Disk to determine what is taking up space.
- If you have a lot of pictures, videos, and documents, you can save space by moving those to an external backup or iCloud.
- The Trash can take up a lot of space, so you should make sure to empty it often. Unwanted programs and apps can consume valuable space, too, so you can clear up space by removing them.
- System Cache folders can take up space. Deleting them is simple, or you can use a 3rd-party program like CleanMyMac X.
- Additionally, you should empty your Downloads folder frequently and delete old Time Machine Snapshots.
What is the Startup Disk on a Mac?
An all too common situation many Mac users find themselves in is the startup disk running out of space. One day while using your MacBook, you are presented with a warning: “Your startup disk is almost full.”
Generally speaking, your startup disk is the primary storage device for holding your operating system and all your files. Since the operating software for your MacBook is contained on this device, it is known as the startup disk.
When the startup disk runs out of space and fills up, this can cause several problems. The most concerning issue is that your Mac may perform poorly due to the lack of space. Not to mention you won’t have any free storage for your personal files.
How to Check Startup Disk Usage on Mac
You should keep tabs on how much space is left on your startup disk to ensure you don’t run out. Luckily, checking your startup disk usage is pretty straightforward.
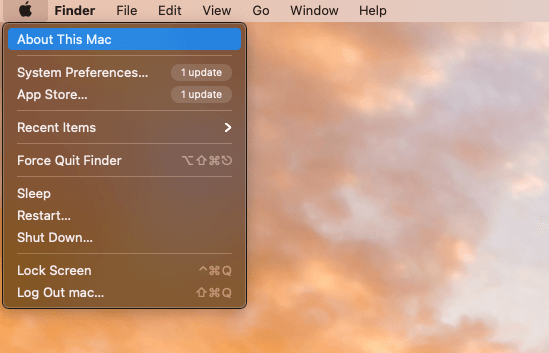
To get started, click on the Apple Icon in the upper left corner of the screen and select About This Mac.
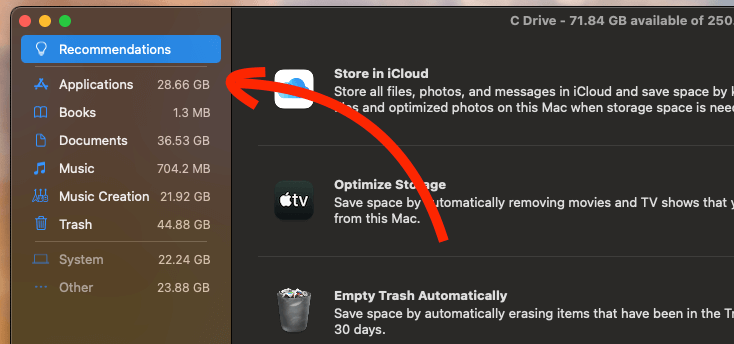
Next, click on the Storage tab. Within this page, you’ll see a breakdown of storage usage on your startup disk.
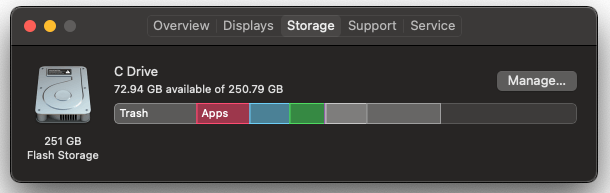
Observe what file types are taking up the most space. If you see a lot of documents, pictures, and music on your startup disk, the best option is to move these files to an external storage location or cloud backup.
Method 1: Move Your Personal Files to iCloud
Many cloud storage services are available, but for simplicity, iCloud is the easiest solution. Since it is built right into macOS, you can quickly turn it on through your Preferences.
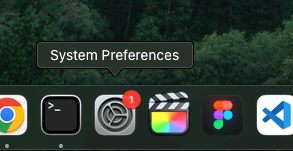
To do this, click on the System Preferences icon in the dock.
Click Apple ID and select iCloud from the options in the sidebar. Next, open the iCloud Drive Options menu and make sure Desktop & Documents Folders is checked.
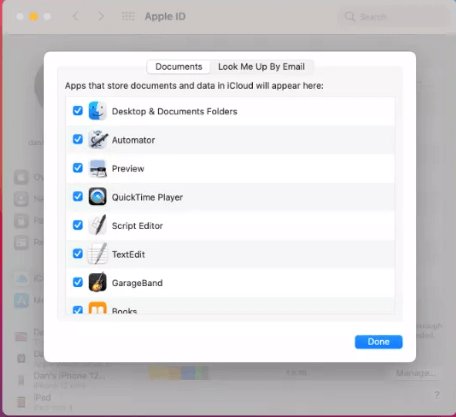
This will clear up space on your startup disk by automatically uploading all files in your Desktop and Documents folders to your iCloud. You can also check other options while you’re in there, such as your Photos, Books, or other applications.
When reviewing your startup disk usage, you may notice unwanted files taking up a lot of space, such as trash, system files, or files marked “other.” Getting rid of these files will free up space on your Mac and make your computer perform better. So how can you do it?
Method 2: Empty the Trash
When you delete an item or drag it to the Trash bin, it doesn’t get deleted immediately. In fact, Trash can easily be forgotten about and take up too much space. Luckily, this is one of the quickest things to solve.
The fastest way to empty the Trash is by using the Trash Icon on the Dock. Hold the Control key while clicking on the Trash icon and select Empty Trash.
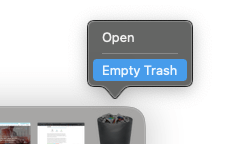
When your Mac asks if you are sure, select Yes, and the Trash will empty. Alternatively, you can access the Trash through the storage manager.
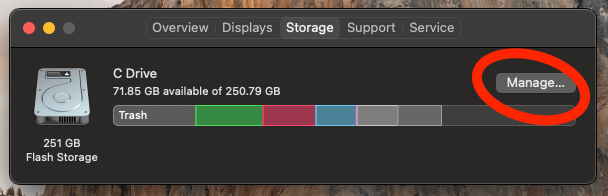
To do this, follow the same steps you took to check the startup disk. Click the Apple icon in the upper left corner and, select About This Mac, then select the Storage tab. From here, click on Manage.
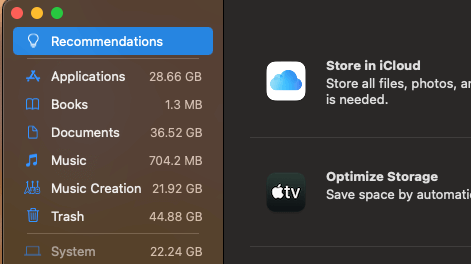
From the options on the left, select Trash. From here, you can select individual trash items and remove them or empty the entire folder.
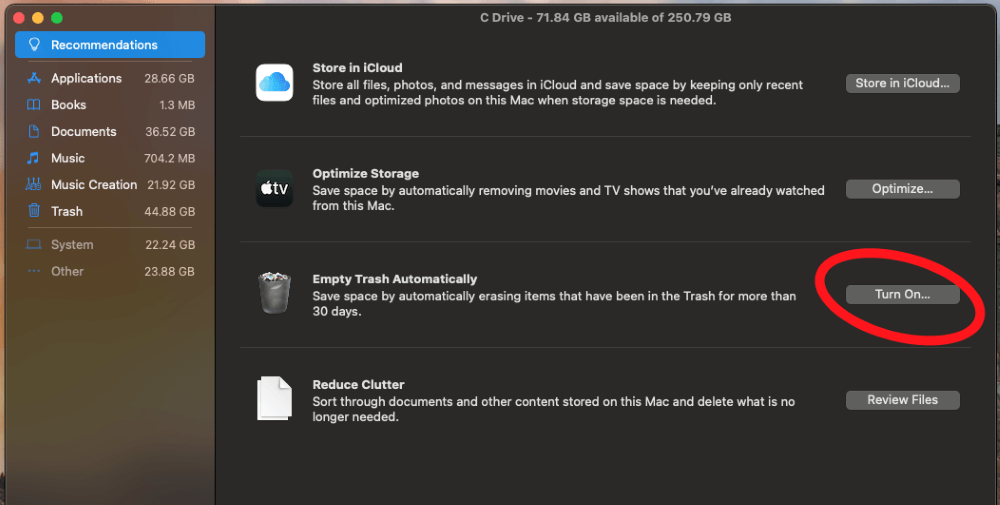
Additionally, you should also enable “Empty Trash Automatically” to automatically erase items that have been in the Trash for more than 30 days.
Method 3: Remove Unwanted Applications
Applications can take up quite a bit of space, and you might have more applications installed than you really need. You could also have applications that you don’t even know about. So it is important to check every now and then to ensure you don’t have any unnecessary apps.
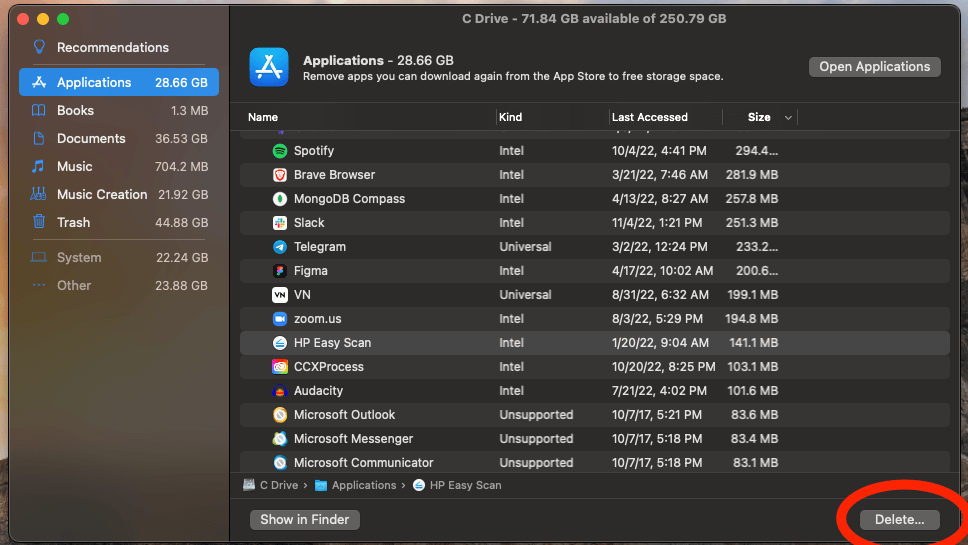
Follow the same procedure as we did in method one to access the storage manager. Click the Apple icon in the upper left, select About This Mac, then click on the Storage tab. Next, click on Manage.
Along the left of this window, select Applications from the available options.
You will see a list of all of your installed applications. You can also view helpful stats like size and date last accessed to help you decide which apps to remove. When you find one you want to delete, just select it and click on the Delete button.
Also Read: How to Delete Apps on Mac That Won’t Delete
Method 4: Clear System Cache Folders
The cache is a necessary part of any program, but leftover cache files are useless and consume precious space on your startup disk. The temporary cache files that accumulate on your Mac must be dealt with to avoid running out of space.
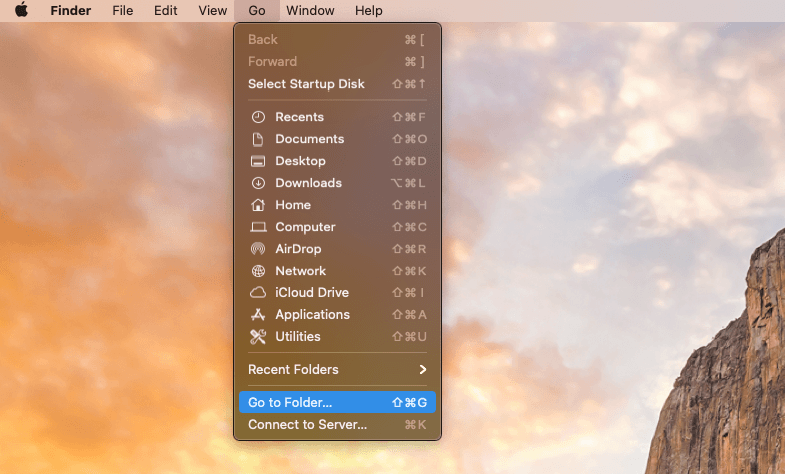
Removing cache files is relatively easy and can be done in just a few steps. To get started, click Go along the top of your screen, and select Go To Folder from the drop-down menu.
Type ~/Library/Caches and hit Go.
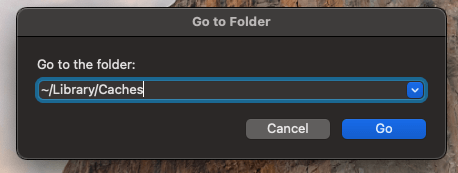
A directory will open up, showing all of your cache folders. You’ll need to go into each one and delete the files inside.
An easier way to clear your cache folders is with a 3rd-party program like CleanMyMac X. All you have to do is download and run the app. Click System Junk, then select Scan. A quick scan will run, and the results will be displayed. Just hit Clean to remove the files.
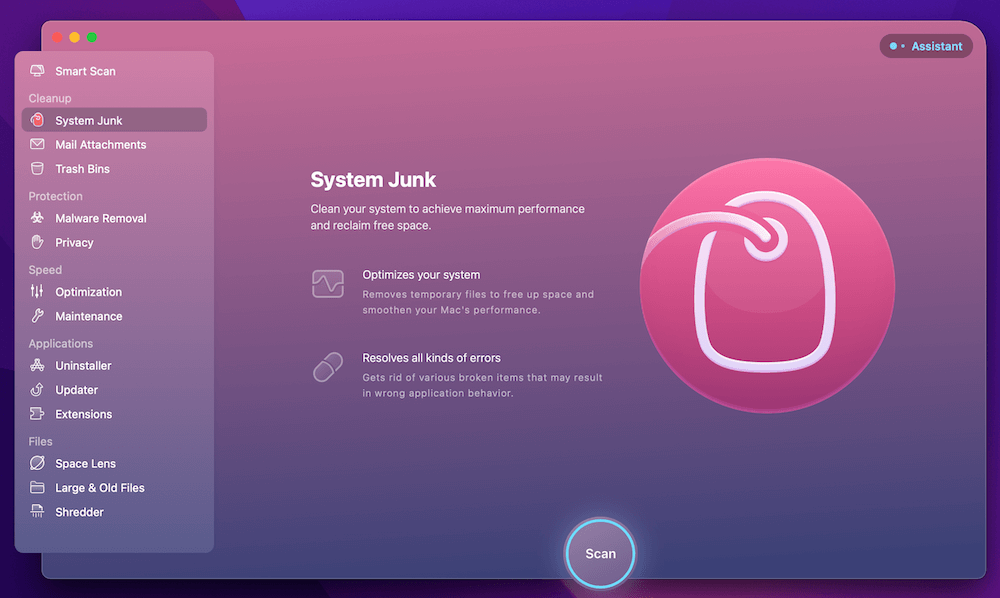
CleanMyMac X can also help you remove other types of files that can take up space, like Browser Cache Files and other junk files. While it is paid program, there is a free trial with some helpful features.
Method 5: Empty the Downloads Folder
The Downloads folder can swell to unmanageable proportions if you don’t keep an eye on it. Whenever you download an image, file, or installer from the web, it goes into your Downloads folder. These files can take up precious space on your startup disk.
To clear the downloads folder, select Go from the top of your screen and select Downloads.
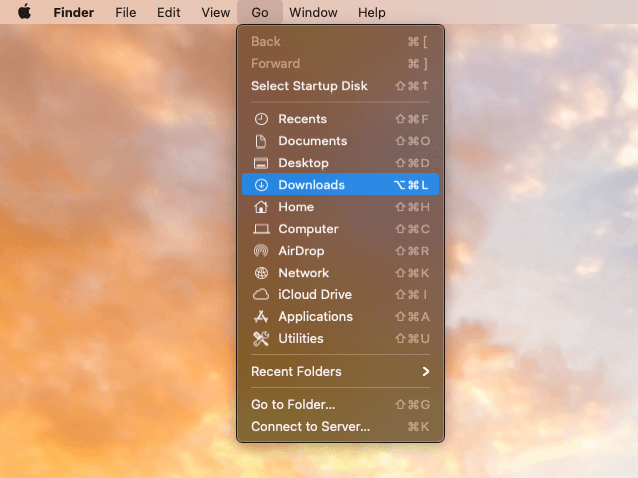
A directory showing all of your downloaded files will appear. You can drag and drop individual items into the Trash or hold the Command and A keys to select all files.
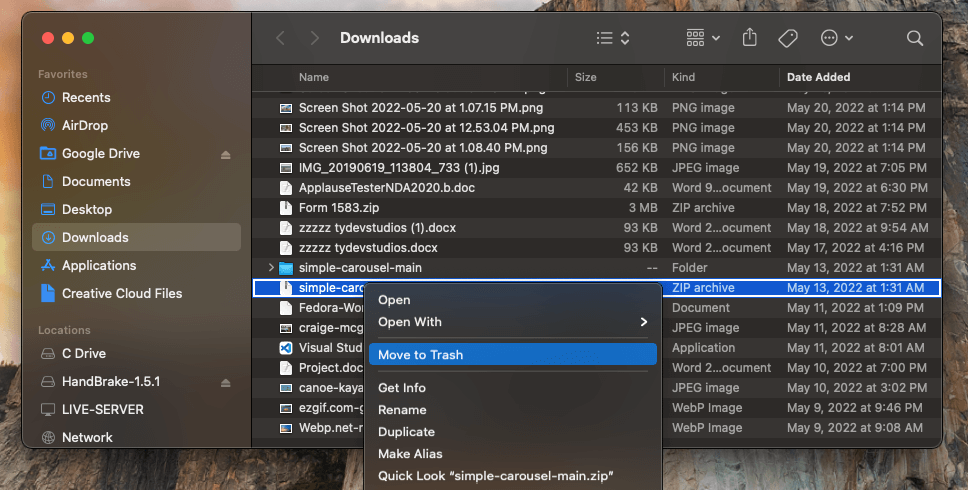
Just remember to Empty the Trash when you are done.
Method 6: Delete Time Machine Backups
Time Machine is one of the most essential macOS programs for backing up your data. However, excess Time Machine Snapshots can take up valuable space on your startup disk.
To start, open System Preferences by selecting the icon on the dock. From here, select Time Machine.
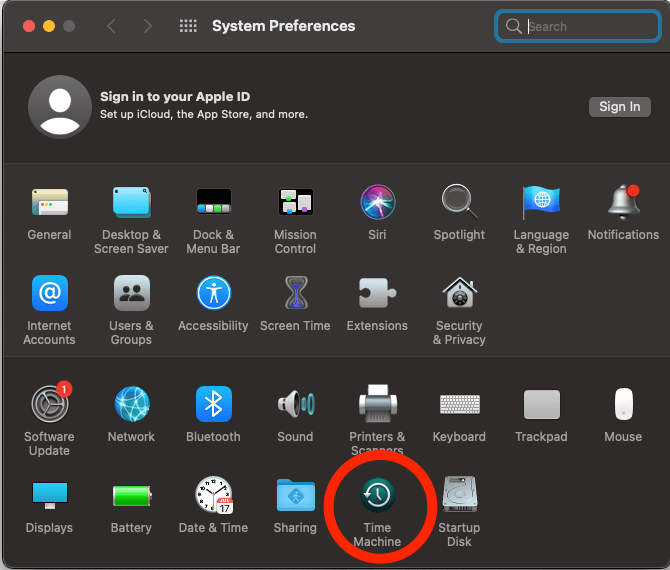
Now, just uncheck the box next to “Back Up Automatically,” and your old Time Machine Snapshots will be deleted. Make sure to restart your Mac for the changes to take effect.
Restart the Mac, then Check Storage Again
If you don’t notice any additional free space after trying these methods, you should restart your MacBook. Any time you clear out the cache folder or empty the Trash, you’ll need to restart for the changes to take effect.
Additionally, rebooting your Mac can sometimes automatically free up space by removing temporary files, especially if you have not rebooted in a while.
Final Thoughts
A common problem MacBook users face is running out of space on the startup disk. You receive a warning while using your Mac: “Your startup disk is almost full.” To ensure that you don’t run out of space, check your startup disk usage and eliminate any unnecessary files.
There are a few ways to free up space on your startup disk, such as emptying the Trash, removing unused programs, clearing cache folders, and deleting unneeded Time Machine Snapshots.
By now, you should have everything you need to fix Your startup disk is almost full error messages. If you need any assistance, leave a comment below!