The most common cause of pixelated lines in Procreate is having a canvas that is too small. To fix this, increase the DPI of your canvas by tapping on the Actions tool (wrench icon). Open the Canvas menu and adjust the DPI to a higher value.
I’m Carolyn and I’ve been using Procreate for over three years to run my digital illustration business so I am very familiar with all of the awful technical issues that can occur when creating artwork in the app. But don’t worry, I have found a solution for almost everything.
Pixelated lines showing when you draw on your canvas in Procreate can not only be frustrating but can lead to major setbacks if you’re completing a project for a client. Today, I’ll explain a little bit about why it happens and some solutions to help you fix it.
Table of Contents
Key Takeaways
- The main cause of pixelated lines in Procreate is having the DPI of your canvas set too low.
- Using the wrong brush can also cause pixelated lines when drawing.
- Your canvas should always remain between 125 and 300 DPI for best results.
- It’s best to start every project with a bigger canvas to avoid the chances of having pixelation issues.
- Adjusting the Streamline in your brush settings can help with pixelation if that is the root cause.
How to Fix Pixelated Lines in Procreate – Step by Step
If the cause of your pixelated lines is due to your canvas being too small, you can follow the method below to increase your DPI.
Here’s how:
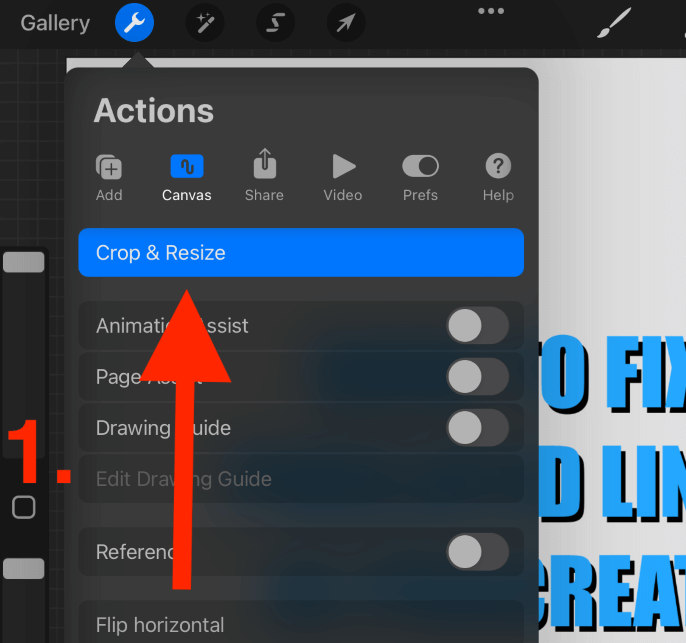
Step 1: Tap on the Actions tool (wrench icon) in the top left-hand corner of your canvas. Scroll over to the Canvas menu. Tap on where it says Crop & Resize.

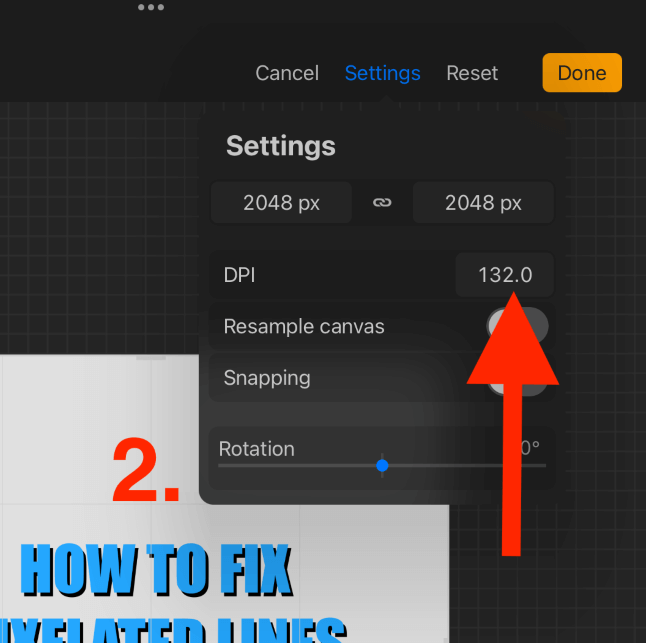
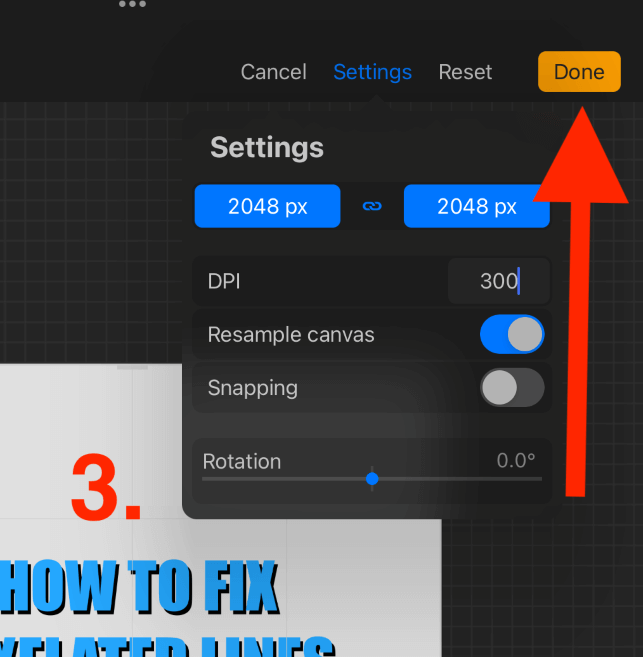
Step 2: Tap on the Settings button which should be in the top right of the canvas. In the DPI box, type in your desired DPI value. Make sure the Resample Canvas toggle is on, this will prevent your artwork dimensions from changing.

Step 3: Tap Done.

Things to Note
You should always set the DPI of your canvas before you start drawing. Changing the DPI of a canvas can sometimes have grave negative effects that cannot be saved or undone.
If you are changing the DPI of an already existing artwork, always make a duplicate of your project so that you can preserve the original in case you make any serious errors.
Another common cause of pixelated lines is using the wrong brush type. If you are using a pencil or charcoal brush and you’re having issues with pixelated lines, I suggest switching to a smoother brush like Studio Pen or Round Brush.
In your Brush Studio, you can also adjust the Streamline setting of any brush you are using. This may increase the smoothness of your lines and it’s worth trying before changing your DPI.
You can manually clean up your lines by using a smooth eraser brush to clean up the edges. This is a very time-consuming method but it’s a great option if you have gone too far or cannot change the DPI of your canvas.
If nothing you try works, you may need to consider upgrading your device to an iPad with bigger RAM capabilities. Your device might not be fit to support the quality of work you need on Procreate.
DPI Values
DPI stands for Dots Per Inch. This affects your artwork as it impacts how clear your work will come out whether it’s printed or presented digitally. Below is a good rule of thumb that I stick to when deciding which DPI to use:
For Printing
You want to set your DPI to at least 300 if you are planning to print your work. This will provide the highest quality and your work should come out clearly.
For Presenting Digitally
If your project is going to remain in the online universe and only be viewed online or through a screen, you can use a DPI of 125. This will give you a clear, high-quality image without having to save your project as a huge file.
Pro Tip: Regardless of what you’re creating your Procreate project for, I recommend always staying between 125 and 300 DPI unless you specifically require otherwise.
FAQs
I have briefly answered some of your frequently asked questions below. If there are any I missed, please submit your questions in the comment section below.
How to avoid pixelation when resizing in Procreate?
The best way to avoid pixelation issues in Procreate is to always work on a larger canvas than you need. This gives you more freedom to size down without losing the quality of your artwork and having pixelated lines when resizing in Procreate.
How to get better lines in Procreate?
Open the Brush Studio of the brush you are using so you can make changes. Under Stabilization increase the amount of Motion Filtering. This will help to stabilize your brush and give you stronger, clearer lines when drawing.
How to get crisp lines in Procreate?
The key to this is to use the right brush for the job and if necessary, activate the QuickShape tool. Use the Studio Pen when drawing and if you want to create sharper, crisp lines, hold down after each shape you draw to activate the QuickShape tool.
What’s a non-pixelated brush in Procreate?
Any brush with a solid stroke will limit the chances of you getting pixelated lines. I recommend using a brush from the Inking palette and avoiding any brushes in the Sketching palette.
Conclusion
As you can see from this article, there is no 100% solution for this issue as it can be caused by so many different factors. It really takes some time to identify the problem first before trying to fix it. This will save you some extra time and stress when finding the right solution.
The safest habit you can get into to avoid this issue altogether is to always start with a large and high-quality canvas every time you start a new project. It’s remarkably easier to downsize your canvas than it is to increase it so it is always best to play it safe at the beginning.
Do you have any other solutions to add to this problem? Leave your feedback in the comments section below so we can learn from you.
