
Movie files can be huge, which can make sharing them (particularly by email) difficult. However, iMovie offers a wide variety of export settings, allowing you to generate smaller files.
I’ve been editing movies for more than a decade and struggle with movie file sizes daily. The raw footage (particularly for commercial clients) takes up loads of space, the project files balloon overnight, and archiving your projects eventually requires an (expensive) external drive or a Cloud drive.
So when my project is complete, but my final iMovie file is too large to easily share with my client or email to my friends, it feels like someone added fuel to the already bonfire-sized file fire.
The good news is that iMovie allows a lot of control over the resolution and quality of your exported movies, so you should be able to get your file down to the size you need.
Table of Contents
How to Export a Smaller File from iMovie
In the following five steps, I will take you through the process to export your movie while explaining all the options available to get the smallest file.
Open the project you want to export from iMovie and click the Share button (highlighted by the red arrow in the screenshot below) or select Share from the File menu.
Either approach provides four options, with the Share button opening a tab with four icons, as can be seen in the screenshot below.
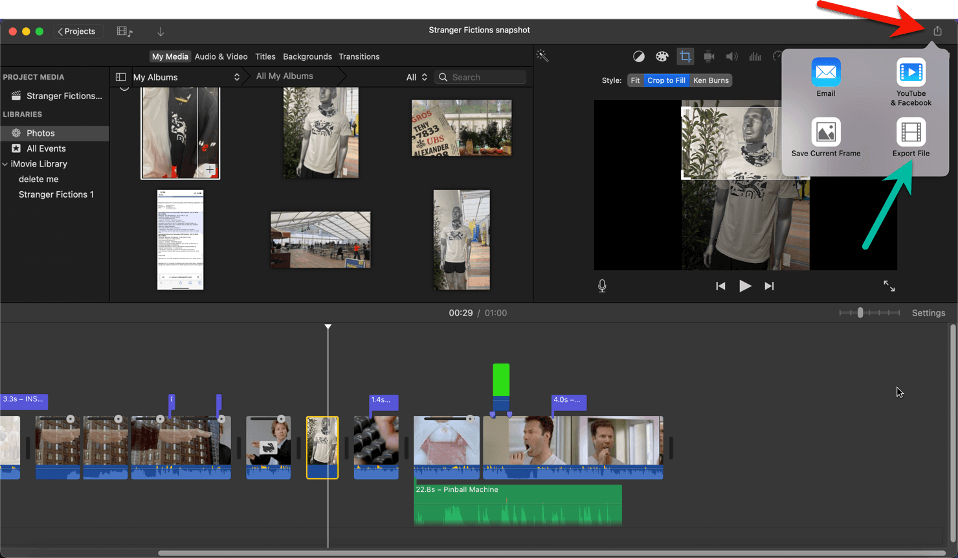
While each of the four options allows some control over the size of your exported file, the Export File (highlighted by the green arrow) options provides the most options and so is where we will focus in this article.
Step 2: Click on Export File
This will open a new window which looks like the screenshot below.
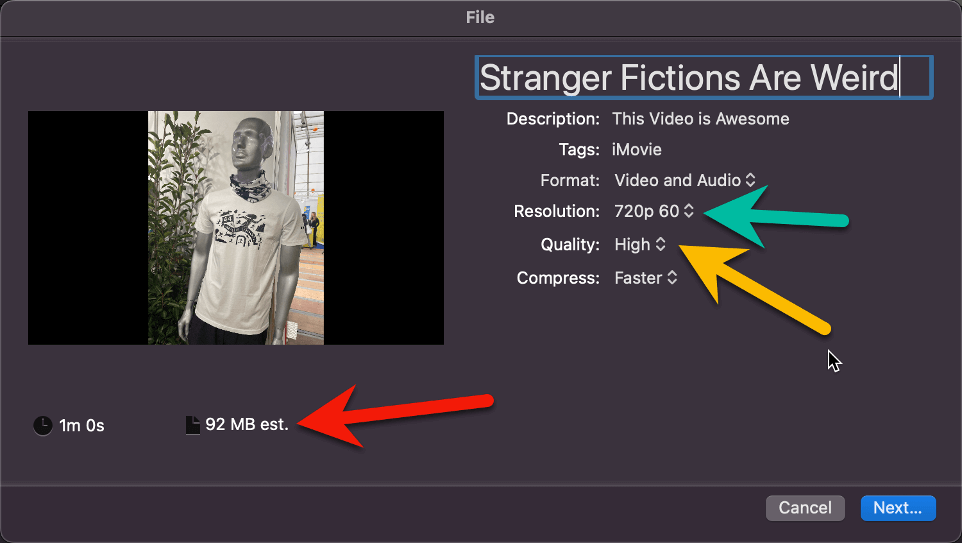
From top to bottom, the first three options allow you to 1) set your movie’s title to something more interesting than “Stranger Fictions Are Weird”, 2) provide a Description, and 3) add some Tags.
The fourth option, Format, just gives you the option to export only the audio (no video) of your movie. And, yes, the uses for this are extremely rare.
But the Resolution and Quality options are powerful and where you should find the solution to your file size problems.
But before we get into the Resolution and Quality settings, notice the number highlighted by the red arrow in the screenshot above. This is iMovie’s estimate of the size of your exported file (92 megabytes, or around 1/10th of a gigabyte in the example above).
As you try different Resolution and Quality options (which will cover in Step 3 below), this number will update automatically. When it hits the range you need, you’re good. (And I do mean range because iMovie is notoriously bad at estimating. I have no idea why.)
For completeness’s sake, after Resolution and Quality, the final setting in the Export File window is Compression Setting. This is not as interesting or useful as you might think. It just gives you an option to export your file faster, at the cost of the picture quality.
Unless your life or your career depends on getting your movie exported as fast as possible, I recommend you leave this set to Better Quality.
Step 3: Lower the Resolution
The most reliable way to lower the file size of your final movie is to reduce your movie’s resolution.
Now, the options iMovie gives you are a bunch of numbers. In the screenshot below you can see “540p 60” and “720p 60” while “1080p 60” is grayed out.
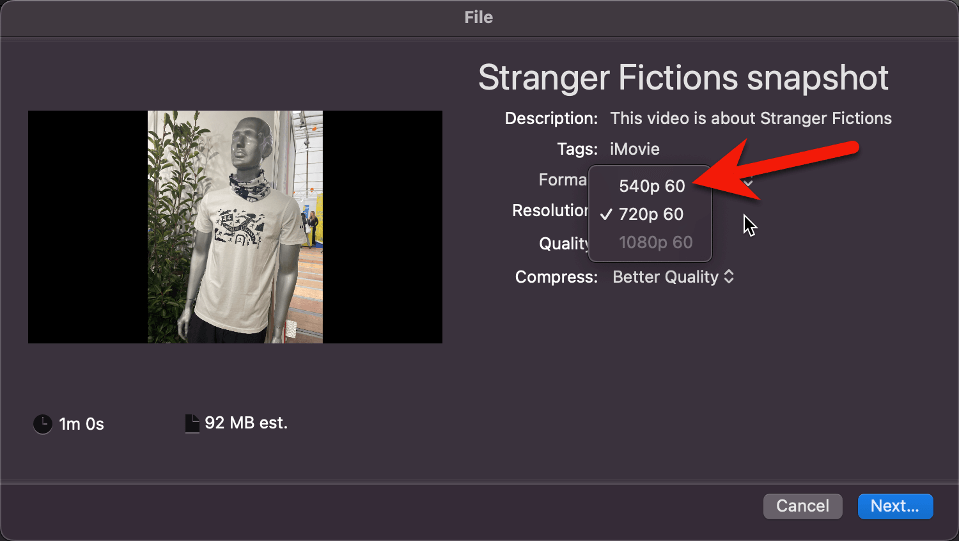
At the risk of completely nerding out, the number before the “p” is the number of pixels in the vertical axis of your movie. So, 540p will have 540 pixels and 720p has … Well, you get the idea. The important thing is that each pixel is a dot in your movie. The more dots, the sharper the image.
The funny thing about pixel counts is that it all kind of depends on how big (literally, the physical size) of a screen your movie will be watched on. If you projected a 520p movie onto a cinema screen it would look positively terrible. But on an iPhone, it will look fine.
As a rule of thumb, 520p should be fine for small screens, while 720p will be fine on a laptop, and if your plan is to watch the movie on a full-sized TV screen, you’ll want to be in the 1080p (or higher) range. (Consider that a “4K TV” is 4096p!).
In conclusion, if all of the above is just too many numbers, select 540p. If you hate the way it looks when you watch it, pray that you can raise the resolution to 720p and still swallow the file size.
One last thing: I mentioned above that 1080p was grayed out in my example. This is because the raw footage I was using in my movie was filmed at 720p. You can export in lower resolutions, but you can’t add pixels that were never there!
Step 4: Lower the Quality
Honestly, this option makes me a bit nauseous because who – ever – wants lower quality?
More technically, lowering the quality means iMovie is going to use some algorithms to remove some of the detail in my movie that it doesn’t think is necessary. Hmm.
But, again, the size of the screen your movie will be viewed on is important. Think of it like the difference between listening to a compressed music file on your iPhone vs a high-end stereo system. You will hear the difference on the stereo, but probably won’t on your iPhone.
And reducing the quality is an effective way of getting the file size down.
And iMovie gives you its options in plain English, not numbers.
As you can see in the screenshot below, you can choose between such everyday alternatives as “Low”, “Medium” and “High”.
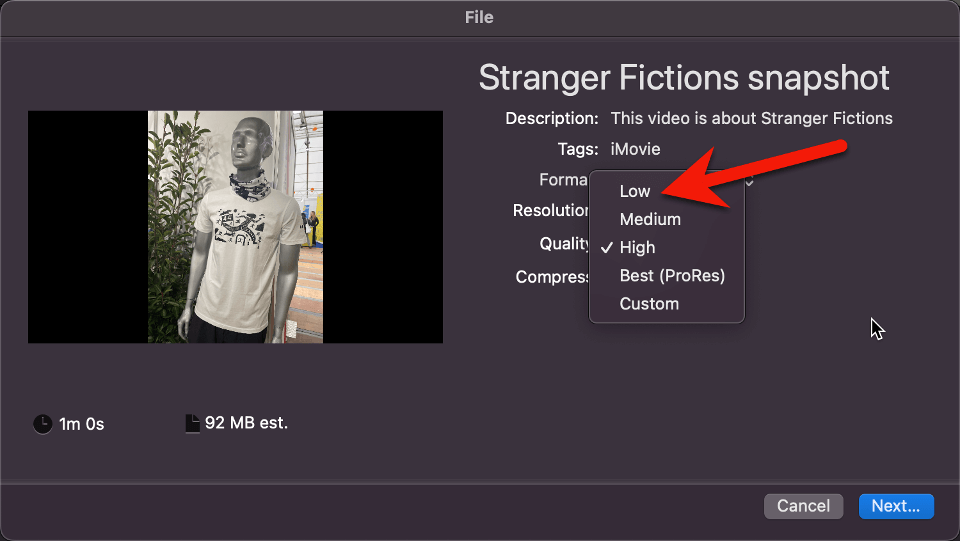
And, remember, iMovie will adjust the estimated file size as you click on the different options. So, just experiment until you find the file size you need at the highest quality you can get.
But do not even think about choosing “Best (ProRes)”. This will inflate the size of your file by 10 times!
And while the Custom option at the bottom can be helpful if you want to squeeze every last bit of quality into your maximum file size, “Low” “Medium” and “High” should be fine for most of you.
Step 5: Save your File
Once you have all the settings the way you want them, click Next in the bottom right corner of the Export File window and you will get the usual Finder window allowing you to choose where you want your exported file to be saved.
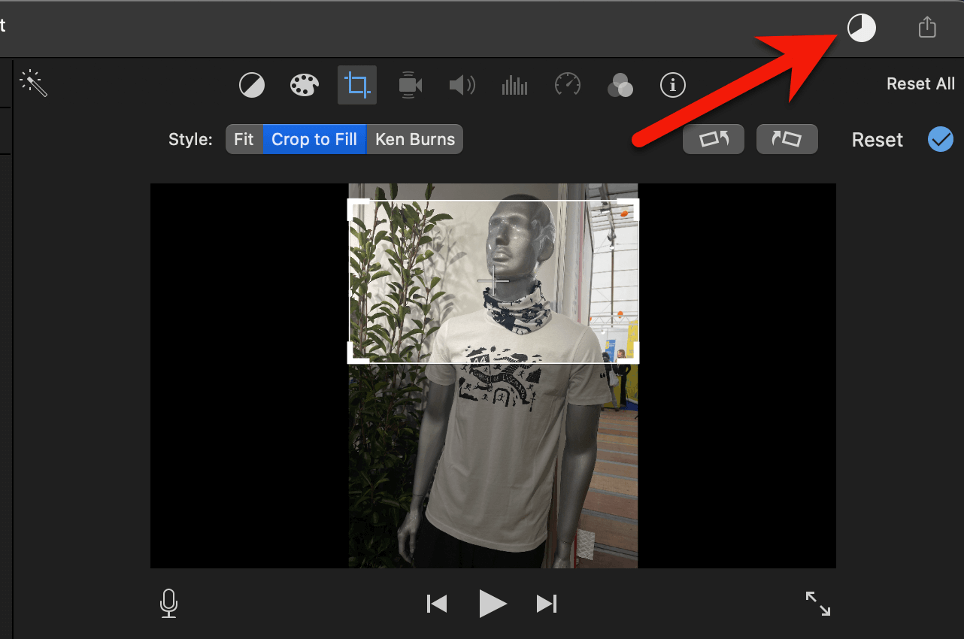
Once you’ve chosen a location, click Save, and a circle will soon appear in the upper right corner (highlighted by the red arrow in the screenshot below) of iMovie showing the progress of your export. When that circle fills and is completely white, your file is exported.
Or, a banner will appear in the top right corner of your mac letting you know your export is done – unless you have notifications turned off, which I usually do.
Finally, this is the time to check the size of your exported file. Was it close to iMovie’s estimate? Is it small enough for your purposes?
If not, you’ll have to go back to the settings and choose a smaller resolution or lower quality. And, I’m sorry, but I warned you that iMovie’s estimate was just an estimate!
Final (Compressed) Thoughts
I hope the above was clear enough to help you achieve the file size you need. But if you’ve tried everything and still need a smaller file, iMovie can help you no more.
While there are a variety of third-party video compression and conversion tools out there, it gets very technical very quickly. If you have no choice, and have some free time, I suggest starting with either VLC or Handbrake, both of which are free, and should at least get you started on finding a workable solution.
In the meantime, please do let me know in the comments below if I can improve this article, or you just have a question. We are all in this together, so reach out and let’s learn more together. Thank you.