
Have you ever opened a photo after editing it in Lightroom, only to wonder what happened to all your edits? Or perhaps you have a recurring nightmare about losing hours of editing work because it didn’t save properly?
Hey there! I’m Cara and today I’m going to alleviate your worries and explain where photos and edits are stored when using Lightroom. At first, the system seems complicated and you might wonder why the program does it this way.
However, once you understand how it works, it also makes sense why. The method Lightroom uses ensures you never lose editing information, plus unnecessary data isn’t slowing down your system.
Let’s dive in!
Table of Contents
Where Are the Photos Stored in Lightroom
Lightroom is a photo editing program, not a storage one and RAW files are huge. Can you imagine how much Lightroom would slow down if it were storing thousands of images in your collection?
(If Lightroom is running slow for you anyway, check out this article to speed it up).
So where are the photos actually stored? On your hard drive of course!
You can choose which drive to store your photos on. To keep my main drive relatively empty (and thus fast and snappy), I installed a second drive on my computer that is dedicated to storing my photo collection.
Setting up an external drive is an option as well. However, it will have to be plugged in for you to access the photos. If you try to access the photos through Lightroom without the drive connected, they will be grayed out and uneditable.
Lightroom and your photos don’t have to be stored on the same drive. Thus, you can have Lightroom running on your faster main drive while working with the images on your storage drive.
When you import images into Lightroom, you’re telling the program where to find them on your computer. If you move the files to a new location, you’ll have to resynchronize the folder so Lightroom knows the new location.
Where are Nondestructive Edits in Lightroom
So how does Lightroom edit images if the files aren’t stored in the program?
Lightroom works on a premise called non-destructive editing. The edits you make in Lightroom are not actually applied to the original image file.
Try this, after editing an image in Lightroom, go and open it from your hard drive (not within Lightroom). You’ll still see the original image with no edits applied.
But that doesn’t mean you’ve lost your work! It simply means that Lightroom doesn’t make changes to the original file -it’s non-destructive.
So how does Lightroom make edits?
Instead of changing the image file directly, it creates a separate file that is stored in your Lightroom catalog. You can think of this file as a file of instructions that will tell the program which edits to apply to the image.
Exporting Images from Lightroom
You might be wondering if this means you can only see the edits when in Lightroom. That’s right! And that’s why you need to export images from Lightroom once you’ve finished editing them.
This creates a completely new JPEG file with the edits you’ve applied already built-in to the image. If you open this file in Lightroom, you’ll see that all the image sliders have been zeroed out. It’s now a new image.
XMP Files
This also means that you can’t share an original image with visible Lightroom edits with another user. Your options are the original image or the JPEG image. The other user won’t be able to see the specific edits you made.
But there’s a solution!
You can tell Lightroom to create an XMP sidecar file. This is the same set of instructions that the program automatically stores in the Lightroom catalog.
You can send this file to another user along with your original file. With these two files, they can see your RAW image with your Lightroom edits.
Set this up by going to Edit in Lightroom and choosing Catalog Settings.
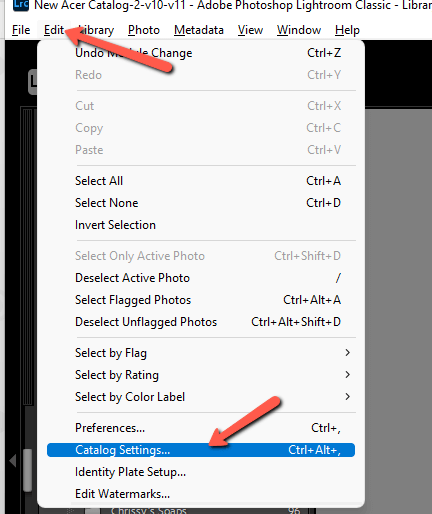
Under the Metadata tab, make sure the box is checked for Automatically write changes into XMP.
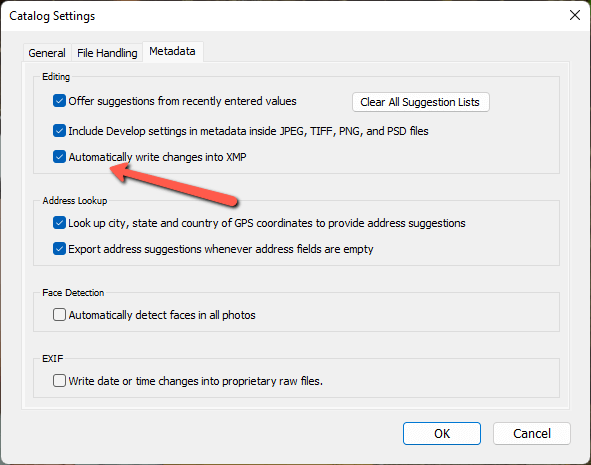
Now, go to your image file on the hard drive. As you make changes, you’ll see a sidecar XMP file appear linked to each edited image.
This feature isn’t necessary for most people, but it comes in handy in certain situations.
The Lightroom Catalog
So let’s back up for a second. If you don’t need the XMP files, where are your edits being stored?
They are automatically stored in your Lightroom Catalog.
You can have as many catalogs as you want. Some professional photographers create new lightroom catalogs for every shoot or every type of shoot.
I find it a pain to switch back and forth, but once you have thousands of images in the same catalog, it can slow down Lightroom. So I put all my images into the same catalog but create a new catalog every few months to keep the number of images in each catalog down.
To create a new catalog, go to File in the menu bar of Lightroom and choose New Catalog.
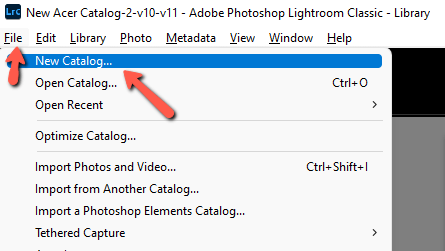
Chose where you want to save it on your hard drive and give it a recognizable name. When you want to switch between catalogs, choose Open Catalog from the menu and choose the catalog you want.
To ensure the safety of your image edits, you can create backups of your Lightroom catalog as well. Check out how to back up your Lightroom catalog here.
Saving vs Exporting Lightroom Edits
At this point, you probably have an idea of the difference between saving Lightroom edits and exporting Lightroom images. But let’s clarify.
Unlike Photoshop, Lightroom automatically saves your work. As you make edits to images in the program, the instructions are written and stored in your Lightroom catalog. They are always safe and you never have to remember to hit the Save button.
Once your image is finished and you want to create the final JPEG copy, you will have to manually export the image.
Final Words
There you go! As I said, Lightroom’s storage method seems complicated at first glance. But once you understand how it works, it’s quite simple. And it’s an ingenious way of handling the files so you can easily work with thousands of images and Lightroom doesn’t get bogged down in the process.
Curious about how other stuff works in Lightroom? Check out how to organize photos here!