
iMovie’s Precision Editor can help refine both the video and audio transitions between two movie clips.
Like the Clip Trimmer, the Precision Editor is not one of the essential tools you need to learn to make movies in iMovie. But if you’ve ever struggled with getting a transition between two clips just the way you want it, you’ll want to check out the Precision Editor.
If the Clip Trimmer helps you focus on where you want to start and end a clip, the Precision editor helps you focus on how a Transition effect (such as Cross Dissolve or Fade to Black) will affect the flow from one clip to the next.
This can really help solve problems in your edits, such as removing lingering bits of unwanted video as you fade out of a clip. Which, to be honest, happens to me all the time…
That is precisely why I wanted to write this article. I’ve been a filmmaker for a long time, and because I am mostly self-taught, I struggled way too long with Transitions that just weren’t working.
So, I encourage you to read on and learn how to edit your Transitions with precision!
Table of Contents
How to Use the Precision Editor
Because the Precision Editor is built to better understand your Transition from one clip to the next, you launch it by either double-clicking on the edge of a clip or by selecting an edge of a clip and selecting Show Precision Editor from the Window menu.
In the screenshot below, I have two clips that I have already trimmed to where I think I want them, separated by a Transition effect (the tiny bow-tie-looking thing highlighted by the green arrow).
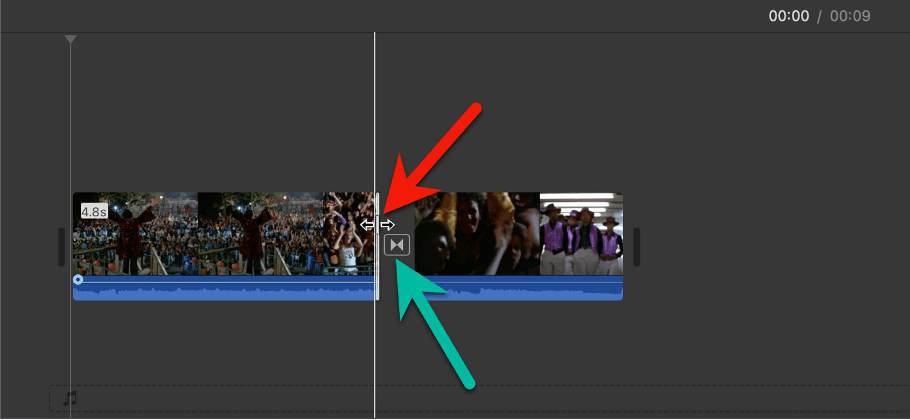
Note that my pointer (highlighted by the red arrow) has changed from the usual arrow symbol to the two sideways-pointing arrows. This means I am on the edge of the clip and can double-click to open the Precision Editor.
When the Precision Editor opens, my timeline now looks like this:
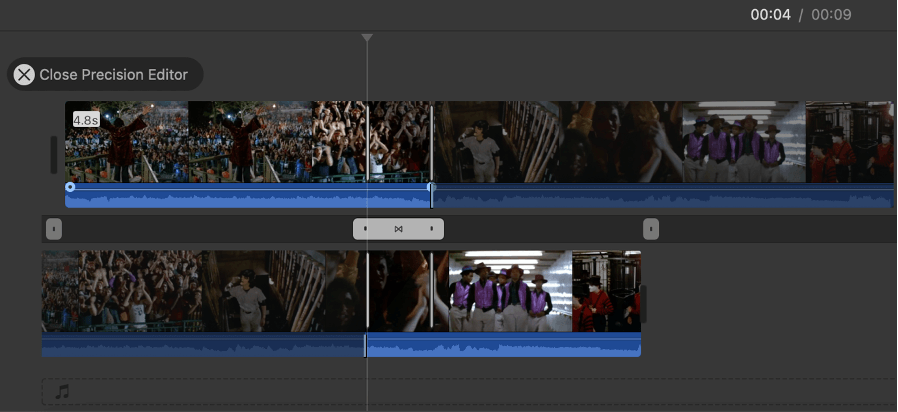
This may look confusing, but the Precision Editor is giving you a lot more information to help you, well, make a more precise edit.
To do this, it has put the outgoing clip (the one that was on the left of my transition in the previous screenshot) on top of the incoming clip (the one that was on the right side of my transition.) Why?
Because the Precision Editor wants to show us not just the footage we have in our two already trimmed clips, but the whole (untrimmed) footage in both clips to help us adjust our Transition.
In the screenshot below, I have zoomed in so we can get a better look at the Transition.
The horizontal gray box, highlighted by the red arrow, shows us where our Transition is currently taking place and the vertical white lines within the clips show us precisely where the Transition starts and ends.
Finally, the yellow arrows in the screenshot point to invisible diagonal lines that indicate how the outgoing (top) clip is fading out and the incoming (bottom) clip is fading in.
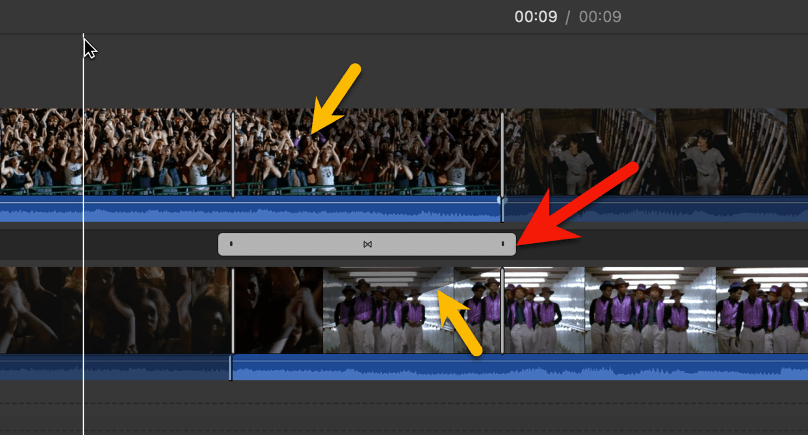
Intuitively, the footage to the right of the invisible diagonal line in the top clip is darker, because it will not be seen. At the same time, the footage to the right of the invisible diagonal line in the bottom clip gets bigger.
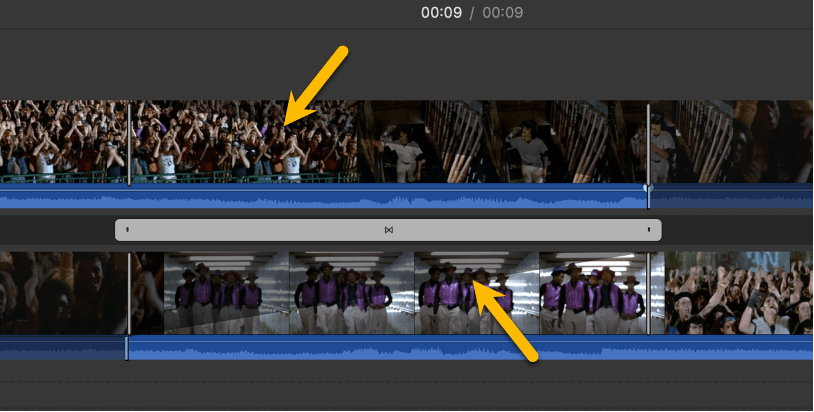
Now, we can move this transition simply by clicking on the tiny bow-tie-like symbol in the center of the gray box. Just click there and you can drag the Transition left or right.
Also, if you click on either of the black dots at the edges of the grey box (the right one is very near where the red arrow is pointing) to shorten or lengthen the duration of the transition effect.
In the screenshot below, I have lengthened the transition by dragging one of the black dots away from the center. Notice that the diagonal lines (again highlighted by the yellow arrows) are flatter – indicating that the outgoing clip will fade out slower, and the incoming clip will fade in slower.
Between dragging your transition right or left and changing its duration, the Precision editor can show you exactly what will be seen when the clip plays back.
Remember that problem I listed at the beginning of this article, where unwanted bits of footage were visible in my Fade In/Out Transitions? Well, because the Precision Editor shows me exactly how much of both clips will be visible, this problem can quickly be solved. Priceless.
How to Modify How Your Audio Transitions
By default, iMovie will transition the audio in clips along the same diagonal line as the video – the outgoing clip’s audio will fade out as the incoming clip’s audio will fade in.
To be clear, regardless of which kind of Transition you use, and how long or short you make that Transition, the audio in both clips will, by default, transform in line with the video.
But you can change this in the Precision Editor, in two ways.
First, you can move the start and end points of the audio, independent of the video.
In the screenshot below, the red arrow is pointing at a vertical blue bar. You can click on this and drag it left or right to determine when the clip’s audio – and only the audio – will start playing.
This is handy when you want, for example, the incoming clip’s audio to start before the Transition itself starts. This is more common than you might think – often it just sounds better when you start to hear what is going to come next.
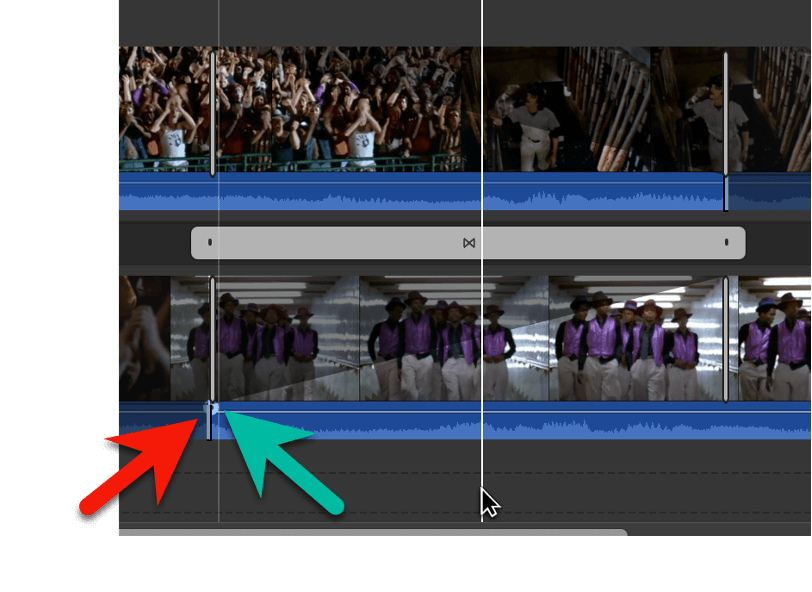
The second way to adjust how the audio transition is using the audio fade handles. In the screenshot above, the green arrow is pointing at a tiny semi-circle of light blue. This is the audio fade handle.
If you click on a fade handle and drag it towards the center of the clip, another diagonal line will appear over the audio which indicates how the audio will fade in (or fade out if you are dragging the audio handle from the end of the clip in).
You can read more about Fade Handles in our article How to Fade Music or Audio in iMovie Mac.
Between adjusting when each clip’s audio will start and stop, and adjusting the fade handles in both the outgoing and incoming clips, you can really get the audio transition exactly as you want it.
And, trust me, I have done hundreds of Transitions where the audio transition just wasn’t quite sounding right, and doing all of this kind of precision work in the timeline is just a recipe for frustration!
Final Precision Thoughts
Working with the Precision Editor can be a bit daunting at first, and – in all honesty – you may not be able to appreciate its usefulness until you’ve edited enough Transitions in the iMovie timeline that were just not working and annoyingly painful to get right.
But regardless of how much you’ve already suffered, I encourage you to play around with the Precision Editor.
The more you do, the more I think you will see how it can really help get a Transition just right. Particularly the difficult ones that – if they are not timed perfectly – just feel like an interrupting thud in the middle of an otherwise enjoyable movie.
But, please, do let me know if you have questions, concerns, a success story, or you are just completely lost. I am happy to help. Thank you.