
Using the Clip Trimmer in iMovie provides some compelling advantages over the standard method of trimming clips in the timeline by dragging their edges.
When you trim a clip in the timeline, by clicking and dragging on the edge of a clip, you only get to see what will be in your clip, not what could be if you just dragged the edge a little further.
To make sure you are trimming the clip in exactly the spot you want, keeping everything you might want, most editors start by making the clip too long, then work backward to find their end point.
But when you use the Clip Trimmer, you can see the whole clip as you trim. And, the Clip Trimmer allows you to perform Slide edits (don’t worry, I will explain what that is).
As a long time filmmaker, I can tell you that the combination of being able to see the whole clip and Slide the clip make using the Clip Trimmer both fast, and surprisingly powerful.
Table of Contents
How to Trim Clips with the Clip Trimmer
To launch the Clip Trimmer, you can either:
- Right-click on a clip and select Show Clip Trimmer from the popup menu
- Press the keyboard shortcut (Command + $)
- Select Show Clip Trimmer from the Window menu
Either method produces the same results: a clip (highlighted by the red arrow in the screenshot below) will appear above your selected clip (highlighted by the green arrow).
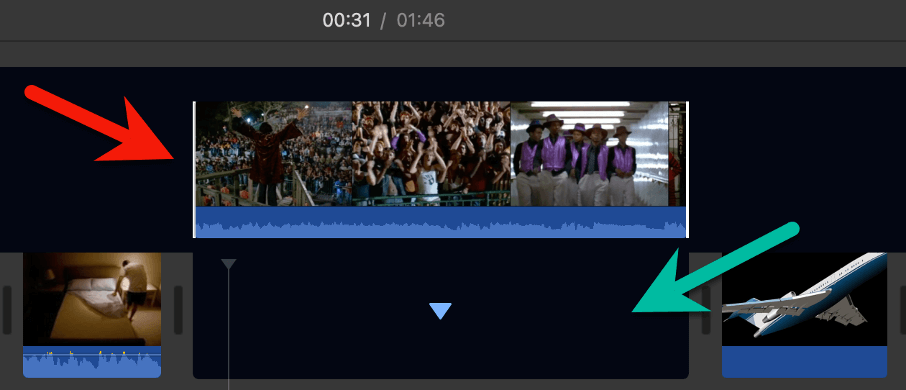
This new clip is the same clip you clicked on in your timeline, but temporarily pulled up and out of your timeline so you can work more closely on it.
Note that my selected clip has gone dark, waiting for you to make edits in the clip above it, except for the upside-down blue triangle (which, if clicked, will close the Clip Trimmer).
Now, if I had already trimmed this clip before I opened the Clip Trimmer, it might look more like the screenshot below.
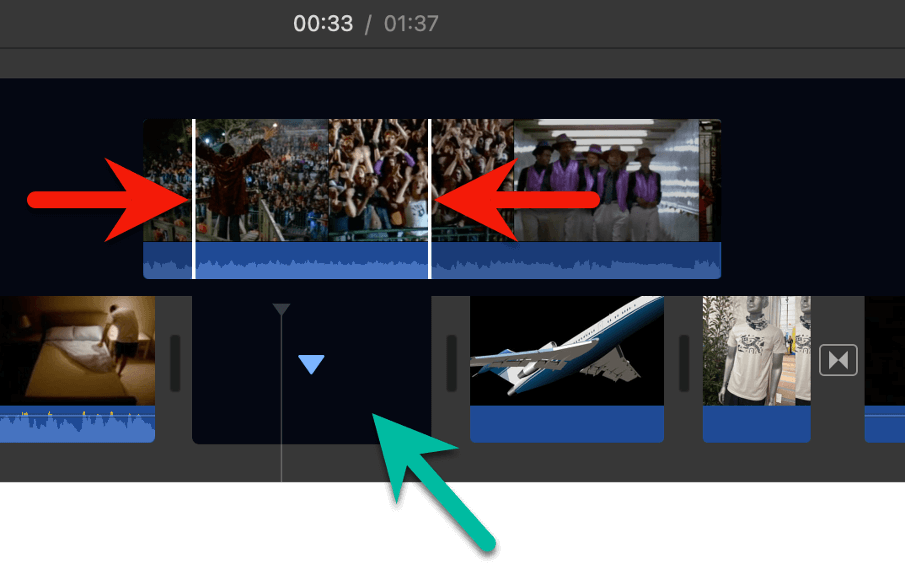
In this example, my clip (highlighted by the green arrow) is shorter than in the previous screenshot, and the vertical white lines (see the red arrows in the screenshot above) in the clip above it are marking just a segment of the original, full, clip.
If you noticed that the white lines perfectly line up with the length of the clip in my timeline, that is because they are there to indicate the current start and end points of my already trimmed clip.
And, they are movable – you can edit directly with the white lines.
If I want to extend my clip – that is, make it longer by adding more footage at the end of the clip, I can just click on the right white line and drag it to the right. I can also shorten the clip by removing footage at the end by dragging the same white line to the left.
And, of course, I can do the reverse: If I want to make my clip longer by adding more footage at the start of the clip, I can just click on the left white line and drag it a bit to the left. And so on.
Pro Tip: If you click on either white line, you can use the left and right arrow keys to move the line just one frame at a time. This can really help you get exactly the right spot to start or end your trimmed clip.
While the Clip Trimmer is providing the same functionality as dragging on the edge of a clip in your timeline, the ability to see the original clip in its entirety can really help – you can see what is coming, not just what has happened.
To close the Clip Trimmer, you can click on the downward pointing blue arrow in the center of your selected clip as we mentioned above, or you just can press Command + $ again.
How to Make a Slide Edit with the Clip Trimmer
A Slide edit is editing jargon for changing the start and end points of a clip while keeping the clip’s length unchanged.
Huh?
Okay, think of it like looking at a strip of film through a keyhole, where somebody is sliding the film strip back and forth on the other side of the door. The keyhole size never changes, but what it can see does change as the film strip slides back and forth.
Why would you ever want to do this? Well, it is rare, but when you need it, it is fantastic.
For example, imagine your movie has a soundtrack, and you know you want to start and end a particular clip on a particular beat. So, the time you have to show some footage is fixed.
A Slide edit is the perfect way to find the segment – of a fixed length – from your clip that works.
Okay, fine, so how do you do it? Simple:
When you have the Clip Trimmer open, just move your pointer anywhere between the white lines and it will change from its usual arrow to this funny shape that I always thought looked like a bus (but is surely a film strip), as highlighted by the red arrow in the screenshot below.
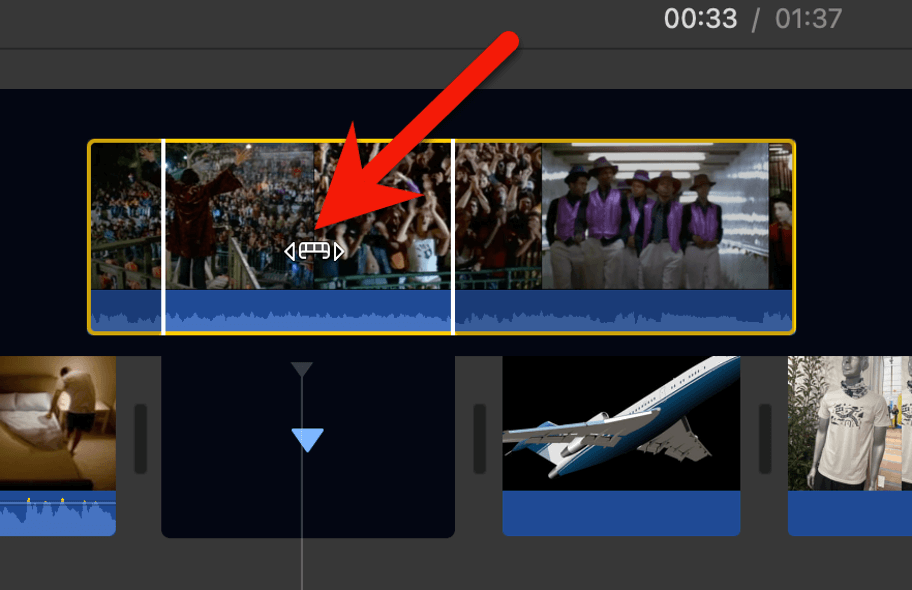
Once you see the bus, just click, hold, and move your pointer back and forth. Your clip will then slide back and forth but the white lines won’t move. When you have the bit you want between the white lines, let go.
Note that you cannot perform a slip edit unless you have extra footage on both sides of your white lines.
Final Trimming Thoughts
Edit enough films and you relish every opportunity to do things more quickly and more precisely.
For example, making a Slide edit without the Clip Trimmer requires adjusting one edge of the clip, noting how many frames you moved it, then adjusting the other edge that exact number of frames.
Then repeating the whole thing when you realize you want to end a few frames later.
It gets tedious.
And, yes, the Clip Trimmer takes some getting used to. I know – because I was one – many junior editors who don’t even bother with it, choosing to drag the edges of their clips around to trim their clips and ignoring the power of a Slide edit.
But you, dear reader, are now ready to harness the power of the Clip Trimmer!
Or, if you are still not sure about all this, drop a note in the comments below. Happy to answer any questions, clarify anything, or take suggestions on how this article could be improved. Happy editing and thank you.