
Moving and trimming movie clips is the heart of moving making and iMovie makes it a snap to split clips, move them around, and trim them.
After over a decade spent editing films, I still marvel at how important getting the basic structure of your story right is to making an effective movie.
Put simply, the core art of editing isn’t much more than putting clips in an order that makes sense, and trimming those clips to a length that keeps the story moving while giving the audience time to digest the action.
So, I am happy to report that below I will cover how to do these basic tasks in iMovie. And don’t worry, it’s not complicated. You’ll be furiously editing movies in no time, and – trust me – the more you do it, the better you will get, the faster you will get, and the better your movies get.
Table of Contents
How to Split a Clip in iMovie Mac
Why would you want to split a clip? There are lots of reasons, but the most common is that you want to move just part of a clip to somewhere else in your movie. Or, you want to split a clip because there is a segment within a clip you don’t want or don’t need.
To move part of a clip, or delete part of a clip, you start by splitting the clip at both the start and end of the segment you want to move or delete.
Once it is separated (split from the original clip) you can move it by dragging and dropping it where you want it to go or delete it simply by clicking on it and hitting Delete. Poof.
So how do you split a clip? In two easy steps:
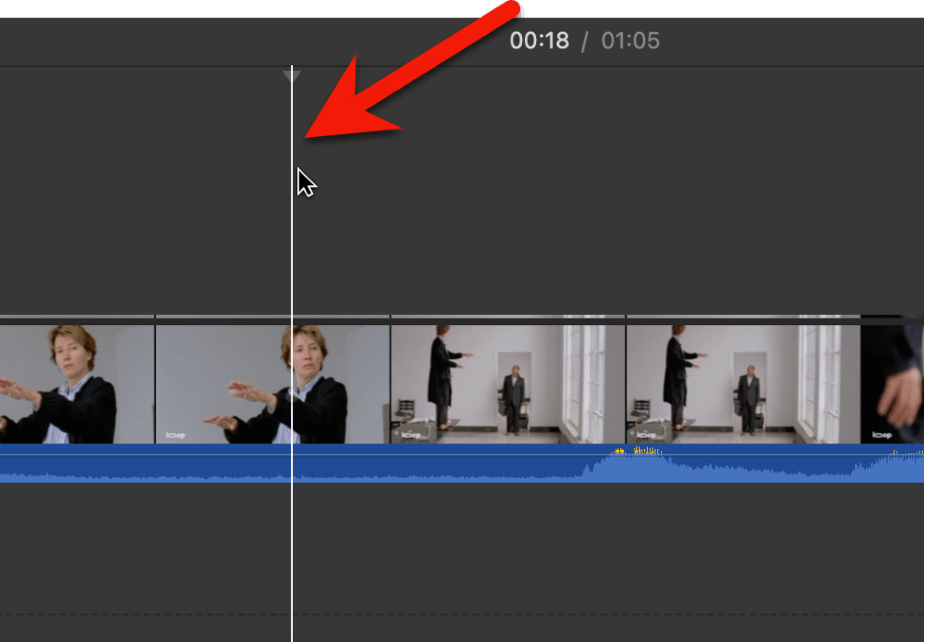
Step 1: Move your playhead to the spot you want to split your clip.
In the screenshot below, I placed my playhead (the vertical white line highlighted by the red arrow) on the frame I want to split, right before the camera angle changes from a closeup of a Famous Actress to a wide shot of the room she is in.
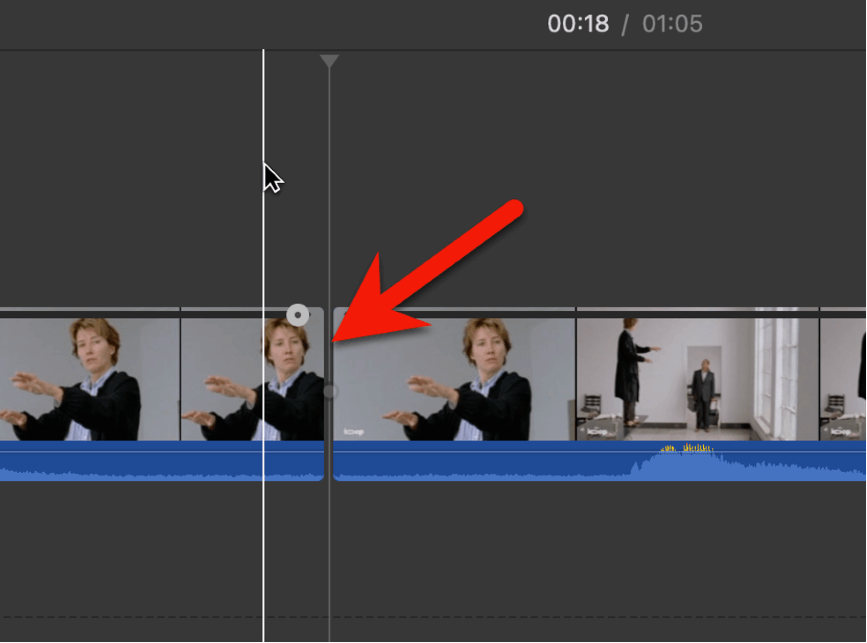
Step 2: Press Command + B to split the clip.
And with that simple keystroke, where there was one (clip), now there are two. You can now see a gray gap (highlighted by the red arrow in the screenshot below) between the two resulting clips right where you split the clip, signifying these are now separate clips.
Note that instead of pressing Command + B you can also position your playhead, then select Split Clip from iMovie’s Modify menu. Either method has the same effect.
And a quick reminder: iMovie shows you the keyboard shortcut (Command + B, in this case) to the right of every menu option – just in case you forget it.
Pro Tip: If you find placing the playhead where you want to split the clip is a little unstable, with the slightest bump to your mouse moving your playhead while you are trying to find the Command + B keys (it happens), then click on that spot. This locks the playhead on the spot.
Bonus Pro Tip: Once you have placed your playhead where you (think) you want to split the clip, you can press the left and right arrow keys to move your playhead one frame left or right. This can be an incredibly quick way to confirm if you put your playhead in exactly the spot that you’d like to make your cut.
How to Trim Clips in iMovie Mac
First, what do we mean by “trimming”? Nothing more than just shortening or lengthening your clip by a little bit, so you have just the part you want in your final movie.
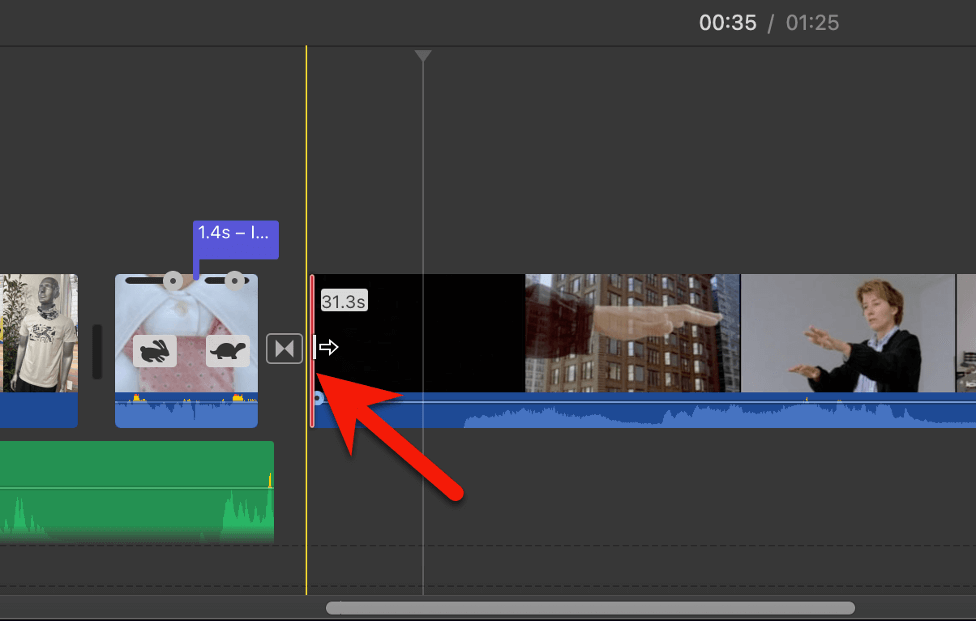
To trim a clip, move your playhead to the edge of the clip you want to trim. When you are right at the edge, your pointer will change from the usual arrow icon to a pair of arrows pointing left and right, as highlighted by the red arrow in the screenshot below.

Once your pointer has switched to the pairs of arrows, you can click, hold, and drag the edge of the clip left or right.
If you are trimming the left (starting) edge, dragging it left will lengthen the clip by adding more footage to the clip, and dragging it right will shorten the clip by trimming off the beginning of the clip.
Likewise, if you are trimming the right (end) edge of your clip, dragging it right will lengthen the clip, showing more of the underlying footage in your movie, and dragging it left will shorten the clip.
Note that if your clip does not have more footage to reveal when you try to lengthen it, the edge will turn red (as highlighted by the red arrow in the screenshot below), and the two-arrow icon becomes a one-arrow icon – signifying that you can only trim in one direction, to shorten the clip.
Trimming a Range in iMovie Mac
Maybe you have a segment within a clip that you like, but you want to trim off some footage at both the beginning of the clip and the end of the clip, so you just have the segment you like.
You can accomplish this by splitting the clip at the start and end of your segment, or by trimming the footage in from both sides of the clip. But both those techniques take a few steps.
A faster way to do it is to select the range in the clip that you want, then select Trim Selection from the Modify menu (or press the keyboard shortcut, Option + /).
What Trim Selection does is delete everything except the bit you highlighted in your range – lopping off what comes before and after it in one fell swoop.
So how do you select a range? Easy. Just move your pointer to the spot where you want the range to start and press I (for the “in” point of your range). Then move to wherever you want the range to end and press O (for the “out” point of your range).
Pro Tip: The fastest way to select a range is to press and hold the R key. Then click where you want your range to start, drag your pointer to where you want the range to stop, and let go of the R key. While it may take a few tries to get used to this technique, it is very quick.
Final Splitting & Trimming Thoughts
Splitting, Trimming, Moving: These are the essential building blocks of editing. While moving a clip in iMovie is as simple as dragging and dropping, splitting is required to get just the clips you want to move, and trimming is needed to whittle those clips down to just the part you want to keep.
So, with the basics mastered, and assuming that movies are made to be watched, I look forward to seeing what you come up with! But, please, if you run into trouble, or just have more questions, leave me a comment below. I’m happy to help. Thank you.