
Fading music or audio in a movie editing program like iMovie is a quick way to have your sound “fade in” from nothing to full volume, or “fade out” from full volume to silence.
Over the decade I’ve been making movies, I have used this technique so many times it has become routine. So, I will start this article by talking a bit about why you might want to use fading in your movie making.
Then we’ll cover the basics of how audio works in iMovie Mac and finally show you the steps to fade your audio in and out.
Table of Contents
The Basics of Audio in iMovie
The audio recorded along with the video is shown in iMovie as a blue waveform just below the video. (See the red arrow in the screenshot below). While the audio for music is shown in a separate clip, below the video, and as a green waveform. (See the purple arrow in the screenshot below).
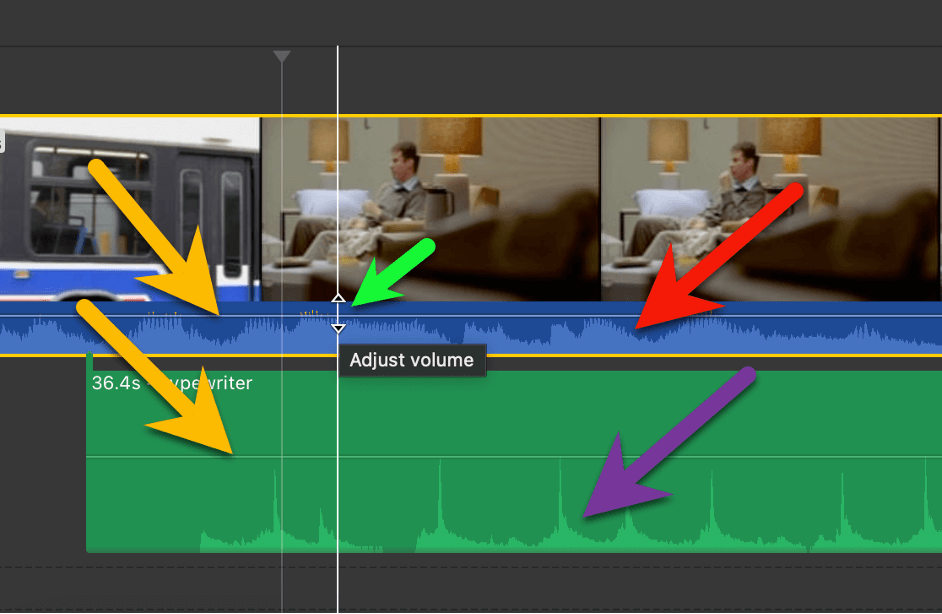
In each case, the height of the waveform corresponds to the sound’s volume.
You can adjust the volume of the whole clip by moving your pointer over the horizontal line that runs through the audio, shown by the two yellow arrows in the screenshot above.
When your pointer is right on the line, it will change from the usual pointer arrow to the two arrows pointing up and down, shown by the short little green arrow in the screenshot above.
Once you have the two up/down arrows, you can click, hold, and move your pointer up/down to raise/lower the clip’s volume.
How to Fade Music or Audio in iMovie on the Mac
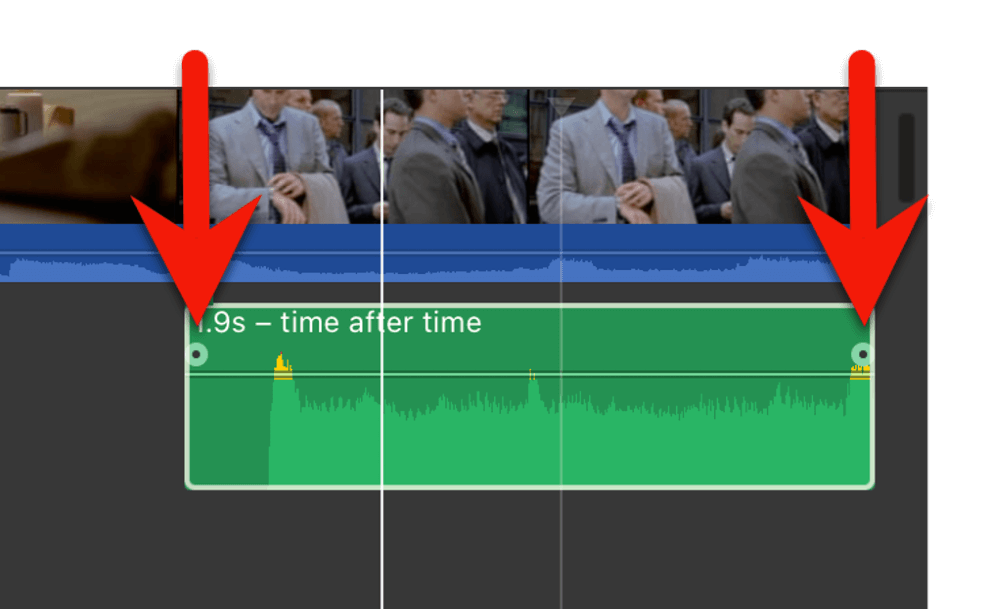
Step 1: Click on the audio track you want to fade. When you do this, a small pale green circle with a black dot in the center appears at either end of the clip (where the red arrows are pointing in the screenshot below). These are your Fade Handles.
Note the fade handles will look the same whether the audio is a music track (as in the screenshot) or the (blue) audio portion of a video clip.
Step 2: Click on the left fade handle, drag it to the right, and let go. You will notice (see the screenshot below) a curved black line appears across your audio clip and the audio waveform to the left of this curved line has a darker shade.
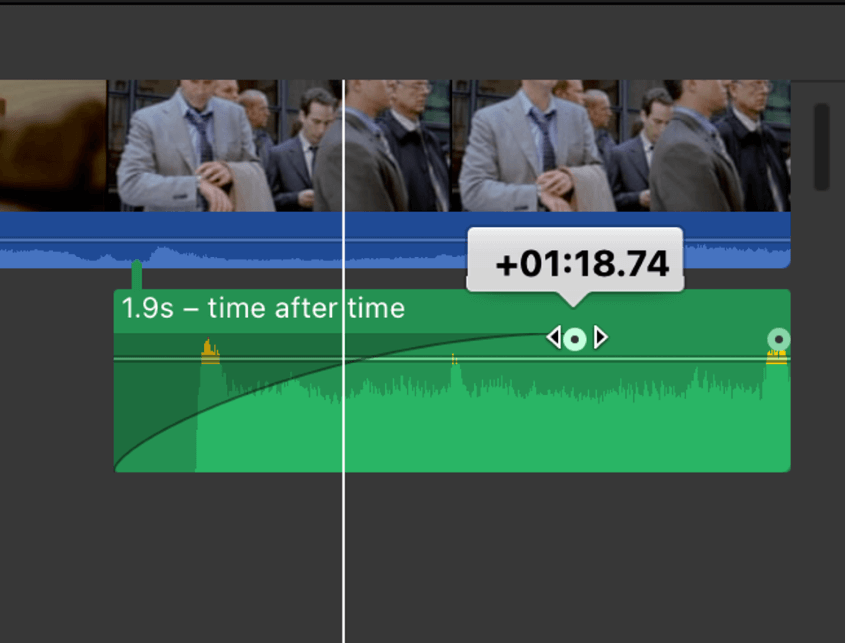
This black line represents how the volume will rise from the beginning of the clip (which will be zero volume) until it hits full volume – the volume set by the horizontal line.
The further you drag the fade handle from the edge of the clip will slow the time it takes to get to full volume, and the number in the white box above the fade handle tells you how long the fade will last.
In the screenshot above, the fade (shown as +01:18.74) will last 1 second, 18 frames, and about three-quarters of a frame (the .74 at the end).
Pro Tip: If you find yourself wishing you could change not just the duration of the curve of a Fade, but the shape of the curve (maybe you want the volume to slowly build at first, then accelerate more rapidly, or vice versa), you are ready to start thinking about learning more advanced video editing software.
To fade audio out, you simply reverse the action in Step 2 above: Drag the right frame handle to the left until you are happy with the time of the fade and let go.
Why Fade Your Audio in iMovie?
Fading is useful when cutting between two scenes that are meant to be more or less simultaneous but perhaps shot from different angles.
For example, if your scene is a conversation between two people, and your shots are cutting from one speaker to another, you want the scene to feel like it is happening in real-time.
But it is likely that, as an editor, you are using different takes of the same dialogue, and it is very likely that some time has passed between them, causing the background noise to be slightly different, and certainly not continuous.
The solution is to fade the audio out in the outgoing take and fade it in for the incoming take.
On the other hand, if your scene rapidly cuts from a man quietly contemplating his fate to the same man fleeing the police in an exotic convertible, you probably don’t want to fade in or out the audio. The sudden contrast is the point, and it probably will feel off to have the sounds of squealing tires rise as the man is thinking.
A few more common uses for fading audio are to reduce any audio popping and to help smooth out any dialog during Frankenbites.
Huh?
Audio popping is an odd effect but annoyingly common. Imagine you are cutting a scene right in the middle of some sound. It can be music, dialogue, or just background noise.
But pretty much no matter where you cut the clip, the volume will go from zero to something when the clip starts. This can create a short, and often subtle, popping sound just as the clip starts.
Fading the audio in – even if the fade lasts just a half a second or even a few frames – can eliminate this pop and make your transition much smoother.
Frankenbites are what video editors call a stream of dialogue that has been assembled (like the monster) from different takes (people).
Imagine having a fantastically delivered bit of dialogue but the actor slurred one word. If you replace the audio of that word with the audio from another take, you have a Frankenbite. And using audio fades can smooth any choppiness that assembly creates.
One final reason to fade in and out your audio: It usually just sounds better. I’m not sure why. Maybe we humans just aren’t used to going from nothing to something and vice versa.
Final/Fading Thoughts
I hope my explanation about how to fade your audio in and out was clear as a bell, and that you found it useful to hear a bit from an experienced filmmaker about when and why you might want to get used to fading your audio.
But please do let me know in the comments below if anything wasn’t clear, or if you just have a question. Happy to help, and all constructive criticism is welcome. Thank you.