
Instagram is one of the most popular social media platforms available today, and it isn’t always just for personal pictures or fan accounts.
A growing percentage of people use Instagram for branding, advertising, or hobbies like photography, making it key that posted images are of high quality.
However, this can sometimes be hard to achieve, and it’s extremely frustrating when a picture that looks great on your phone comes out blurry on Instagram.
Table of Contents
Why Are My Instagram Photos Low-quality?
Whether you feel like your photos randomly come out low quality or if it’s happening to everything you upload, there’s actually a very specific reason that a photo looks low quality on Instagram but high quality on your computer or phone—Instagram compresses photos above certain dimensions.
This means that your photo is being forcefully resized to fit their standards, which doesn’t always have flattering outcomes.
This happens no matter what you use to upload the photo, be it your phone or computer, so it’s unavoidable unless you stick to certain principles.
3 Ways to Upload High-quality Photos to Instagram
There are a few different ways you can avoid having your photos compressed by Instagram. Here’s how to do it.
1. Understand Instagram’s Requirements
If you keep your photos within Instagram’s constraints, then you can control the quality and not worry about them being force-resized by the app.
These are the guidelines released by Instagram for uploading photos:
- Use the most recent version of the Instagram app.
- Upload a photo with an aspect ratio between 1.91:1 and 4:5.
- Upload a photo with a maximum width of 1080 pixels and a minimum width of 320 pixels.
Any photo wider than 1080 pixels will be compressed, and you will lose detail. Photos smaller than 320 pixels wide will be enlarged, which will also produce blurriness.
Any photo that doesn’t meet the aspect ratio requirements will be cropped to acceptable dimensions.
2. Fix Relevant Settings
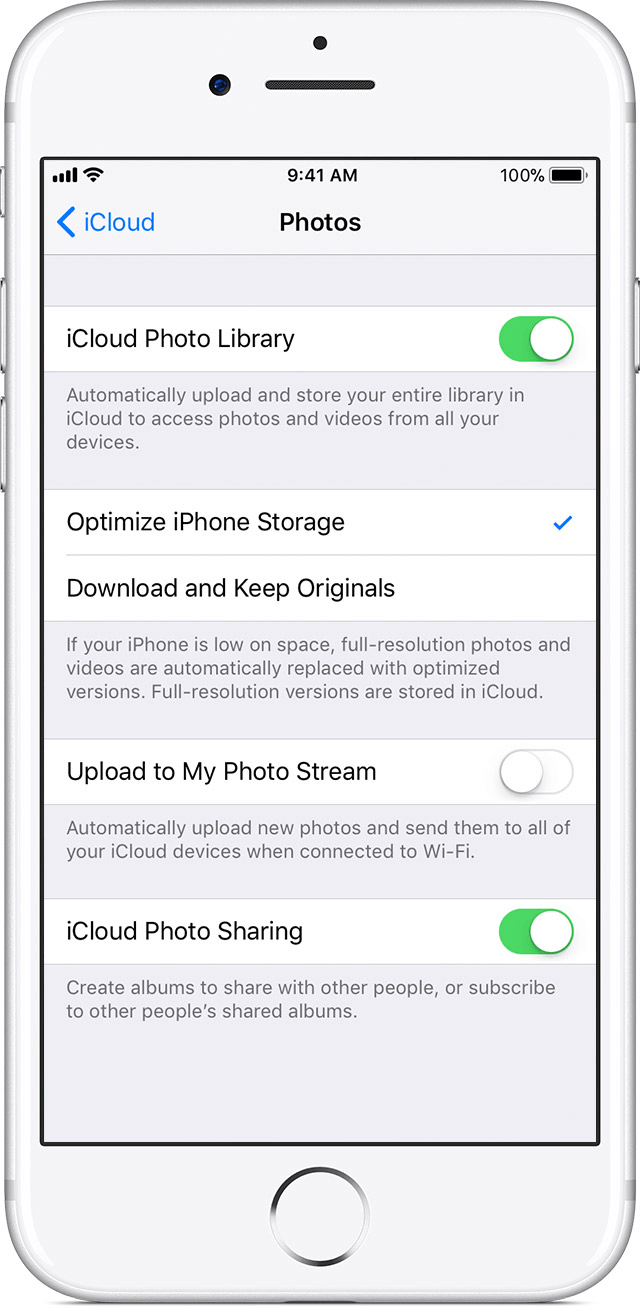
Some users have reported that on iPhone, you may be unintentionally compressing your photo before uploading it to Instagram due to a specific setting, particularly if you use iCloud as your primary data backup solution.
To fix this, open your iPhone’s settings and go to “Camera & Photos”. Then (if the option is available), uncheck “Optimize iPhone Storage”.
Additionally, if you use an online backup service like Dropbox or Google Drive, check if the photos are not being compressed by these services as well.
3. Resize Your Photos Ahead of Time
If you already know your photo is not going to be an acceptable size, you can resize it ahead of time and retain the quality.
For instance, photos from a DSLR camera are almost certainly going to be higher quality than allowed on Instagram, so you should import them to software like Photoshop, Lightroom, or GIMP (free) and resize them by yourself before uploading.
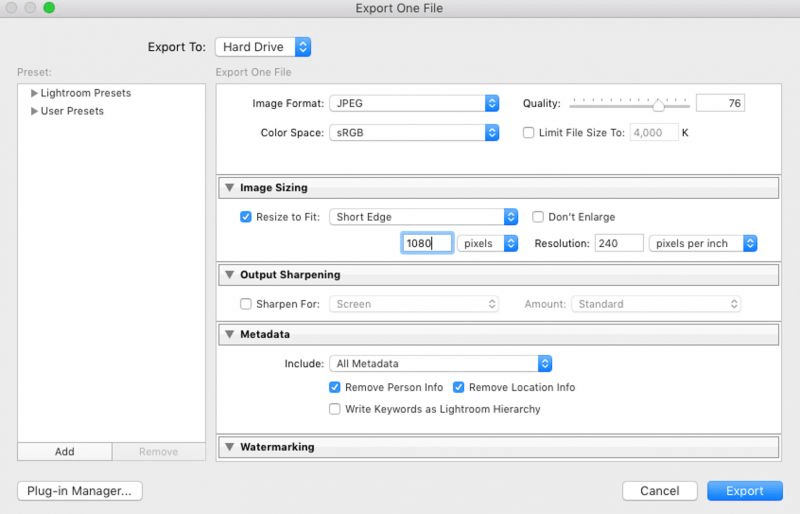
If you use Lightroom, you can set up a custom export setting that will make sure your photos never exceed 1080 px.
- For portrait photos, choose “Resize to fit: Short Edge” and set the pixels to 1080.
- For landscape photos, choose “Resize to fit: Long Edge” and set the pixels to 1080 here as well.
Conclusion
Whether you’re a professional with a brand to market, an aspiring influencer, or just a regular Instagram user, the rules for uploading photos are the same for everyone.
Just make sure to stick to Instagram’s strict pixels requirements and you shouldn’t see any unexpected changes in your photos. It may require a little extra work on your end, but the results will show a clear difference.
you can use ibis paint, some phones already have this feature in their default photo editor
DPI is irrelevant when posting to the web so the problem must be something else.
Is there any free options for the aspect ratio and pixel settings? Thanks.
I have been struggling with this for the longest time. I only resize the ratio (4000×5000) then put 300dpi on resolution and I almost always end up with compromised images. Thanks so much.