
Tap on your Actions tool (wrench icon) and select Canvas. Switch your Drawing Guide on and select Edit Drawing Guide. On the bottom right of your canvas, tap on Symmetry. You can now adjust your options and use the Symmetry tool.
I’m Carolyn and I’ve been using Procreate to run my digital illustration business for over three years. This means I am constantly exploring and studying new techniques that can provide me with a fresh perspective and also potentially save me some time in the long run.
The symmetry tools in Procreate are just the tip of the iceberg when it comes to creating unique designs, patterns, and perspectives quickly. You could spend hours experimenting with these tools and never run out of options. Today, I’m going to show you how.
Note: Screenshots are taken from Procreate on iPadOS 15.5.
Table of Contents
Key Takeaways
- This tool is used for creating patterns, mandalas, and perspectives.
- You have four choices for splitting your canvas.
- The symmetry tool will not remain active on all layers and must be activated on each individual layer.
- Activated the Rotational Symmetry and Assisted Drawing features if you wish to create a repeated pattern.
How to Use Symmetry Tools in Procreate (3 Steps)
This tool is an awesome way to create multiple copies of the same design all at the same time. It’s widely used when creating patterns and mandalas on the Procreate app. Below I have outlined how to access this tool in your canvas. Here’s how:
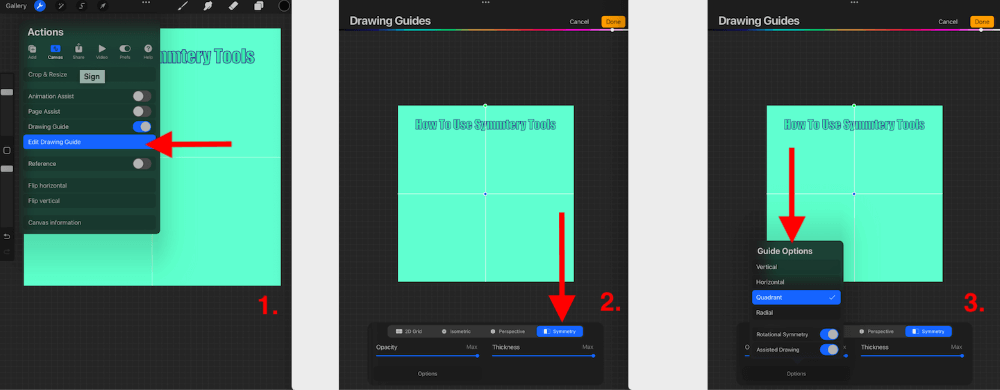
Step 1: On your canvas, tap on the Actions tool (wrench icon) in the top left corner beside where it says Gallery. Select the Canvas menu and ensure your Drawing Guide toggle is switched on. Now tap on Edit Drawing Guide.
Step 2: This will open up your drawing guide and allow you to make a selection of the type of guide you want to use. In the bottom right corner, select Symmetry.
Step 3: You will now be able to adjust the opacity, thickness, and color of your grid. You will also now choose which of the four guide options you need; Vertical, Horizontal, Quadrant, or Radial.
Guide Options
You have four guide options to choose from. Below I have briefly outlined how each one works and attached an example. I activated the Rotational Symmetry and Assisted Drawing functions for all four examples.
Vertical
This option will split your canvas down the middle and allows you to create a mirrored effect on either side of your canvas. You can adjust where the grid is positioned by dragging the green toggles on the edge of your canvas to your desired location.

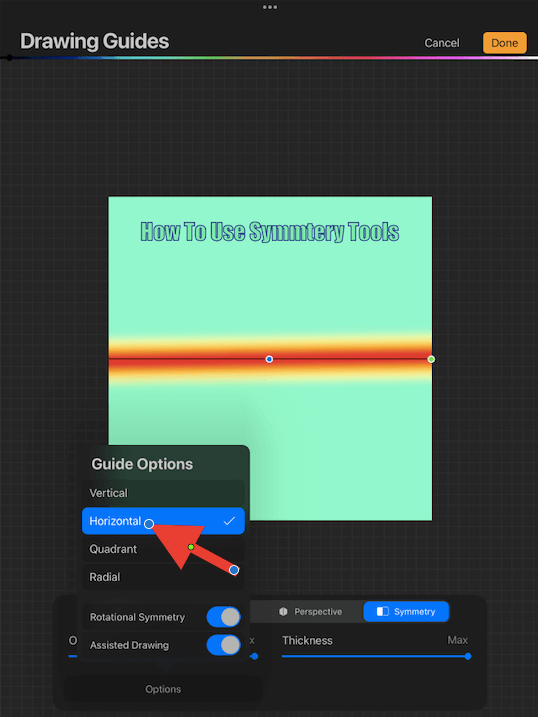
Horizontal
This option will split your canvas from left to right and is great for creating perspective artwork like a sunset or sunrise. You can adjust where the grid is positioned by dragging the green toggles on the edge of your canvas to your desired location.
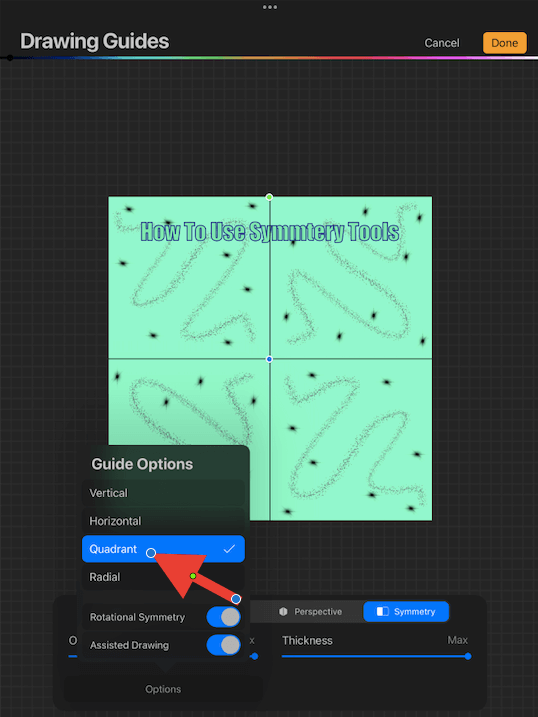
Quadrant
This option will split your canvas into four and allow you to draw on one section and create four replicas of whatever you draw. You can adjust where the grid is positioned by dragging the green toggles on the edge of your canvas to your desired location.
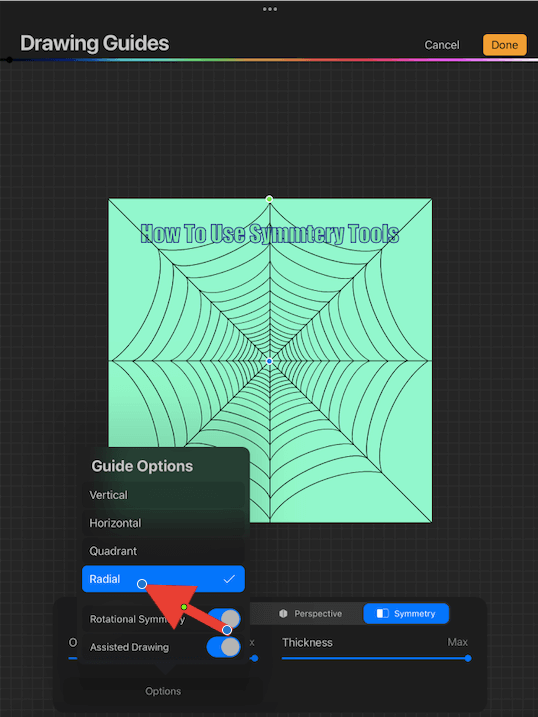
Radial
This option will split your canvas into eight diagonal sections. This is awesome for creating mandalas, trippy patterns, or a spider web. You can adjust where the grid is positioned by dragging the green toggles on the edge of your canvas to your desired location.
Rotational Symmetry
When activated, this toggle will ensure that whatever you draw will be reflected in a clockwise direction rather than a direct mirrored image. Whether or not you use it is all dependent on what you are trying to create.
Assisted Drawing
When activated, this toggle will repeat whatever you draw in all of the other portions of your grid. If you deactivate it, when you draw in one section of your grid, it will not be repeated or mirrored.
Things To Note
There are quite a few little aspects of this tool that can make a huge difference to your artwork. Below I have explained what they are so you can be aware of them next time you use this tool:
- The Drawing Guide that you choose will only be active on the layer that you activated it on. You must reactivate this tool on each individual layer that you wish to use it on. You cannot activate a drawing guide for your entire canvas,
- Remember to switch the Drawing Guide toggle to off when you are finished using the symmetry tool or if you want to see what your artwork looks like without the grid.
- Your eraser tool works the same as your brush with the symmetry tools. That means if you erase something on one portion of your grid, it will also erase from all remaining portions.
- You can also use the QuickShape tool while you are using your symmetry tool. This is a great way to create symmetrical shapes and patterns quickly.
- You can change the color of your grid by adjusting the toggle at the top of your Edit Drawing Guide menu. You need to know this so that you can ensure your grid is visible on the artwork of all colors and brightness.
FAQs
Below I have briefly answered some of your frequently asked questions about this topic. If I missed any, please feel free to add your new question in the comments section below.
How to turn off Symmetry Tool in Procreate?
Once you have tapped ‘Done’ on your Drawing Guide menu, you can also switch the Drawing Guide toggle to off to ensure the symmetry tool is off.
How to use Symmetry Tool in Procreate Pocket?
You can access all of the symmetry tools listed above by opening the Guides menu on your Procreate Pocket app.
Can I change the number of Procreate Radial Symmetry?
At this time, you cannot change the number of sections on the radial symmetry tool. This is a very common question so hopefully, the Procreate gods will answer our prayers someday soon.
What to do when Procreate Symmetry tool is not working?
This is not a common bug on Procreate so I recommend closing the app and turning your device off and on again. If this doesn’t work, perhaps check to see if your app or device is due for an update.
Conclusion
There really is no limit to the number of things you can create using the symmetry tool in Procreate. I spent quite a bit of time ignoring this feature while I mastered the basics. But once I dedicated some time to learning about this feature, my Procreate world opened.
Like all of the awesome features available on this app, I recommend spending some of your time getting to know it. It is guaranteed to expand your drawing repertoire and you will absolutely not regret it. This is essential if you are interested in creating patterns or mandalas.
Do you ever use the symmetry tool for creating patterns or mandalas? Leave your tips below in the comments section.