
Splitting a clip in DaVinci Resolve is a simple task. By learning how to split, you will learn one of the most important, and most often used tools in editing.
My name is Nathan Menser. I am a writer, filmmaker, and stage actor. When I am not on stage, on set, or writing, I am editing videos. Video editing has been a passion of mine for six years now, so the split tool is no stranger to me.
In this article, I am going to show you the super simple process of splitting a clip in DaVinci resolve so that you can get to the movie magic!
Method 1: Using the Razor Tool
Above the DaVinci Resolve timeline, there is a list of icons that resemble tools. The first is the selection tool. The second is the trim/ edit tool. The third is the dynamic trim tool. The fourth icon looks like a razor blade, and it is called the razor tool.
The razor tool is the tool that is used to split clips in DaVinci Resolve.
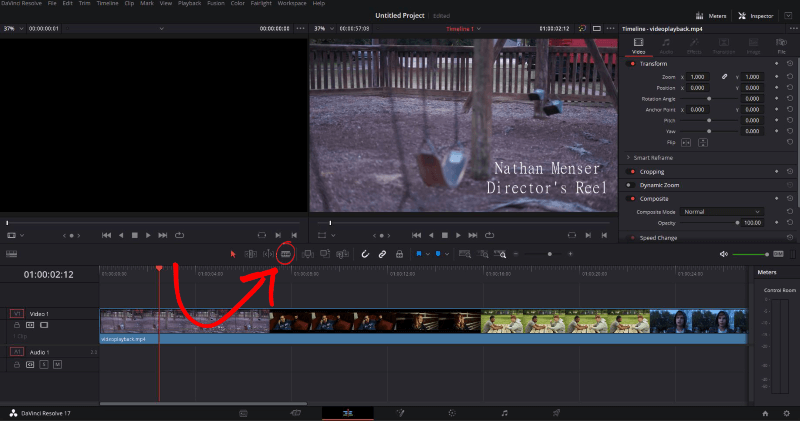
Step 1: Select the razor tool from the toolbar above the timeline.
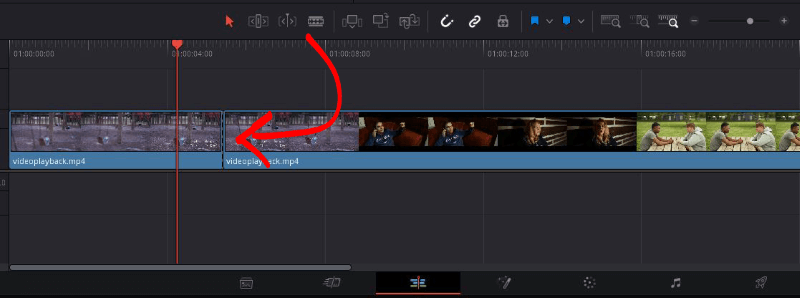
Step 2: Left Click on the part of the clip that you want to split.
Congratulations! You have successfully split a clip. Now everywhere you click on the timeline, it will add a split on the clip you clicked on. The razor tool will stay selected and continue to split clips every time you click on the timeline until you select the selection tool again.
To add precision to your split, make sure the magnet icon has been selected, then choose the cursor tool, drag the timeline cursor over the desired part where you want to make a split and then switch back to the razor tool, and make the split on the timeline cursor.
Method 2: The Keyboard Shortcut
This method is my preferred method of splitting a clip. It is quick and simple. Most of the industry uses this method, so it is worth taking the extra time to memorize and utilize the keyboard shortcut. The more shortcuts you know, the faster a video editor you will be.
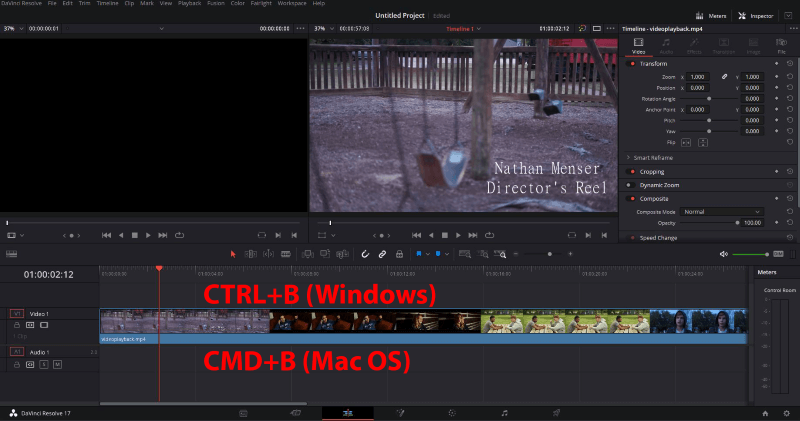
Step 1: Hover over the part of the clip that you want to split with the timeline cursor.
Step 2: Once you are hovering over the desired place of the split, use the following keyboard shortcut to execute the split:
- Ctrl + B ( Windows)
- Command + B (macOS)
Final Thoughts
Be sure that if you are using the razor tool, once you are done doing your split, switch back to the cursor tool, to avoid any unwanted splits in your clips. If you make a mistake such as an unwanted split, all you have to do is press ol’ reliable Ctrl + Z (Windows) or Command + Z (macOS).
That’s it! You have learned one of the easiest and most necessary video editing techniques in one simple lesson. You can now drag your clips around as you desire; replacing, moving, fading, and so on.
I hope this has helped you in your video editing journey on Resolve. Please leave a comment, letting me know what else you would like to read, and also any feedback is always welcome and appreciated.
Great article! It is so clear and simple to understand by newbies like me. Thank you so much! I wonder how can i add texts and some sound effect to clibs in DaVinci Resolve? Could you write an an article about it?
Hi Mustafa! Thank you for the encouraging words. I have actually already written articles for these respective topics. Here is a link to each.
https://www.softwarehow.com/add-text-davinci-resolve/
https://www.softwarehow.com/add-music-davinci-resolve/