
Sometimes a little explanation is needed for video edits to truly get their messages across. And on-screen text is used for commercial work, documentaries, and educational programming. This ensures that the viewers have everything they need to fully engage with the video.
Fortunately, adding text using the Text Tool in DaVinci Resolve is very simple and easy to do.
My name is Nathan Menser. I am a writer, filmmaker, and stage actor. When I am not on stage, on set, or writing, I am editing videos. Video editing has been a passion of mine for six years now, so I have used the text tool thousands of times.
In this article, I will show you a couple of different methods to add text to your video in DaVinci Resolve.
Table of Contents
Method 1: Adding Titles from the Edit Page
This method is a great way to get pre-formatted, and pre-animated text.
Step 1: Open up the program. Once it has booted up, you will see a few symbols in the middle at the bottom of the screen. Hover over each icon and select the Edit option. This will open the Edit page.
Step 2: From the Edit page, choose Effects. Click the Toolbox drop-down menu. This will pop up several options such as “Video Transitions” and “Generators.” Pick Titles. Your screen should look like this:
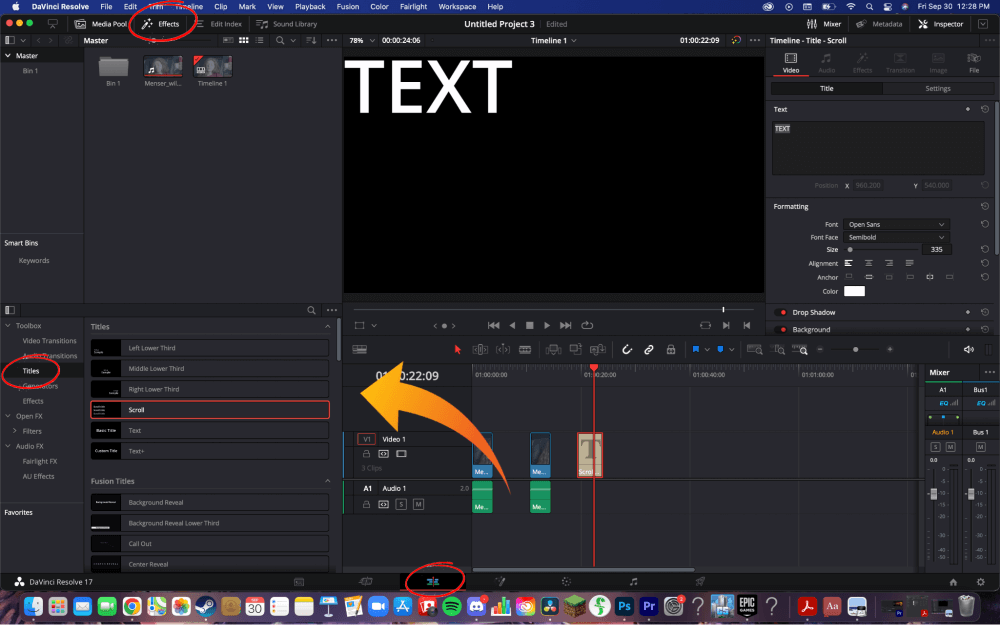
Step 3: Once you’ve navigated to the “Titles” menu, a few options will appear to the right. You can select different locations such as “Left Lower Third,” or you can just select “Text, and position it as needed on the video screen.
You can also change the duration of the text using the timeline. By extending the text or shrinking it, you can alter which frames the text box will appear.
Step 4: Once you have the text positioned correctly, there is a way to alter the color, font, and size to match the aesthetic you’re looking for. In the top right corner, click “Inspector.” This will open a large menu on the right side of the screen to alter the text any way you need.
Method 2: Adding Text from the Cut Page
To access the cut page, hover over the symbols at the bottom of the screen and click on the option titled Cut.
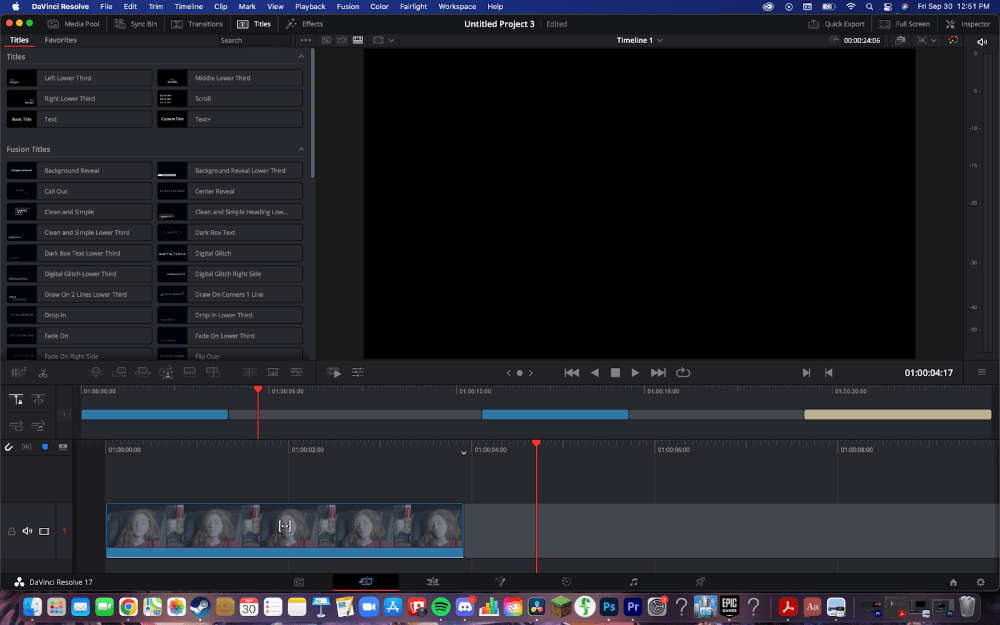
At the top of the screen on the left-hand side, there will be a menu bar. Pick Titles. This will navigate you to a large selection of text options.
To add basic text, select Text. “Text+” is an option, but requires more skill and warrants another, separate tutorial. Drag the Text box down to the timeline.
Since the text box appears as a separate element on the timeline, you can make it longer and shorter by dragging the end of the box left and right. The longer the box, the more time it will appear in your finished project. You can also select the entire box and pull it left and right to position it on the timeline.
To position the text correctly on the video, simply drag the box to wherever needed. You can also alter the size by dragging the corner of the text box up and down.
To alter the actual text, go to the top right corner of the screen and open the “Inspector” tool. This will open a menu on the right side of the screen where you can change font size, color, letter spacing, and more.
Conclusion
Adding text to your video is a simple way to deliver or enhance your message, and it can be accomplished in only seconds in DaVinci Resolve.
Remember that when you are adding texts, you should be aware of the fonts and colors. Depending on the “title” you chose, these can vary.
Thanks for taking the time to read the article; hopefully this helped you along on your video editing journey. Leave a comment letting me know what filmmaking, acting, or editing topic you would like to hear about next, and as always critical feedback is very much appreciated.