
Scrivener
Summary
Writing well is difficult and time-consuming, requiring you to balance planning, research, writing, editing, and publishing. Scrivener offers features to assist with each of these and offers more power than its competitors. If you’re working on a large project or are serious about your writing, the additional learning curve required to master that power will be justified. The fact that it’s available on Mac, Windows, and iOS makes it available to most people.
Is Scrivener worth it? After using Ulysses for many years, I wrote this entire review using Scrivener. Overall, I enjoyed the experience and found the app easy to pick up, but I’m aware that there are a lot of features under the hood that I haven’t even discovered yet. If that appeals to you, I encourage you to try Scrivener—it may suit you. I recommend it, especially if long writing projects are your thing.
What I Like: Structure your document via outline or corkboard. Many ways to track your progress. Powerful research features. A flexible app that can be used in many ways.
What I Don’t Like: I encountered a minor bug while using the app.
What does Scrivener do?
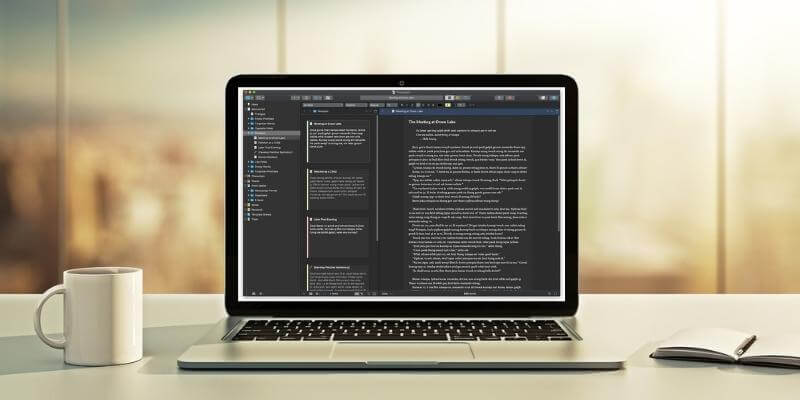
It is a software tool for writers of all kinds. It allows you to see an overview of your work and offers helpful tools as you type each word. It also allows you to structure and restructure your document and keep additional research material on hand. In short, it’s a highly respected app used and recommended by serious writers.
Is Scrivener free?
Scrivener is not a free app but does come with a generous trial period. You are able to use all features of the app for 30 days of actual use, not just 30 calendar days from the date you install it.
That allows plenty of time to get the know the app and evaluate it for your writing requirements and workflows.
How much does Scrivener cost?
Both the Windows and Mac version costs $49 (a little cheaper if you’re a student or academic), and the iOS version is $19.99. If you’re planning to run Scrivener on both Mac and Windows you need to purchase both, but get a $15 cross-grading discount.
Where to find good Scrivener tutorials?
Helpfully, the Scrivener website offers quite a number of video tutorials (also available on YouTube), covering a range of topics from basic to advanced. These are highly recommended.
Major online training providers (including Lynda and Udemy) provide full courses on how to use the software to the max. You can preview the courses for free, but you’ll have to pay to complete them. Quite a number of other third-party providers also offer tutorials and training on the app’s features.
Table of Contents
Why Trust Me for This Scrivener Review
My name is Adrian, and I make my living writing. I rely heavily on writing software and tools and make sure I’m familiar with the best options. My favorites have changed over the years, and currently, my regular toolkit includes Ulysses, OmniOutliner, Google Docs, and Bear Writer.
Although I don’t normally use Scrivener, I have huge respect for the app, keep up to date with its development, and try it out from time to time. I evaluated it again in 2018 as I wrote about The Best Writing Apps for Mac, and downloaded and used the trial version to write this article. While writing, I tried to use just about every feature the app offers, and I’m impressed.
I found Scrivener easy to use and appreciated the many tools and features it offers writers. I know I’ve only scratched the surface, and with further usage would continue making interesting discoveries that would improve my writing workflow. If you’re a writer, this might be the app for you—especially if you write long-form—and we’ll include a list of alternatives in case you don’t find it a good fit.
Detailed Review of Scrivener
Scrivener is all about writing productively, and I’ll list its features in the following five sections. In each subsection, I’ll explore what the app offers and then share my personal take.
1. Type and Format Your Document
As a writing tool, you might expect Scrivener to provide a number of word processing features, and you’d be right. The app does allow you to type, edit and format words in ways you’re familiar with.
The toolbar above Scrivener’s Edit pane allows you to choose the font family, typeface and font size of your text, as well as make it bold, italic or underlined, and align it to the left, right, center or justify it. Font and highlight colors are selectable, line spacing options are available, and a range of bullet and numbering styles are offered. If you’re comfortable with Word there will be no surprises here.
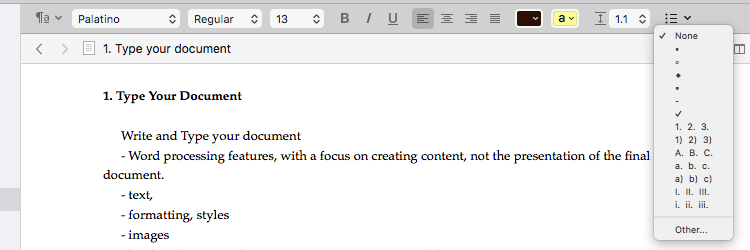
Images can be added to your document through drag and drop or from the Insert menu or paperclip icon. Images can be scaled, but not cropped or otherwise edited, once in your document.
But rather than using fonts to format your text, the best practice is to use styles. By doing so you’re defining the role the text plays (title, heading, blockquote), rather than the way you want it to look. That’s much more flexible when it comes to publishing or exporting your document, and also assists in clarifying the document structure.

The Scrivener team has obviously thought a lot about what writers will find useful, and I keep finding new treasures the longer I use the app. Here’s an example. When you select some text, the number of words selected is displayed at the bottom of the screen. That’s handy!
My personal take: Just about everyone is familiar with typing, editing, and formatting in a word processor like Microsoft Word. You can make full use of that familiarity when starting to use Scrivener. That’s not true of all writing apps. For example, Ulysses formats your text using Markdown syntax, which may be harder for some users to get their head around initially.
2. Structure Your Document
While Scrivener resembles a word processor in some ways, that’s just the tip of the iceberg. It offers many features that word processors don’t, especially when it comes to structuring your document, and flexibly rearranging that structure. That’s particularly helpful with long documents.
Rather than displaying your document as one large scroll, Scrivener lets you break it up into smaller pieces, and arrange them hierarchically. Your project will be made up of documents and subdocuments, and maybe even folders. That allows you to see the big picture more easily, and rearrange the pieces as you like. Scrivener offers two different ways to visualize all of this: outlines and the corkboard.
I’ve always loved structuring information in an outline, and the effective use of outlines is one of Scrivener’s greatest appeals to me. Firstly, a tree view of your project is displayed on the left of the Editor pane. Scrivener calls this the Binder.
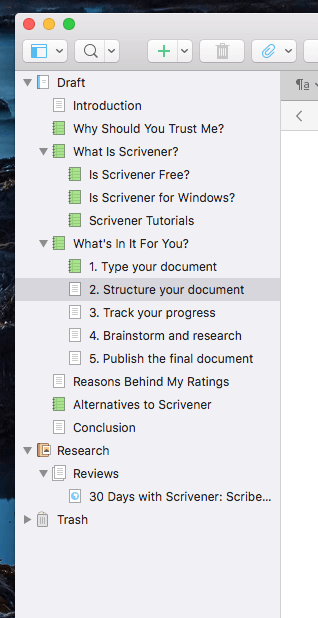
This works exactly as you’d expect if you’ve spent any time managing files or emails. You can view or edit any document by clicking on it, and rearrange the outline by drag-and-drop. Note that the outline contains only sections of the current project you are working on. Ulysses, by comparison, displays an outline of every project in your library. The best approach is a matter of personal preference.
By clicking on the blue Outline icon on the toolbar, you can also display an outline of your project in the Editor pane on the right. This will show you a more detailed outline of the current document along with any subdocuments. To display the entire outline, you’ll need to select the topmost outline item, called “Draft” in my project.
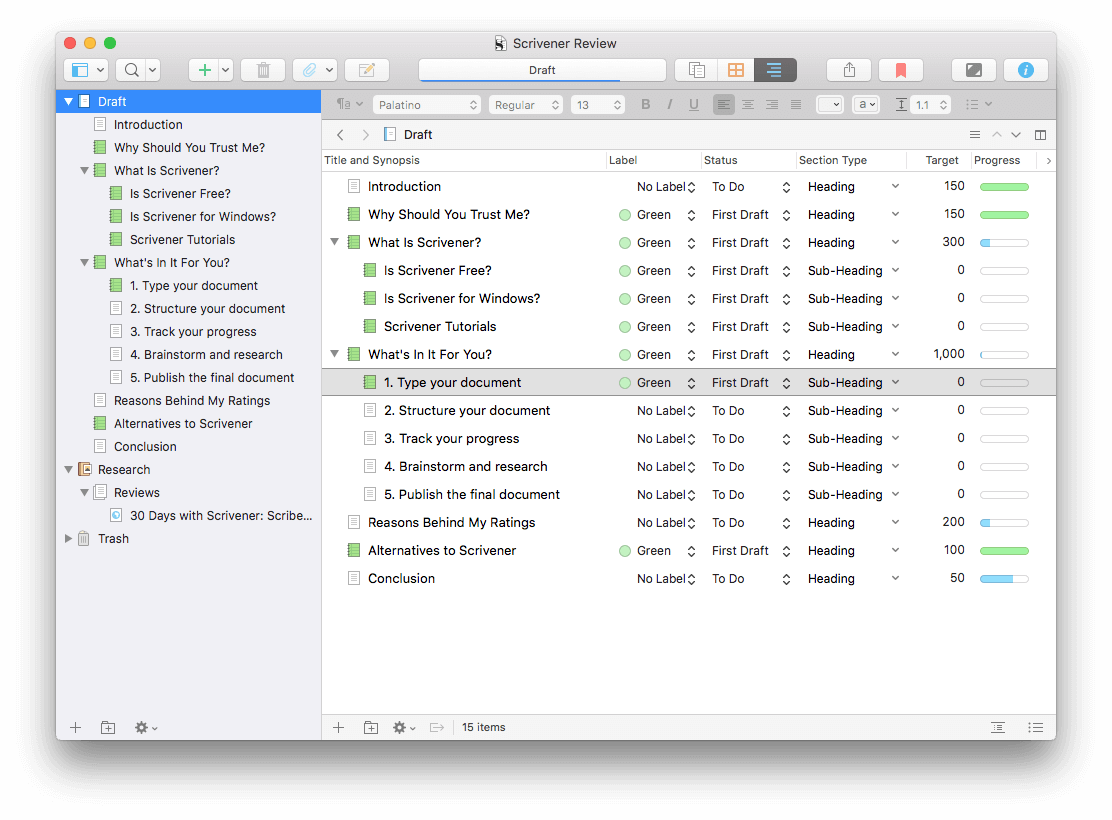
You’ll notice that the outline view gives several additional columns of information. You can customize the columns that are displayed.
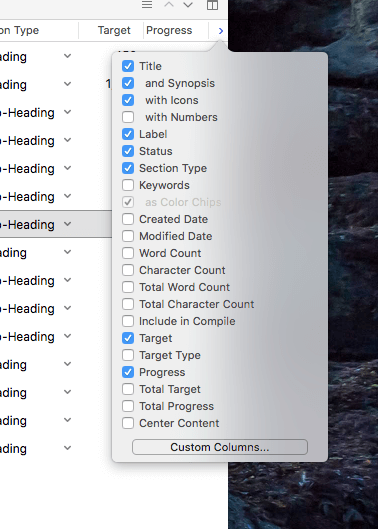
Another way to get an overview of your document is Scrivener’s Corkboard, which can be accessed by the orange icon on the toolbar. This displays each section of your document as an index card.
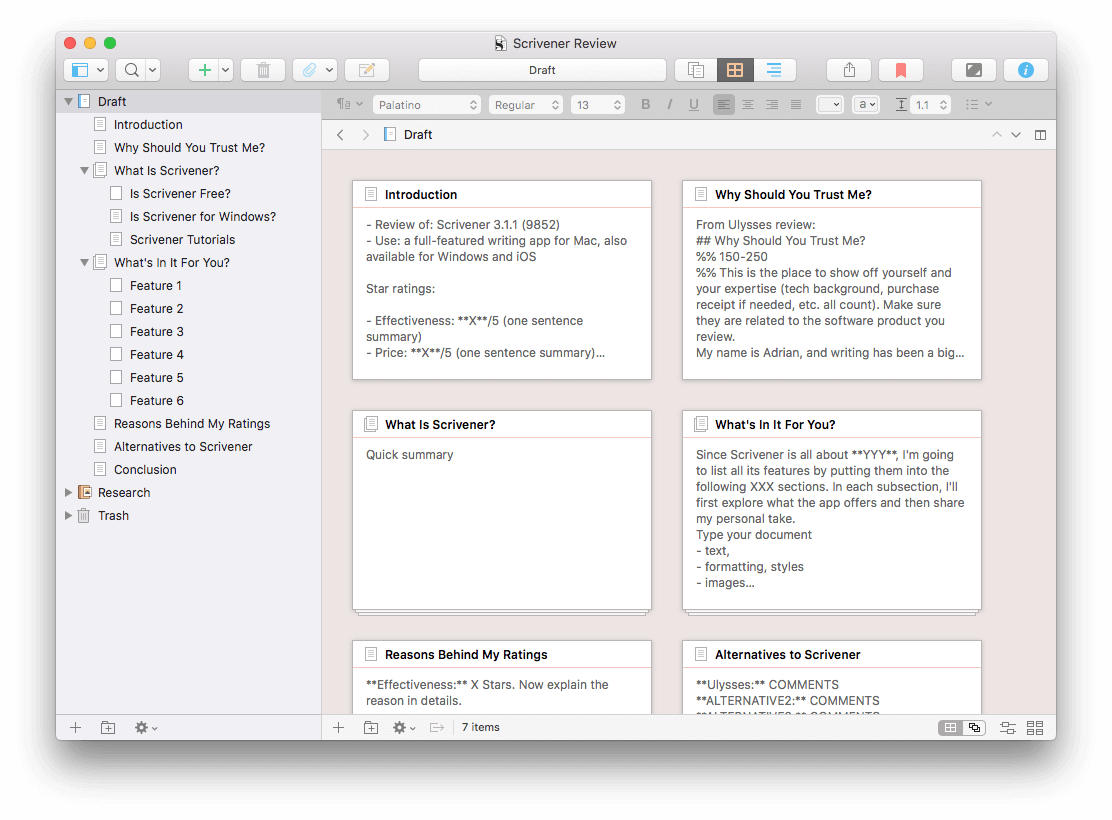
Rearranging these cards will rearrange the attached text in your document. You can give each card a short synopsis to summarise the content you intend to write in that section. Like the Outline view, the Corkboard will display cards for any subdocuments of the chapter you have highlighted in the binder.
My personal take: To make the best use of Scrivener, don’t be tempted to type everything into a single document. Splitting up a large writing project into smaller pieces will assist your productivity, give you a better sense of progress, and the Outline and Corkboard features will allow you to rearrange your project quickly.
3. Track Your Progress
When writing a long document, it can be helpful and motivating to keep track of your progress. Knowing at a glance which parts of a document have been finished gives you a sense of progress, and makes sure that nothing slips through the cracks. As I’ve been writing this review, I’ve experimented with a number of ways of achieving this.
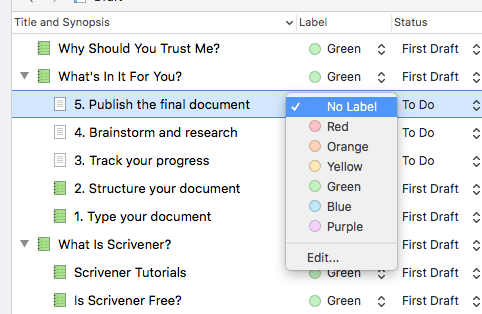
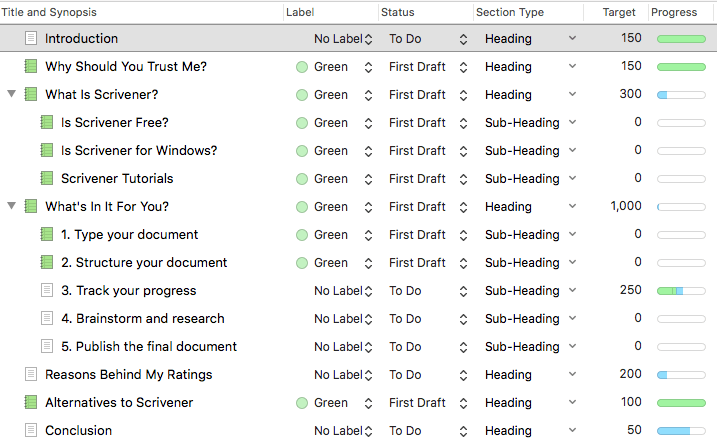
The first feature I tried is the Label. You can add a different label to each section of your document. By default, Scrivener uses colors, but what you call them is completely customizable. I decided to add a green label to any section I’ve completed. I then added a column to display that label in the document’s outline.
A second feature for tracking your progress is Status. The status of any section of a document can be set as to do, in progress, first draft, revised draft, final draft or done—or left with no status.
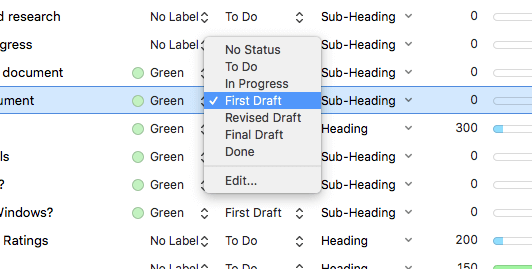
Initially, I marked each section as “to do”, and added an outline column to display the status. As I work through each section, I’ll update the status to “First Draft”, and by the time I’m ready to publish the project, everything will be marked “Done”.
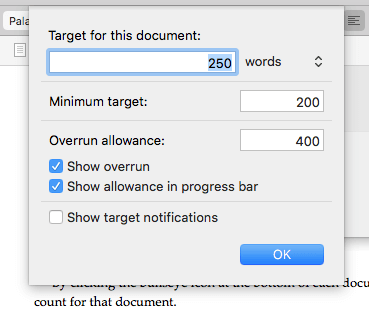
Another way to track progress are goals, or Targets. Most of my writing projects have a word count requirement. Scrivener’s Targets allow you to set a word goal and deadline for your project, and individual word goals for each document.
You can set a word target for the entire project…
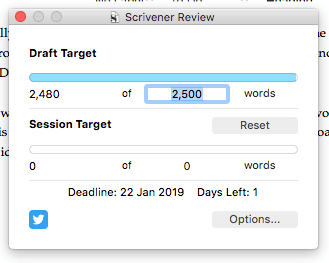
And by clicking the Options button, set a deadline too.

By clicking the bullseye icon at the bottom of each document, you can set a word or character count for that document.
Targets can be displayed in the document outline along with a graph of your progress, so you can see how you’re going at a glance.
Unfortunately, when I add a word target for the main heading, words typed in the subheadings don’t count. I notice that this feature was requested in 2008, but doesn’t seem to have been implemented yet. I think it would be a useful addition.
I enjoyed using these features to track my progress, though using all of them seemed like overkill. I might feel differently when working on a multi-month (or multi-year) project where tracking progress is even more crucial. But coming from Ulysses, what I really wanted was to get a sense of progress just by glancing at the outline in the Binder. To achieve that, I started changing icons, and that’s my favorite method so far.
Scrivener provides a wide range of icons, but the ones I made use of were different colors of the default sheet of paper. As I writing this review, I’ve turned the icon green for each section I’ve completed.

It’s a simple approach with a useful visual. I can easily extend my system to include additional colors for the first draft, final draft, etc. In fact, what I’d really like to do is associate each document status with a different color icon, so when I change the status to Final Draft, the icon automatically turns green, but unfortunately, that doesn’t seem possible. What some people do is open an extra pane so that they can view the Binder, Outline, and Editor all at the same time, and keep an eye on the statuses and labels that way.
My personal take: Tracking progress is motivating, stops things slipping through the cracks, and keeps me on top of my deadlines. Scrivener offers a number of ways to achieve this. Using all of them is probably overkill, but there’s enough choice to find something that’s effective for your workflow.
4. Brainstorming and Research
The biggest thing that sets Scrivener apart from other writing apps is the way it lets you work with reference material that’s separate (but related to) the words you are writing. Keeping track of your ideas and research effectively is incredibly important, especially for long and complex documents. Scrivener offers the best-in-class tools.
I’ve already noted that you can add a synopsis to each document. This can be seen in the Outline and Corkboard views, and also in the inspector, so you can refer to it as you type. And underneath the synopsis, there’s a space to type additional notes.
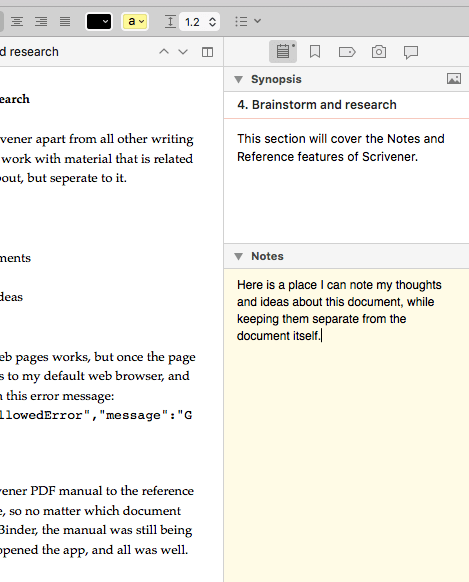
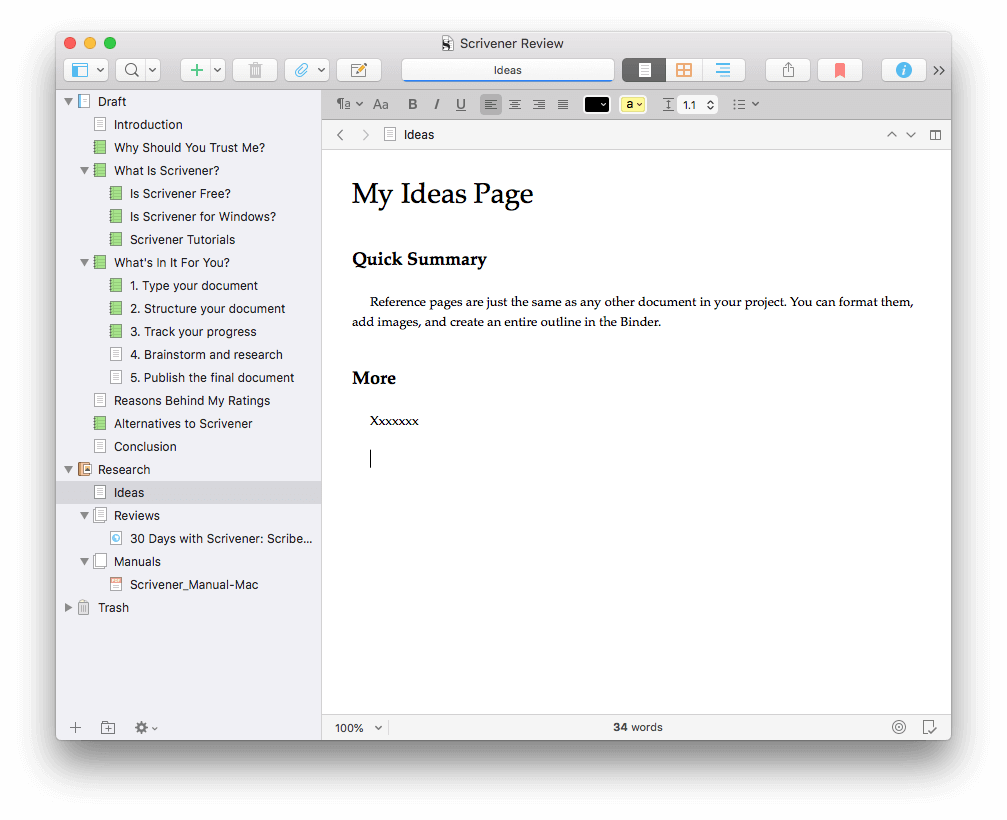
While that’s helpful, these features barely scratch the surface. The real power of Scrivener is that it gives you a dedicated area for your research in the Binder. You can create your own outline of thoughts and ideas, web pages, PDFs and other documents, and images and photos.
For a short piece like this article, I’m just as likely to keep the reference information open in my browser. But for a long article, thesis, novel, or screenplay, there’s often a lot of material to keep track of, and the project is likely to be long-term, meaning that material will need a more permanent home.
The reference area can contain Scrivener documents, which offer all of the features you have when typing your actual project, including formatting.
But you can also attach reference information in the form of web pages, documents, and images. Here I attached another Scrivener review for reference.
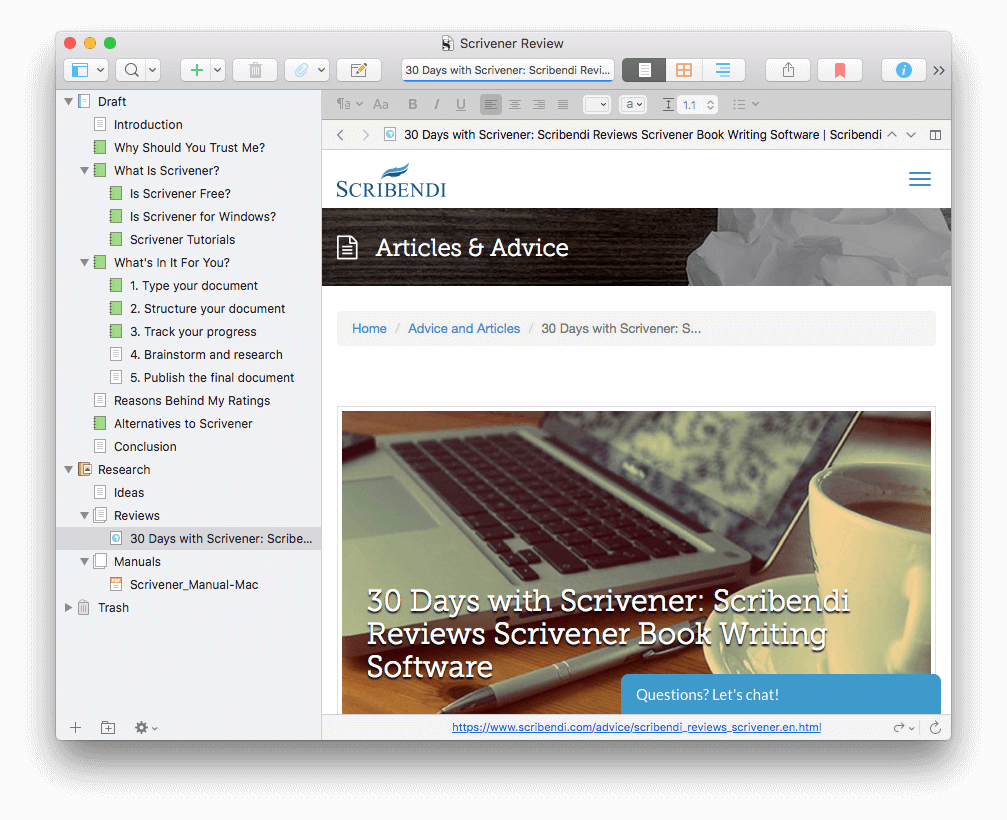
Unfortunately when I click on that page, I’m redirected to my web browser where the following error message is displayed:
{“code”:”MethodNotAllowedError”,”message”:”GET is not allowed”}
Not a serious error—I just come back to Scrivener and read the review. It didn’t happen with any other webpage I added, so I’m not sure why it’s happening with this one. I passed the problem on to Scrivener support.
Another useful reference resource is the Scrivener user manual, which I attached as a PDF. Unfortunately, I encountered another problem. After adding the document, the Editor pane froze, so no matter which document section I clicked on in the Binder, the manual was still being displayed. I closed and reopened the app, and all was well. I tried to reproduce the error, but the second time, adding the PDF worked perfectly.
I don’t get the feeling that these errors are common, so it’s strange that I had trouble with the first two items I added to the research area. And fortunately, it only happened with those first two. Other documents and web pages I added were problem-free.
My personal take: Some projects require a lot of brainstorming. Others require you to gather and wade through a lot of reference material. Rather than keeping dozens of browser tabs open, Scrivener gives you a long-term place to store it all. Storing that material in the same file as your writing project is very convenient.
5. Publish the Final Document
During the writing stage of your project, you don’t want to obsess about how the final version will look. But when you’re finished, Scrivener offers some very powerful and flexible publishing options. Because they’re powerful, they do come with a learning curve, so for best results, reading the manual is recommended.
Like most writing apps, Scrivener allows you to export the document sections you select as a file in a variety of formats.
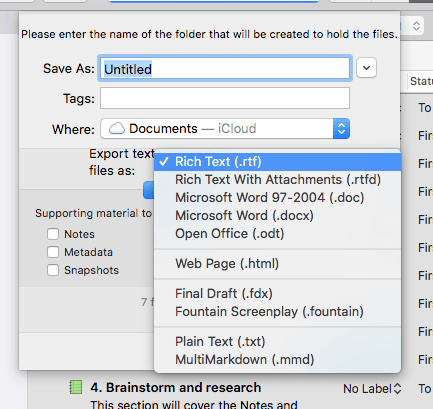
But Scrivener’s real publishing power lies in its Compile feature. This allows you to publish your document to paper or digitally in a number of popular document and ebook formats.
Quite a number of attractive, predefined formats (or templates) are available, or you can create your own. When I finish this review, I’ll export it to a Microsoft Word document I can upload to Google Docs for final submission, proofreading, and editing.
My personal take: Scrivener takes care of you throughout the entire writing process, including publishing your work. The features it offers are powerful and flexible, allowing you to quickly export your work into quite a number of useful formats, both for print and digital distribution.
Reasons Behind My Ratings
Effectiveness: 5/5
Scrivener is one of the most powerful and popular writing apps out there, especially for long-form writing projects. Available for Mac, Windows, and iOS, this app lets you write wherever and whenever you get the opportunity.
Price: 4.5/5
While Scrivener is not cheap, it does offer good value for money, as you’ll notice when you come to the Alternatives section of the review. At a one-off purchase of $49, it is only marginally more expensive than a single year’s subscription of Ulysses, its closest rival.
Ease of Use: 4/5
Scrivener may require more effort to master than its competitors. It’s not that it’s hard to learn, but there’s a lot to learn—it’s a professional tool offering a wider range of features than its competitors. Fortunately, you don’t have to know everything before you begin, so it’s a program you can grow into.
Support: 5/5
Scrivener seems to be a labor of love by a small team of developers who are serious about supporting their product. The website’s Learn and Support page includes video tutorials, a user manual, and user forums. The page also covers common questions, links to books about the app, and links that allow you to submit a bug report or ask a question.
Conclusion
Scrivener is not a word processor. It’s a tool for writers and is focused on supporting the task of writing long-form pieces by providing a number of unique features. It functions like a typewriter, ring-binder, and scrapbook—all at the same time. This depth can make the app a little difficult to learn.
Scrivener is the go-to app for writers of all kinds, used every day by best-selling novelists, screenwriters, non-fiction writers, students, academics, lawyers, journalists, translators, and more. Scrivener won’t tell you how to write—it simply provides everything you need to start writing and keep writing.
So, although the app allows you to choose fonts, justify text, and vary line spacing, that’s not where you’ll spend most of your time. When you’re writing, it can be actually unproductive to focus on the final appearance of the document. Instead, you’ll be brainstorming, working on the structure of your document, gathering reference information, and typing words. Then when you’re finished, Scrivener can flexibly compile your work to a wide number of publishable or printable formats.
Scrivener is available for Mac, Windows, and iOS, and will sync your work onto each device you own. This piece of software is loved by many serious writers. It might be the right tool for you, too.
I think some people are more planners and work out the structure in advance, in terms of scenes, characters, places, plot arcs and so on, before they start writing. Whereas others tend to go with the flow more and make things up as they go along. Scrivener, then, better suits those who lean towards the former approach. I also suspect that people are so used to the one file approach of word processors that adapting to any other way of working seems unnatural.
Scrivener is at heart an outliner that allows you to collapse very long documents and look at them from a higher level perspective and that can be a good way of managing story worlds that are hard to hold in your head all at once. Personally, I don’t find Scrivener hard to use; maybe as with many tools it is a question of getting to understand the workflow it is designed to facilitate. And whether you wish to work in that way is a personal decision, of course.
The main issue is that you can buy Windows and Mac versions, but Scrivener does not function well as a cross-platform app. It would make a huge difference to me if there were able to present it as a cross-platform app at one price (https://scrivener.tenderapp.com/help/kb/features-and-usage/cross-platform-compatibility).
Have you tried Manuskript?
Also, are there any good cross platform apps for journaling? I like the cork board view a lot, as well as the index tree on the left, but don’t need all the extras intended for book or novel writing.
Thanks for a helpful overview of the product, succinct and comprehensive.
I’m a journalist and I love Scrivener because I can organize all my resources (documents, photos, website links, ideas, etc.) for handy reference in the left-hand column. It makes it a lot easier to organize my thoughts and fact check. If there’s a problem with something in the story, I can easily solve it without having to search all over my computer. But there isn’t any single do-it-all tool for any journalist or writer and I might have two or three different tools in use at the same time. I sometimes use Writer’s Block (very pricey though), for example, because I can see and organize large numbers of related facts across one large computer screen while writing with Scrivener on another. I often need to open LibreOffice as well (can’t stand Microsoft’s clunky Word), simultaneously. You have to find the write combination for your needs and preferences.
Can I import extract of newspaper articles and photographs easily into my book for both Scriniver or Ulyssess?
Thank you for your thoughtful and comprehensive review – very helpful.
I need help. I have 32 bit Scrivener that I have not used in 2 years. If I get Literature and download it, will I be able to see the book I began on the 32 bit.
Hi Clare. I recommend you contact Literature and Latte with your question.
I can’t stand Scrivener. It’s a clunky mess with so many bells and whistles that I’ve never needed. Most editors hate it as well in my experience and consistently ask for .doc or .docx, and with good reason– you can’t track changes in Scrivener, making it a horrific pain to actually edit and revise in.
It’s garbage, frankly. I guess it’s cool if you spend more time making things look fancy than actually writing; I don’t.
Hi Sarah, isn’t it wonderful that we’re all different? I actually feel the same way about Microsoft Word! 😉 My favorite writing app is Ulysses. Once it’s time to track changes, you can export it to another app, even Word. 🙂
You can track changes using the Snapshots function, but it is not meant for collaborative writing; the app and the function assume you have made all changes. To use it, you save a snapshot, then go back and revise your document. In the snapshot window, you can load up a comparison that will show you all changes along with a revision history.
In my workflow with my editor, I send him an exported Word document, which he marks up (along with my tech editor). When he sends it back, I import it to Scrivener and review the marked up changes, then generate a ‘clean’ version with markup stripped out.
It is completely different than the review tools in Word, to be sure, but it is effective if you plan carefully.
Sarah, What program do you recommend ? I want to be able to track changes and ideally collaborate in real time (multiple people work at same time)
I really hate this software. I have been using it for a few years now, but I spend so much time dealing with the not intuitive software that I lose time writing. Issues that I have had include: disappearing writing, formating that works in one book but not another, compiling only to find little # all through my book. There is no tech support to speak of here and thier rationalization of this is that it is a small company. And yes, before you ask, I watched the tutorials. I have also read through the numerous questions and comments where users seem to have to figure things out themselves. Maybe this is a program designed for programmers. But is is highly frustrating if you are simply trying to write.
Sorry to hear that, Lexy. We’ve written a number of reviews on other writing apps, including a roundup of the best apps for Mac. Let us know if you find something that suits you better.
Perhaps you should realize that that’s user error (as in, your fault) rather than the fault of the program itself. Many, many people use Scrivener just fine and have none of the problems you have. Some people apparently can’t deal with something more complex than Notepad….
Or maybe they need something more refined and streamlined on both operating systems. A whole lot of tender love and care with updates to the MacOS app but Windows is still behind by several digits even with Version 3. The IOS app is no better. Relying on Dropbox and a sync button while continually dealing with an overwhelming software can put a kink in any writers flow. At least the successful ones.
The biggest problem with your review and your alternatives suggestions is that they are much too Mac specific. The current Windows version of Scrivener is at version 1.9 and is nowhere close to the Mac Version 3 in terms of features. Plus you can’t use Mac Scriv 3 files on Win Scriv 1.9
The publisher is promising a Windows-based Scrivener 3 version “Real Soon Now” for quite some time. I have no doubt it will happen eventually but it’s a small company and these things take time.
Your alternatives are also exclusively Mac oriented. Only iA Writer has a windows option that I know of. Two viable Windows only alternatives that I like are Quoll Writer and Atomic Scribbler. Both are free. Quoll Writer is an open source title. Atomic Scribbler is by the publisher/developer of Page Four and SmartEdit.
Atomic Scribbler has the option (at additional cost) of seamless integration with SmartEdit, but is otherwise fully functional. As far as I know, Atomic Scribbler is the ONLY writing/Authorship title that offers full integration with an after draft editing tool.
Thanks, Glen, that’s a fair criticism. I appreciate your feedback, and for your recommendations of Quoll Writer and Atomic Scribbler. We will update the review at some time in the future, and I’ll make sure your issues are addressed. Literature and Latte are a small team and it does seem to take them time to complete projects. Their iOS version seemed to take forever, and I understand they encountered quite a few roadblocks on the way. Hopefully, Scrivener 3 will arrive soon. It’s expected Q2 of 2019 and will be a free upgrade.