
Tap on your Actions tool (wrench icon) and open your Add menu. Select Add Text and type in your text. Open your Edit Text menu by tapping on the Aa icon. Under Attributes, select the Outline setting (O icon). When you are finished, tap on Done.
I’m Carolyn and I’ve been running my own digital illustration business for over three years. I use the Procreate app to create all of the work my clients need on a daily basis. A lot of these projects are branding and graphic design, so when it comes to lettering and text, I’m a pro.
Because Procreate comes with all amazing text and lettering features, it’s quite a popular app for graphic designers and digital artists because it’s a one-stop shop for all your design needs. Outlining text and lettering is one of those features. Today, I’ll show you how.
Table of Contents
Key Takeaways
- There are two different methods for outlining lettering and text in Procreate.
- You can adjust the color of your text either during the design process or afterward.
- There are outlining brush palettes available to purchase online from Procreate artists.
How to Outline Text in Procreate – Step by Step
The process to add an outline to your text needs to be done during the first stages of adding your text and choosing your front. Here’s how:
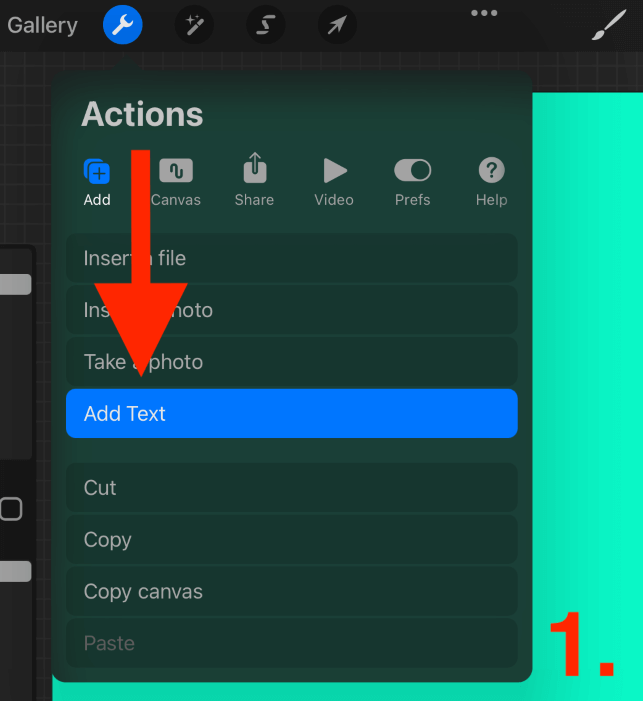
Step 1: Open your Actions tool by tapping on the wrench icon. Open the Add menu, scroll down and select Add Text.
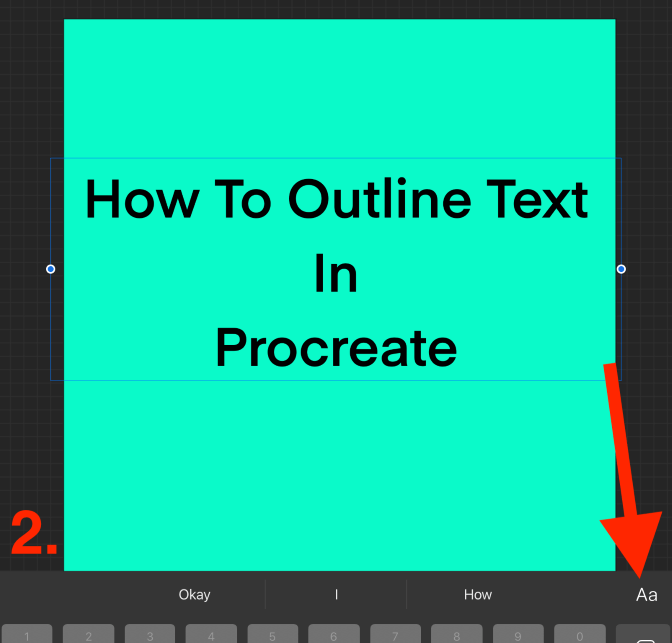
Step 2: Type your message and then open your Edit Text menu by tapping on the Aa icon.
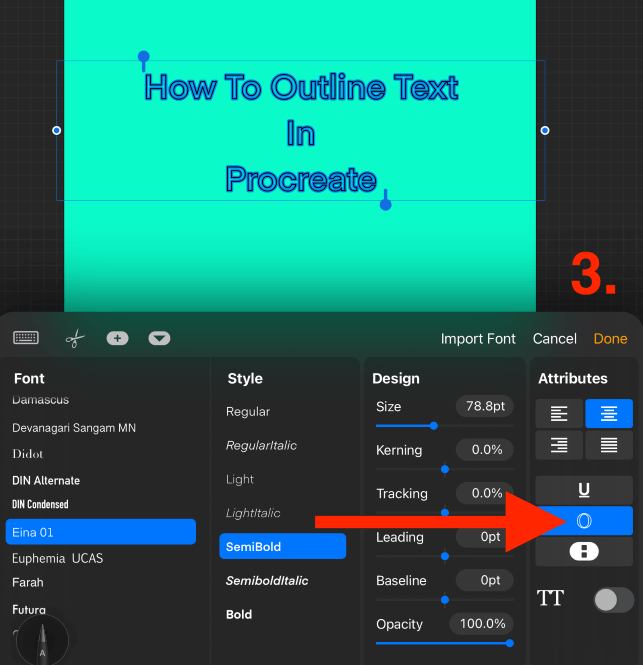
Step 3: Choose the desired font and size of your text. Under your Attributes menu in the bottom right-hand corner, tap on the O icon. This will add an outline to your highlighted text.
How to Edit Text Color in Procreate
You can also change the color of your outlined text during the adding text stage. It’s much easier to change the color of your text now rather than after your layer has been rasterized.
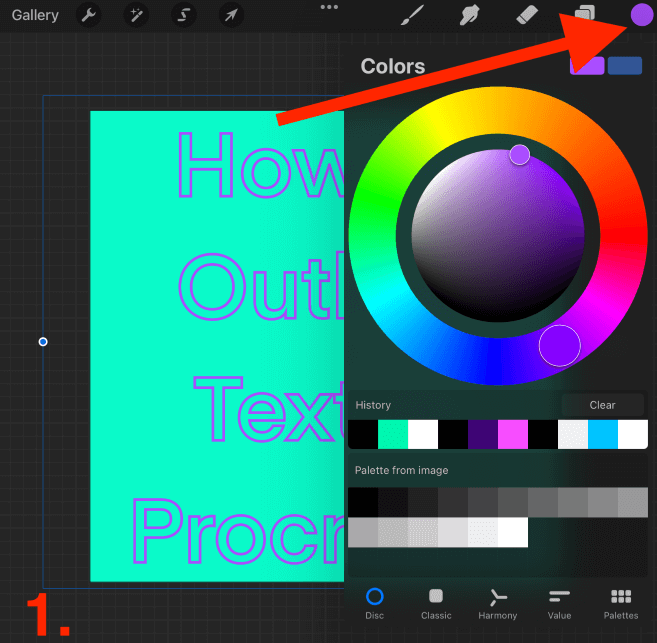
While your highlighted text is selected in the Edit Text menu, tap on the Color Disc in the top right-hand corner of your canvas. Choose the color you want on your Color Wheel and it will automatically update the color of your text.
Pro Tip: You can recolor each letter of your text individually by zooming in and carefully dragging and dropping colors from your Color Disc directly onto the text outline. This is the best option if you want all of the letters in your text colored differently.
How to Outline Hand Lettering in Procreate
The process to outline lettering is a bit more complex because you’re dealing with hand-created strokes rather than rigid text. Here’s how:
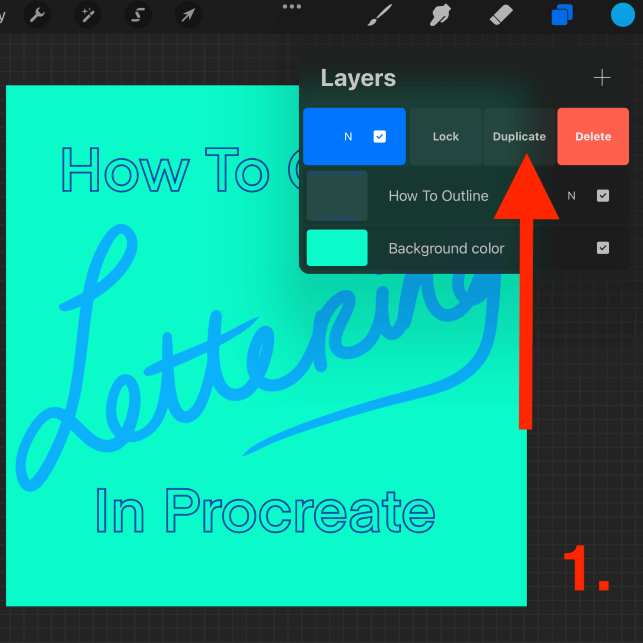
Step 1: Open your Layers menu and duplicate your lettering layer but swiping to the left and tapping the Duplicate option.
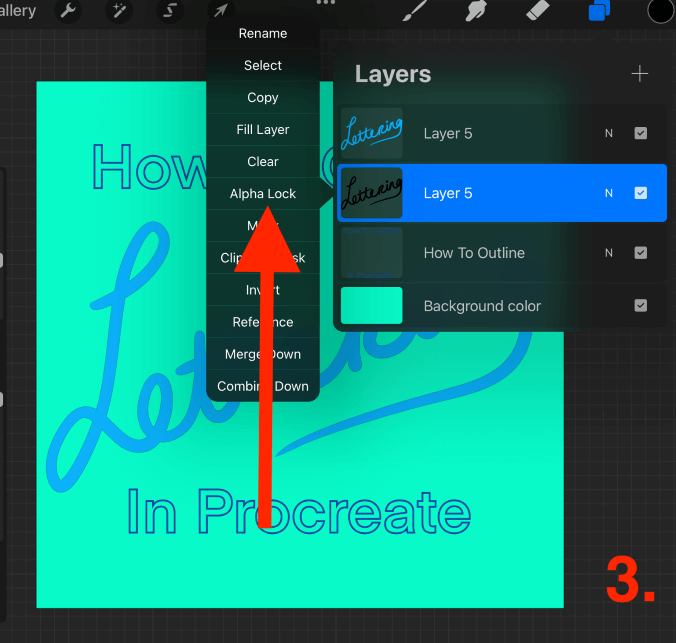
Step 2: Alpha Lock your bottom lettering layer by tapping on the layer’s thumbnail and tapping on the Alpha Lock setting. Once it’s locked, fill your layer with black or whatever shade you wish to use as your outline.

Step 3: Once your layer has been filled, deactivate the Alpha Lock by tapping on the layer’s thumbnail and tapping on the Alpha Lock option again until it is unticked.
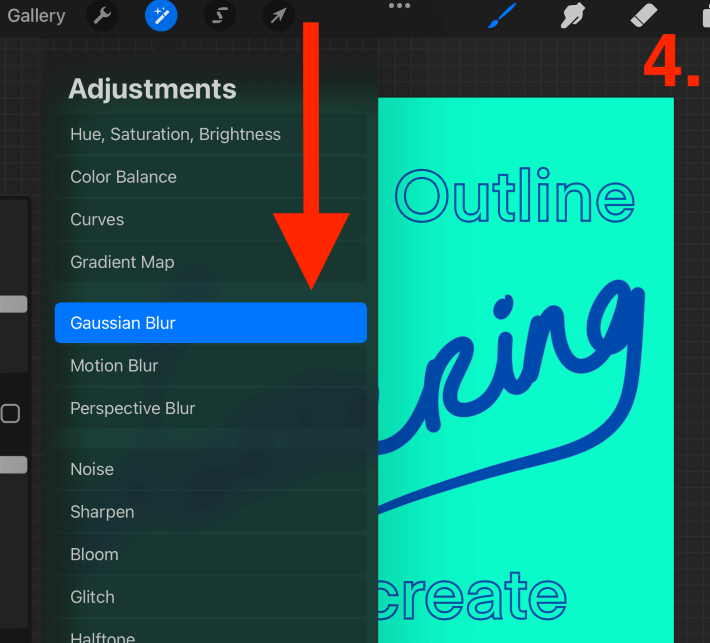
Step 4: To keep the bottom layer active, open your Adjustments menu by tapping on the magic wand icon. Scroll down and select Gaussian Blur.
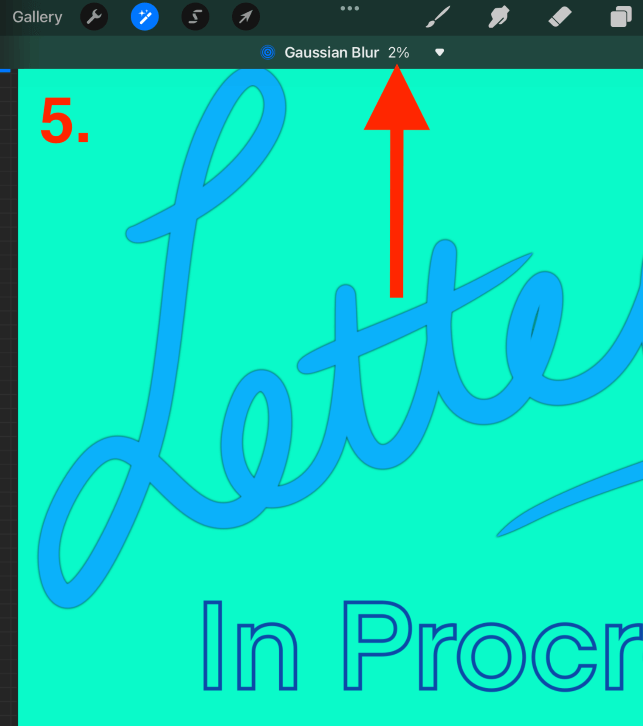
Step 5: Using your finger or stylus, hold down on your canvas and slowly slide to the right until a slight outline appears. This should start at about 2%, don’t go too far to the point that it’s blurry.
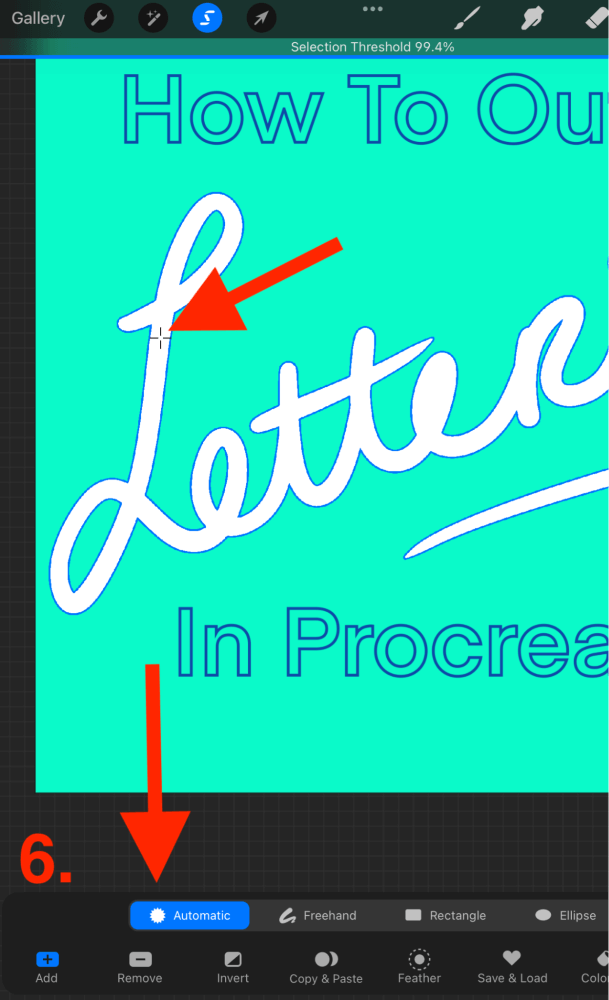
Step 6: Open your Selection tool by tapping on the S icon. Select the Automatic setting and tap and hold on to your lettering. Drag it slowly to the right until your threshold reaches over 99%. If it selects your entire canvas screen, you have gone too far.
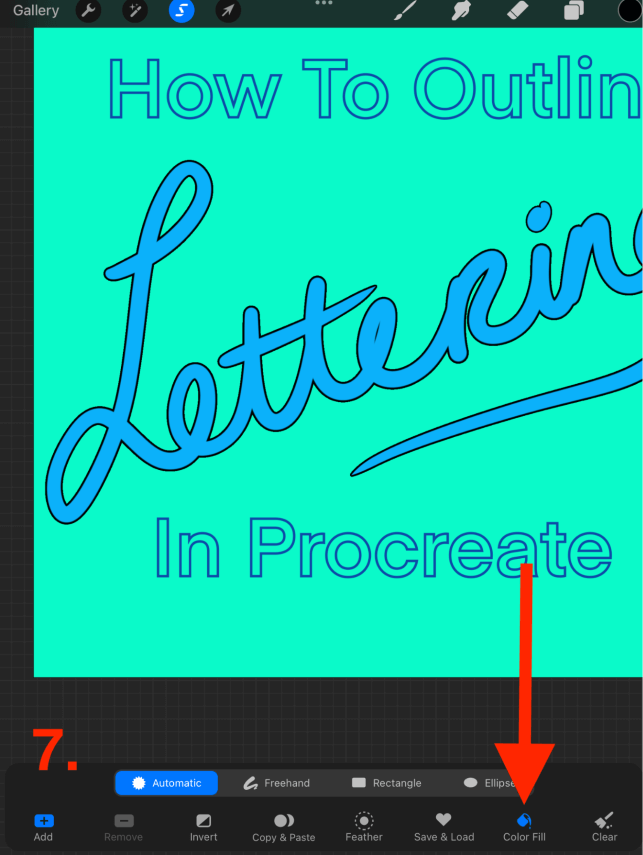
Step 7: Once you have adjusted your threshold properly, tap on the Color Fill setting in the bottom right-hand corner of your canvas. This will solidify your outline. When you are done, tap on the S icon to deactivate the Selection tool and confirm your changes.
Pro Tip: You can purchase and download outline lettering brushes for Procreate if you don’t want to complete the process manually yourself. This will allow you to create and draw lettering with outlines from the beginning instead of having to edit your text.
FAQs
Below I have gathered some of your frequently asked questions about adding an outline to text and lettering in Procreate. I have briefly answered them for you:
How to outline an image in Procreate?
Outlining an image is basically the same as outlining hand lettering, except applying each step to your image layer in Procreate.
How to highlight text in Procreate?
You can either double-tap on your text within your canvas to highlight it or you can tap on the text layer thumbnail and select Edit Text and then double-tap on it to highlight it.
Are there ready-to-use outlined lettering brushes in Procreate?
There are many options online to purchase and download outline lettering brushes that you can import into your Procreate app. Digital artists have created some really awesome palettes for you to choose from which means you don’t have to manually outline your lettering at all.
How to make text thicker in Procreate?
When you are editing your text, you can change the font to bold. You can also duplicate the layer and increase its size and then combine both text layers together to thicken your text.
How do you outline text in Procreate for stickers?
You can duplicate your sticker shape layer, fill the bottom duplicate layer and then expand it so that it outlines your shapes. I recommend using white for sticker outlines as it’s much more striking than darker colors.
How do I shadow outline text in Procreate?
You can follow the same method shown above “How To Add Outline to Lettering” except in Step 4, continue to Gaussian Blur your layer until you achieve the desired shadow or glow underneath the original layer.
Final Thoughts
This technique for adding outlines to text and lettering is probably one of the most commonly used skills when it comes to creating graphic design posters, stickers, and branding on Procreate. It gives your text depth and can make a 2D image pop from your screen.
Whether you’re getting into lettering or you’re just experimenting, these steps shown above are a perfect place to start getting familiar with these settings in the Procreate app. It will take some time to get used to getting things perfect, but once you get it, you’ll use it every day.
How do you outline your text/lettering in Procreate? Show us some examples of your work by adding them in the comments section below.